Try Basic Fixes
- Update the app: The Microsoft Authenticator may not work properly if you are using an outdated version of the app. Head over to the Play Store (Android) or App Store (iPhone) to check if a newer version is available. Tap the Update button to install the update and see if that fixes your problem.
- Force close and reopen the app: Microsoft Authenticator may act up on your phone if one of its app processes encounters issues while running. In that case, you’ll need to close the app entirely and open it again.
Fix 1: Enable Notification Permission for Microsoft Authenticator
Like any other app, the Microsoft Authenticator app requires permission to display notifications on your Android or iPhone. If you have previously declined this permission, Microsoft Authenticator won’t show any login approval requests on your phone.
On Android
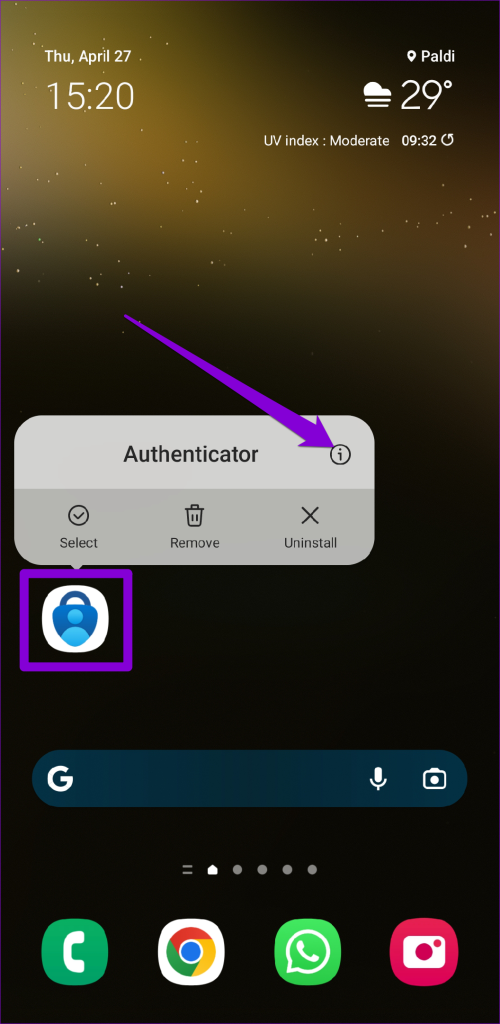
Step 1: Long-press on the Microsoft Authenticator app icon and tap the info icon from the menu that pops open.
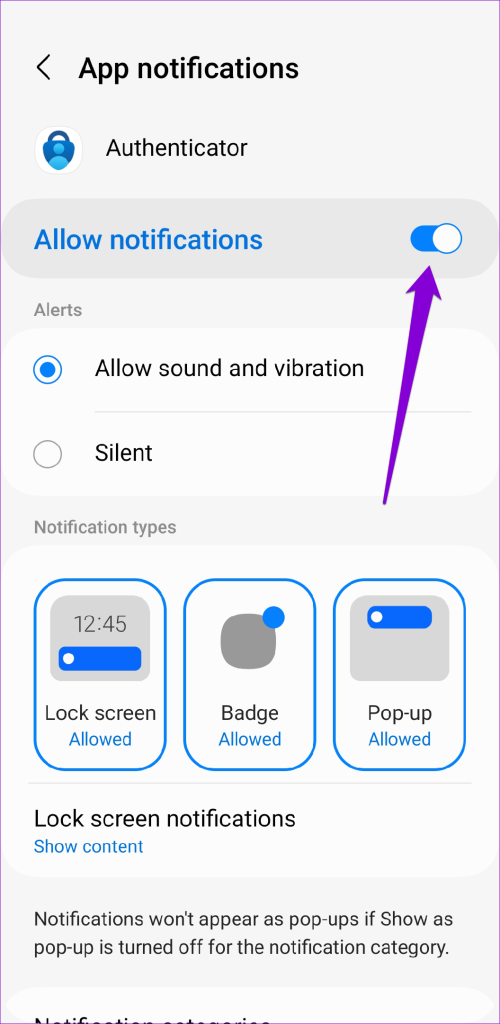
Step 2: Tap on Notifications and enable the toggle next to Allow notifications in the following menu.

On iPhone
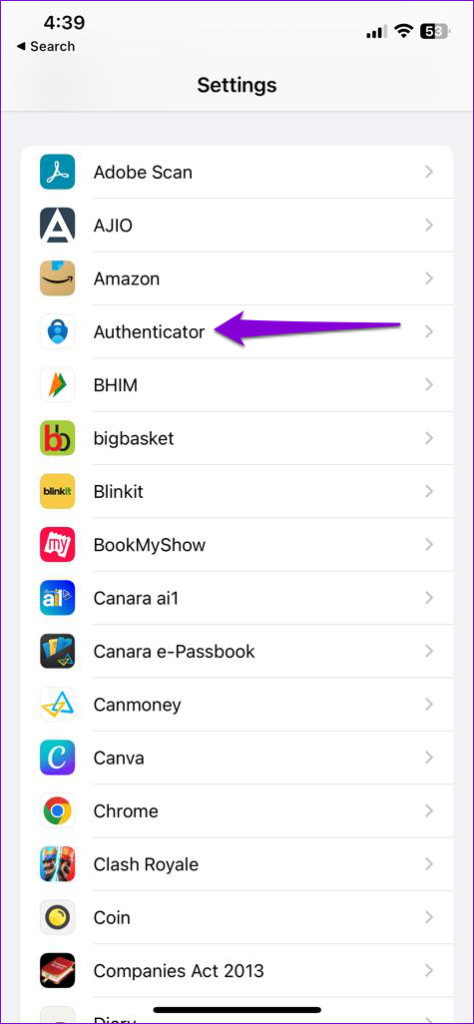
Step 1: Open the Settings app and scroll down to tap on Authenticator.
Step 2: Tap on Notifications and enable the toggle next to Allow Notifications.


Fix 2: Enable Automatic Date and Time
Microsoft Authenticator relies on your device’s current time and a locally stored secret key to generate codes. If your phone’s clock is not in sync, Microsoft Authenticator won’t work. To fix this, you can enable your phone’s automatic date and time feature by following the steps below.
On Android
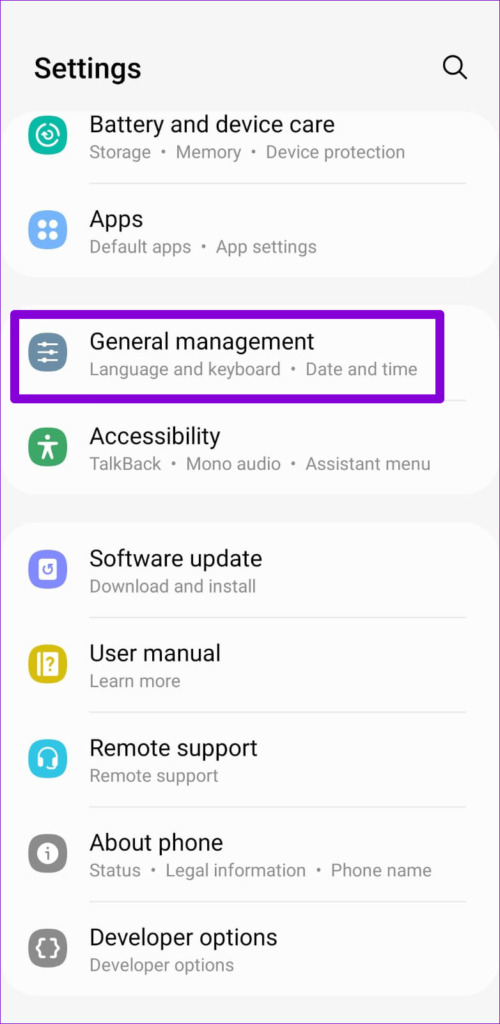
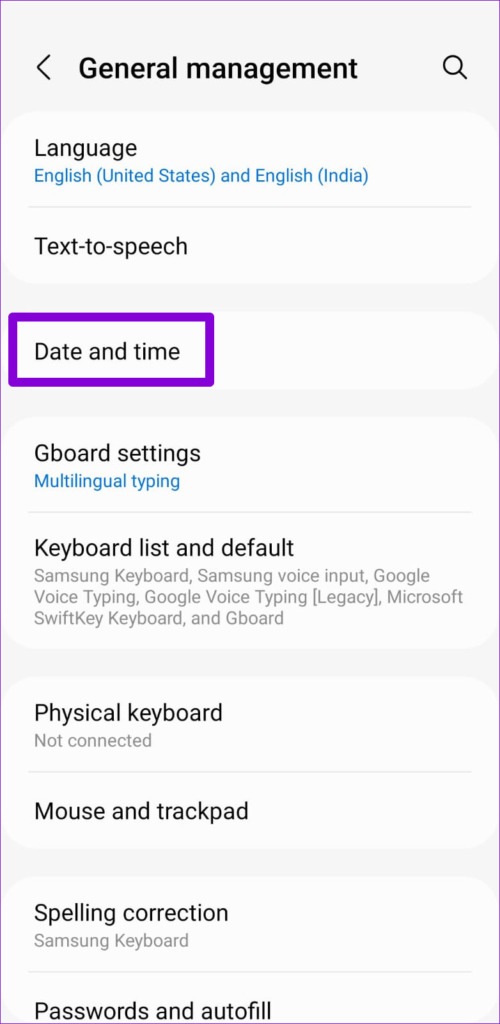
Step 1: Open the Settings app on your phone and go to General management.
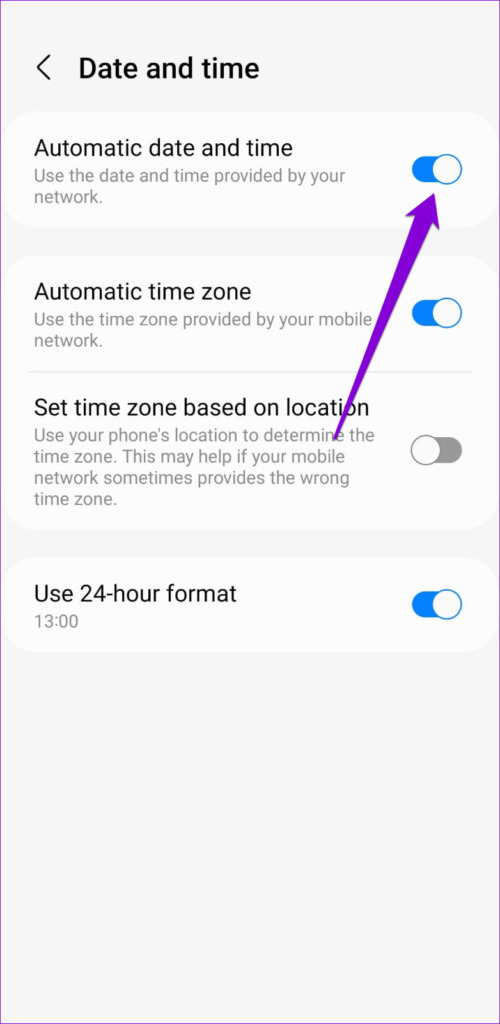
Step 2: Tap on Date and time and enable the toggle next to Automatic date and time.
On iPhone
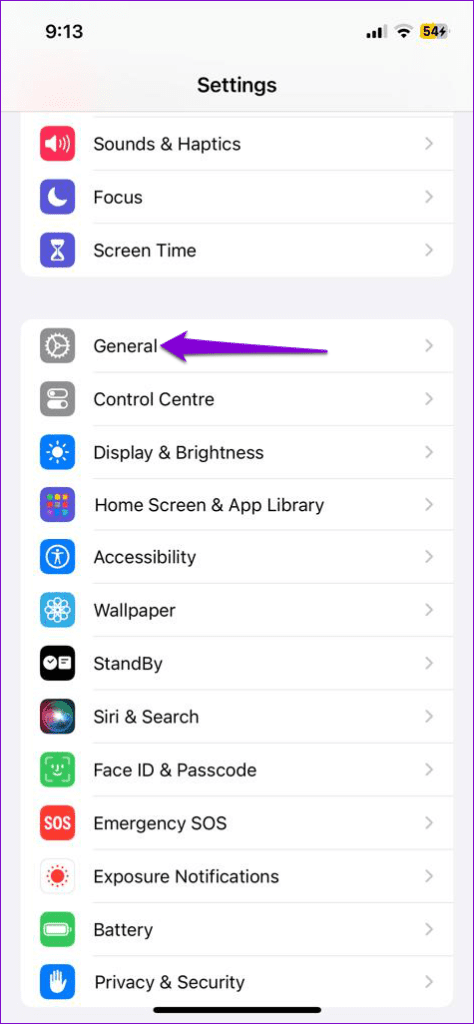
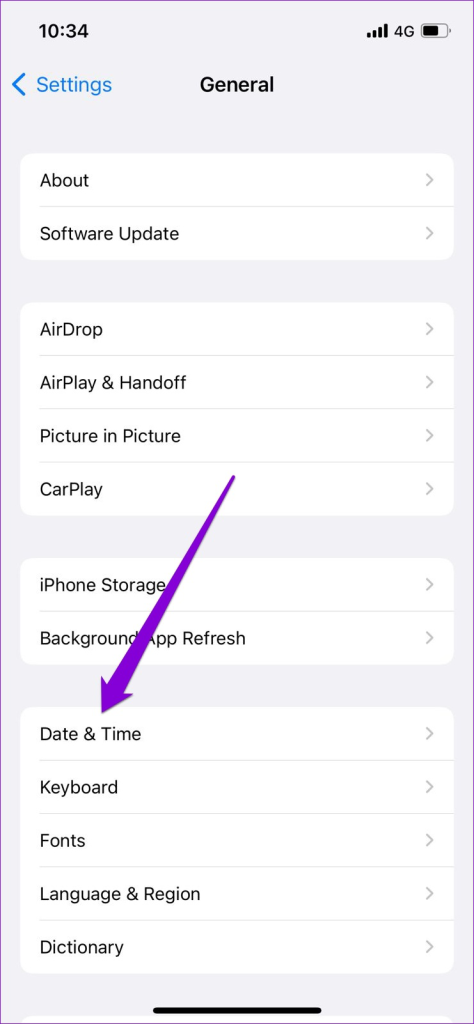
Step 1: Launch the Settings app on your iPhone and navigate to General.
Step 2: Tap on Date & Time. Then, turn on the toggle next to Set Automatically.

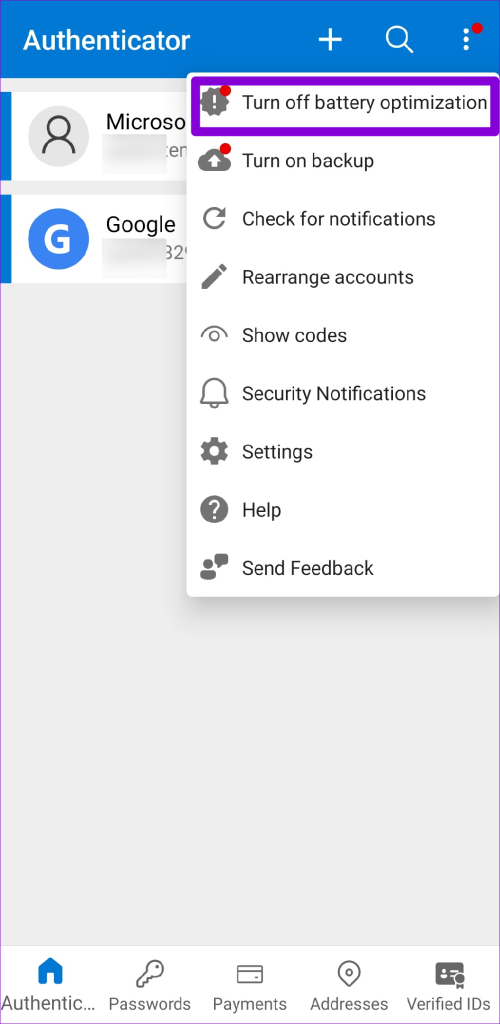
Fix 3: Turn Off Battery Optimization for the App (Android)
Enabling battery optimization for Microsoft Authenticator can prevent the app from receiving necessary updates in the background and working properly. Hence, it’s best to remove any battery restrictions for the app to ensure optimal performance.
Step 1: Open the Microsoft Authenticator app on your phone. Tap the three-dot menu icon in the top right corner and select Turn off battery optimization.
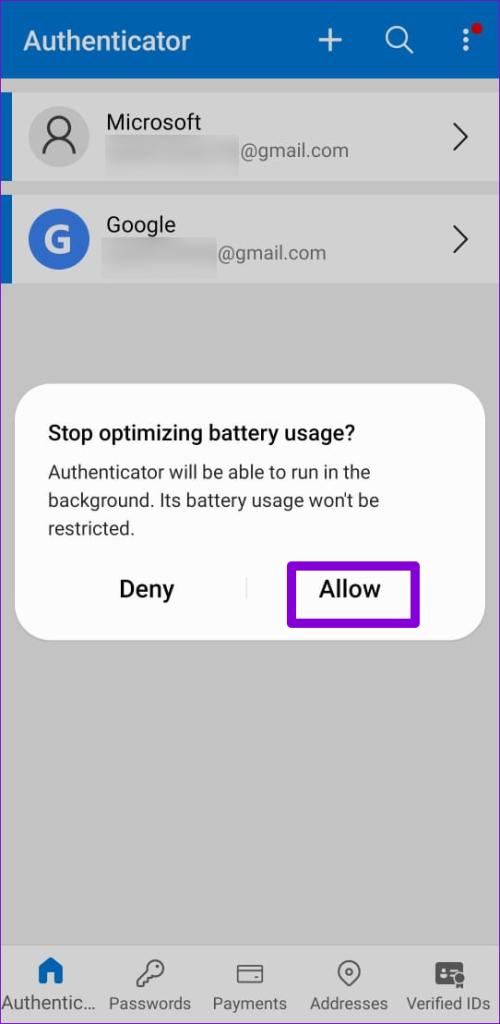
Step 2: Select Allow to confirm.

Fix 4: Remove and Re-Add Your Accounts
If Microsoft Authenticator is not showing codes only for a specific account, you may need to re-authenticate your account to start receiving codes again. You will have to remove your account from the app and add it back.
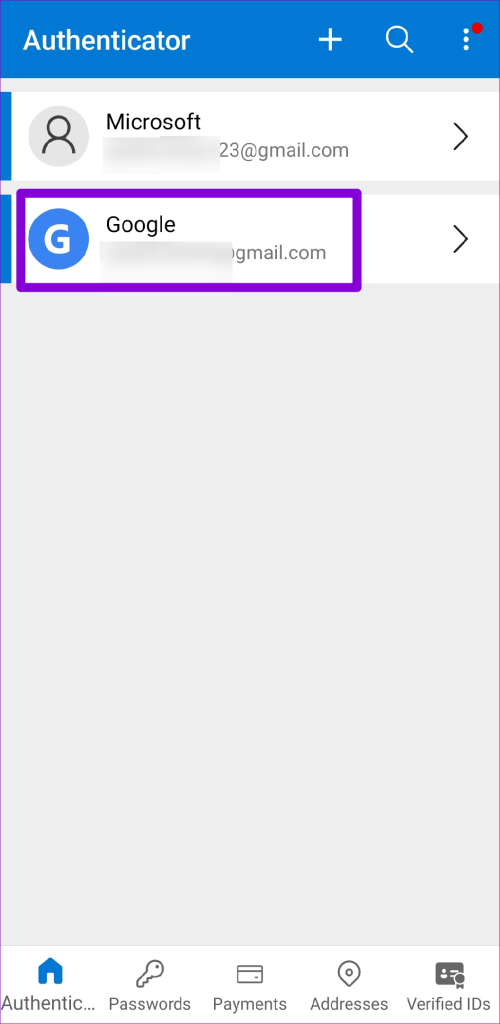
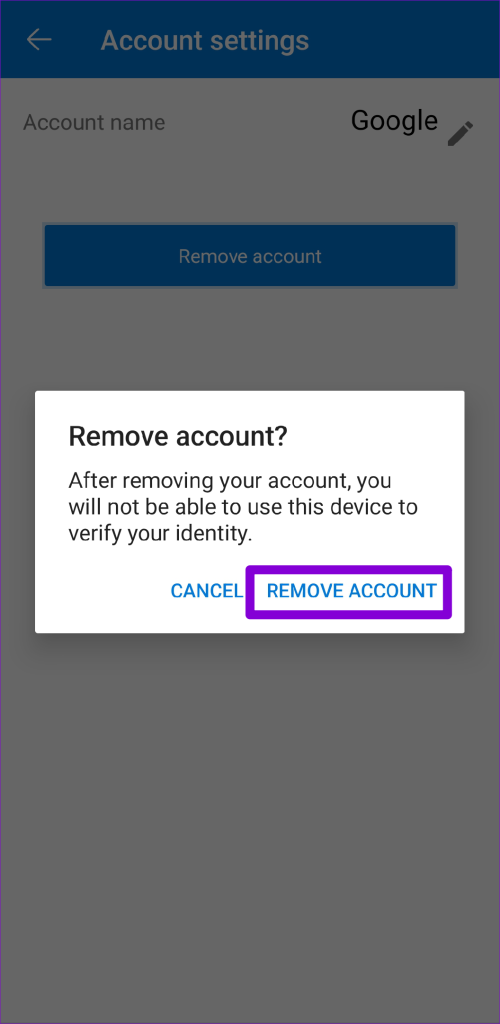
Step 1: Open the Microsoft Authenticator app on your phone and select the problematic account from the list.
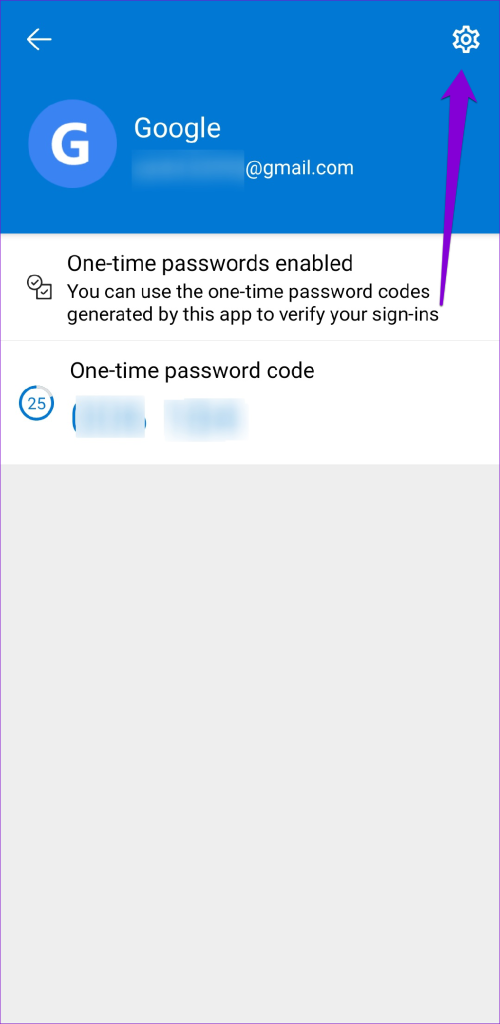
Step 2: Tap the gear icon in the top right corner and select Remove account.

Step 3: Select Remove Account to confirm.
Step 4: Tap the plus icon at the top and follow the on-screen prompts to add your account again.

Fix 5: Clear App Cache (Android)
Outdated or corrupt cache files can also cause the Microsoft Authenticator to malfunction on your Android. You can try purging the existing app cache to see if that restores normalcy. Since clearing the Microsoft Authenticator cache does not remove any of your accounts, there’s no reason not to try it.
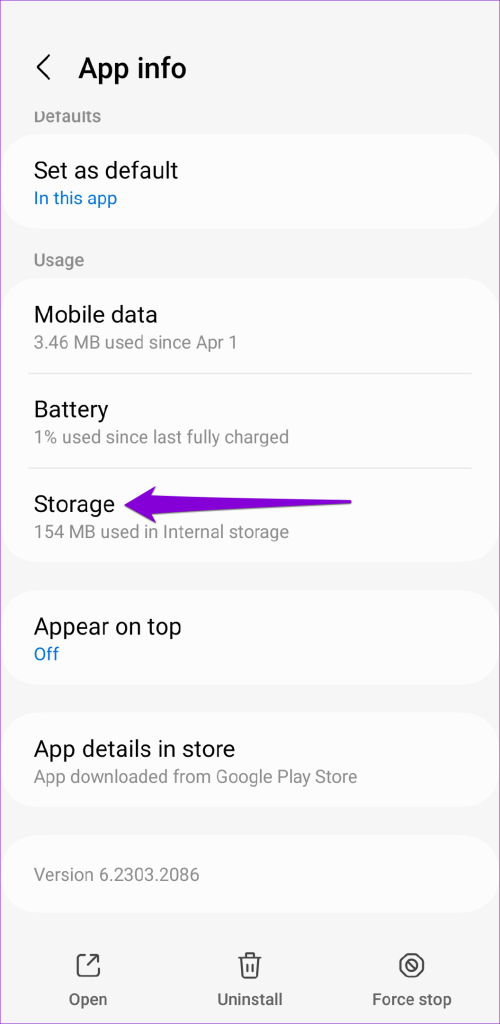
Step 1: Long-press on the Microsoft Authenticator app icon and tap the info icon from the menu that pops open.
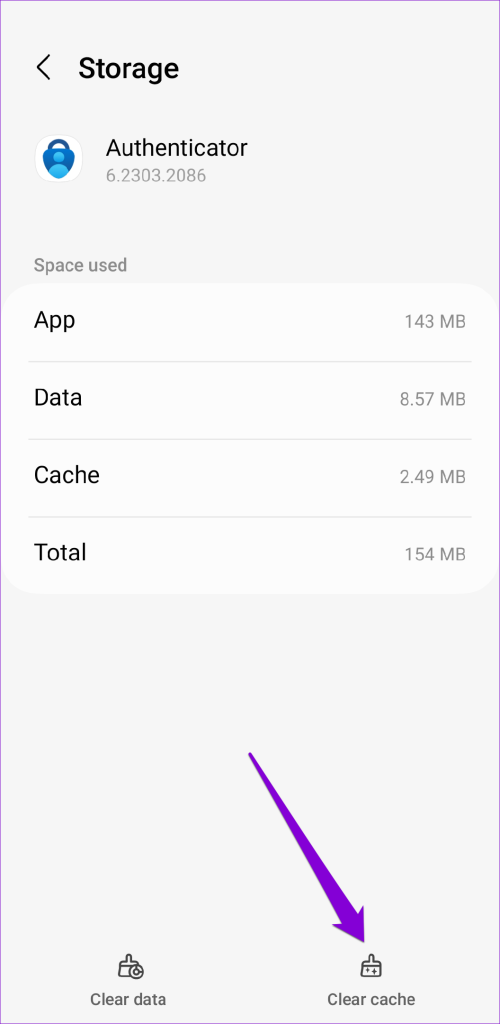
Step 2: Go to Storage and tap the Clear cache option.
Was this helpful?
Last updated on 25 July, 2024
3 Comments
Leave a Reply
Read Next
 How to Fix Google Authenticator Not Working on iPhone
Basic Fixes Restart iPhone - It could eliminate some software- or settings-related glitches causing Google Authenticator to not work.
How to Fix Google Authenticator Not Working on iPhone
Basic Fixes Restart iPhone - It could eliminate some software- or settings-related glitches causing Google Authenticator to not work.
 How to Move Microsoft Authenticator to Your New Phone
How to Backup Microsoft Authenticator Data on Your Old Phone To move Microsoft Authenticator to a new phone, you first need to back up all your accounts on the old
How to Move Microsoft Authenticator to Your New Phone
How to Backup Microsoft Authenticator Data on Your Old Phone To move Microsoft Authenticator to a new phone, you first need to back up all your accounts on the old
 4 Ways to Fix Microsoft Teams Notifications Not Working on Android
Basic Fixes Check the Microsoft Teams server: Open the Microsoft Service Health page and click on Teams in the left sidebar to check its service status.
4 Ways to Fix Microsoft Teams Notifications Not Working on Android
Basic Fixes Check the Microsoft Teams server: Open the Microsoft Service Health page and click on Teams in the left sidebar to check its service status.
 6 Ways to Fix Microsoft Teams App Not Working on Android
Basic Fixes Check internet connectivity: Ensure your device is connected to a Wi-Fi network or cellular data with good signal strength and an active plan.
6 Ways to Fix Microsoft Teams App Not Working on Android
Basic Fixes Check internet connectivity: Ensure your device is connected to a Wi-Fi network or cellular data with good signal strength and an active plan.
 4 Ways to Fix Spotify Canvas Not Working on Android and iPhone
https://youtu.be/ptmKAurfoyQ Try Basic Fixes Check if Canvas is available in your region: Spotify’s Canvas feature is not available in every region.
4 Ways to Fix Spotify Canvas Not Working on Android and iPhone
https://youtu.be/ptmKAurfoyQ Try Basic Fixes Check if Canvas is available in your region: Spotify’s Canvas feature is not available in every region.
 3 Ways to Fix ChatGPT App Not Working on Android and iPhone
Try Basic Fixes Turn off your VPN connection: Problems with your VPN connection can prevent the ChatGPT app from communicating with the server and make it unresponsive.
3 Ways to Fix ChatGPT App Not Working on Android and iPhone
Try Basic Fixes Turn off your VPN connection: Problems with your VPN connection can prevent the ChatGPT app from communicating with the server and make it unresponsive.
 3 Fixes for Microsoft Outlook Not Receiving Emails on Android
Basic Fixes Check other inboxes: If you have multiple email accounts in the Outlook app, you might have opened the wrong one in the app.
3 Fixes for Microsoft Outlook Not Receiving Emails on Android
Basic Fixes Check other inboxes: If you have multiple email accounts in the Outlook app, you might have opened the wrong one in the app.
 4 Fixes for Microsoft Teams Notifications Not Working on iPhone
Fix 1: Enable Notifications in iPhone Settings Ensure you haven't disabled notifications for the Teams app in Settings.
4 Fixes for Microsoft Teams Notifications Not Working on iPhone
Fix 1: Enable Notifications in iPhone Settings Ensure you haven't disabled notifications for the Teams app in Settings.
The article above may contain affiliate links which help support Guiding Tech. The content remains unbiased and authentic and will never affect our editorial integrity.


great page with detailed steps and screen captures!
I have iphone on ios16.5
Can you confirm that section “2. ENABLE NOTIFICATION PERMISSION FOR MICROSOFT AUTHENTICATOR” – “Step 3: Tap on Notifications and enable the toggle next to Allow Notifications” the [Notification] option is no longer available for the Authenticator app?
I do not see that option.
Thanks!!
Hi KY,
I manage mobile devices in my organization and I don’t see an option to enable notifications on an iOS. Do you happen to find how to enable it?
Thanks
hi, i am student of pia i cant login in my school account as not receiving codes.