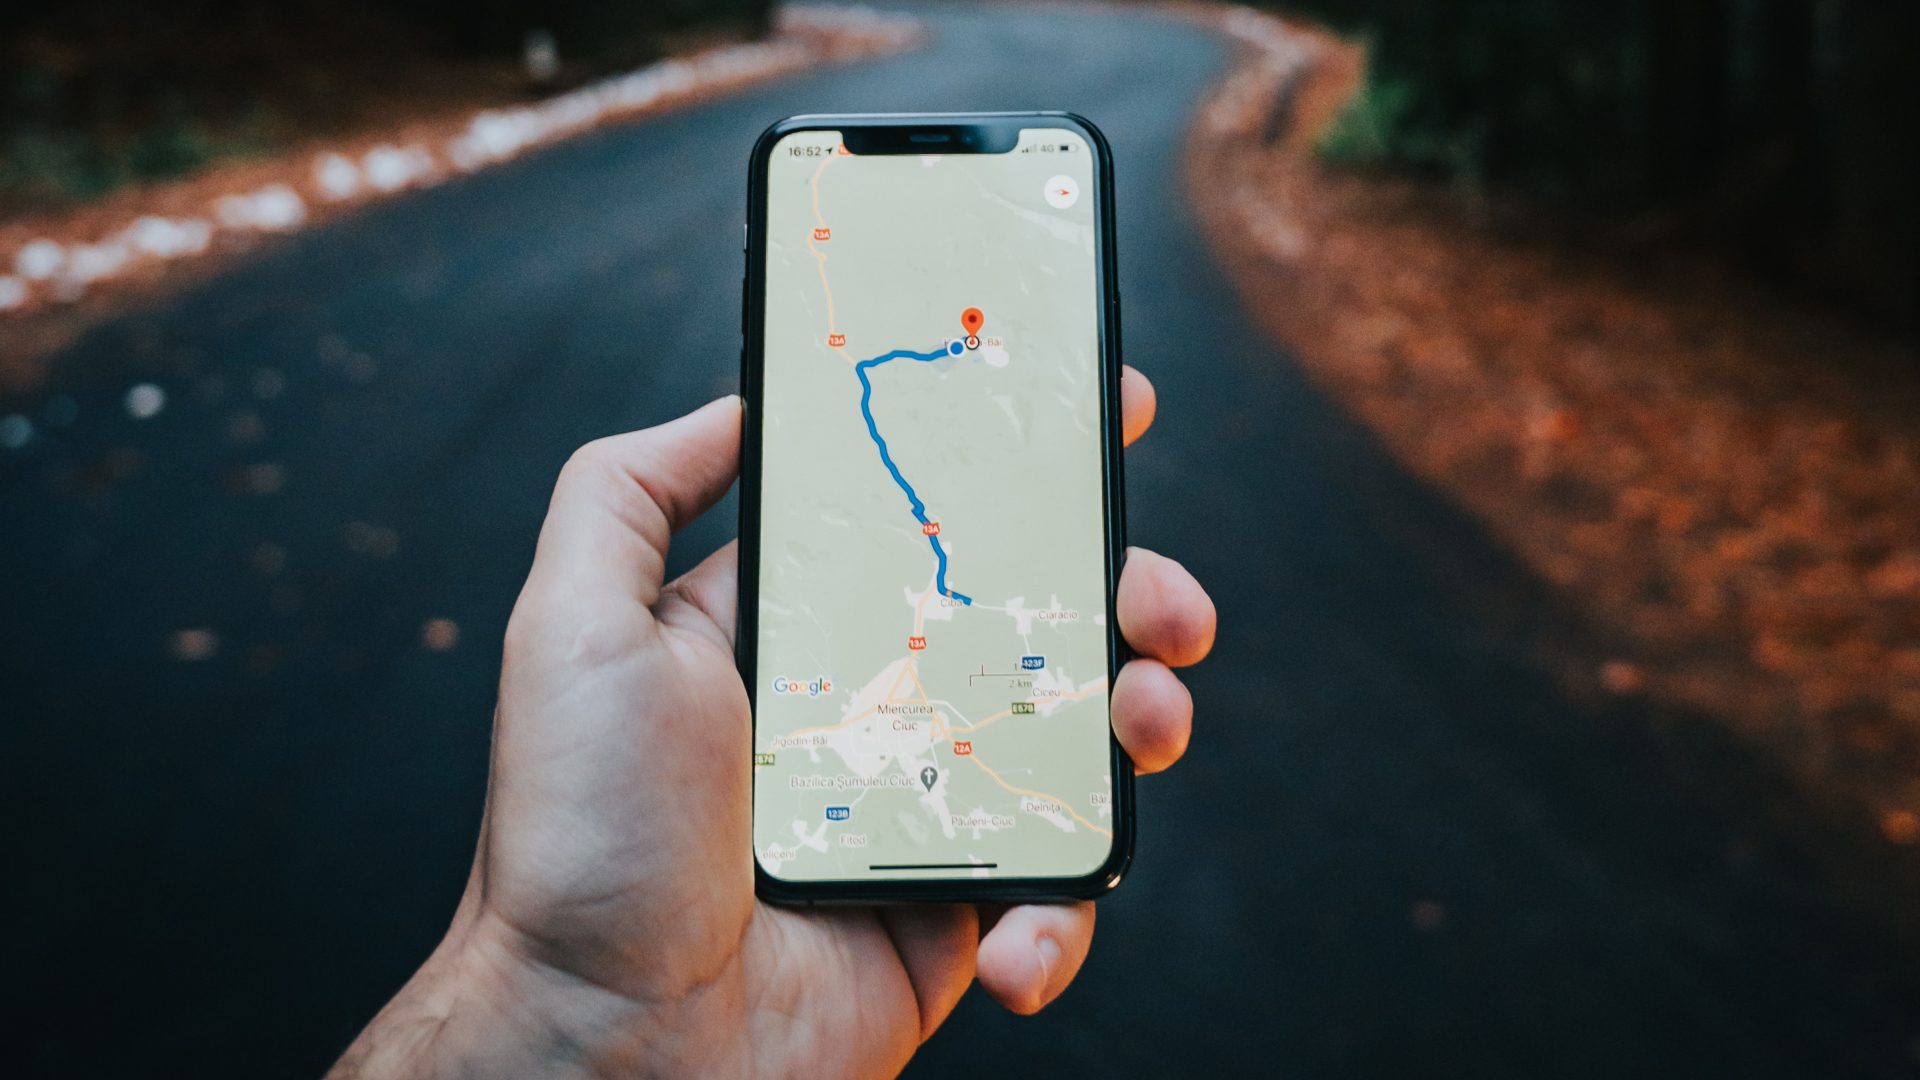
Google Maps is a lifesaver for directions while you’re driving. But you wouldn’t want to get your hands off the steering wheel and adjust the settings on your phone while you move it for the best view – there’s the auto-rotate toggle for that. But what if the app isn’t responding to it, and Google Maps is not auto-rotating on your device?
We want to show you how to fix the problem on the Google Maps app on iPhone and Android. We’ve compiled a list of eight effective methods to help you out. But first, let us understand more about the problem and why it occurs on Google Maps in the first place.
Why Is Google Maps Showing the Wrong Orientation on My Smartphone
Here are some of the reasons why Google Maps is not auto-rotating on your smartphone :
- You have accidentally disabled auto-rotate.
- There is a bug within the Google Maps app preventing it from auto-rotating.
- There is a bug on your device that is affecting the auto-rotate function.
- The hardware sensors on your device, responsible for automatically changing the orientation, are damaged.
In the next section of the article, we’ll elaborate on the above reasons and help you fix the issue.
Google Maps Won’t Rotate: How to Fix the Issue
Here are eight ways to fix the problem, and use Google Maps with the correct orientation on your smartphone.
1. Double Check Auto Rotate Option on your Smartphone
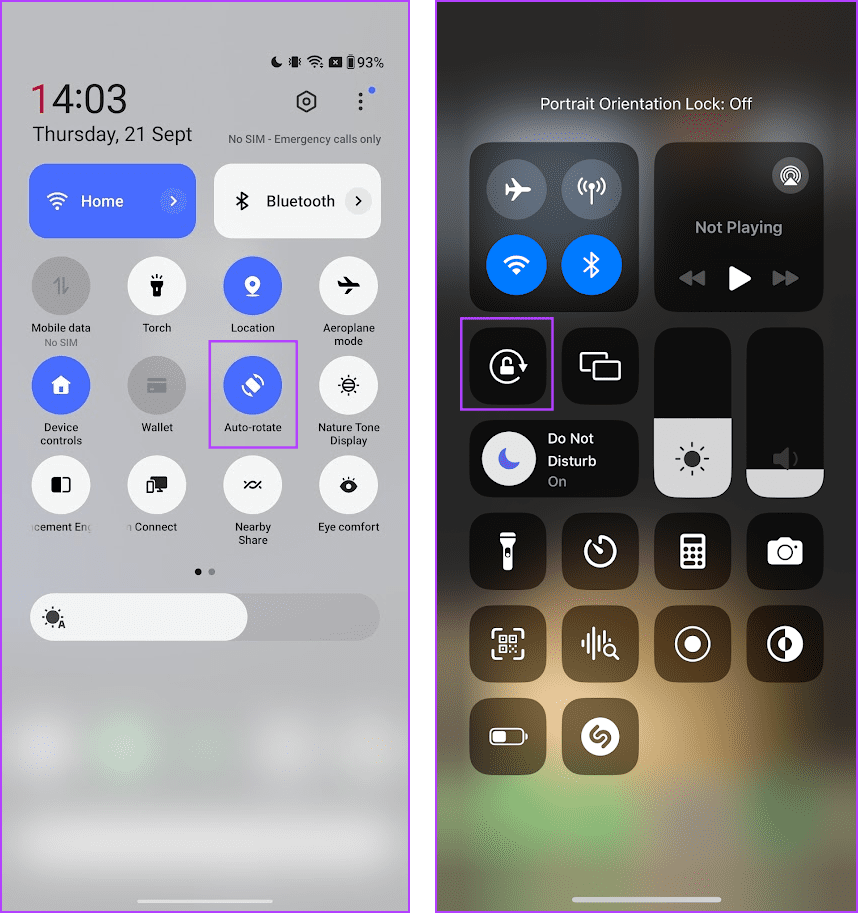
You may have accidentally disabled the auto-rotate toggle on your smartphone – therefore, ensure that it is enabled before you try to fix the orientation of Google Maps.
Open the control center on your device, and enable the toggle for Auto Rotate on Android. On iPhone, however, you need to disable the orientation lock to enable auto-rotate for apps.
If you are facing any problems doing so, you can read a guide that we published earlier :
2. Restart Google Maps
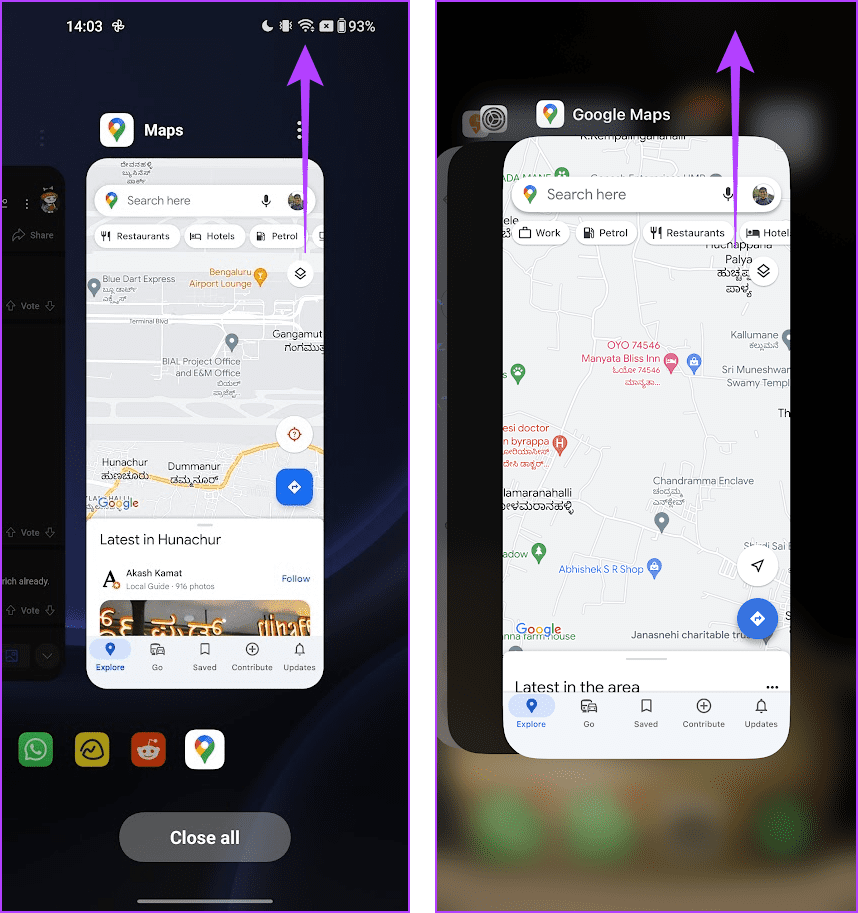
Closing the Google Maps app shuts down all the processes – including the bugs that were preventing it from auto-rotating. Once you restart the app, it is unlikely that these bugs will appear. Here’s how you can restart Google Maps on your device.
Step 1: Open the app switcher tray on your iPhone or Android device.
Step 2: Swipe up to clear Google Maps.
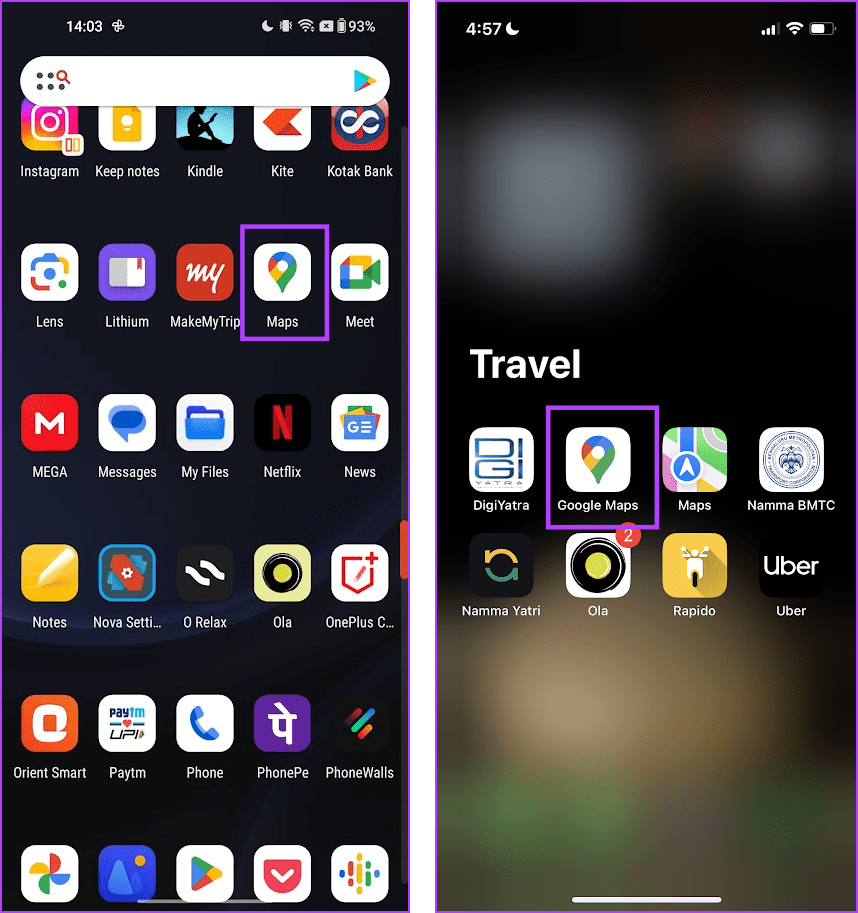
Step 3: Open Google Maps from your app library again.
3. Restart Your Phone
If you notice that Google Maps isn’t the only app that cannot auto-rotate and you are facing the issue on other apps as well, there might be an issue with your device. Therefore, try restarting it as an attempt to erase the bug that is causing the issue.
Restart iPhone
Step 1: Firstly, you need to shut down your device.
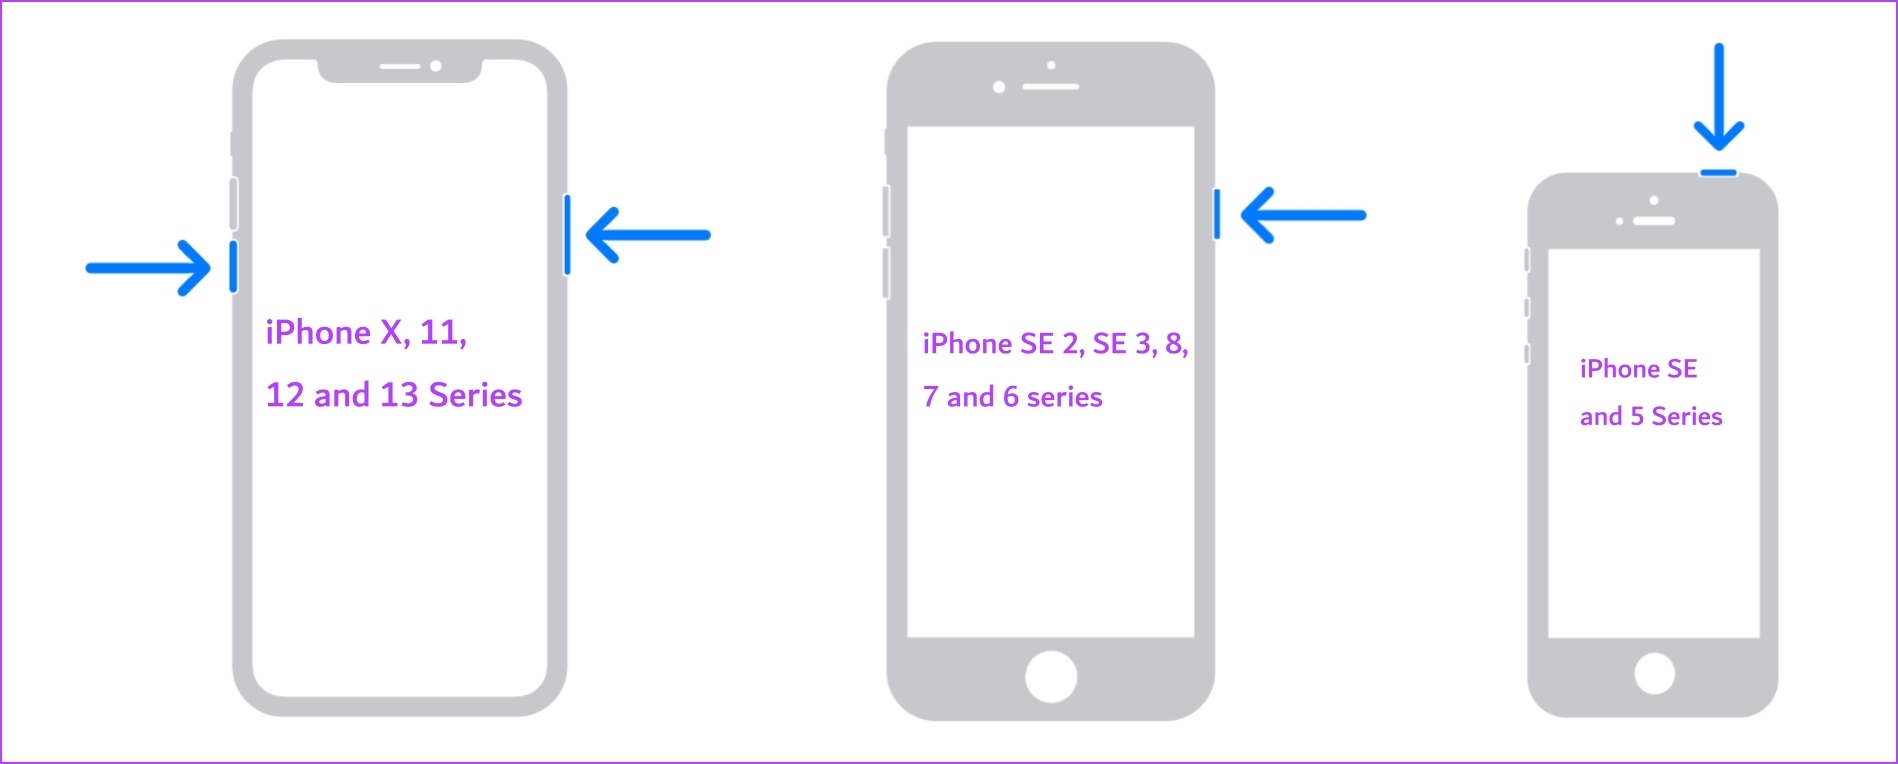
- On iPhone X and above: Press and hold the volume down and the side button.
- On iPhone SE 2nd or 3rd gen, 7, and 8 series: Press and hold the side button.
- On iPhone SE 1st gen, 5s, 5c, or 5: Hold the power button at the top.
Step 2: Drag the power slider to turn off the device.
Step 3: Next, turn on your device by pressing the power button.
Restart Android Device
Almost all Android devices show up the power on/off menu as you long-press the power button. You can use the Reboot option to restart your device.

4. Update Google Maps
If Google Maps is not auto-rotating for many users, Google will certainly take note of the complaints and release an update to fix the bug. Therefore, make sure you always use the latest version of the Google Maps app. Here’s how to update the app.
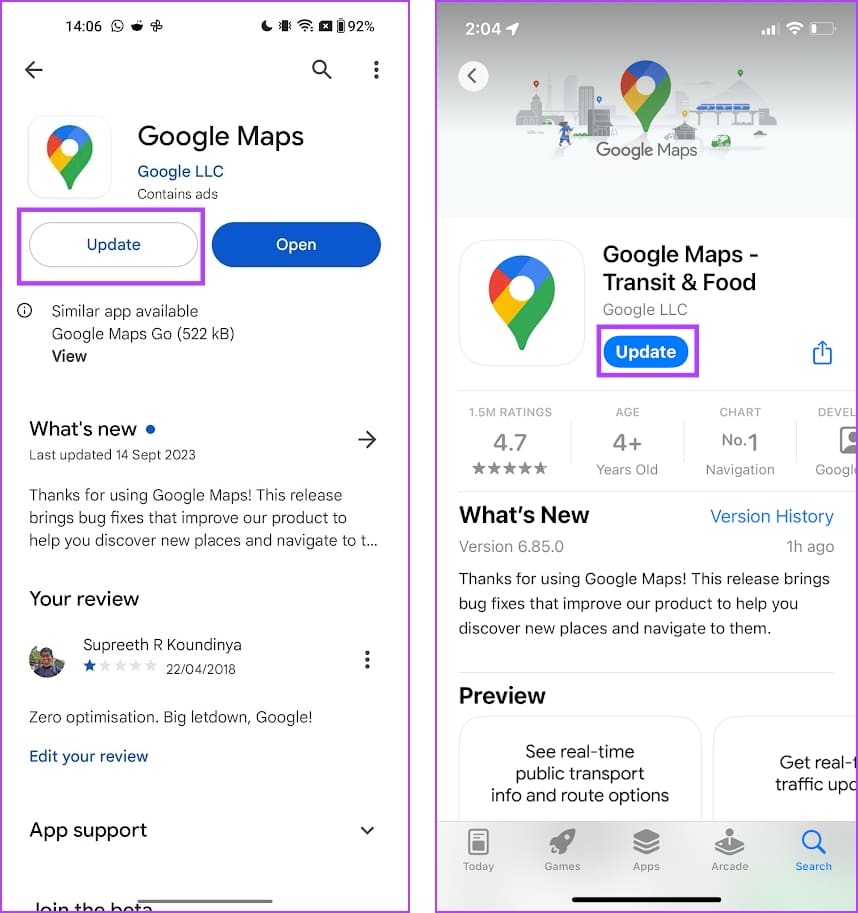
Step 1: Open the Google Maps app on the Play Store or the App Store from an iPhone using the link below.
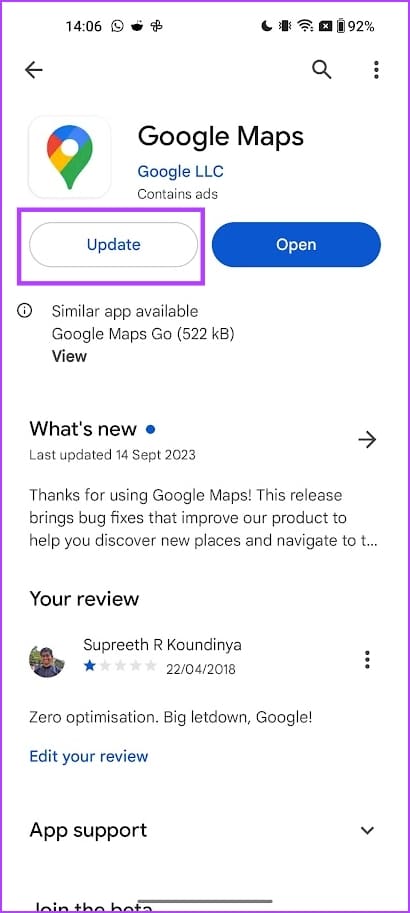
Step 2: Tap on the Update option to download and install the latest version of the app.
5. Clear Cache on Google Maps
The cache is the temporary application data stored within the local storage of your device. This helps the app to load elements quickly.
However, when many cache files accumulate, a few files may get corrupted and execute some bugs. Therefore, Google Maps may be affected by the cache, and clearing it might help you use the app with auto-rotate without an issue.
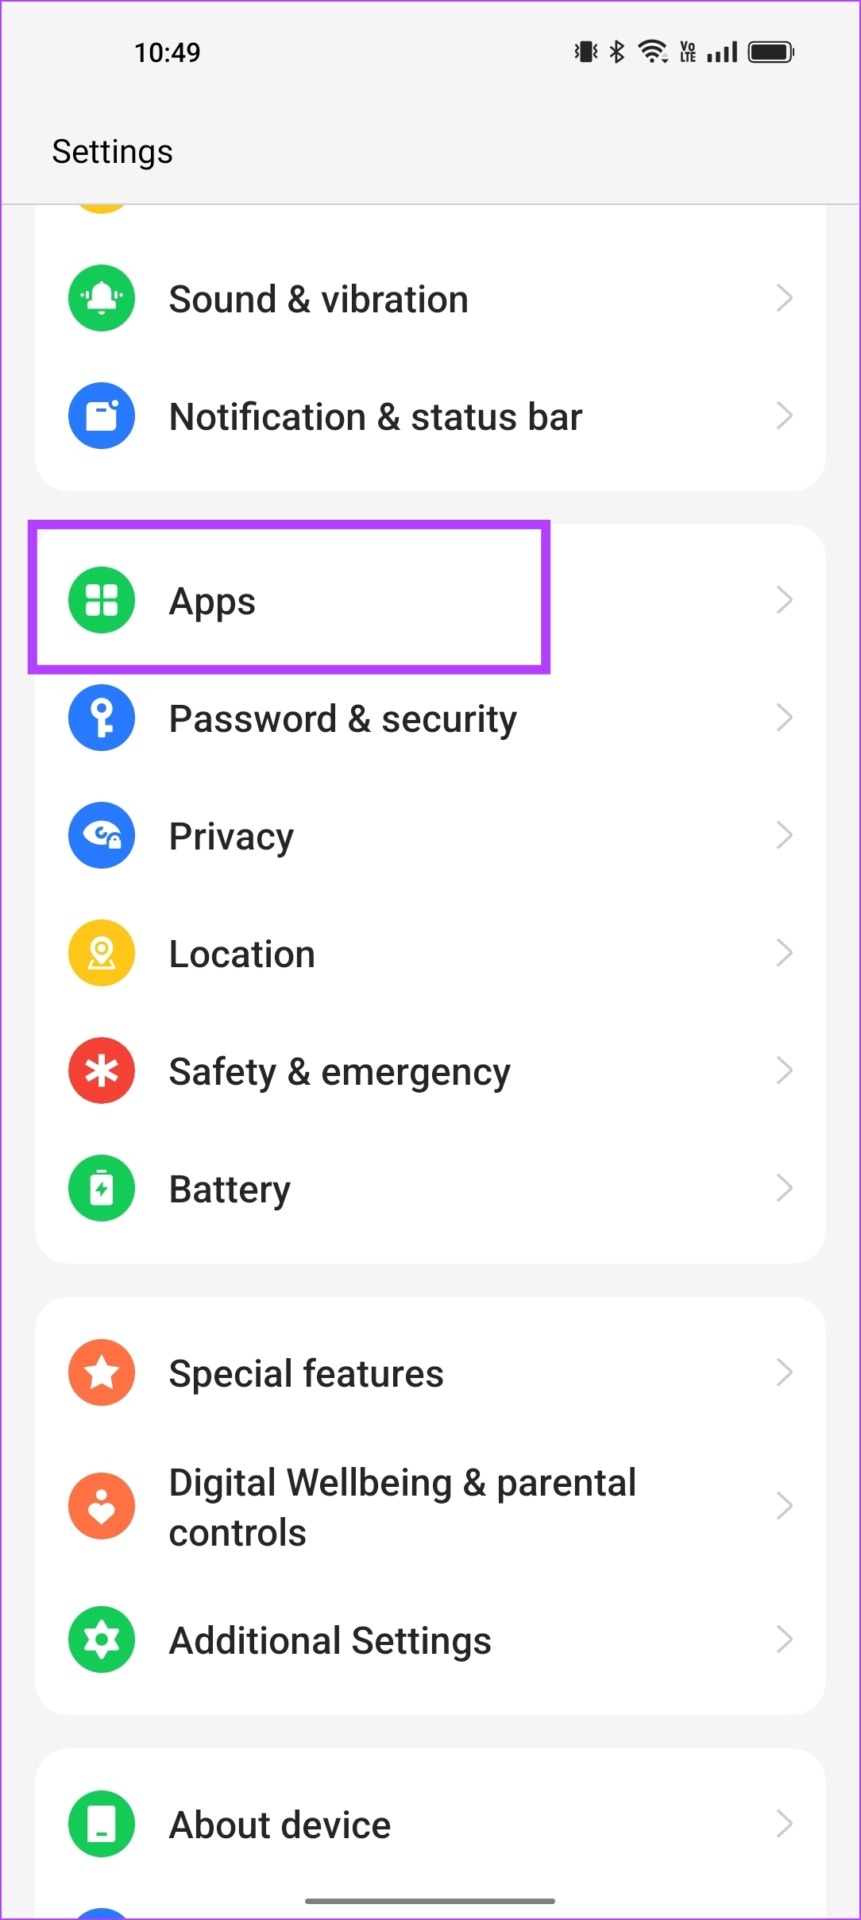
Step 1: Open the Settings app.
Step 2: Tap on Apps.

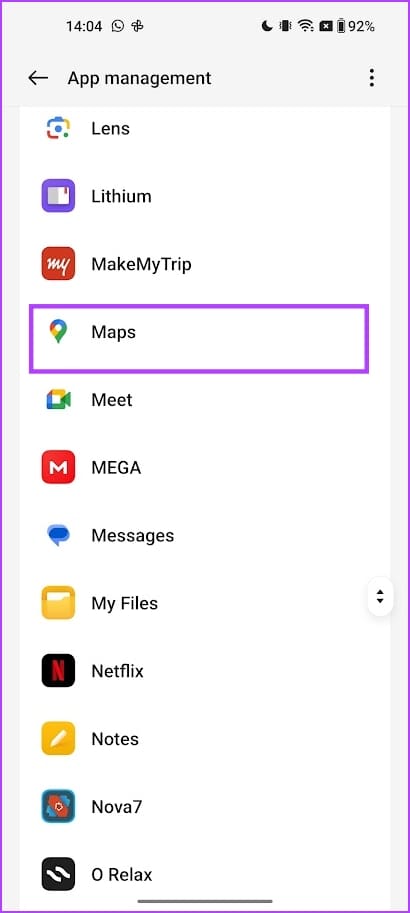
Step 3: Select the Google Maps app from the list.
Step 4: Tap on Storage Usage.
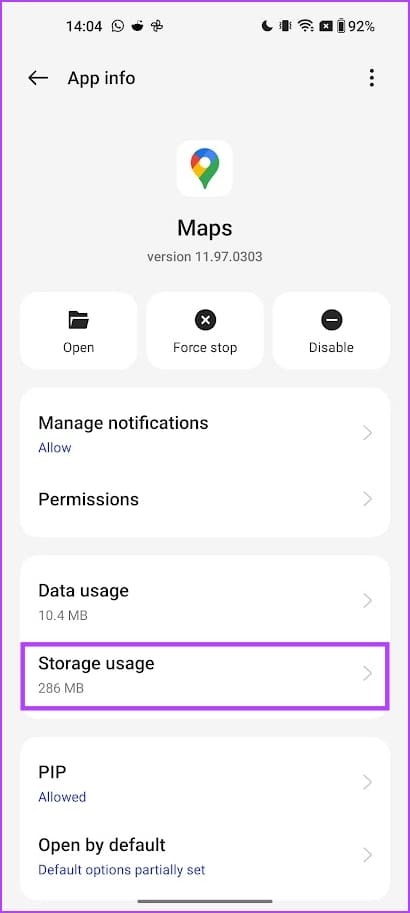
Step 5: Tap on Clear Cache to delete the cache files for Google Maps.

6. Reinstall Google Maps
However, if Google Maps is not auto-rotating and you can’t fix it no matter what, try uninstalling the app and installing it again. Here’s how you can do it.
Reinstall Google Maps on iPhone
Step 1: Long-tap on the Google Maps app and tap on Remove App.
Step 2: Select Delete App again.


Step 3: Download and install Google Maps from the app store.
Reinstall Google Maps on Android
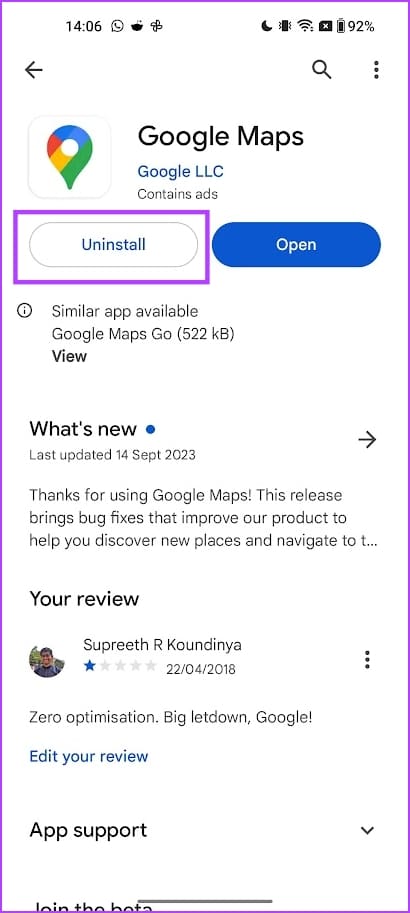
Since Google Maps is a system application on Android, it cannot be uninstalled. However, you can roll back and uninstall all updates made to the app and then install the latest version again. This is more or less equivalent to reinstalling the app.
Step 1: Open the Google Maps application page on the Play Store using the link below.
Step 2: Tap on Uninstall.
Step 3: Tap on uninstall to confirm.

Step 4: Now, tap on Update to install the latest version of the app.
7. Update Device
If a lot of users face the issue of not being able to auto-rotate apps on a system-wide level on Android OS or iOS, you will soon receive an update to fix the problem. Therefore make sure you check for updates on your smartphone.
Update iPhone
Step 1: Open the Settings app.
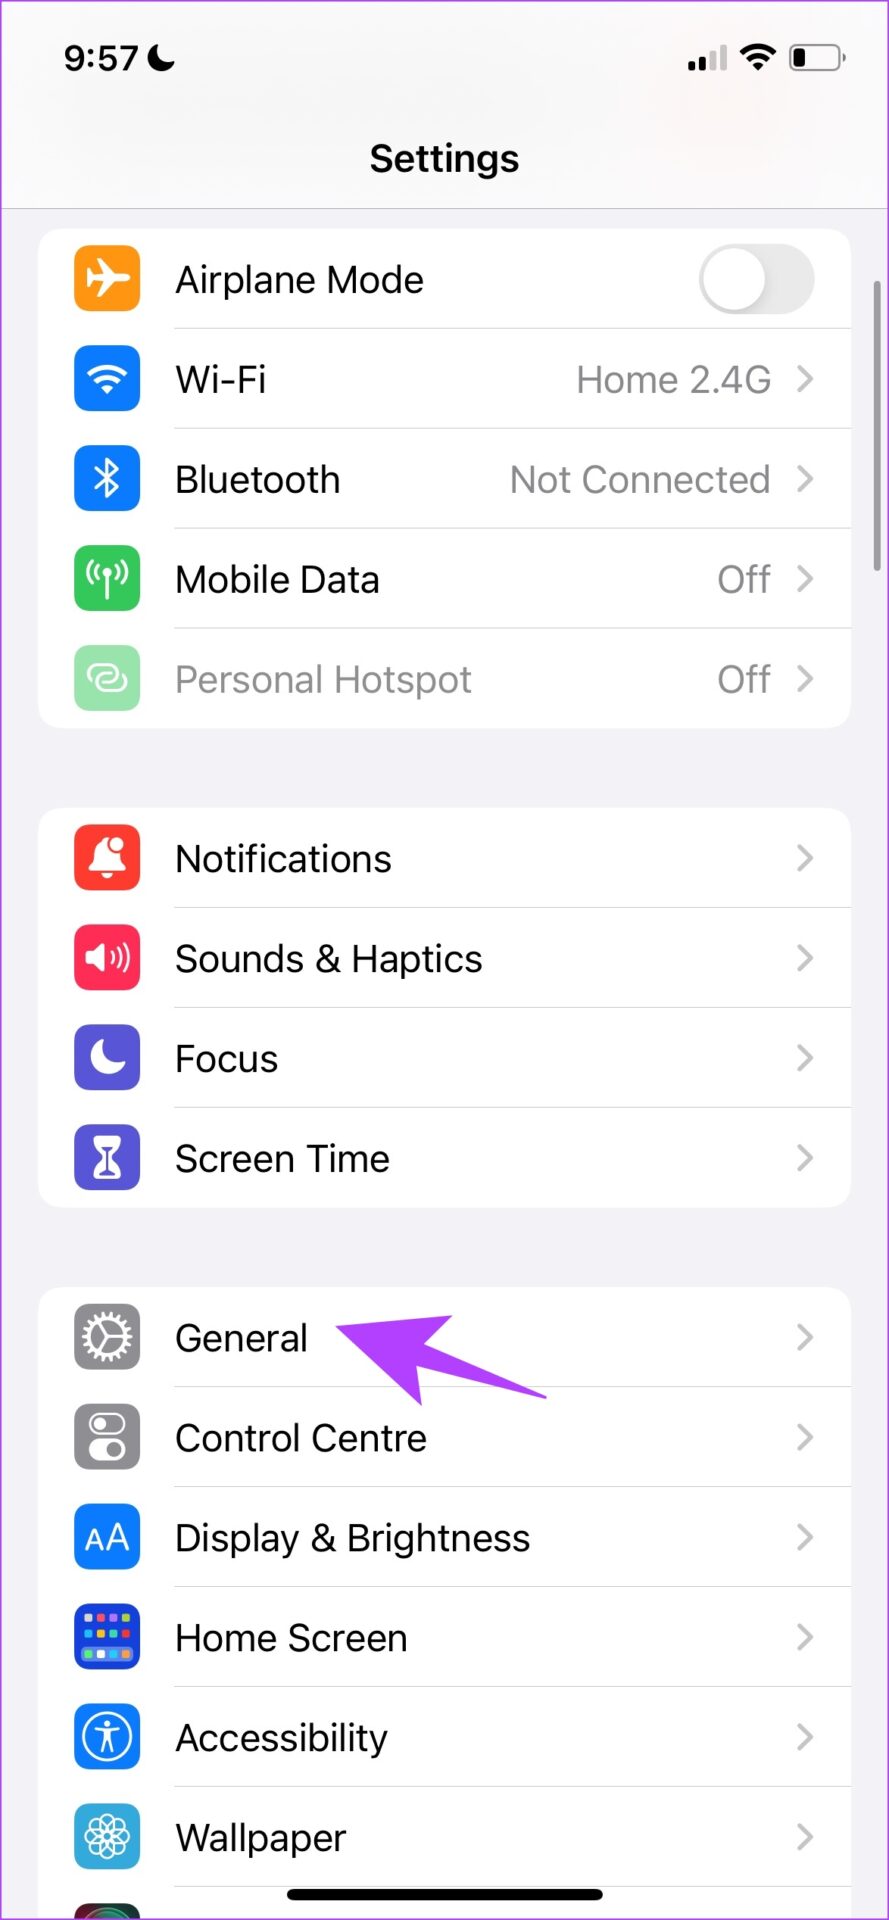
Step 2: Tap on General.
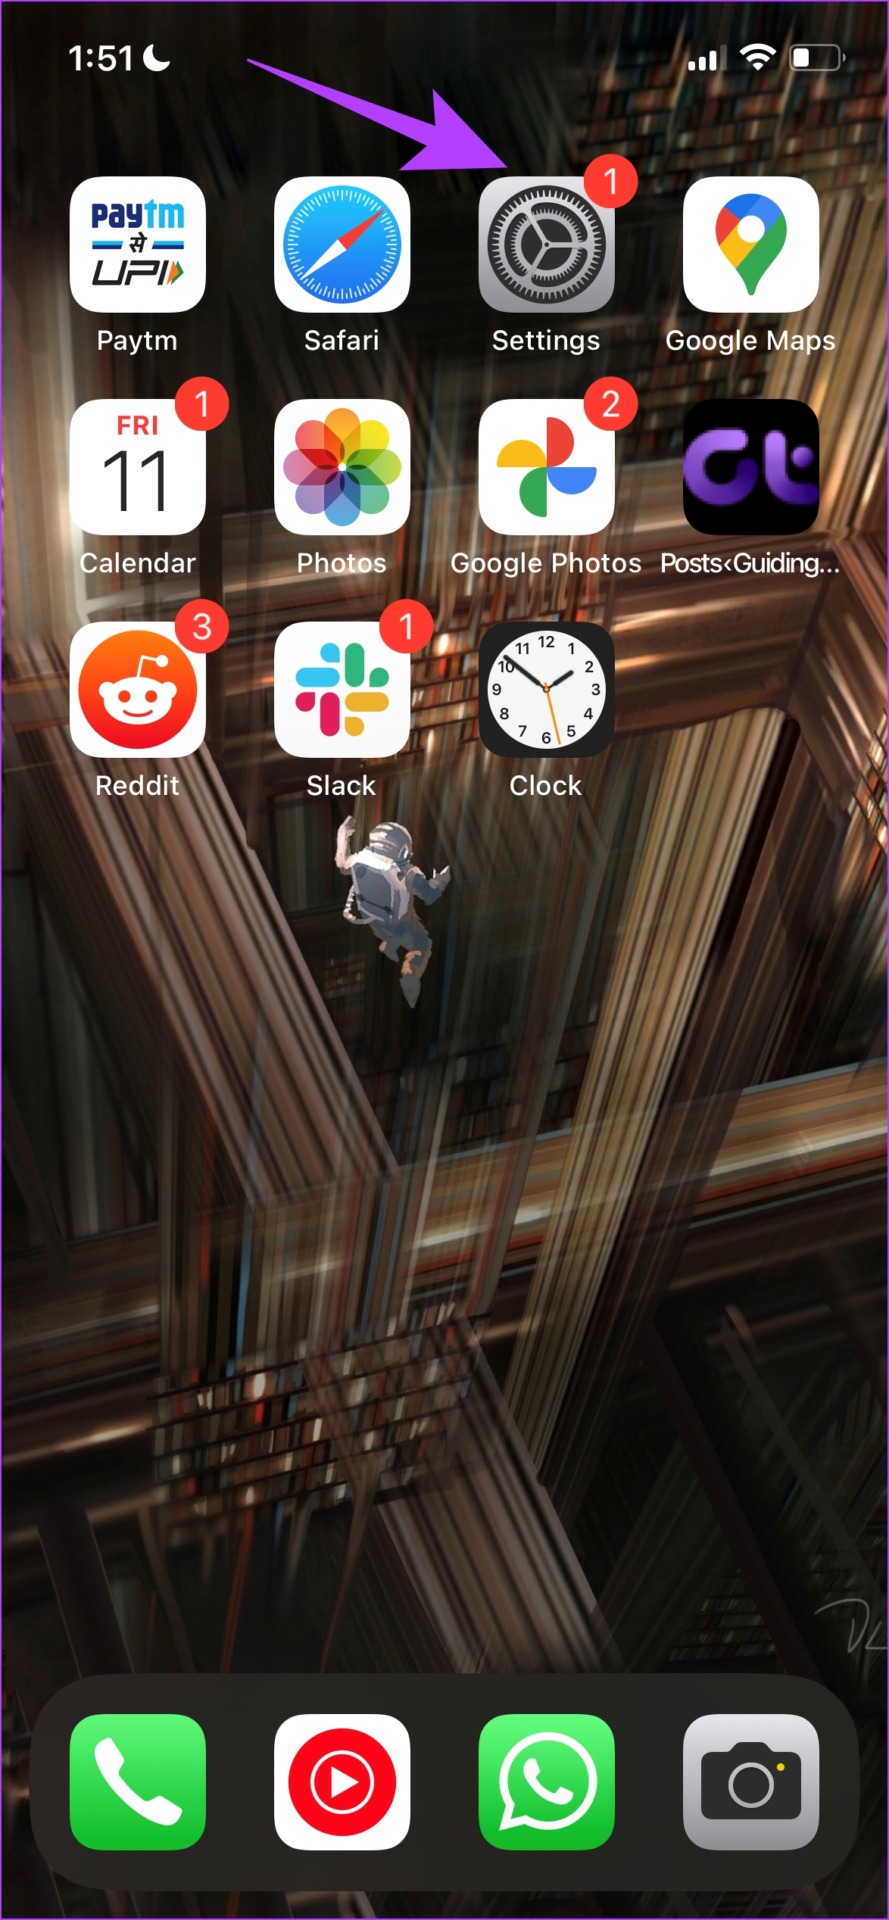
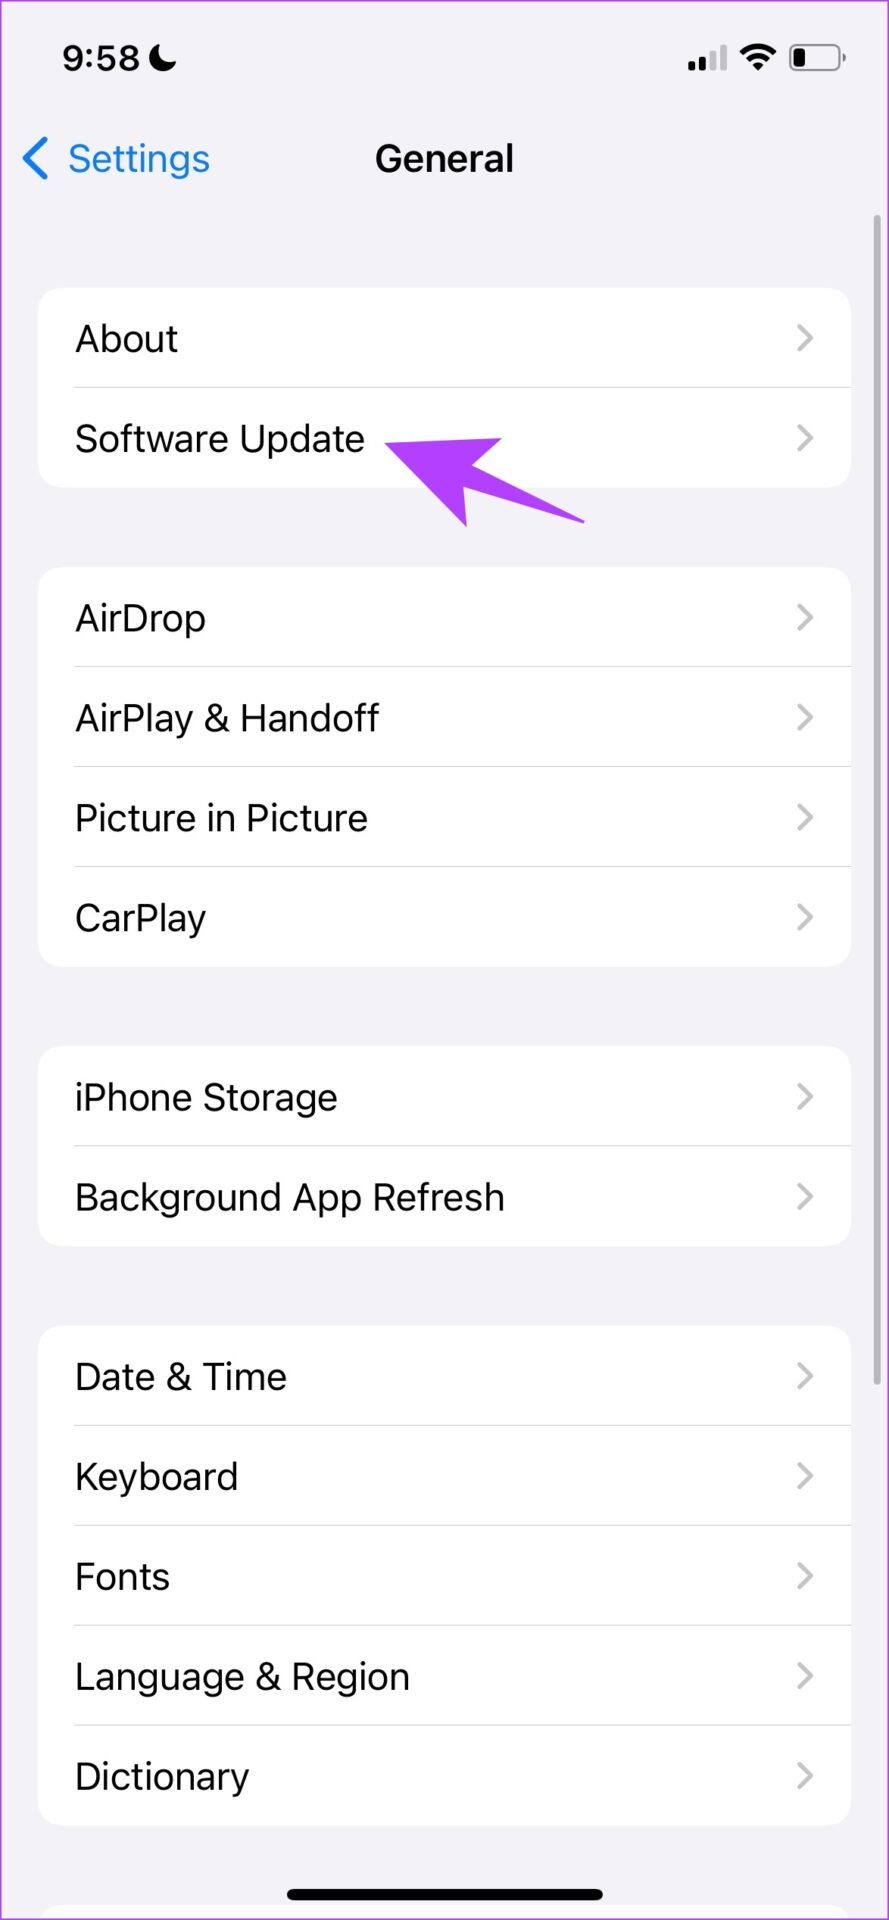
Step 3: Tap on Software Update.
Step 4: If you are already on the latest update, your iPhone will show that you are. If not, you will get an option to update your iPhone.
Update Android Device
Step 1: Open the Settings app.
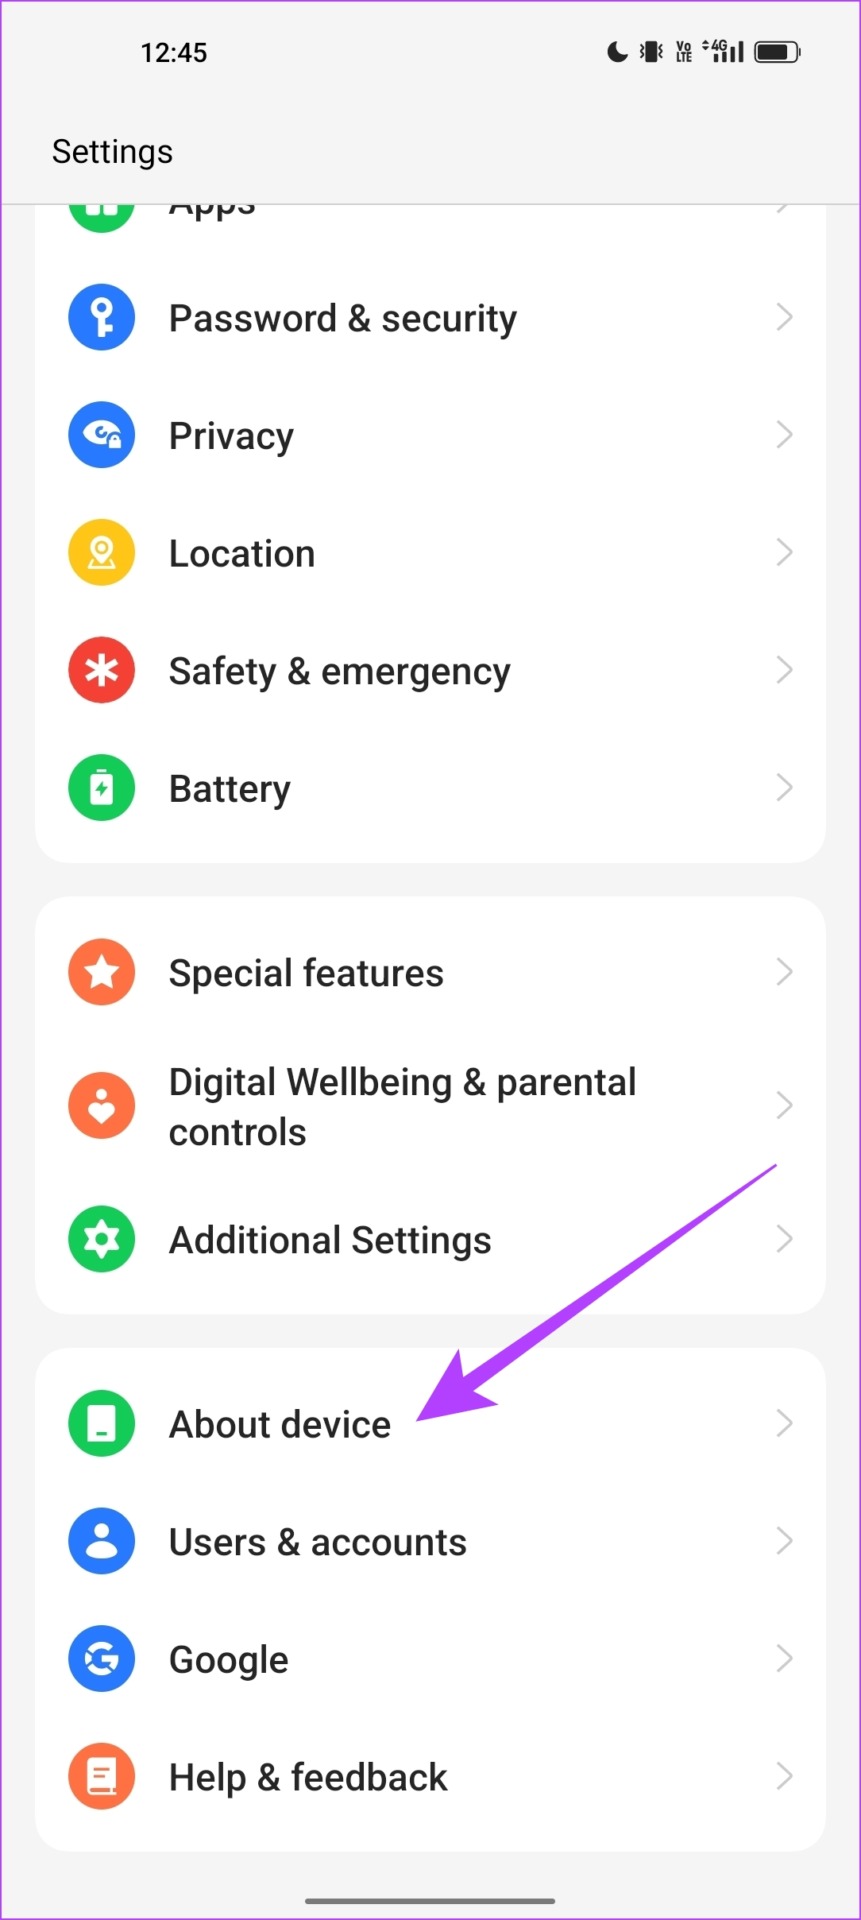
Step 2: Tap on About Device.

Step 3: Tap on Software Version.
Step 4: Ensure that the software version is up to date. If not, you will get an option to update the software.


8. Reset Device
As a last resort, you can try resetting your smartphone. Once you do this, all the configurations will return to their default states. Hence, fixing any misconfiguration that was preventing Google Maps and other apps from auto-rotating.
Reset iPhone
Step 1: Open the Settings app.
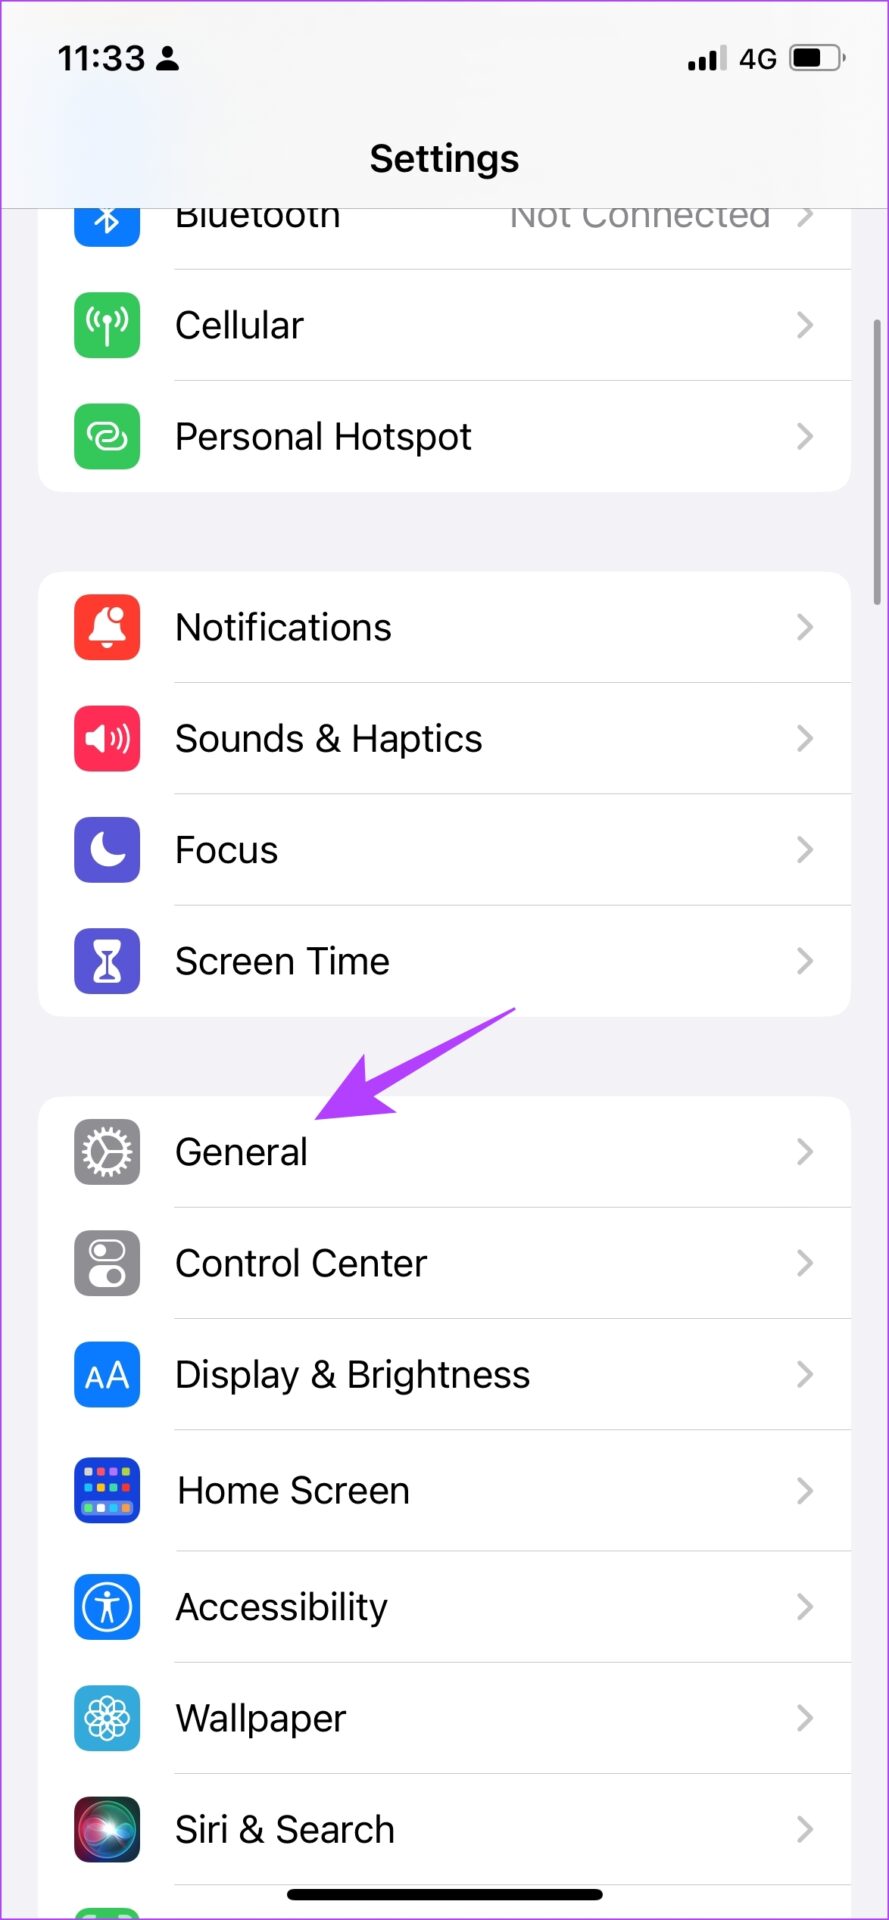
Step 2: Tap on General.

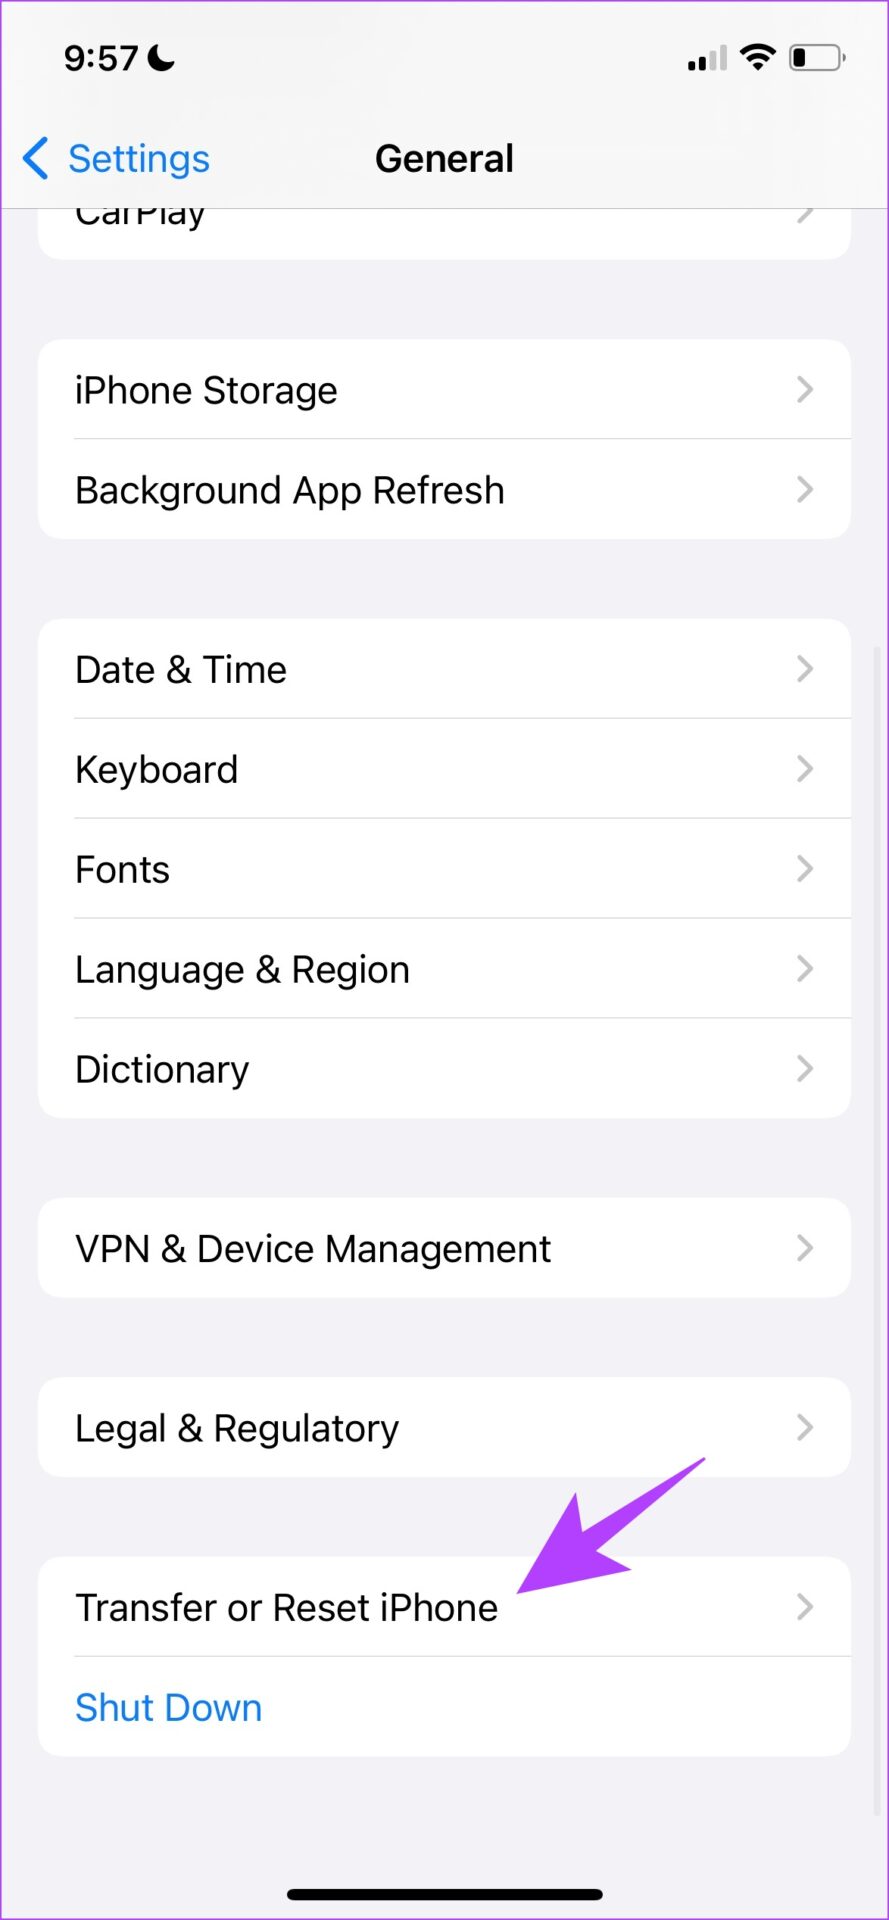
Step 3: Tap on ‘Transfer or Reset iPhone’.
Step 4: Tap on Reset.
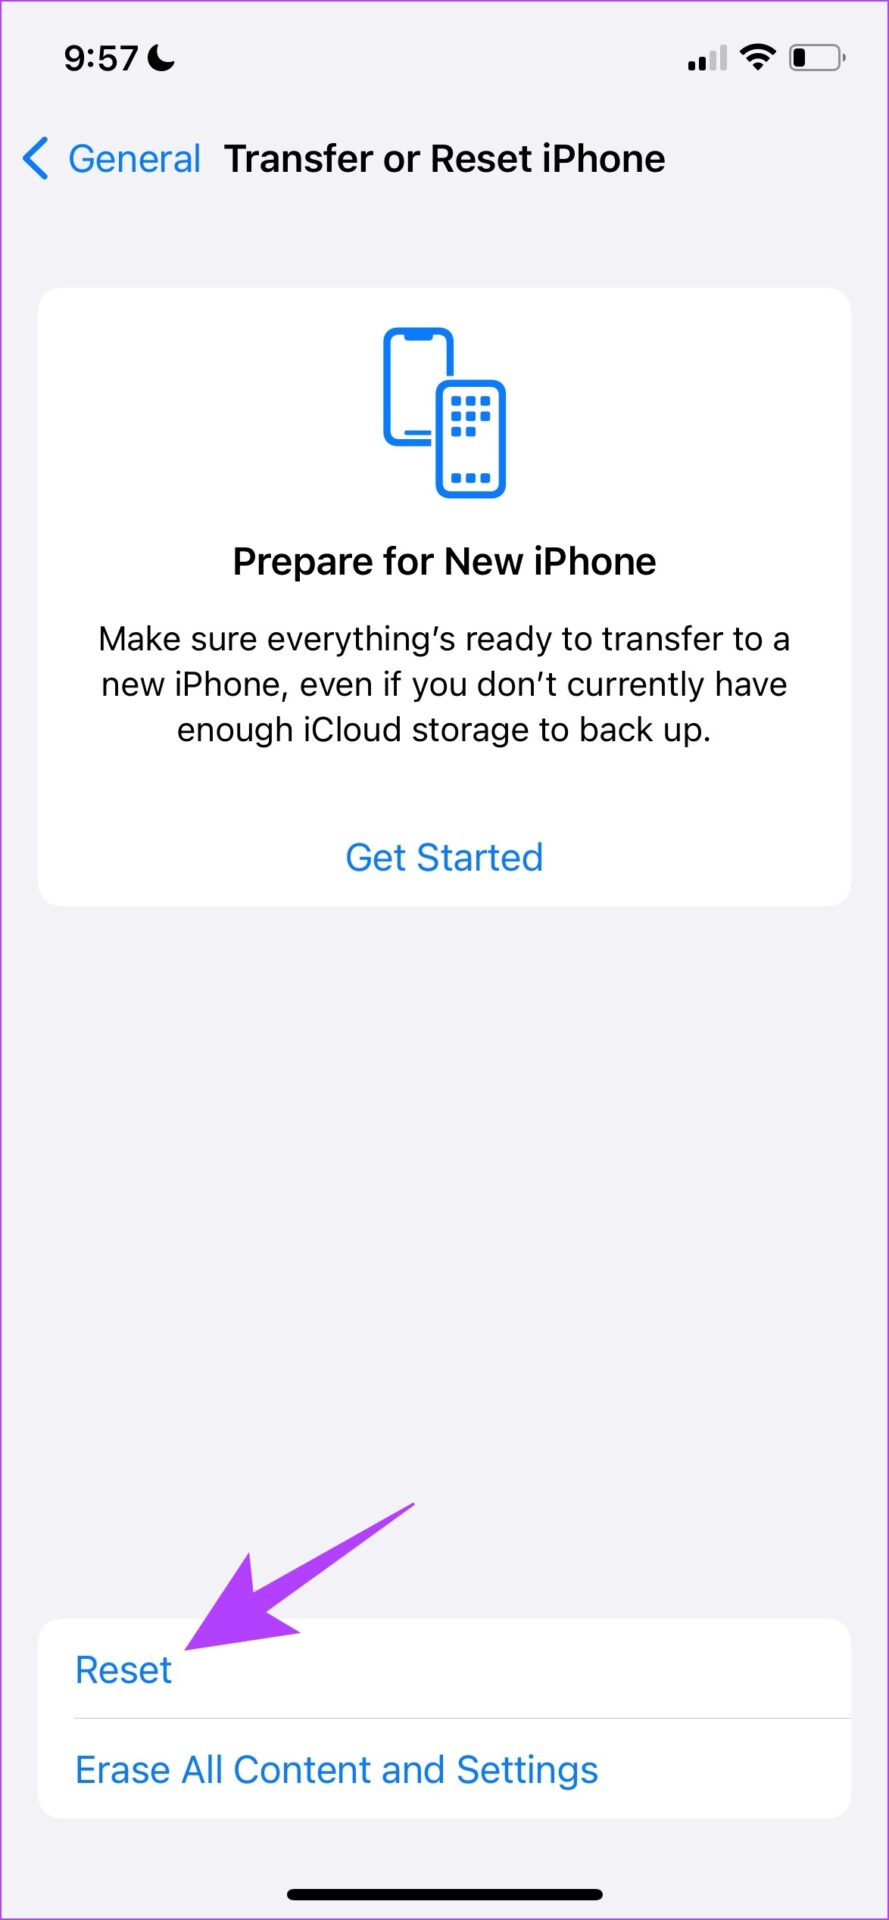
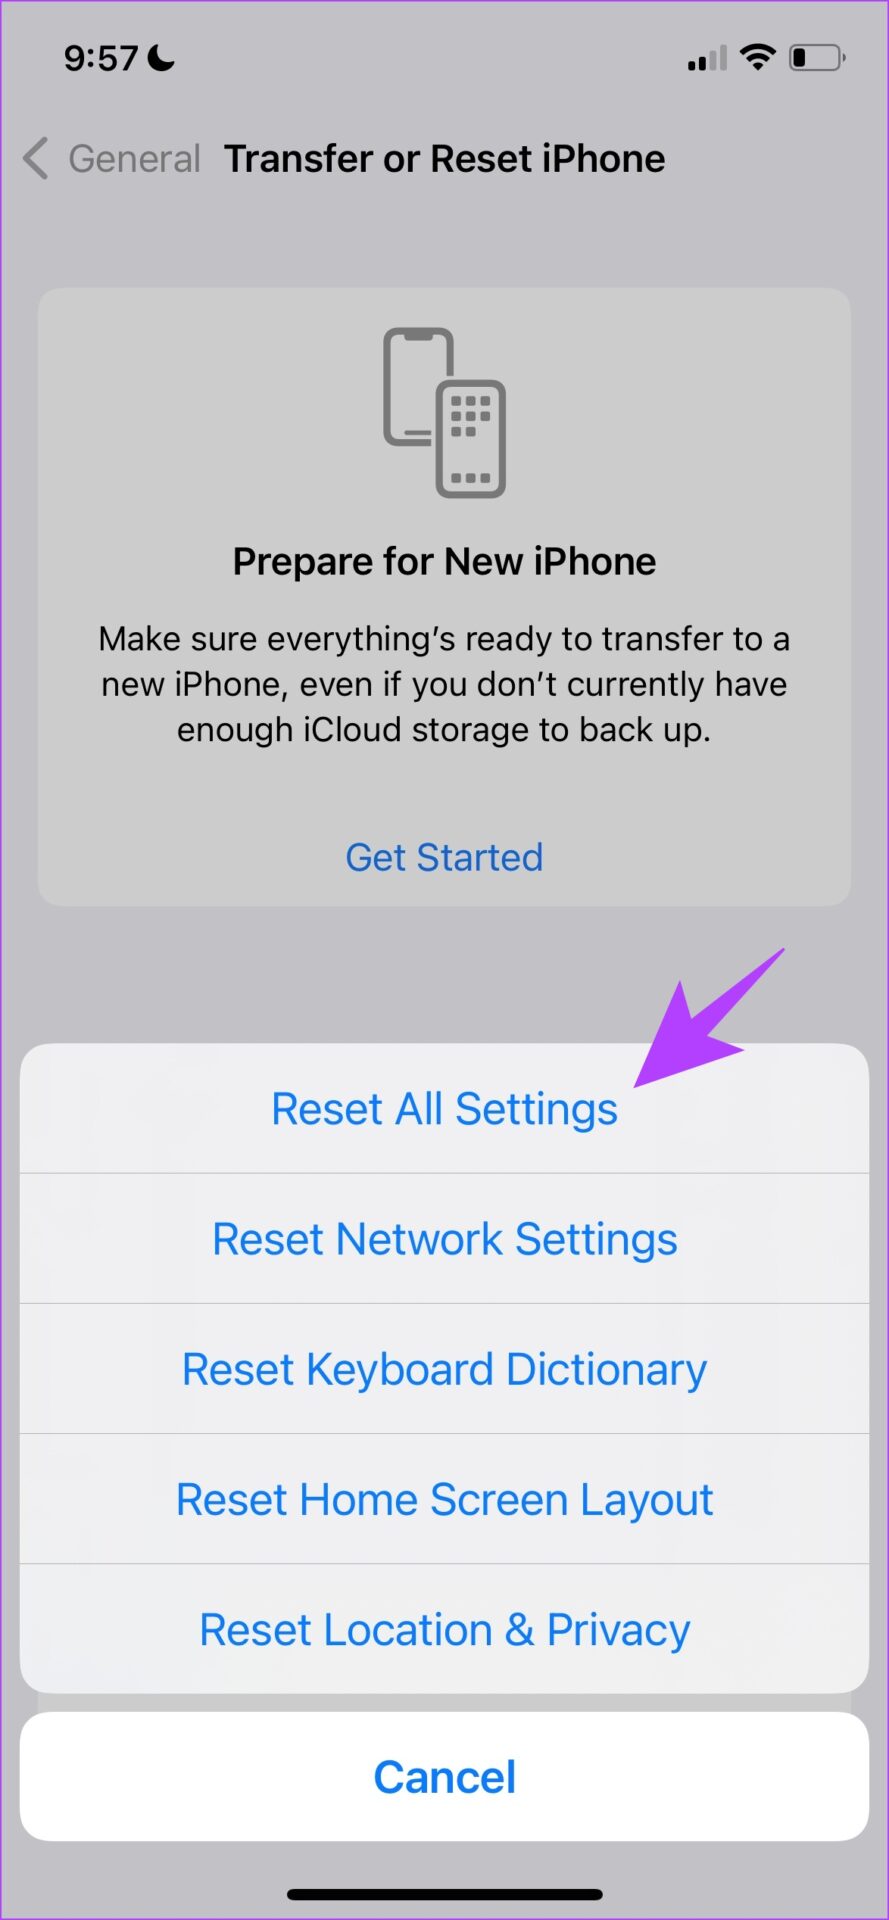
Step 5: Now, tap on ‘Reset All Settings’ to reset your iPhone.
Note: If prompted, enter the password to confirm.
Reset Android Device
Step 1: Open the Settings app.
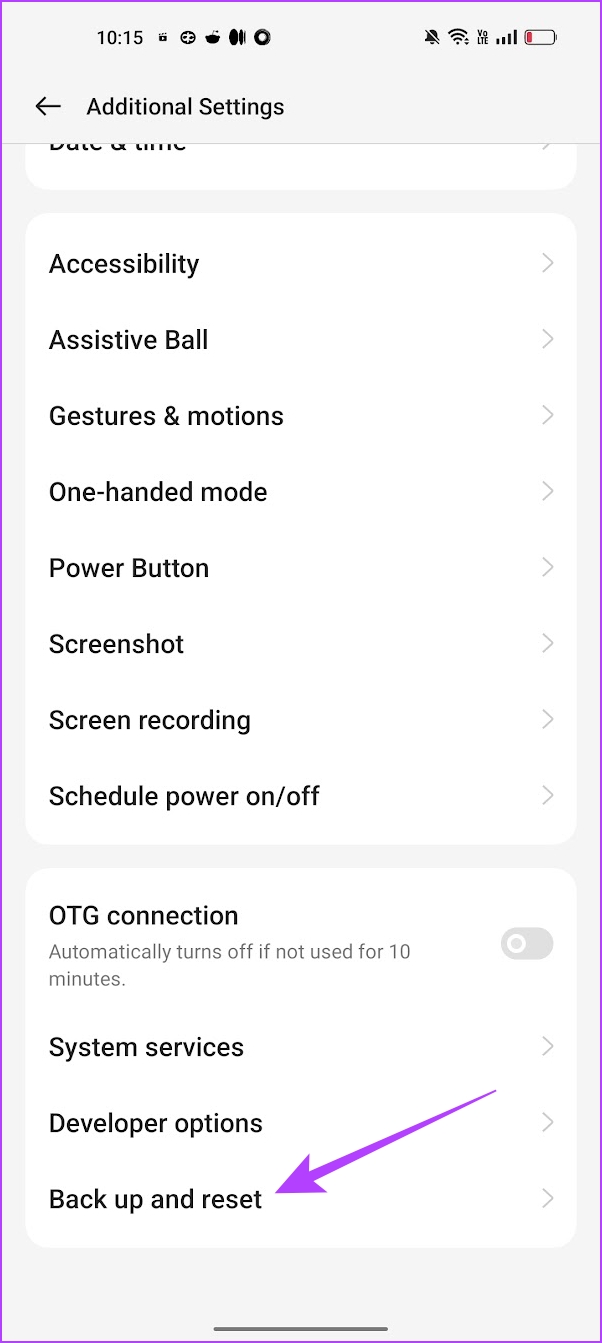
Step 2: Select Additional Settings.


Step 3: Tap on ‘Back up and Reset’.
Step 4: Tap on Reset phone.

Step 4: Select ‘Reset All Settings’.

That is everything you need to do if Google Maps is not auto-rotating on your iPhone or Android smartphone. If you have any further questions, you can take a look at the FAQ section below.
FAQs on Google Maps Auto Rotate Not Working
Try restarting Google Maps, or try clearing the app cache to fix the problem. (on Android)
When you are using Google Maps in landscape mode, turn off the auto-rotate button to prevent it from going back to portrait mode.
Use Google Maps in Your Preferred Orientation
We hope this article helps you fix the problem on Google Maps. We’ve noticed problems like these occur often on Google Maps, and the app certainly needs a good amount of optimization. Let’s hope the experience improves soon in the upcoming updates!
Was this helpful?
Last updated on 04 November, 2023
The article above may contain affiliate links which help support Guiding Tech. The content remains unbiased and authentic and will never affect our editorial integrity.

