Basic Fixes
- Use another VPN server: Most VPN apps have hundreds of servers. If a specific server experiences an outage, move to another server and try your luck in Google Chrome.
- Update VPN app: VPN apps frequently release updates to add new features and fix bugs. You should update the VPN app and try again.
- Clear Chrome cache: Google Chrome collects cache in the background; some websites may try to load content from such saved files. Try clearing the cache and trying again. To learn more, read what happens when you clear browsing data in Chrome.
- Update Google Chrome: Outdated Google Chrome can sometimes conflict with VPN software. To get things working smoothly again, update Chrome to the latest version.
Fix 1: Disable Chrome Extensions
One of the installed extensions may interfere with the VPN on Chrome. To fix this, disable or delete irrelevant extensions from Chrome.
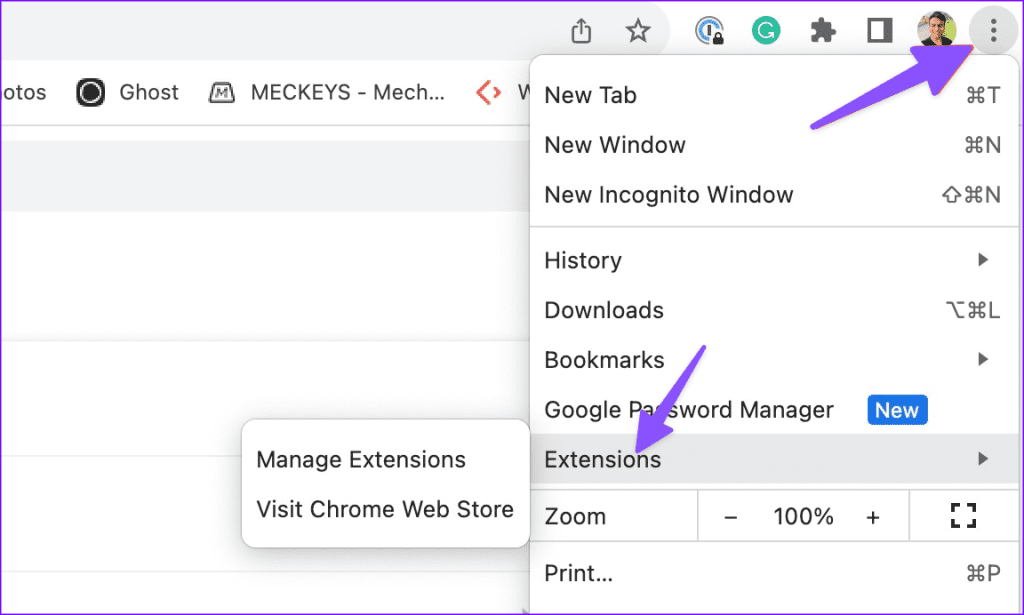
Step 1: Launch Chrome and click the three-dot menu.
Step 2: Select Extensions and open Manage Extensions.
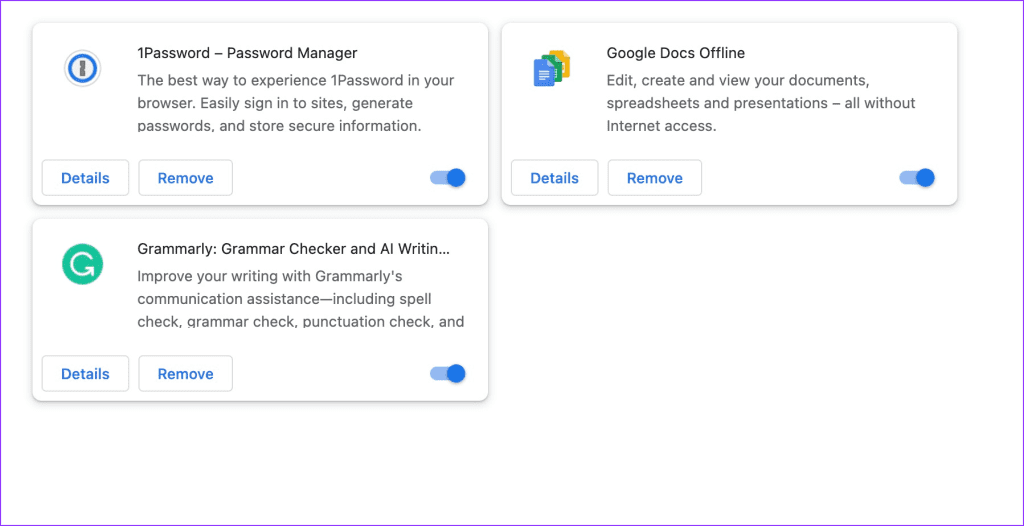
Step 3: Disable or delete extensions from the following menu.
Also Read: How to set a custom search engine as default in Chrome
Fix 2: Disable QUIC in Chrome
QUIC (Quick UDP Internet Connections) is a relatively new protocol that might not be fully compatible with all VPNs. Disabling it can help you fix the issue.
Step 1: Open Chrome and type chrome://flags in the address bar.
This will open the Chrome flags page, which contains experimental features.
Step 2: In the search bar, type QUIC.
Step 3: Click on the drop-down menu for Experimental QUIC protocol and select Disabled.

Once you’ve selected Disabled, relaunch Chrome for the changes to take effect. Click on the blue Relaunch button that appears at the bottom.
Also Read: How to disable efficiency mode for Google Chrome on Windows 11
Fix 3: Switch to Cloudflare or Google DNS in Chrome
Step 1: Launch the Chrome browser, click on the three vertical dots, and select Settings.

Step 2: Within the Settings menu, scroll down and click on Privacy and security.
Step 3: Under Privacy and security, select Security.

Step 4: Under Advanced, next to Select DNS provider, click on the chevron (arrow) icon and select Cloudflare (1.1.1.1).

Once done, restart the Chrome browser. The issue should be resolved.
Was this helpful?
Last updated on 05 June, 2024
Read Next
 Top 8 Ways to Fix VPN Not Working in Windows 11
You can hide your location (IP address) and browsing history from an ISP (Internet Service Provider) and local government using a VPN.
Top 8 Ways to Fix VPN Not Working in Windows 11
You can hide your location (IP address) and browsing history from an ISP (Internet Service Provider) and local government using a VPN.
 4 Ways to Fix VPN Not Working on iPhone or iPad
Basic Fixes: Check app server status: When your preferred VPN provider faces an outage, you may face issues when using their services.
4 Ways to Fix VPN Not Working on iPhone or iPad
Basic Fixes: Check app server status: When your preferred VPN provider faces an outage, you may face issues when using their services.
 6 Best Browsers With Built-in VPN for Android
Why Should You Need a Browser With VPN VPN (Virtual Private Network) serves multiple purposes apart from the fact that it unlocks content locked away in your geolocation.
6 Best Browsers With Built-in VPN for Android
Why Should You Need a Browser With VPN VPN (Virtual Private Network) serves multiple purposes apart from the fact that it unlocks content locked away in your geolocation.
 5 Best Ways to Fix Google Chrome Translate Not Working
https://youtu.be/OYo1Caq10A0 Preliminary Fixes Disable Extensions: Sometimes, browser extensions can interfere with the functionality of Google Chrome, including the translation feature.
5 Best Ways to Fix Google Chrome Translate Not Working
https://youtu.be/OYo1Caq10A0 Preliminary Fixes Disable Extensions: Sometimes, browser extensions can interfere with the functionality of Google Chrome, including the translation feature.
 5 Ways to Fix Gmail Not Working in Google Chrome
Fix 1: Disable Browser Extensions Third-party extensions in Chrome can sometimes prevent Gmail from loading properly.
5 Ways to Fix Gmail Not Working in Google Chrome
Fix 1: Disable Browser Extensions Third-party extensions in Chrome can sometimes prevent Gmail from loading properly.
 Five VPN Android Apps to Bypass Country Restrictions
While few VPNs offer free service, they are not safe, and it is best to use a service with free or completely paid plans.
Five VPN Android Apps to Bypass Country Restrictions
While few VPNs offer free service, they are not safe, and it is best to use a service with free or completely paid plans.
 4 Fixes for No Internet Connection After Connecting to VPN
Fix 1: Change Routing Settings The routing settings are set to use the default gateway as it is.
4 Fixes for No Internet Connection After Connecting to VPN
Fix 1: Change Routing Settings The routing settings are set to use the default gateway as it is.
 How to Fix Google Search Autocomplete Not Working in Chrome
Basic Fixes: Restart Google Chrome: Temporary browser glitches can cause autocomplete to not work properly in Chrome.
How to Fix Google Search Autocomplete Not Working in Chrome
Basic Fixes: Restart Google Chrome: Temporary browser glitches can cause autocomplete to not work properly in Chrome.
The article above may contain affiliate links which help support Guiding Tech. The content remains unbiased and authentic and will never affect our editorial integrity.