Basic Fixes
- Check if the folder is encrypted. The administrator could have password-locked or encrypted the folder, so contact them for assistance.
- Check if the folder is corrupted: You can recover data from a corrupt folder if you cannot access it.
- Check if the user account is corrupted: Creating a new standard or admin user account is quick and can help fix the error.
- Check for malware: Use Windows Defender to scan files and folders for malware.
Fix 1: Check Admin Rights
The user account you are using to access the folder doesn’t have the necessary administrative rights. If it is your work laptop, switch the user account or contact the system administrator responsible for the IT equipment.
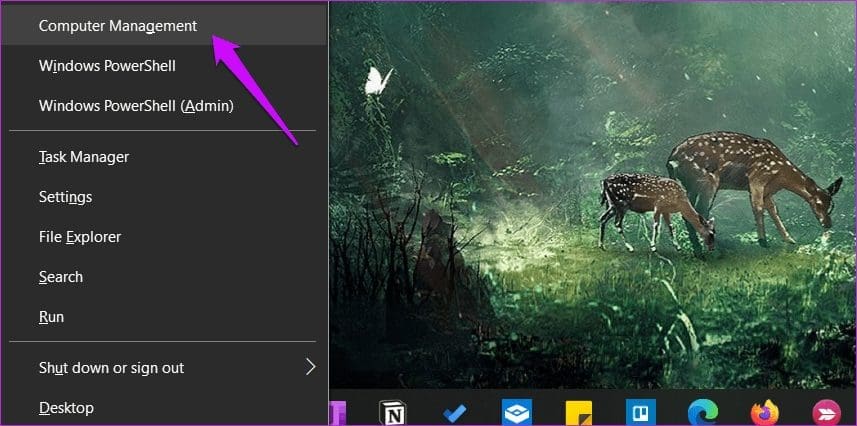
Step 1: Press the Windows key + X > select Computer Management or search for it from the Start menu.
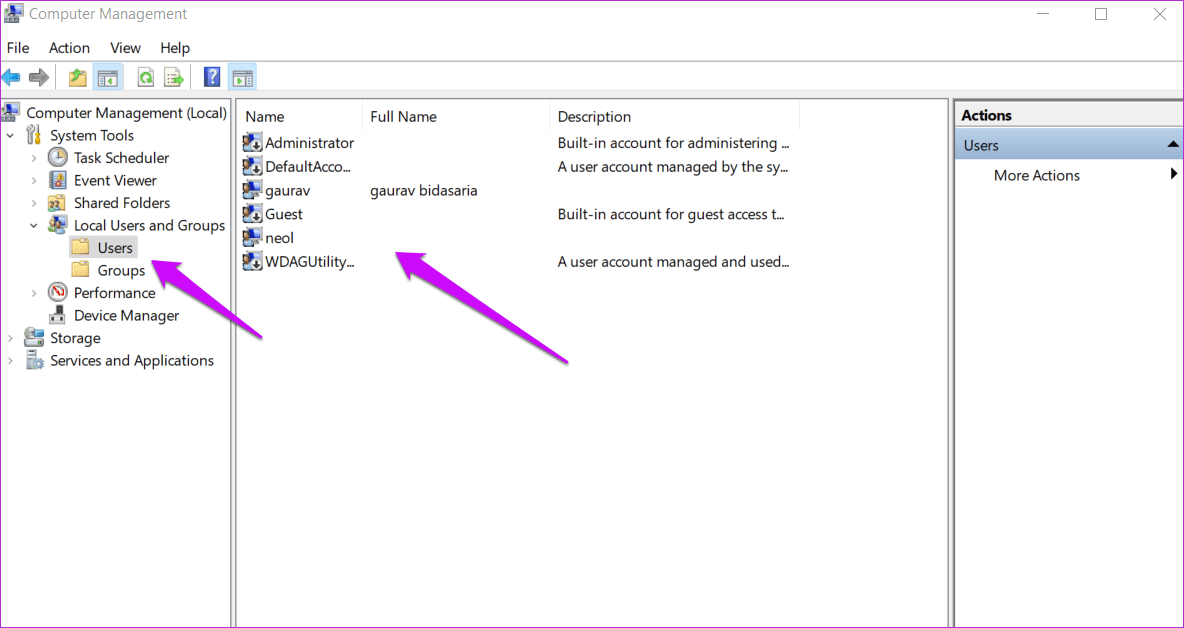
Step 2: Navigate to System Tools > Local Users and Groups > Users > double-click the user account name to open it.
Step 3: Click on the Add button under the Member Of tab.

Step 4: Type administrators in the pop-up that follows and select the Check Names button to find the admin account. Then, click on OK.
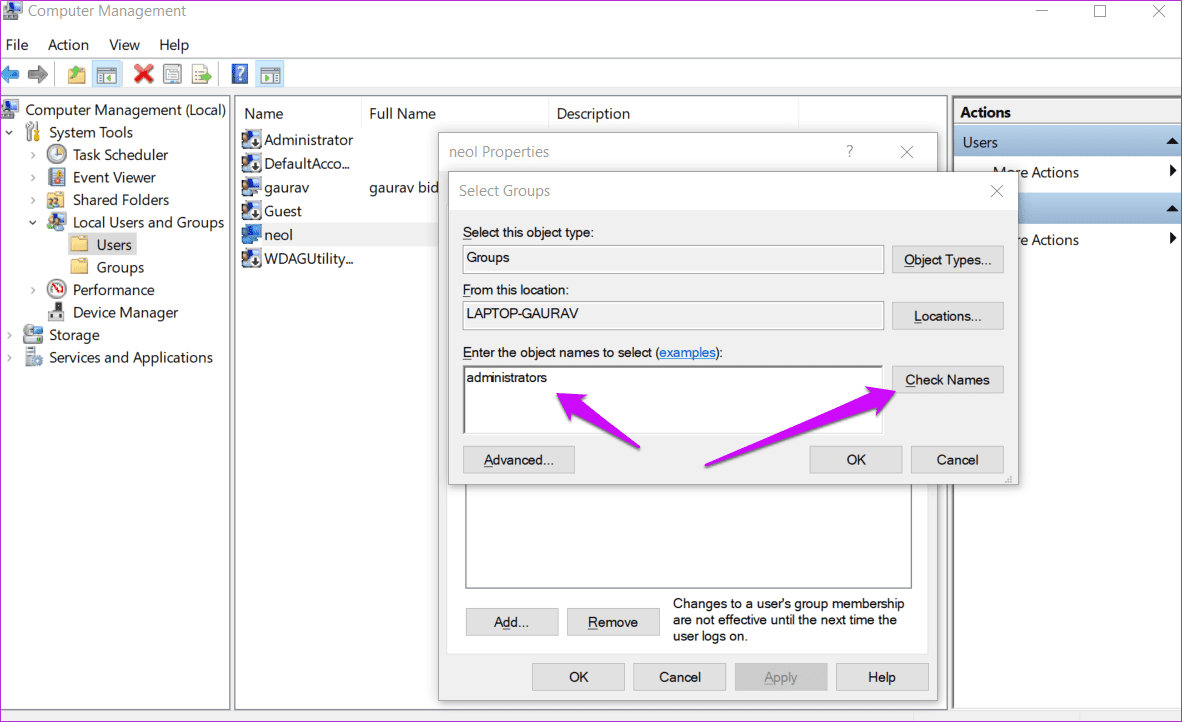
Step 5: You will be taken back to the previous pop-up, where you will notice the Administrators entry. Click on it once and select OK.

Also Read: How to access the WindowsApps folder on Windows
Fix 2: Change Folder Permissions
If you see the message ‘Folder Access Denied As Admin’, you can modify the permissions and take ownership of the folder.
Step 1: Right-click on the folder throwing the access denied error and select Properties. You can also press the Alt + Enter keys to open it.
Step 2: Under the Security tab, select the Edit button. In the pop-up that follows, select your username and give it Full Control.

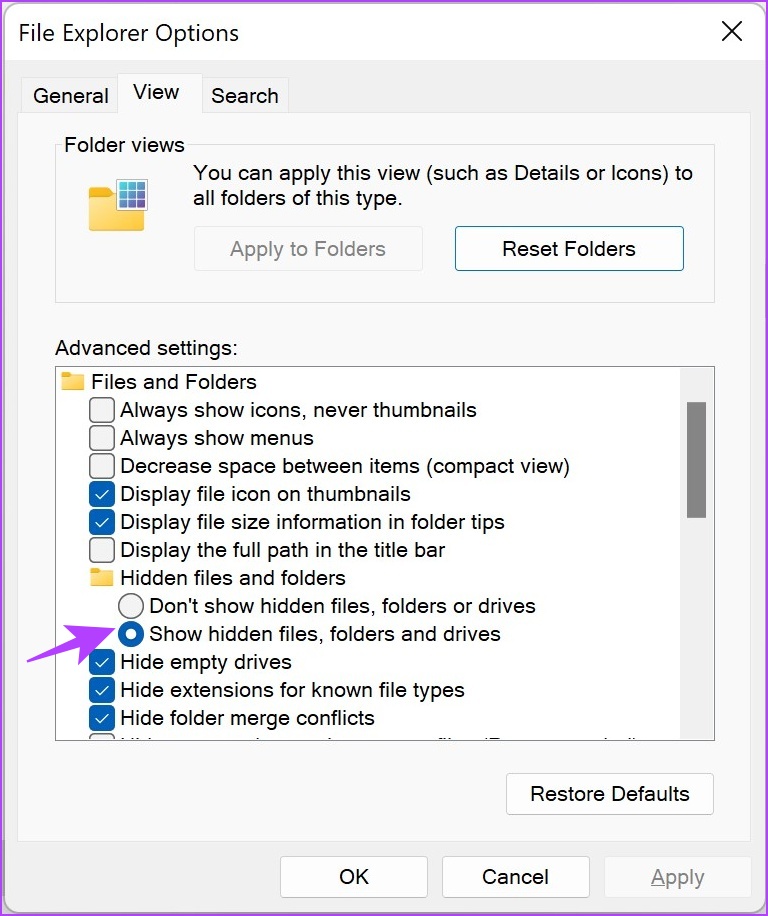
Fix 3: Disable Hidden Folders
If you’re trying to access a hidden folder, you might encounter an error message.
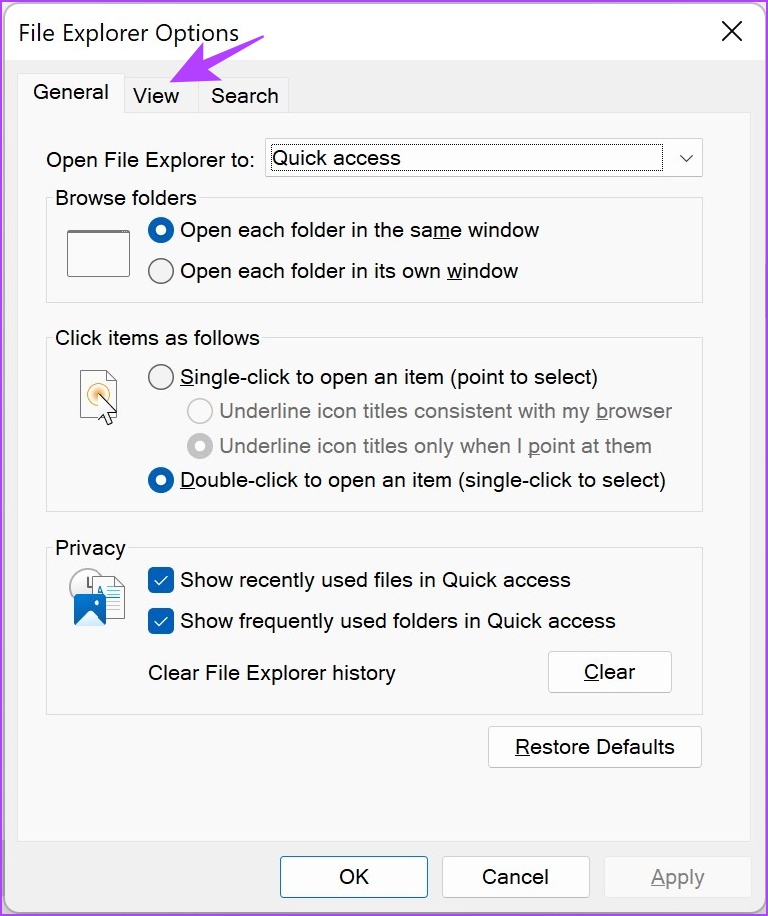
Step 1: In the start menu, search for File Explorer Options and click on the first result.

Step 2: Once opened, click on View.
Step 3: Check the option for Show hidden files, folders, and drives. Click on OK to apply the settings.
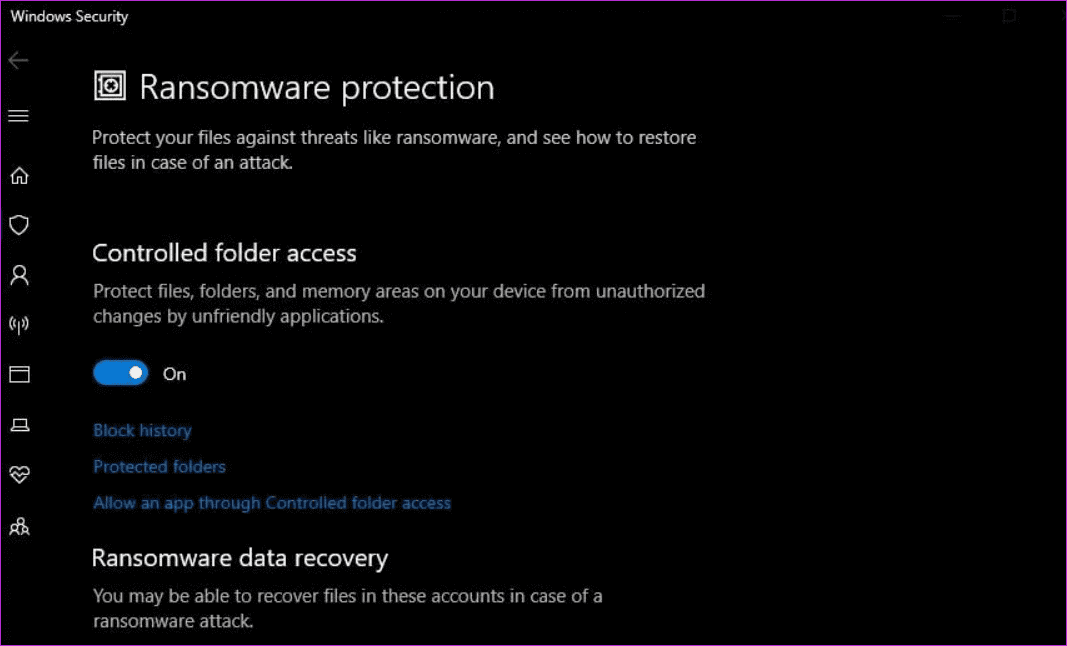
Fix 4: Turn off Controlled Folder Access
Windows Security Suite also has a ransomware module to protect against such threats. You can find it under Windows Security > Virus & Threat Protection.
Disable Controlled folder access here and try again. You should be able to access the folder now. Proceed with caution, as you may incur a security risk once you disable the option.
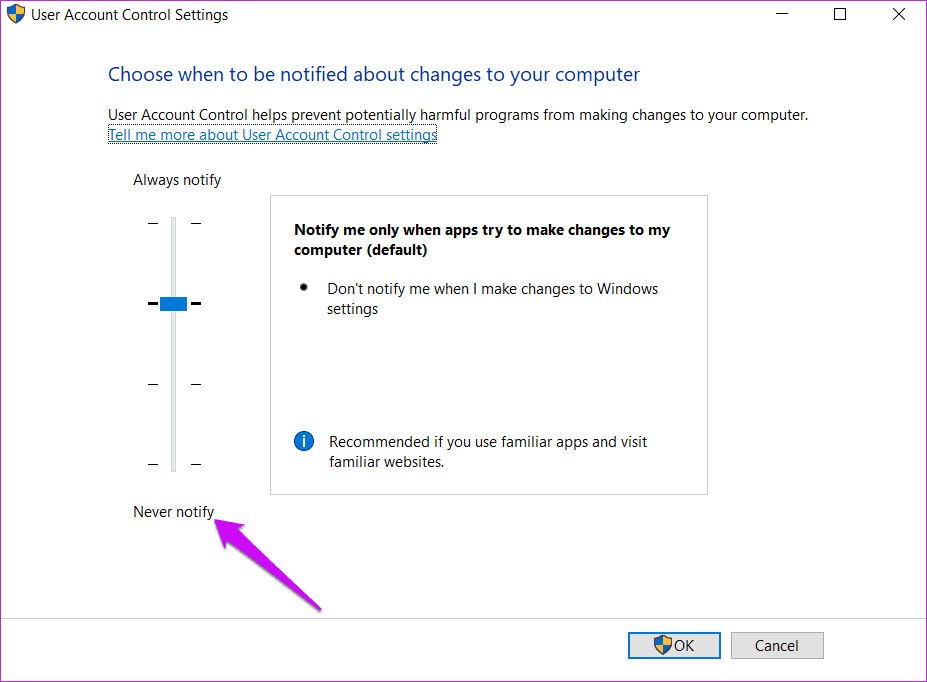
Fix 5: Turn off User Account Control
Disabling User Account Control (UAC) can potentially help you fix “Folder Access Denied” errors on your Windows PC by reducing certain restrictions on file and folder access.
Step 1: Search for UAC in the Start menu and open Change User Account Control settings.

Step 2: Drag the slider to the bottom towards the Never Notify and save settings.
The Windows access denied error should not appear again when opening that folder.
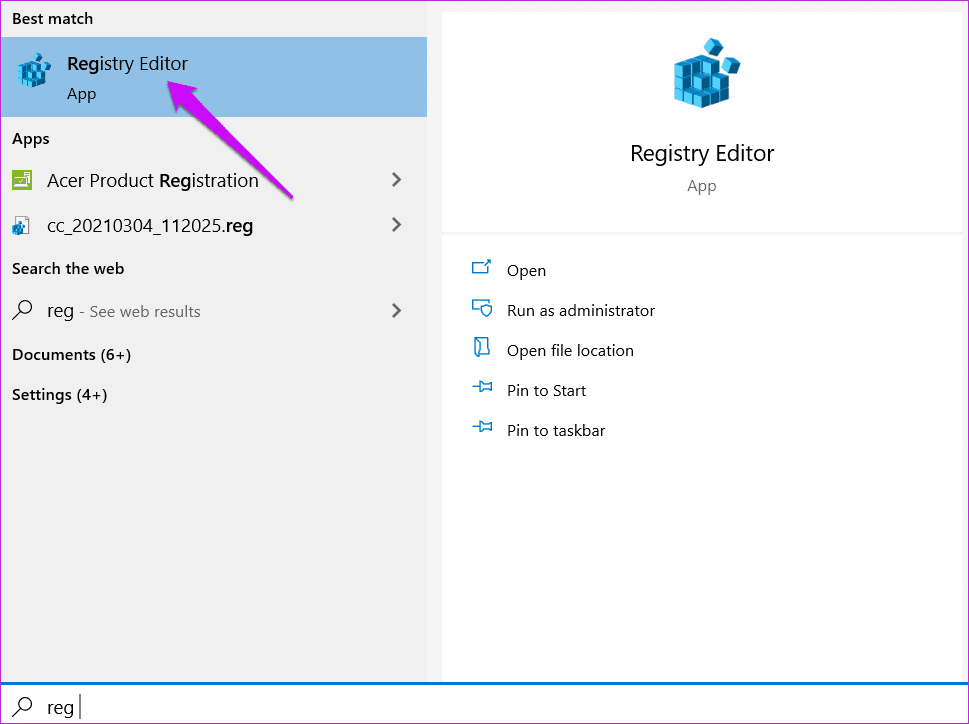
Fix 6: Use Registry Editor
You can try tweaking the registry settings if you can’t access a folder.
We recommend taking a backup of registry files before making any edits if something goes wrong. These are system-level files and can mess up your computer. You don’t want that.
Step 1: Search for the Registry Editor in the Start menu and open it.
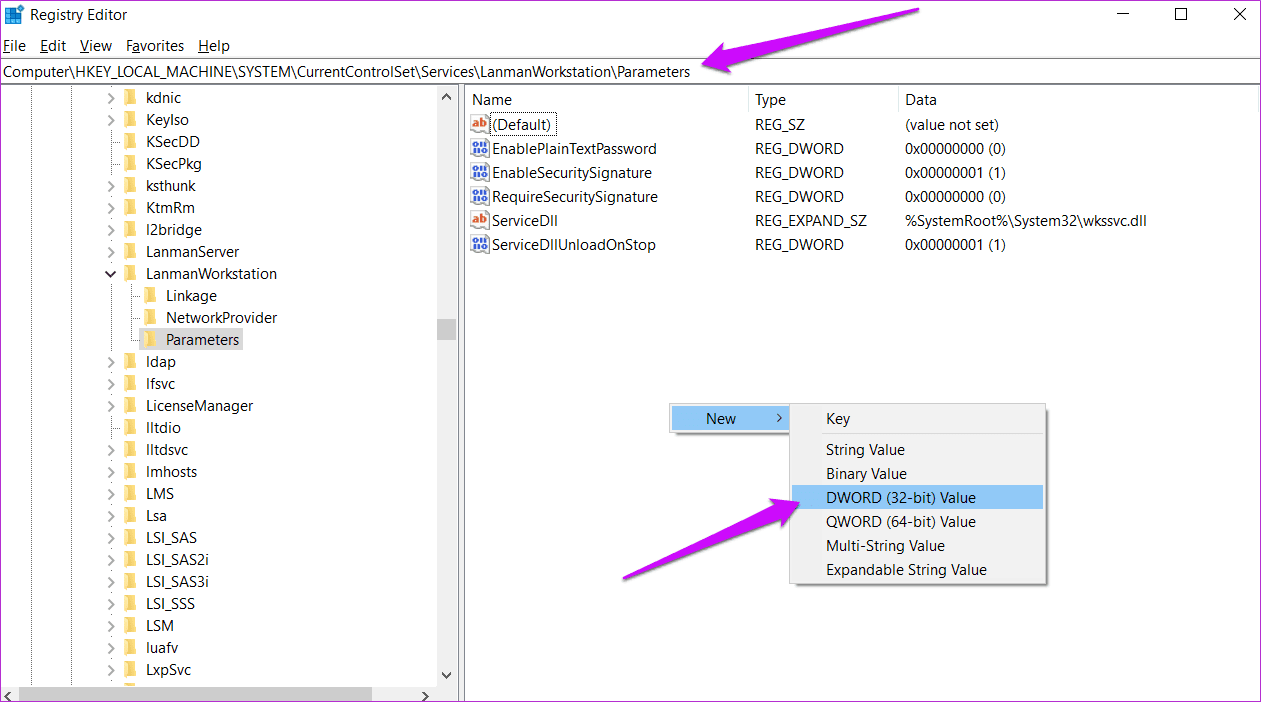
Step 2: Navigate to the folder structure below.
HKEY_LOCAL_MACHINE/SYSTEM/CurrentControlSet/Services/LanmanWorkstation/Parameters
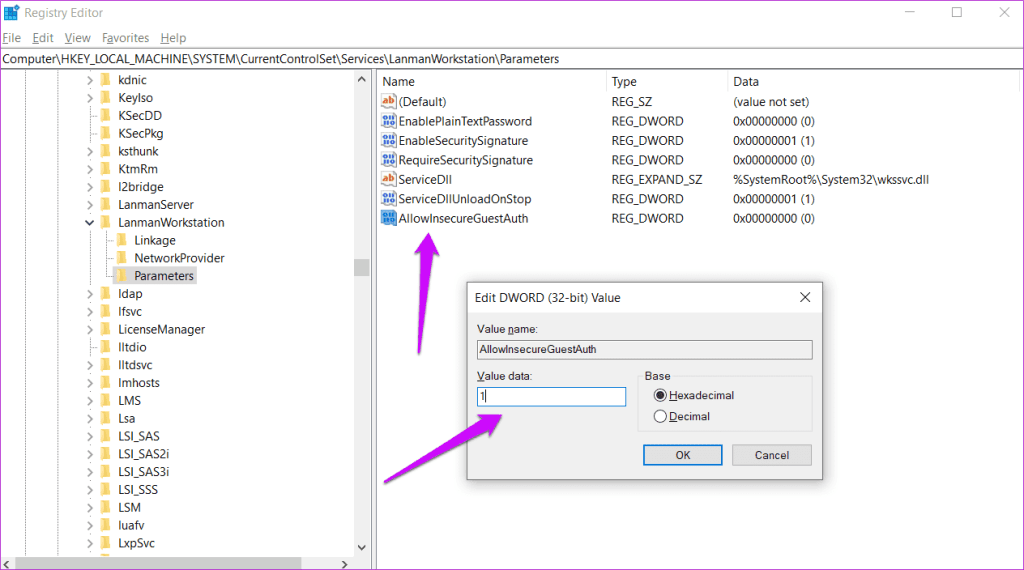
Step 3: In the right window pane, right-click to select New > DWORD (32-bit) Value and name the file as AllowInsecureGuestAuth.
Step 4: Double-click to open the file, input the value as 1, and save changes.
Was this helpful?
Last updated on 04 September, 2024
Read Next
 4 Ways to Fix Access Denied Error in Steam for Windows
Try Basic Fixes Check if Steam is down: Just like any other service, Steam is vulnerable to occasional server-side glitches.
4 Ways to Fix Access Denied Error in Steam for Windows
Try Basic Fixes Check if Steam is down: Just like any other service, Steam is vulnerable to occasional server-side glitches.
 3 Ways to Fix MIUI Dual Apps Permission Denied Error
Basic Fixes Restart device: Restarting your device can eliminate any bugs causing problems with the Dual Apps feature.
3 Ways to Fix MIUI Dual Apps Permission Denied Error
Basic Fixes Restart device: Restarting your device can eliminate any bugs causing problems with the Dual Apps feature.
 6 Ways to Fix Windows 11 Can’t Access Shared Folder
Fix 1: Use the Command Prompt to Access the Shared Folder If you can't open the shared folder in File Explorer, use Command Prompt to access it.
6 Ways to Fix Windows 11 Can’t Access Shared Folder
Fix 1: Use the Command Prompt to Access the Shared Folder If you can't open the shared folder in File Explorer, use Command Prompt to access it.
 3 Ways to Access the WindowsApps Folder on Windows
https://youtu.be/Sug1OVa0Q3A Method 1: Gain Access to the WindowsApps Folder via File Explorer The easiest way to open the WindowsApps folder is through File Explorer.
3 Ways to Access the WindowsApps Folder on Windows
https://youtu.be/Sug1OVa0Q3A Method 1: Gain Access to the WindowsApps Folder via File Explorer The easiest way to open the WindowsApps folder is through File Explorer.
 4 Ways to Access Secure Folder on Samsung Galaxy Phones
Method 1: From the App Drawer or Home Screen Once you create the Secure Folder the first time, you can access it easily from your phone’s App drawer or home
4 Ways to Access Secure Folder on Samsung Galaxy Phones
Method 1: From the App Drawer or Home Screen Once you create the Secure Folder the first time, you can access it easily from your phone’s App drawer or home
 4 Ways to Fix Exception Access Violation Error on Windows 11
Fix 1: Use the Built-in Troubleshooter The Hardware and Device troubleshooter can help you resolve hardware-related issues that trigger the Exception Access Violation error.
4 Ways to Fix Exception Access Violation Error on Windows 11
Fix 1: Use the Built-in Troubleshooter The Hardware and Device troubleshooter can help you resolve hardware-related issues that trigger the Exception Access Violation error.
 How to Manage and Share Files and Folder Access on Microsoft OneDrive
Like iCloud and Google Drive, Microsoft's OneDrive is a great cloud storage platform to store your data.
How to Manage and Share Files and Folder Access on Microsoft OneDrive
Like iCloud and Google Drive, Microsoft's OneDrive is a great cloud storage platform to store your data.
 Top 6 Ways to Fix Cannot Expand Folder Error in Outlook
Microsoft Outlook users have been facing a particular error for the past decade.
Top 6 Ways to Fix Cannot Expand Folder Error in Outlook
Microsoft Outlook users have been facing a particular error for the past decade.
The article above may contain affiliate links which help support Guiding Tech. The content remains unbiased and authentic and will never affect our editorial integrity.