Fix 1: Enable Dual Boot Option Using Command Prompt
Sometimes, the dual boot option goes missing when upgrading the operating system. When that happens, you can re-enable the dual boot option using Command Prompt.
Step 1: Press the Windows key to open the Start Menu.
Step 2: Type Command Prompt and choose Run as administrator.

Step 3: Type the following command and press Enter.
bcdedit /set {bootmgr} displaybootmenu yes
Fix 2: Turn Off Fast Startup
Fast Startup is an incredible feature in Windows that facilitates quick computer restarts after shutdown. This feature proves especially useful if your computer takes a long time to restart.
However, the dual boot feature blocks the Windows installation drive, leading to the operating system’s failure to recognize the dual boot system. In such cases, the solution is to disable the fast startup option on your computer.
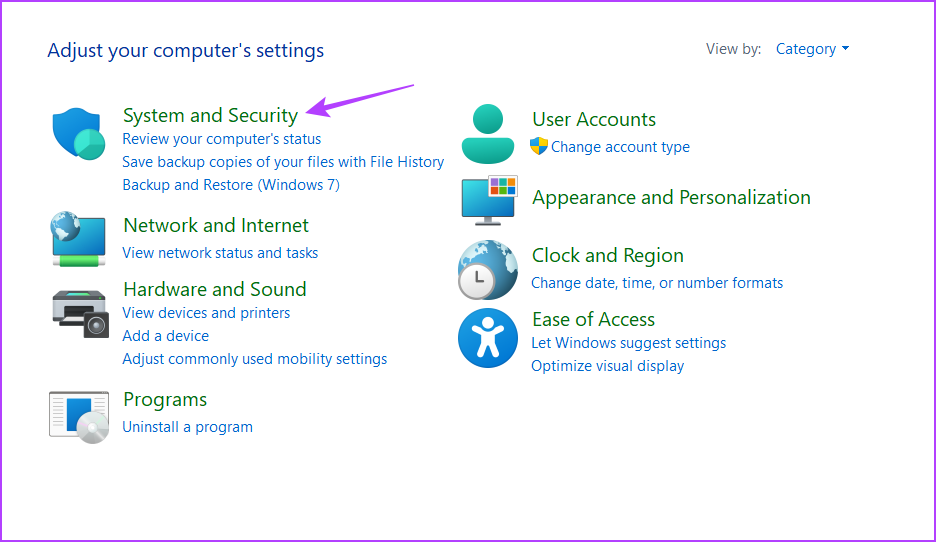
Step 1: Press the Windows key to open the Start Menu, type Control Panel in the search bar, and press Enter.

Step 2: Choose System and Security.
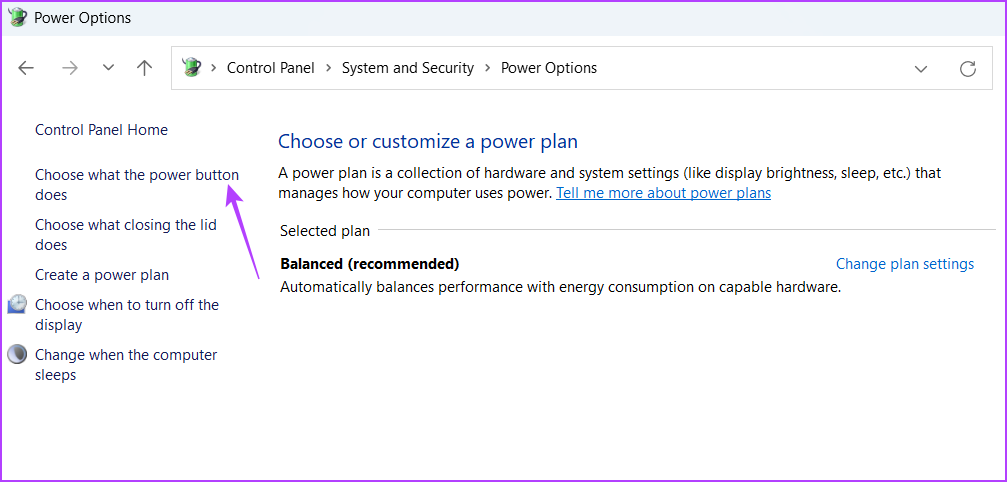
Step 3: Select Power Options.

Step 4: Click the Choose what the power button does option in the left sidebar.
Step 5: Click the Change settings that are currently unavailable option.
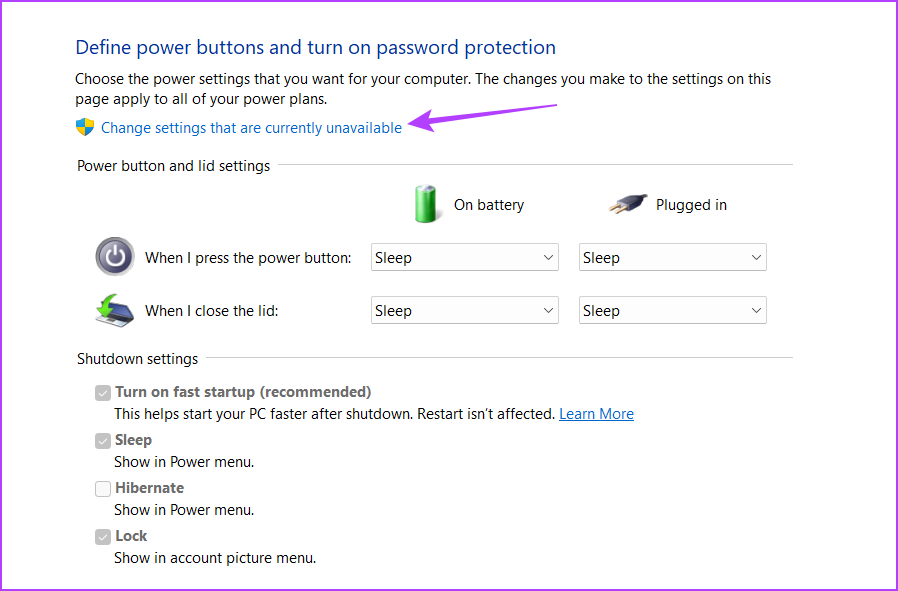
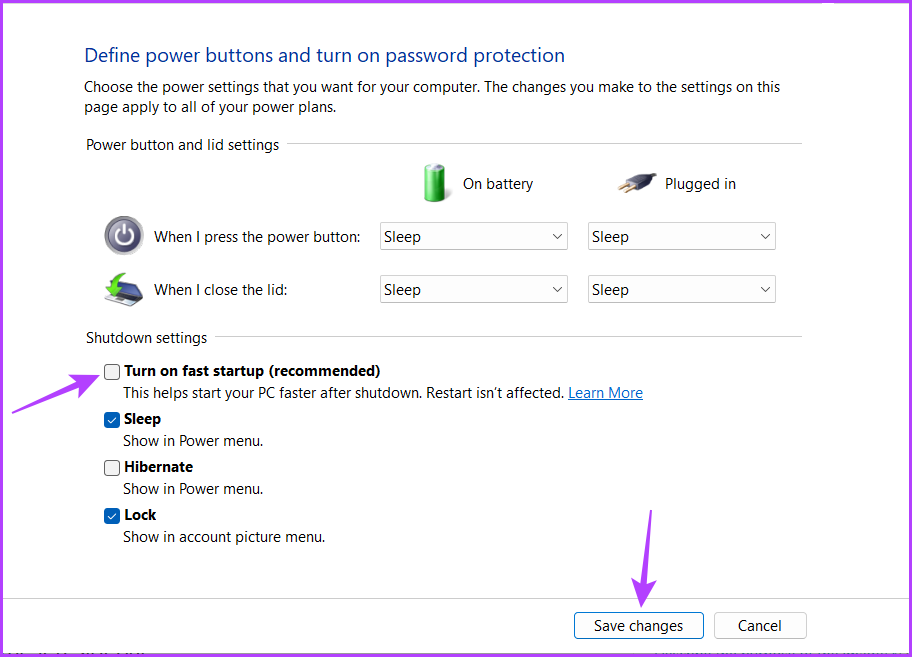
Step 6: Uncheck the Turn on fast startup box. Then, click the Save Changes button.
Fix 3: Choose the Default Operating System in Startup and Recovery
Another quick way to fix the dual boot option not showing on Windows 11 is to configure the default operating system on your computer.
Step 1: Press the Windows + I keyboard shortcut to launch the Settings app.
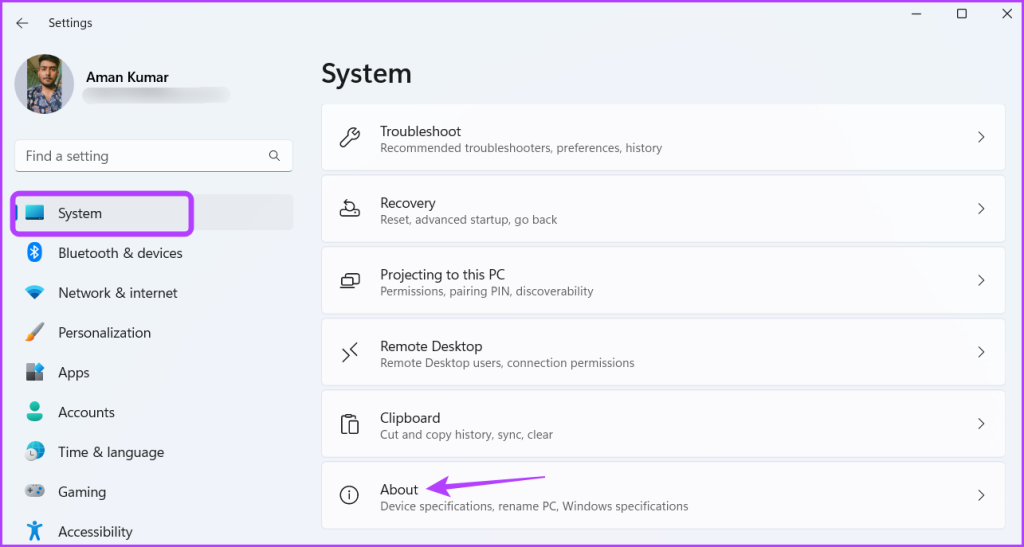
Step 2: Choose System from the left sidebar and click the About option in the right pane.
Step 3: Click the Advanced system settings option in the right pane.

Step 4: In the Advanced tab, click the Settings button under Startup and Recovery.

Step 5: Select the default OS from the Default operating system drop-down menu. Then, click the OK button.

Fix 4: Enable Boot Disk Partition
To use the second operating system installed on a disk partition, it’s important to enable the partition for the computer to boot from it. If you fail to enable it, the dual boot option will not appear. You can enable the boot disk partition by following the below steps:
Step 1: Press the Windows key to launch the Start Menu, type Command Prompt in the search bar, and choose Run as administrator from the right pane.
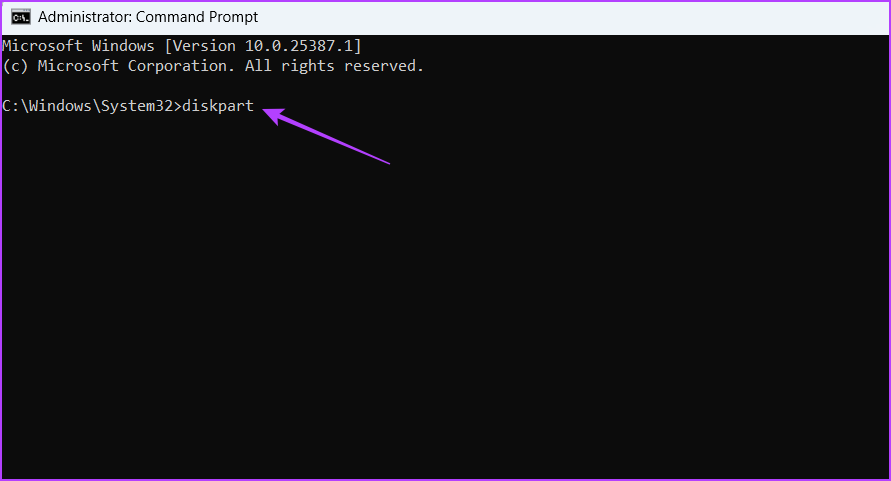
Step 2: Type diskpart into the Command Prompt window and press Enter.
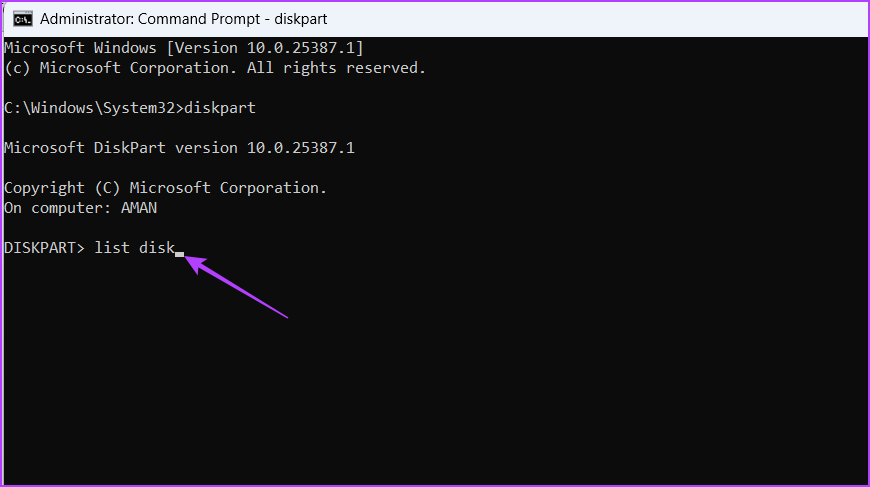
Step 3: Type list disk and press Enter. This will list all the disks on your computer.
Step 4: Type select disk (DiskNumber) and press Enter. Make sure to replace DiskNumber with the actual number of the disk where you’ve installed the second OS.

Step 5: Type list partition and press Enter. This will give a list of all the partitions on the selected disk.
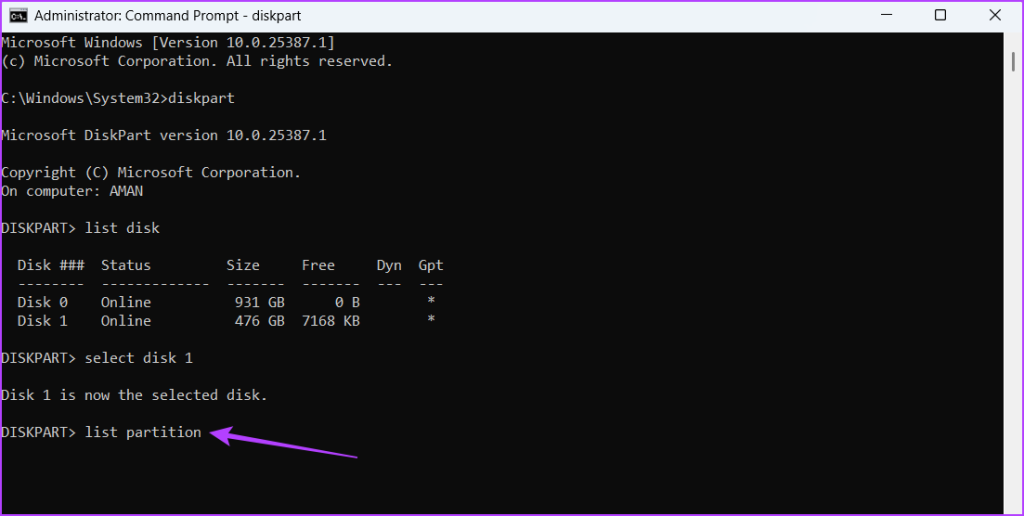
Step 6: To choose the target partition, type select partition (PartitionNumber). Make sure to replace PartitionNumber with the actual number of the target partition.

Step 7: Type Active and press. This will enable the selected partition.

You will see the ‘DiskPart marked the current partition as active’ message when the process completes.
Fix 5: Run SFC and DISM Scan
If the dual boot option is still missing, you can run SFC (System File Checker) and DISM (Deployment Image Servicing and Management) scans. Running these scans will detect and replace corrupt system files that might be causing the issue.
Step 1: Press the Windows key to launch the Start Menu, type Command Prompt in the search bar, and click the Run as administrator option in the right pane.
Step 2: Type sfc /scannow and press Enter. This will run the SFC scan on your computer.
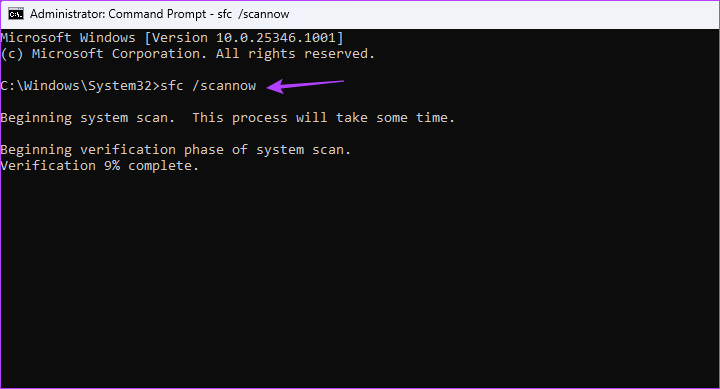
Step 3: Type the following commands one by one and press Enter after each command:
DISM /Online /Cleanup-Image /CheckHealth
DISM /Online /Cleanup-Image /ScanHealth
DISM /Online /Cleanup-Image /RestoreHealth

After the scanning process is complete, restart your computer, and you’ll see the dual boot option.
Was this helpful?
Last updated on 09 August, 2024
Read Next
 How to Perform a Clean Boot in Windows and Why It Matters
What Is Clean Boot on a Windows PC A clean boot in Windows is a troubleshooting technique that helps you identify software conflicts causing issues with your computer.
How to Perform a Clean Boot in Windows and Why It Matters
What Is Clean Boot on a Windows PC A clean boot in Windows is a troubleshooting technique that helps you identify software conflicts causing issues with your computer.
 4 Ways to Fix Android Phone Stuck on Boot Screen
https://youtu.be/JaOC_-u7kdM Try Basic Fixes Perform a force reboot: In most cases, performing a force reboot should resolve any temporary glitches with your OnePlus, Samsung, Motorola, or any other phone, allowing
4 Ways to Fix Android Phone Stuck on Boot Screen
https://youtu.be/JaOC_-u7kdM Try Basic Fixes Perform a force reboot: In most cases, performing a force reboot should resolve any temporary glitches with your OnePlus, Samsung, Motorola, or any other phone, allowing
 9 Cool Tips and Tricks for Dual Monitor Setups on Windows 10
Not too long ago, having a dual monitor setup was considered to be a huge deal.
9 Cool Tips and Tricks for Dual Monitor Setups on Windows 10
Not too long ago, having a dual monitor setup was considered to be a huge deal.
 3 Ways to Fix MIUI Dual Apps Permission Denied Error
Basic Fixes Restart device: Restarting your device can eliminate any bugs causing problems with the Dual Apps feature.
3 Ways to Fix MIUI Dual Apps Permission Denied Error
Basic Fixes Restart device: Restarting your device can eliminate any bugs causing problems with the Dual Apps feature.
 7 Ways to Fix No Wi-Fi Option in Windows 11
Try Basic Fixes Perform a power cycle: Performing a power cycle can help discharge residual power from the capacitor and reset all the temporary configurations.
7 Ways to Fix No Wi-Fi Option in Windows 11
Try Basic Fixes Perform a power cycle: Performing a power cycle can help discharge residual power from the capacitor and reset all the temporary configurations.
 5 Ways to Fix Background Apps Permissions Option Missing on Windows 11
Fix 1: Configure Background App Permissions via Battery Settings You can manage background app permissions in various ways in Windows 11.
5 Ways to Fix Background Apps Permissions Option Missing on Windows 11
Fix 1: Configure Background App Permissions via Battery Settings You can manage background app permissions in various ways in Windows 11.
 6 Ways to Fix Windows Hello Fingerprint Option Unavailable or Not Working
Basic Fixes Restart PC: Restart your PC to fix any temporary bugs and glitches.
6 Ways to Fix Windows Hello Fingerprint Option Unavailable or Not Working
Basic Fixes Restart PC: Restart your PC to fix any temporary bugs and glitches.
 What Is Dual-Frequency GPS and Why Is Apple Using It
What is Dual Frequency Band GPS The turn-by-turn directions on your navigation app are a result of a GPS signal received from a satellite.
What Is Dual-Frequency GPS and Why Is Apple Using It
What is Dual Frequency Band GPS The turn-by-turn directions on your navigation app are a result of a GPS signal received from a satellite.
The article above may contain affiliate links which help support Guiding Tech. The content remains unbiased and authentic and will never affect our editorial integrity.