Method 1: Disable Fast Startup Using Control Panel
Using the Control Panel is an old-school way of making changes to your Windows computer. Here’s how to use it to disable fast startup on Windows.
Step 1: Click the search icon on the taskbar, type control panel, and select the first result that appears.

Step 2: Use the drop-down menu at the top right corner to change the view type to large icons. Then, go to Power Options.

Step 3: Click the Choose what the power buttons do option in the left pane.

Step 4: Click on Change settings that are currently unavailable.

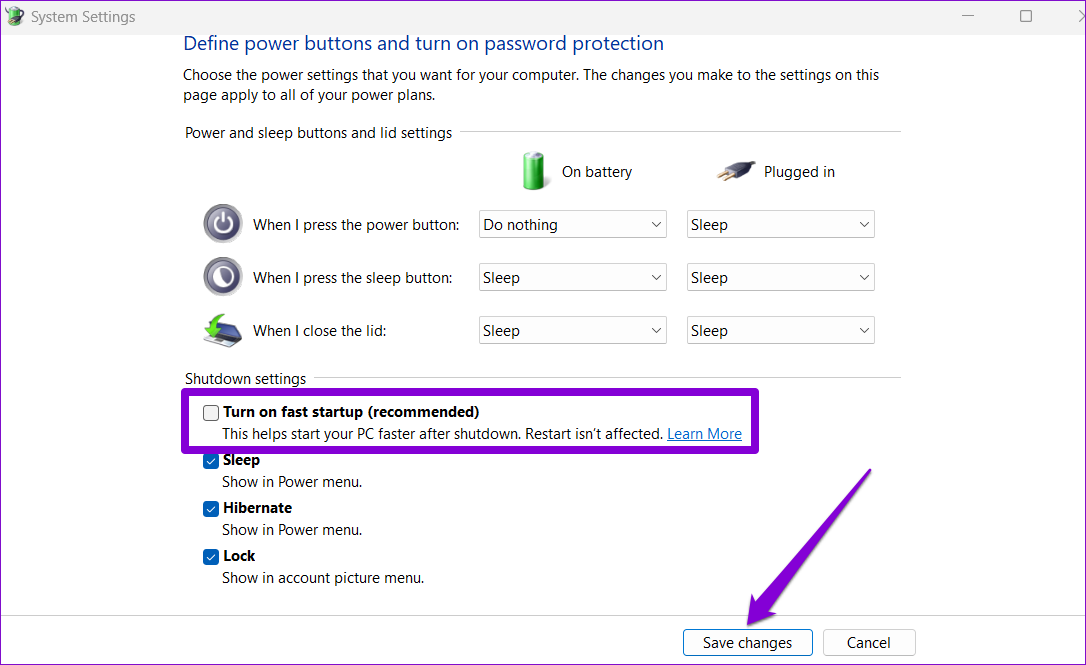
Step 5: Uncheck the Turn on fast startup (recommended) option and click Save changes.
Method 2: Disable Fast Startup via Command Prompt
Command Prompt is a powerful tool that allows you to run scripts, repair system files, and perform advanced administrative tasks. You can also use it to change your PC’s power plan or disable the fast startup feature. Here’s how.
Step 1: Right-click on the Start icon > select Terminal (Admin) from the list.

Step 2: In the console, run the following command and press Enter:
Powercfg -h off

Once you run the above command, the fast startup feature will be disabled.
Method 3: Turn Off Fast Startup From the Group Policy Editor
You can also change the Group Policy settings to disable the fast startup feature on Windows 11. However, you can only use this method using the Windows Professional, Education, or Enterprise editions.
Step 1: Press the Windows key + R to launch the Run dialog box. Type gpedit.msc in the Open field and press Enter.
Step 2: In the Local Group Policy Editor window, use the left pane to navigate to Computer Configuration > Administrative Templates > System > Shutdown.

Step 3: Double-click the Require use of fast startup policy on your right.

Step 4: Select Disabled > hit Apply, followed by OK.

Method 4: Disable Fast Startup From the Registry Editor
Another way to disable fast startup on Windows is via the Registry Editor. Since this method is risky, you should only use it if none of the other methods work.
Step 1: Press the Windows key + S to open the search menu. Type registry editor in the box and select Run as administrator.
Step 2: In the Registry Editor window, use the address bar at the top to navigate to the following key:
HKEY_LOCAL_MACHINE\SYSTEM\CurrentControlSet\Control\Session Manager\Power

Step 3: Within the Power key, locate the HiberbootEnabled entry. Double-click on it and change its value to 0 (zero). Then, click on OK.

Exit the Registry Editor and restart your PC to apply the changes. If you wish to re-enable fast startup at any point, follow the same steps above and change the Value data for HiberbootEnabled DWORD to 1.
FAQs
Enabling fast startup does not inherently damage SSDs, and leaving it enabled does not negatively impact their lifespan or performance.
No, fast startup is not dangerous for any computer.
Was this helpful?
Last updated on 25 April, 2024
Read Next
 4 Ways to Enable or Disable Num Lock at Windows Startup
Method 1: Disable Fast Startup Step 1: Click the search icon on the taskbar, type control panel, and press Enter.
4 Ways to Enable or Disable Num Lock at Windows Startup
Method 1: Disable Fast Startup Step 1: Click the search icon on the taskbar, type control panel, and press Enter.
 3 Ways to Open a Web Page at Startup in Windows 10 and 11
Method 1: Use the Startup Folder The Startup folder on Windows is designed to launch programs when your computer boots up.
3 Ways to Open a Web Page at Startup in Windows 10 and 11
Method 1: Use the Startup Folder The Startup folder on Windows is designed to launch programs when your computer boots up.
 5 Ways to Fix Startup Programs Not Launching on Windows 10 or 11
Try Basic Fixes Install Windows updates: A buggy or outdated Windows build could cause such issues.
5 Ways to Fix Startup Programs Not Launching on Windows 10 or 11
Try Basic Fixes Install Windows updates: A buggy or outdated Windows build could cause such issues.
 5 Ways to Fix Slow Startup Times on Windows 10 and 11
Basic Fixes Install Windows Updates: Microsoft regularly releases updates that bring security patches, new features, and performance improvements to your Windows PC.
5 Ways to Fix Slow Startup Times on Windows 10 and 11
Basic Fixes Install Windows Updates: Microsoft regularly releases updates that bring security patches, new features, and performance improvements to your Windows PC.
 2 Ways to Fix Discord Black Screen at Startup on Windows 11
Basic Fixes Check the Discord server: Head to the Discord Status page to check an active service outage.
2 Ways to Fix Discord Black Screen at Startup on Windows 11
Basic Fixes Check the Discord server: Head to the Discord Status page to check an active service outage.
 4 Ways to Stop Apps From Opening at Startup in Windows 11
Method 1: Remove Startup Programs via Windows Settings Probably the easiest way to disable or manage startup apps in Windows 11 is via the Settings app.
4 Ways to Stop Apps From Opening at Startup in Windows 11
Method 1: Remove Startup Programs via Windows Settings Probably the easiest way to disable or manage startup apps in Windows 11 is via the Settings app.
 4 Ways to Run Apps at Startup on Windows 11
Method 1: Modify In-App Settings Probably the simplest way to run an app at startup is by tweaking its in-app settings.
4 Ways to Run Apps at Startup on Windows 11
Method 1: Modify In-App Settings Probably the simplest way to run an app at startup is by tweaking its in-app settings.
 4 Ways to Fix OneDrive Not Opening on Startup in Windows 11
Fix 1: Enable OneDrive as a Startup App Windows 11 provides several options for running apps at startup.
4 Ways to Fix OneDrive Not Opening on Startup in Windows 11
Fix 1: Enable OneDrive as a Startup App Windows 11 provides several options for running apps at startup.
The article above may contain affiliate links which help support Guiding Tech. The content remains unbiased and authentic and will never affect our editorial integrity.