Windows 11 should be able to run games that were compatible with everything designed for Windows Vista and later. However, if you want to use some of the really niche titles, here’s how to run older games on Windows 11.
How to Run Older Games on Windows 11 with Compatibility Mode
If the game was designed for Windows (or has a Windows port) for Windows Vista or later, the most recent version of Windows 11 should be able to run it with no issues. However, if you can’t run the applications, you may need to use the compatibility mode.
Step 1. Find the installation files for the game and install the game on your PC.
Step 2. Go to the .exe file for the game and right-click on it.
Step 3. Find the “Compatibility” tab on the top and go to it.
Step 4. Check the “Run this program in compatibility mode for” box, then select the version of Windows the game was designed by.
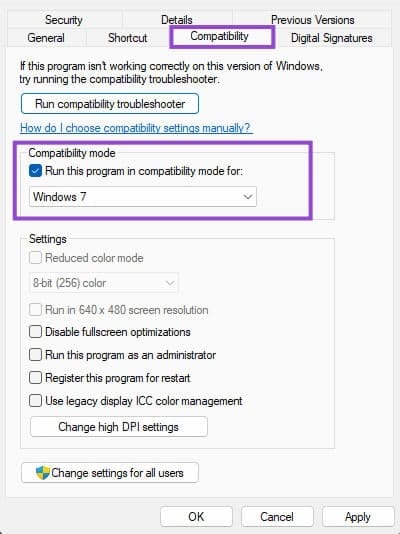
In here, most Windows XP games should run in compatibility mode for Windows Vista or 7. If the game doesn’t start, check some of the other boxes below in the tab and retry. In some cases, you may need to use “Disable fullscreen optimizations” and run the game in windowed mode.
If the game is installed through a game library, such as Steam, the shortcut you see on the Desktop won’t have the option. You’ll need to go to the installation folder and find the actual .exe file to change the settings on.
If the game doesn’t work in compatibility mode (but should still be available for an older version of Windows), you might need to enable legacy components.
Step 5. Go to Settings.
Step 6. In the “System” tab, scroll down and select “Optional features.”
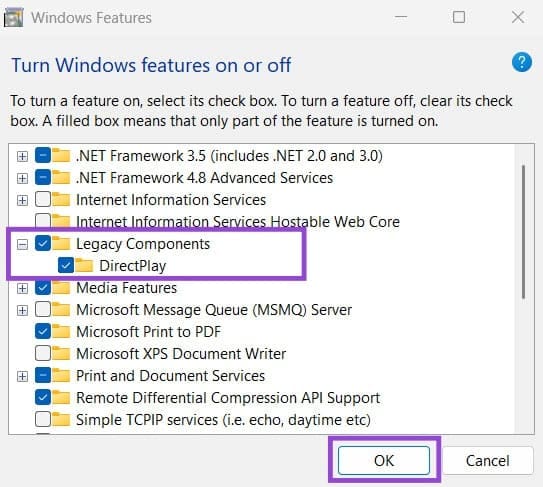
Step 7. Click on “More Windows features.”

Step 8. Expand the option “Legacy components” and check both it and “DirectPlay.”
Step 9. Click on “OK.”
How to Play Older Games on Windows 11 Using an Emulator
An emulator provides a virtual version of a system that should be able to run games that were natively designed for it.
Unfortunately, most console emulators for the PC end up with one issue or another. Depending on which game you want to play, you may need to search for a specific emulator that has been shown to have minimal or no problems running it.
For Windows XP games, you can use VMWare to run a virtual version of Windows XP on your system. VMWare comes with the benefit of not needing specialized software and being free to use for Windows versions. DOS games can use DOSBox.
In order to use a virtual system, you’ll need:
- A downloaded ISO file for the system you want to install.
- BIOS enabled for virtualization (this setting will depend on the motherboard model, including “Intel VT-x”, “AMD-V” or “SVM.”)
You can check virtualization in the Task Manager.
Step 1. Open Task Manager and go to the Performance tab.
Step 2. Click on “CPU” and check if the “Virtualization” option is set to “Enabled.” If not, you’ll need to enter BIOS and turn it on.
Was this helpful?
Last updated on 11 February, 2026
Read Next
 How to Convert Normal Photos to Portrait on iPhone 15 and Older Models
Add Portrait Mode to an Existing Photo on iPhone 15 Series Both the A17 Pro and the A16 Bionic have a neural engine and an image-sensing processor that help run
How to Convert Normal Photos to Portrait on iPhone 15 and Older Models
Add Portrait Mode to an Existing Photo on iPhone 15 Series Both the A17 Pro and the A16 Bionic have a neural engine and an image-sensing processor that help run
 How to Update Epic Games Launcher and Its Games on Windows
How to Check and Update Epic Games Launcher Epic Games Launcher auto-updates along with its games.
How to Update Epic Games Launcher and Its Games on Windows
How to Check and Update Epic Games Launcher Epic Games Launcher auto-updates along with its games.
 How to Fix Epic Games Library Not Showing Games
Basic Fixes: Refresh Epic Games launcher library: A quick refresh can help fix any glitches keeping you from accessing your Epic Games Library.
How to Fix Epic Games Library Not Showing Games
Basic Fixes: Refresh Epic Games launcher library: A quick refresh can help fix any glitches keeping you from accessing your Epic Games Library.
 How to Uninstall Epic Games Launcher and Its Games
Things to Consider Before Uninstalling Games or Epic Games Launcher Before uninstalling Epic Games Launcher or the games in it, consider the following things: Backup game files: If you have
How to Uninstall Epic Games Launcher and Its Games
Things to Consider Before Uninstalling Games or Epic Games Launcher Before uninstalling Epic Games Launcher or the games in it, consider the following things: Backup game files: If you have
 3 Ways to Run Old Programs in Compatibility Mode on Windows 11
Method 1: Modify Program Properties You can configure a program to run in compatibility mode by modifying its properties.
3 Ways to Run Old Programs in Compatibility Mode on Windows 11
Method 1: Modify Program Properties You can configure a program to run in compatibility mode by modifying its properties.
 3 Ways to Run CHKDSK Utility to Repair Disk Errors on Windows 11
Method 1: Run Check Disk Utility From File Explorer File Explorer provides an easy way to run the Check Disk Utility on your selected system drive to repair its errors.
3 Ways to Run CHKDSK Utility to Repair Disk Errors on Windows 11
Method 1: Run Check Disk Utility From File Explorer File Explorer provides an easy way to run the Check Disk Utility on your selected system drive to repair its errors.
 4 Ways to Fix “This App Can’t Run on Your PC” Error in Windows 11
https://youtu.be/7WuW8HnSp9Q Try Basic Fixes Launch the app as an administrator: If an app lacks the necessary permissions to work on your computer, it could fail to launch and trigger the
4 Ways to Fix “This App Can’t Run on Your PC” Error in Windows 11
https://youtu.be/7WuW8HnSp9Q Try Basic Fixes Launch the app as an administrator: If an app lacks the necessary permissions to work on your computer, it could fail to launch and trigger the
 6 Ways to Run PowerShell as Administrator in Windows 11
Method 1.
6 Ways to Run PowerShell as Administrator in Windows 11
Method 1.
The article above may contain affiliate links which help support Guiding Tech. The content remains unbiased and authentic and will never affect our editorial integrity.