Your Steam Deck is a powerful handheld gaming PC, but like any computer, it can accumulate glitches and performance issues over time. If you find your experience sluggish or buggy or want a fresh start with your Steam Deck, a factory reset might be the solution. A factory reset, also known as a hard reset, erases all your data and settings, restoring your Steam Deck to its factory settings.
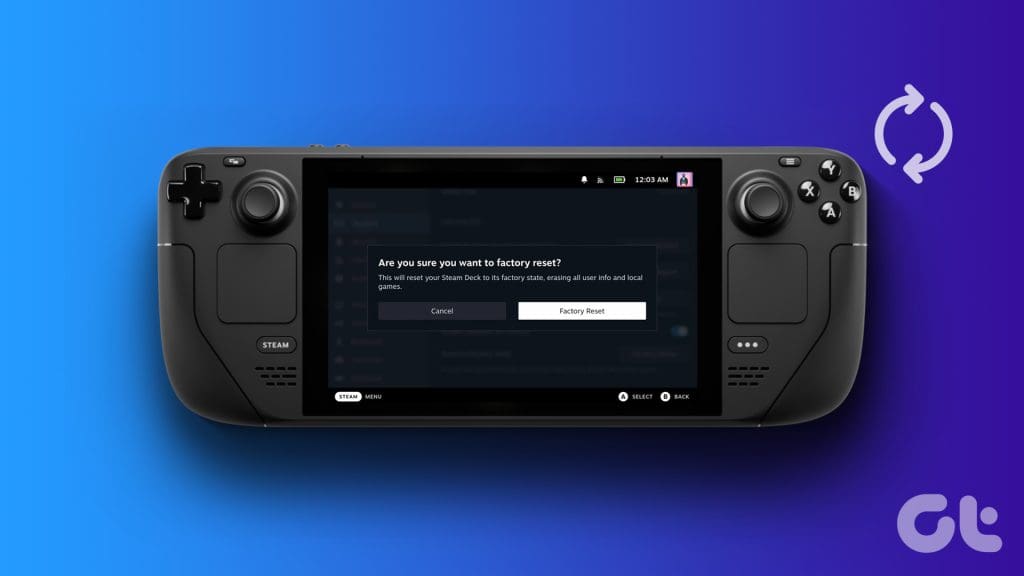
But before you dive in, it’s important to understand what it entails and how to do it safely. This guide will answer your questions and walk you through the process step-by-step. We’ll first help you understand what a factory reset will do to your Steam Deck and then how to do it via different methods. So, let’s get started.
What to Expect When You Factory Reset Your Steam Deck
Before we dive into the nitty-gritty, let’s understand the basics. A factory reset on your Steam Deck essentially takes it back to its original state, wiping out any customizations or changes you’ve made. This will remove your data and files, including saved files, downloaded games, screenshots, and any other files you’ve stored on the internal storage. After a factory reset, you’d have to re-download and install everything you want to use again.
Does a Factory Reset Wipe Out All My Games and Apps
Yes, a factory reset deletes all installed games and apps, including their saved files. As such, ensure to back up any important saves before proceeding.
Does a Factory Reset Update the Steam Deck’s Firmware
No, a factory reset doesn’t update the Steam Deck’s firmware. However, it provides a clean slate, making it an excellent time to ensure your system is running the latest update. To update the firmware, you’ll need to do it manually through the Steam Deck settings.
How Long Does a Factory Reset Take to Complete
The factory reset process usually takes around 10-15 minutes. However, it might take longer depending on the amount of data you have stored on your Steam Deck. That being said, it can take longer if your data is on an eMMC drive instead of a faster SSD on the Steam Deck.
Can You Abort a Factory Reset Mid-Flight
Unfortunately, no. Once you initiate the factory reset process, you cannot cancel it. Ensure you’re sure you want to proceed before starting.
Does Factory Resetting a Steam Deck Fix All Issues
A factory reset can fix many software-related issues but might not solve hardware problems. If you’re experiencing hardware issues, such as a faulty battery or screen, you’ll need to contact Steam Support.
Factory Reset Risks: What You Need to Know
Generally, there are no significant risks involved here. However, ensure that your data is backed up. Double-check before initiating the reset to avoid any heartaches later on.
Can I Perform a Factory Reset Without Internet
Yes, you can perform a factory reset without an internet connection. Both methods outlined in this guide work offline. That being said, having an internet connection is needed for updates and verification while setting up the Steam Deck post the factory reset.
Method 1: Factory Reset using Steam Deck Settings
Now that you’re aware of everything, let’s get to business. Essentially, there are two ways to factory reset the Steam Deck, with the first being super simple. Valve offers a simple menu inside the Steam Deck’s settings, allowing you to reset your Steam Deck easily in a couple of steps. Here’s how to do that.
Step 1: Ensure you’re inside the Gaming Mode. Here, press the Steam button on your Steam Deck and select Settings.
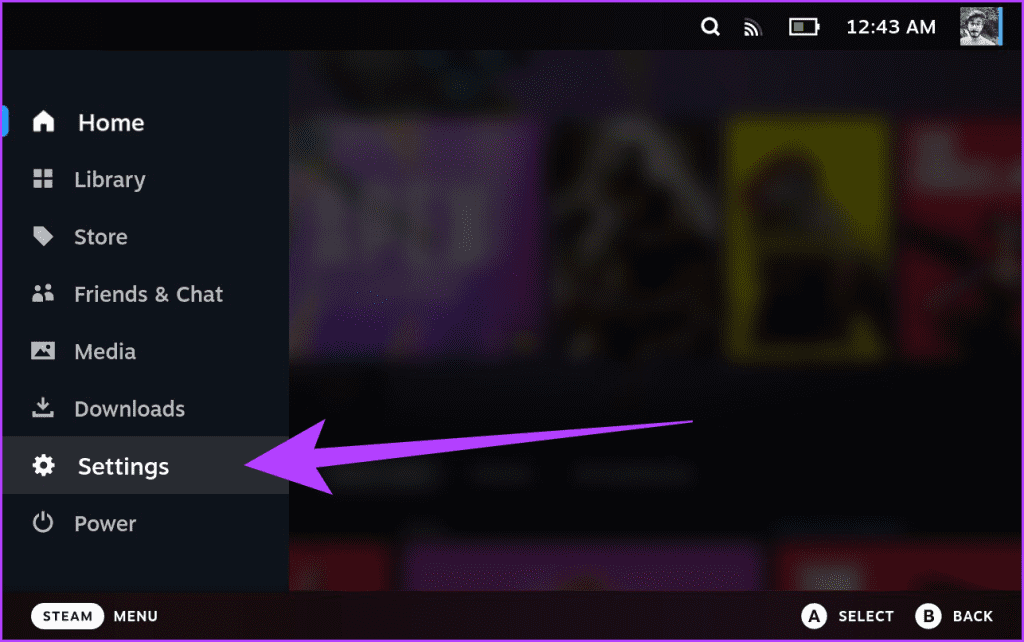
Step 2: Inside Settings, navigate to System Settings on the left pane. Now, scroll down to the Advanced section on the right side. Here, tap on ‘Factory Reset’ next to ‘Reset to factory state’.

Step 3: You will be presented with a warning screen. Tap on ‘Factory Reset’ again to confirm your decision.
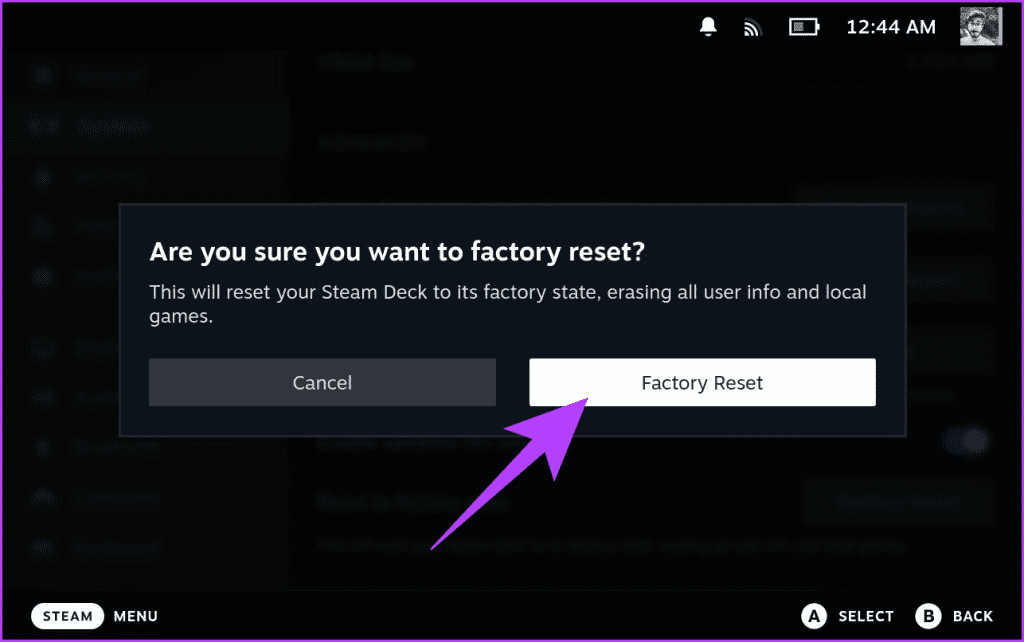
And that’s it. Your Steam Deck will restart and begin the factory reset process. Once finished, you’ll be greeted by the initial setup screen.
Method 2: Factory Reset using Recovery Image
As simple as the previous method is, there might be instances where it doesn’t fix the issues on your Deck. Your handheld might not be booting properly, or you can’t access the settings. In such a scenario, you can use the recovery image to reinstall SteamOS on your Steam Deck.
Alternatively, it’s also possible that you have a different OS installed on your Steam Deck and now want to reset Steam Deck before selling it to someone else. Either way, using a recovery image is a tedious but sure-shot way to factory reset your Steam Deck.
For this method, you’ll need a USB pen drive and a PC or Mac. You’ll be creating a bootable drive to install SteamOS on your console. Think of it as how you install Windows on a laptop, except that you’ll be installing SteamOS on your Steam Deck. So, let’s get to it.
Step 1: Download the SteamOS recovery image provided by Valve on your PC or Mac device. Download it from the link below and not from third-party websites.
Step 2: Now, it’s time to create a bootable USB disk. For that, first, insert the USB drive into your PC or Mac device.
For Windows:
Step 3: Download Rufus on your Windows PC. Once downloaded, launch it.
Step 4: Inside Rufus, set the Device parameter to the USB drive you wish to convert to a bootable disk. Then, for the ‘Boot selection’, click on Select, and select the recovery image file you previously downloaded in Step 1. Once done, click on Start.

Step 5: You will get a warning pop-up, asking if you’re sure. Simply tap on OK to proceed.

Step 6: Rufus will now start to create your bootable USB drive for SteamOS. That’s it.
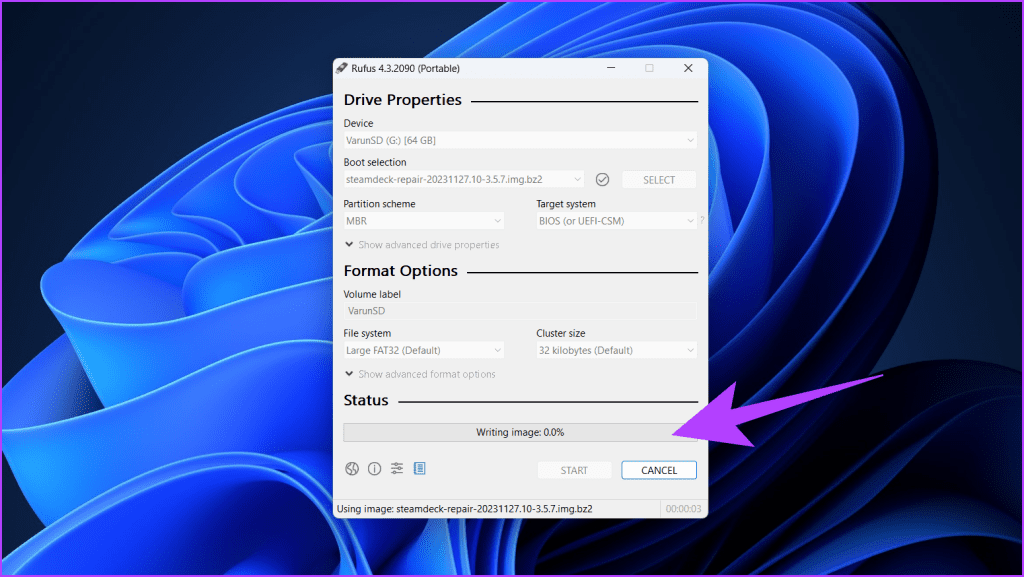
Once the process is complete, Rufus will notify you of the same. Your bootable drive is now ready to use with the Steam Deck.
For macOS or Linux:
Step 3: Download balenaEtcher on your macOS or Linux device. Once done, launch it.
Step 4: Inside the balenaEtcher window, select ‘Flash from file’. From here, select the recovery image you downloaded previously.

Step 5: Now, click on Select target. Select the USB drive you wish to convert to a bootable disk.
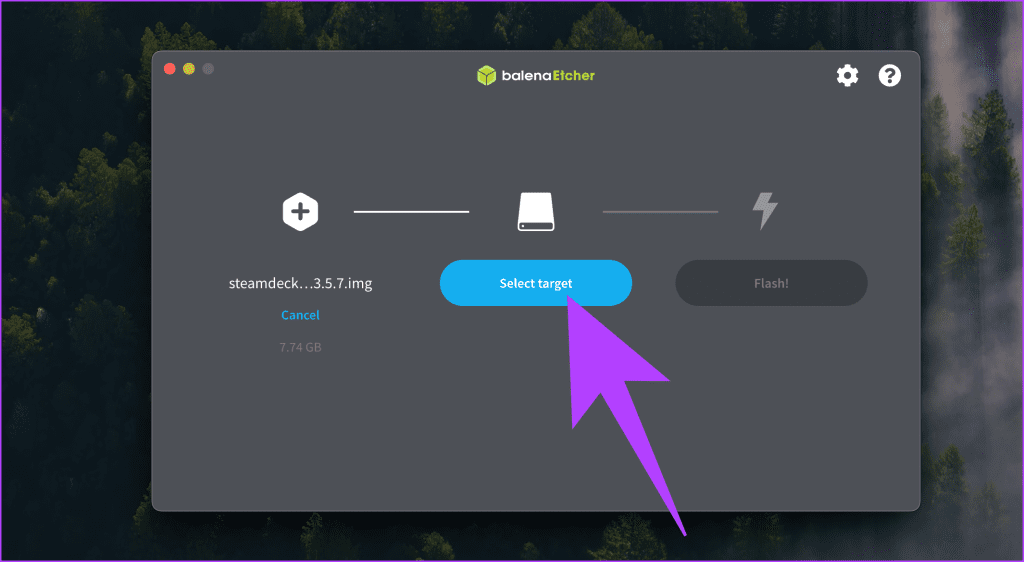
Step 6: Finally, click on Flash. balenaEtcher will create your bootable USB drive for the Steam Deck using the SteamOS recovery image.

You might be prompted to enter your account password to proceed, depending on your OS. Enter your credentials to grant administrator rights required to format the USB drive. Once done, you’ll be notified that your disk is ready for use.
Installing SteamOS on Steam Deck
Step 7: Now that your bootable USB drive with SteamOS recovery image is ready, it’s time to connect it to the Steam Deck. Shut down your Steam Deck from the power settings. Now, connect your USB pen drive to the Steam Deck using a dock or USB hub.
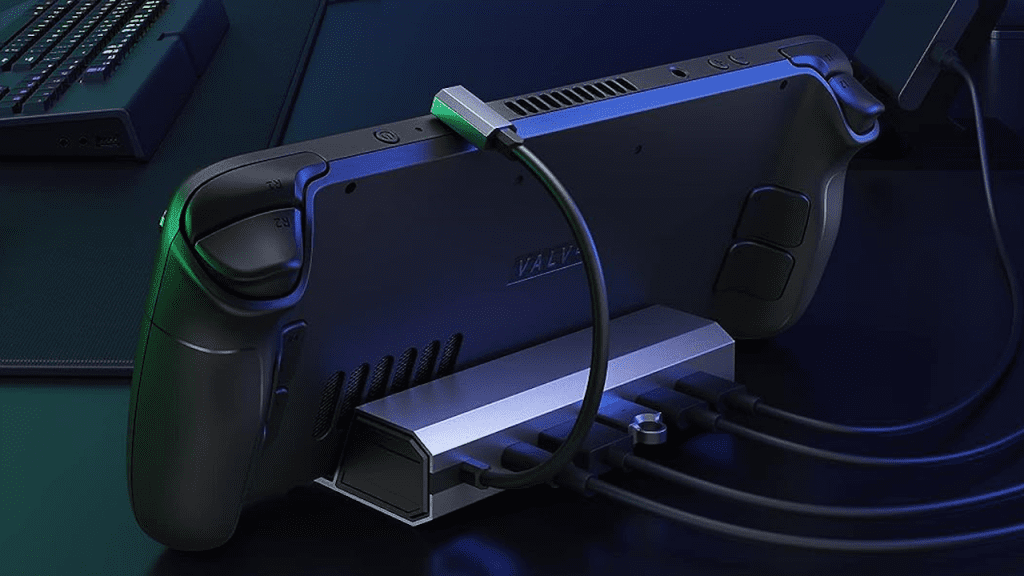
Step 8: With the USB drive connected to your Steam Deck, hold the ‘Volume Down’ and press the Power Button once. When you hear the chime, let go of the Volume Down button, and you’ll be booted into the Boot Manager.
Step 9: Inside the Boot Manager, select the boot from the ‘EFI USB Device’ option. Here, ‘USB Device’ refers to the name of the disk that you created earlier.
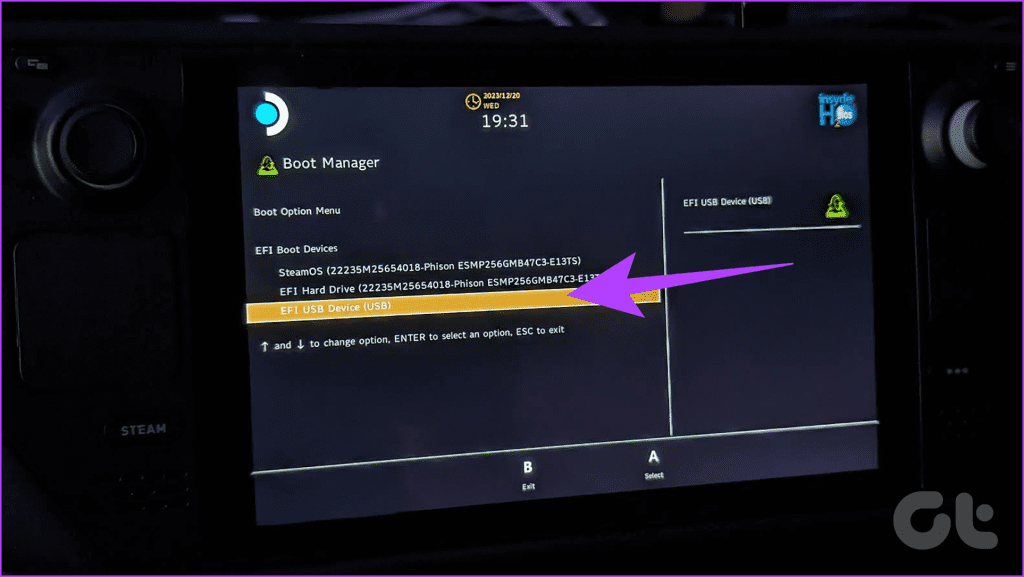
Step 10: Your Steam Deck should now boot into a recovery environment. Here, you can use the trackpad, buttons, and trigger to navigate the different options.
Speaking of which, you’d be greeted with four options – Clear local user data, Re-image Steam Deck, Reinstall Steam OS, and Recovery tools.
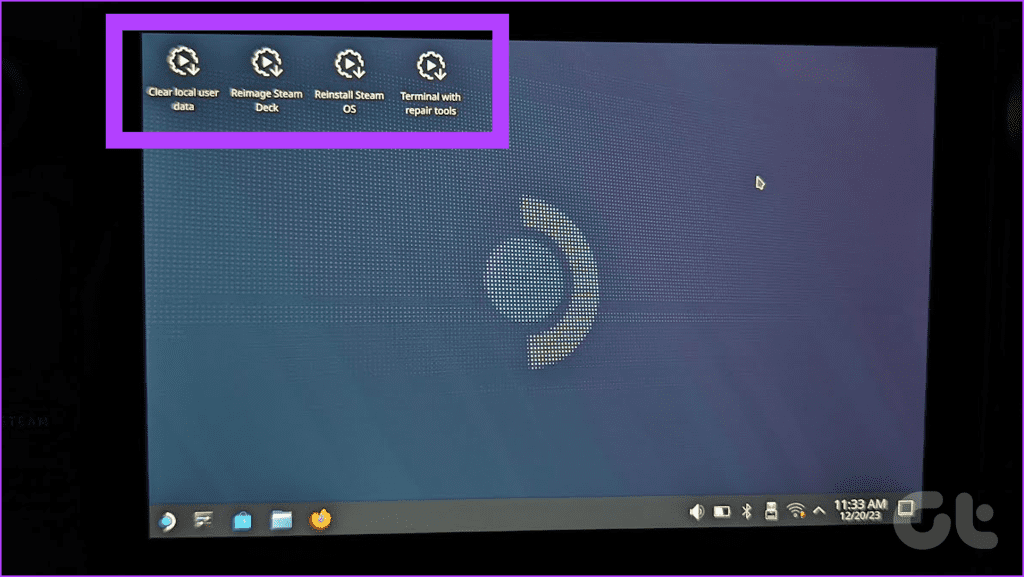
As per Valve, these options hold the following meaning:
- Re-image Steam Deck – This option removes all user info, installed games, applications, and operating systems and replaces them with stock SteamOS. In the simplest words, it does a complete factory reset.
- Clear local user data – Use this option to reformat the home partitions on your Steam Deck. This will remove downloaded games and all personal content stored on this Deck, including system configuration.
- Reinstall SteamOS – This will reinstall SteamOS on the Steam Deck while attempting to preserve your games and personal content.
- Recovery tools – This opens a prompt with the ability to make changes to the Steam Deck boot partition.
Step 10: If you wish to format completely and factory reset your Steam Deck, double-tap to select ‘Re-image Steam Deck’.
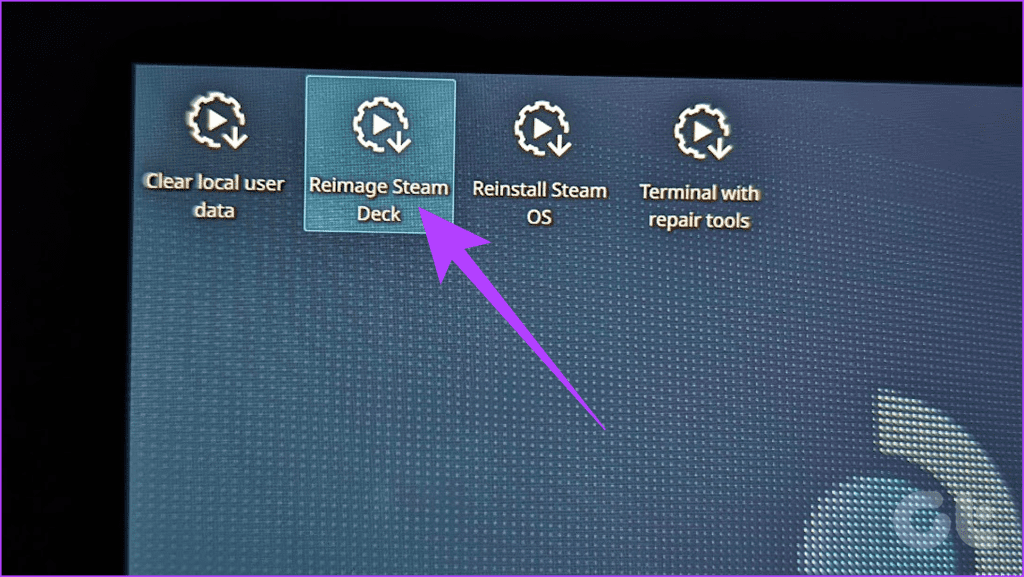
And that’s it. The process will take about 10-15 minutes to fully reset and reinstall the SteamOS on your Steam Deck with the factory settings. Once done, your Deck will automatically reboot, and you can set it up as new.
Reset Your Steam Deck with Ease
Now you have all the information to factory reset your Steam Deck confidently. Remember to back up your important data before you start, and choose the method that best suits your situation.
With a fresh start, your Steam Deck will be ready to tackle any game you throw at it. Remember, once you’ve performed a hard reset on your Steam Deck, you’ll need to actively sign in to your Steam account and re-download any games or apps you had installed.
Was this helpful?
Last updated on 10 January, 2024
Read Next
 3 Ways to Fix Fire TV Stick Remote Not Pairing After Factory Reset
Basic Fixes Replug your Fire TV Stick: Unplug it from the connected device and plug it in again to restart it.
3 Ways to Fix Fire TV Stick Remote Not Pairing After Factory Reset
Basic Fixes Replug your Fire TV Stick: Unplug it from the connected device and plug it in again to restart it.
 5 Ways to Reset Amazon Fire TV Stick to Factory Settings
Method 1: Using Physical Remote For this method, the remote must be paired to your Fire TV Stick.
5 Ways to Reset Amazon Fire TV Stick to Factory Settings
Method 1: Using Physical Remote For this method, the remote must be paired to your Fire TV Stick.
 7 Best Steam Deck Protective Cases That You Can Buy
The Valve Steam Deck has been gaining popularity quickly thanks to its performance.
7 Best Steam Deck Protective Cases That You Can Buy
The Valve Steam Deck has been gaining popularity quickly thanks to its performance.
 How to Watch Movies on Steam Deck
Stream YouTube, Netflix, or Other Websites on Steam Deck Step 1: Ensure your Steam Deck is connected to the Internet.
How to Watch Movies on Steam Deck
Stream YouTube, Netflix, or Other Websites on Steam Deck Step 1: Ensure your Steam Deck is connected to the Internet.
 How to Connect AirPods and Other Bluetooth Accessories to Steam Deck
Put Bluetooth Accessories Into Pairing Mode Before connecting your AirPods or other Bluetooth accessories to the Steam Deck, you must put them into pairing mode.
How to Connect AirPods and Other Bluetooth Accessories to Steam Deck
Put Bluetooth Accessories Into Pairing Mode Before connecting your AirPods or other Bluetooth accessories to the Steam Deck, you must put them into pairing mode.
 How to Check, Calibrate, and Disable the Gyro on Steam Deck
If you're the proud owner of a Steam Deck, you're already well-versed in the joys of portable gaming.
How to Check, Calibrate, and Disable the Gyro on Steam Deck
If you're the proud owner of a Steam Deck, you're already well-versed in the joys of portable gaming.
 How to Optimize Steam Deck’s Performance in Games
Valve's Steam Deck is easily one of the best handheld gaming consoles.
How to Optimize Steam Deck’s Performance in Games
Valve's Steam Deck is easily one of the best handheld gaming consoles.
 How to Install EmuDeck on Steam Deck
Valve's Steam Deck is one of the most powerful handheld gaming consoles on the market, giving you the power of a gaming PC in a portable format.
How to Install EmuDeck on Steam Deck
Valve's Steam Deck is one of the most powerful handheld gaming consoles on the market, giving you the power of a gaming PC in a portable format.
The article above may contain affiliate links which help support Guiding Tech. The content remains unbiased and authentic and will never affect our editorial integrity.