Change Audio Output on Windows Using SoundSwitch
If you need more flexibility and customization options, third-party software like SoundSwitch can help. SoundSwitch is a lightweight application that lets you change your default audio playback device using user-defined hotkeys. Here’s how to use it.
Step 1: Download and install SoundSwitch on your Windows PC.
Step 2: Once installed, launch SoundSwitch from the Start Menu.
Step 3: Select the devices you wish to toggle between once SoundSwitch launches.

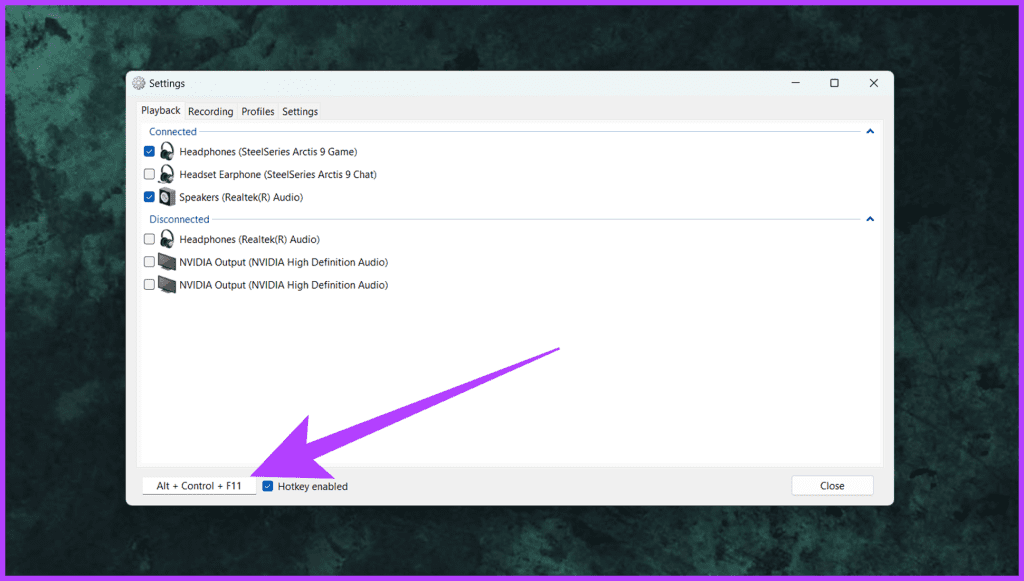
Step 4: Check the box for Hotkey enabled at the bottom. Once done, assign a custom hotkey. You can use the default hotkey, Alt + Control + F11, or anything you prefer.
Step 5: Once done, click on Close to exit.
Step 6: Now, press the Alt + Control + F11 keys together to switch to the audio output device. You’ll see a notification at the top-left corner of your screen indicating the same.
Do More With SoundSwitch
SoundSwitch allows you to quickly switch between audio output devices and perform various other actions. To access them, right-click on the SoundSwitch icon in the system tray and select Settings.
- Now, switch to the Recording tab. Here, set up a custom hotkey for switching the audio input devices and for quickly muting your microphone.

- SoundSwitch lets you switch to a specific output/input device when launching an app. Go to Profiles > click Add > define the activation trigger with an app path > name the profile.

- You can also launch SoundSwitch automatically when your Windows PC boots up. To do this, go to the Settings tab > check the box for Start automatically with Windows.

Was this helpful?
Last updated on 03 June, 2024
Read Next
 How to Change Speed of Audio Playback on Android Devices
The default audio players on Android smartphones cannot change the audio speed or playback.
How to Change Speed of Audio Playback on Android Devices
The default audio players on Android smartphones cannot change the audio speed or playback.
 How to Change WhatsApp Audio Speed on Mobile and Desktop
Change Playback Speed for Audio Messages on WhatsApp WhatsApp allows you to change the playback speed of audio messages in three levels : 1x – 1x means WhatsApp will play
How to Change WhatsApp Audio Speed on Mobile and Desktop
Change Playback Speed for Audio Messages on WhatsApp WhatsApp allows you to change the playback speed of audio messages in three levels : 1x – 1x means WhatsApp will play
 How to Adjust Audio Balance in Windows 10
Have you ever paid careful attention to the sound on a Windows 10 computer and found something was off?
How to Adjust Audio Balance in Windows 10
Have you ever paid careful attention to the sound on a Windows 10 computer and found something was off?
 How to Enable Audio in TeamViewer on Windows 10 (and More Tips)
So the other day, I was troubleshooting an issue on my friend's PC using TeamViewer.
How to Enable Audio in TeamViewer on Windows 10 (and More Tips)
So the other day, I was troubleshooting an issue on my friend's PC using TeamViewer.
 6 Ways to Fix Audio Distortion Issues While Streaming on Windows 11
Fix 1: Reconnect the Audio Device Your first course of action is to disconnect your audio device and reconnect it.
6 Ways to Fix Audio Distortion Issues While Streaming on Windows 11
Fix 1: Reconnect the Audio Device Your first course of action is to disconnect your audio device and reconnect it.
 3 Fixes if GeForce Experience Not Recording Game Audio in Windows 11
Common Fixes Close and restart GeForce Experience - Click the Arrow button in the system tray notifications area and right-click the NVIDIA icon to select Exit.
3 Fixes if GeForce Experience Not Recording Game Audio in Windows 11
Common Fixes Close and restart GeForce Experience - Click the Arrow button in the system tray notifications area and right-click the NVIDIA icon to select Exit.
 5 Fixes for Microsoft PowerPoint Not Playing Audio on Windows
Fix 1: Check the Volume Level in PowerPoint and Windows Your first step is double-checking the volume level in PowerPoint and on your Windows computer.
5 Fixes for Microsoft PowerPoint Not Playing Audio on Windows
Fix 1: Check the Volume Level in PowerPoint and Windows Your first step is double-checking the volume level in PowerPoint and on your Windows computer.
 2 Ways to Record Audio on Windows 11
Method 1: Using the Native Windows Sound Recorder App Microsoft consistently updates Windows to optimize its performance.
2 Ways to Record Audio on Windows 11
Method 1: Using the Native Windows Sound Recorder App Microsoft consistently updates Windows to optimize its performance.
The article above may contain affiliate links which help support Guiding Tech. The content remains unbiased and authentic and will never affect our editorial integrity.

