Method 1. Add Tags to a Microsoft Word Document Using the Save as Function
The Save As function in Microsoft Word allows you to save different document copies using another name or file type. Another less-known and underutilized feature of the Save As function is that users can also add tags to a document through it. Here’s how to use the Save As function to add tags to your Word document.
Step 1: Open the Word document and navigate to File Menu > Save As to launch the File Explorer.
Step 2: Click the Add a tag link in the Save As window.
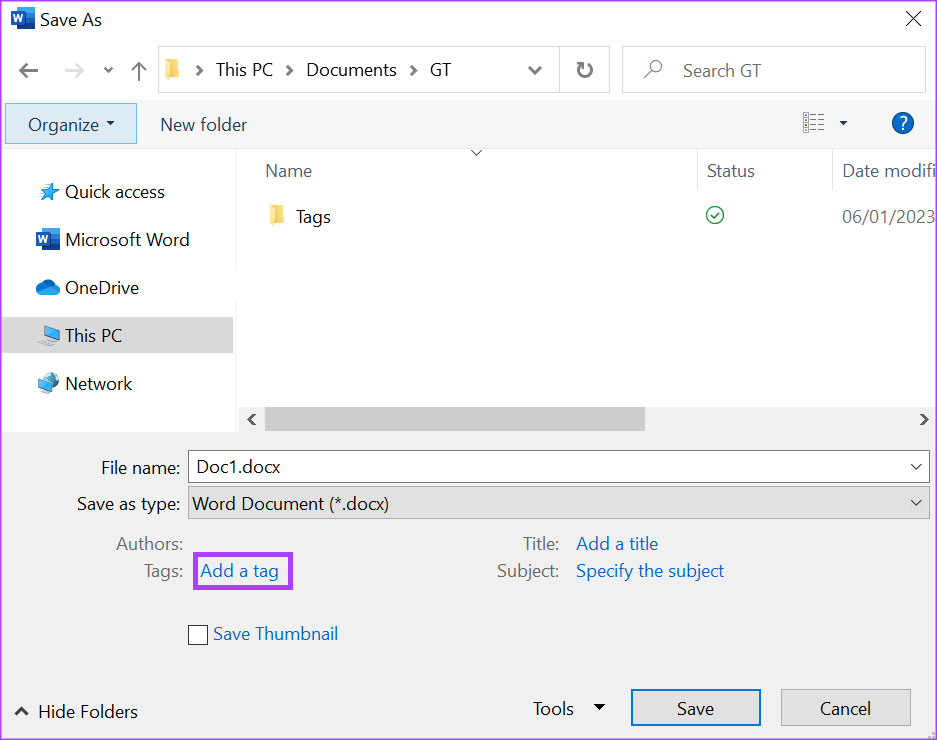
Step 3: Type your preferred tag into the box next to the Tags label. If you have multiple tags to type out, Word should automatically incorporate a semi-colon into the box after each written tag.

Step 4: Click Save after typing out your tags to save all changes.

Method 2. Add Tags to a Microsoft Word Document Using the Info Section
The Word Info section is one of the places to visit to find out information such as the size, author, and word count of a Word document. The Info section can also be used to update the document’s tags. Here’s how to do so.
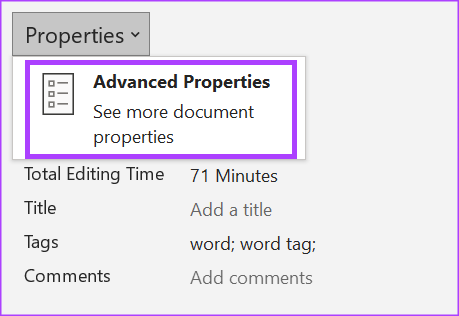
Step 1: In the Word document, Click on File menu > Info.
Step 2: The Properties section will appear on the right. Click the Add a tag option beneath it.

Step 3: Type out your preferred tags into the box shown. Finally, save the file to retain all your new changes.

Method 3. Add Tags to a Microsoft Word Document Using Advanced Properties
Step 1. Go to the Properties section under Info and click the down arrow.

Step 2: Click Advanced Properties from the drop-down to launch a dialog box.
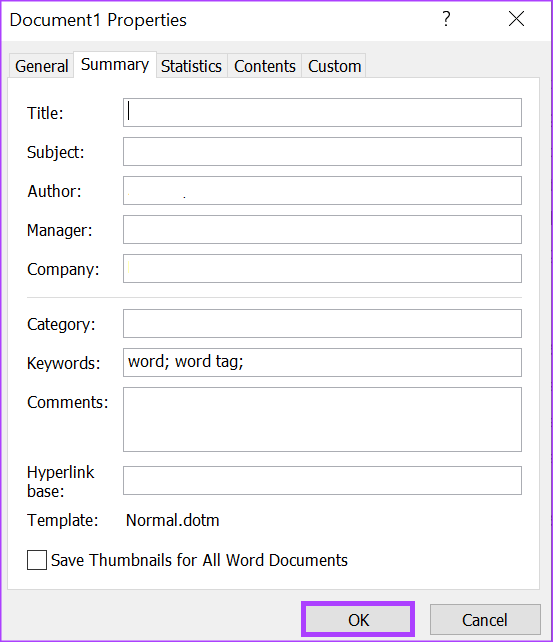
Step 3. In the Document Properties box, click on the Summary tab.

Step 4: Place your cursor inside the Keywords box and type out your preferred tags separated by semicolons.

Step 5: Click OK at the bottom of the dialog box to close it, then save the document to keep the changes.
Was this helpful?
Last updated on 19 July, 2024
Read Next
 How to Add Tags to Files to Find Them Easily in Windows 11
How to Add Tags to a File in Windows 11 There are multiple ways to add tags to a file in Windows 11.
How to Add Tags to Files to Find Them Easily in Windows 11
How to Add Tags to a File in Windows 11 There are multiple ways to add tags to a file in Windows 11.
 A Complete Guide to Using and Managing Tags in Microsoft OneNote
OneNote offers many ways to organize your notes.
A Complete Guide to Using and Managing Tags in Microsoft OneNote
OneNote offers many ways to organize your notes.
 How to Block or Filter Tags on Tumblr
Inarguably, Tumblr ranks right up among the craziest places on the internet.
How to Block or Filter Tags on Tumblr
Inarguably, Tumblr ranks right up among the craziest places on the internet.
 How to Use Reddit Spoiler Tags on Desktop and Mobile Apps
If you're a Reddit user, you've probably discussed your favorite movies or shows extensively with other users on the platform.
How to Use Reddit Spoiler Tags on Desktop and Mobile Apps
If you're a Reddit user, you've probably discussed your favorite movies or shows extensively with other users on the platform.
 Google Docs vs. Microsoft Word Online: Which Word Processor Is Better
Google Docs vs.
Google Docs vs. Microsoft Word Online: Which Word Processor Is Better
Google Docs vs.
 Apple Pages vs Microsoft Word: Which Word Processing Software Is Better
Every major tech company out there is offering their version of the productivity suite.
Apple Pages vs Microsoft Word: Which Word Processing Software Is Better
Every major tech company out there is offering their version of the productivity suite.
 How to Add Page Numbers in Microsoft Word
Add Page Numbers in Word Mobile App If you are on the go and want to add page numbers at the last minute, you can use the Microsoft Office app
How to Add Page Numbers in Microsoft Word
Add Page Numbers in Word Mobile App If you are on the go and want to add page numbers at the last minute, you can use the Microsoft Office app
 How to Add or Edit Document Properties in Microsoft Word
How to Add Custom Properties to a Word Document You can assign numeric, text, or time values to custom properties.
How to Add or Edit Document Properties in Microsoft Word
How to Add Custom Properties to a Word Document You can assign numeric, text, or time values to custom properties.
The article above may contain affiliate links which help support Guiding Tech. The content remains unbiased and authentic and will never affect our editorial integrity.