Basic Fixes
- Enable Mail app notifications: Open Settings > Mail > Notifications > Customize Notifications > enable alerts.
- Check internet connection: To quickly receive notifications from the Mail app, you need a strong internet connection.
- Update or reinstall the Mail app: Update the iOS version to install the latest version of the Mail app.
Fix 1: Enable Fetch New Data for the Mail App
After you sign in to your email account using the Mail app, it will connect with the email server for fetching new emails in the Mail app. The Mail app’s Fetch New Data feature is automatically enabled for your email account. You can verify the same.
Especially for Gmail users, you must choose a time interval of 15 minutes for sending push notifications. Gmail doesn’t allow push notifications for the Mail app on your iPhone.
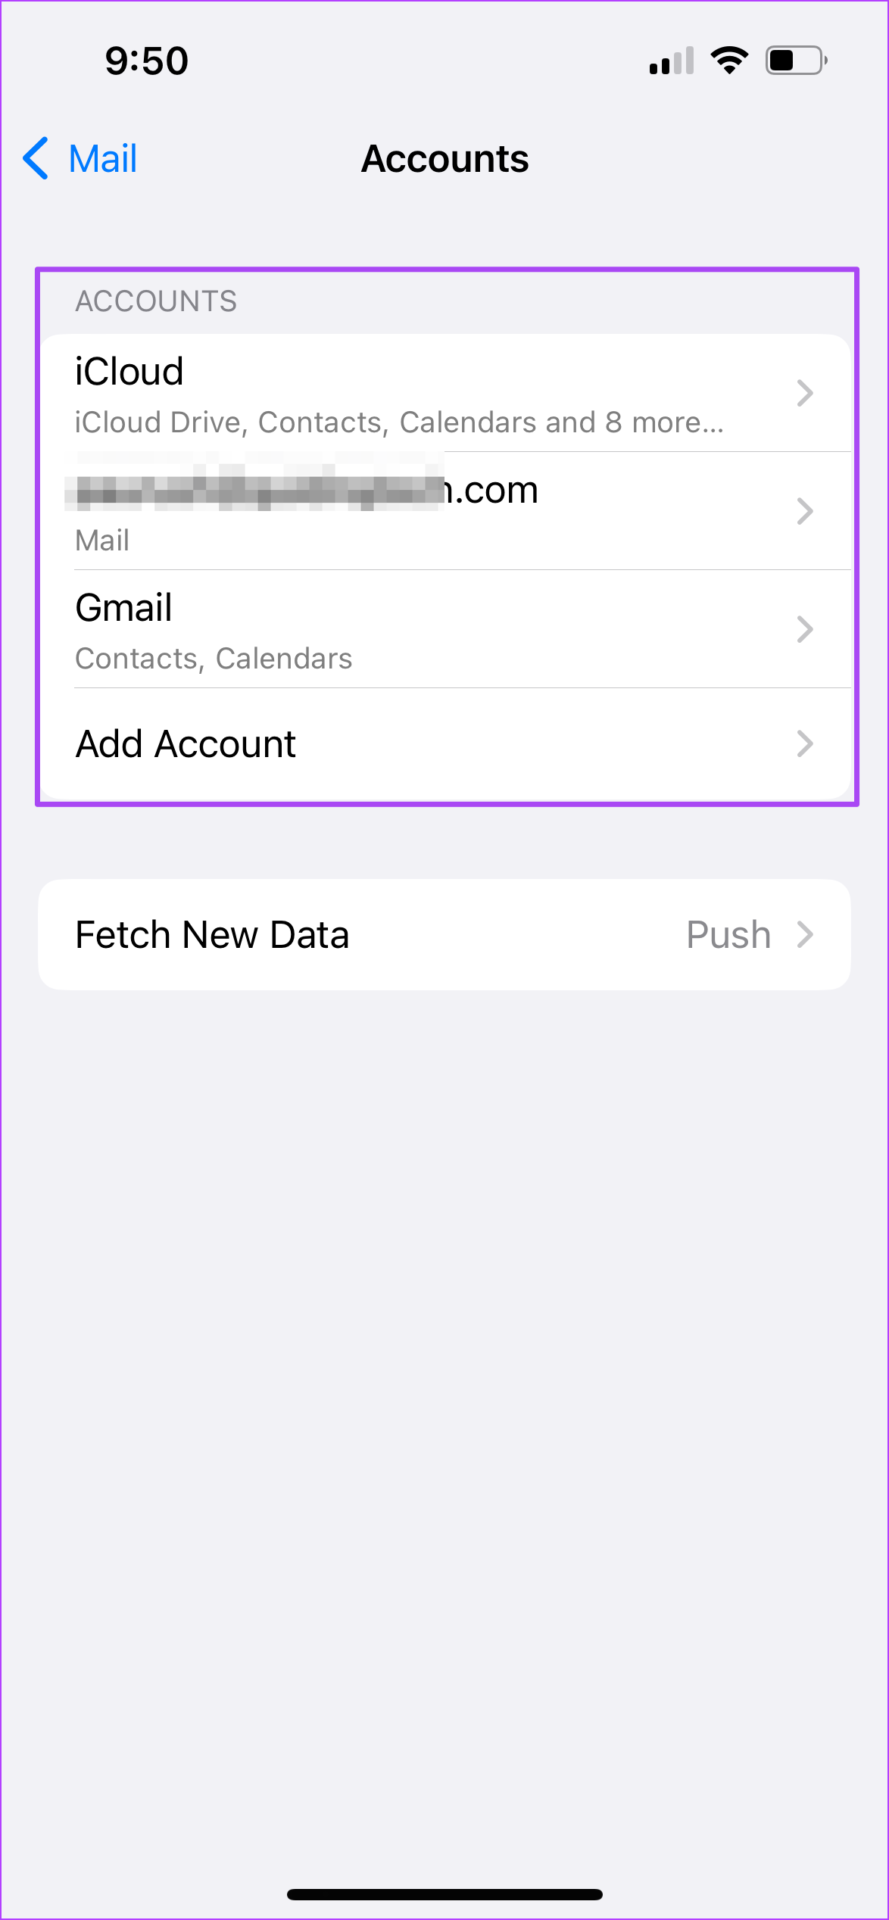
Step 1: Open Settings > Mail > Accounts.
Step 2: Select Fetch New Data.
Step 3: Enable Push at the top. Select your email account for which you are not receiving the notifications.
Step 4: Select Fetch for your email account.
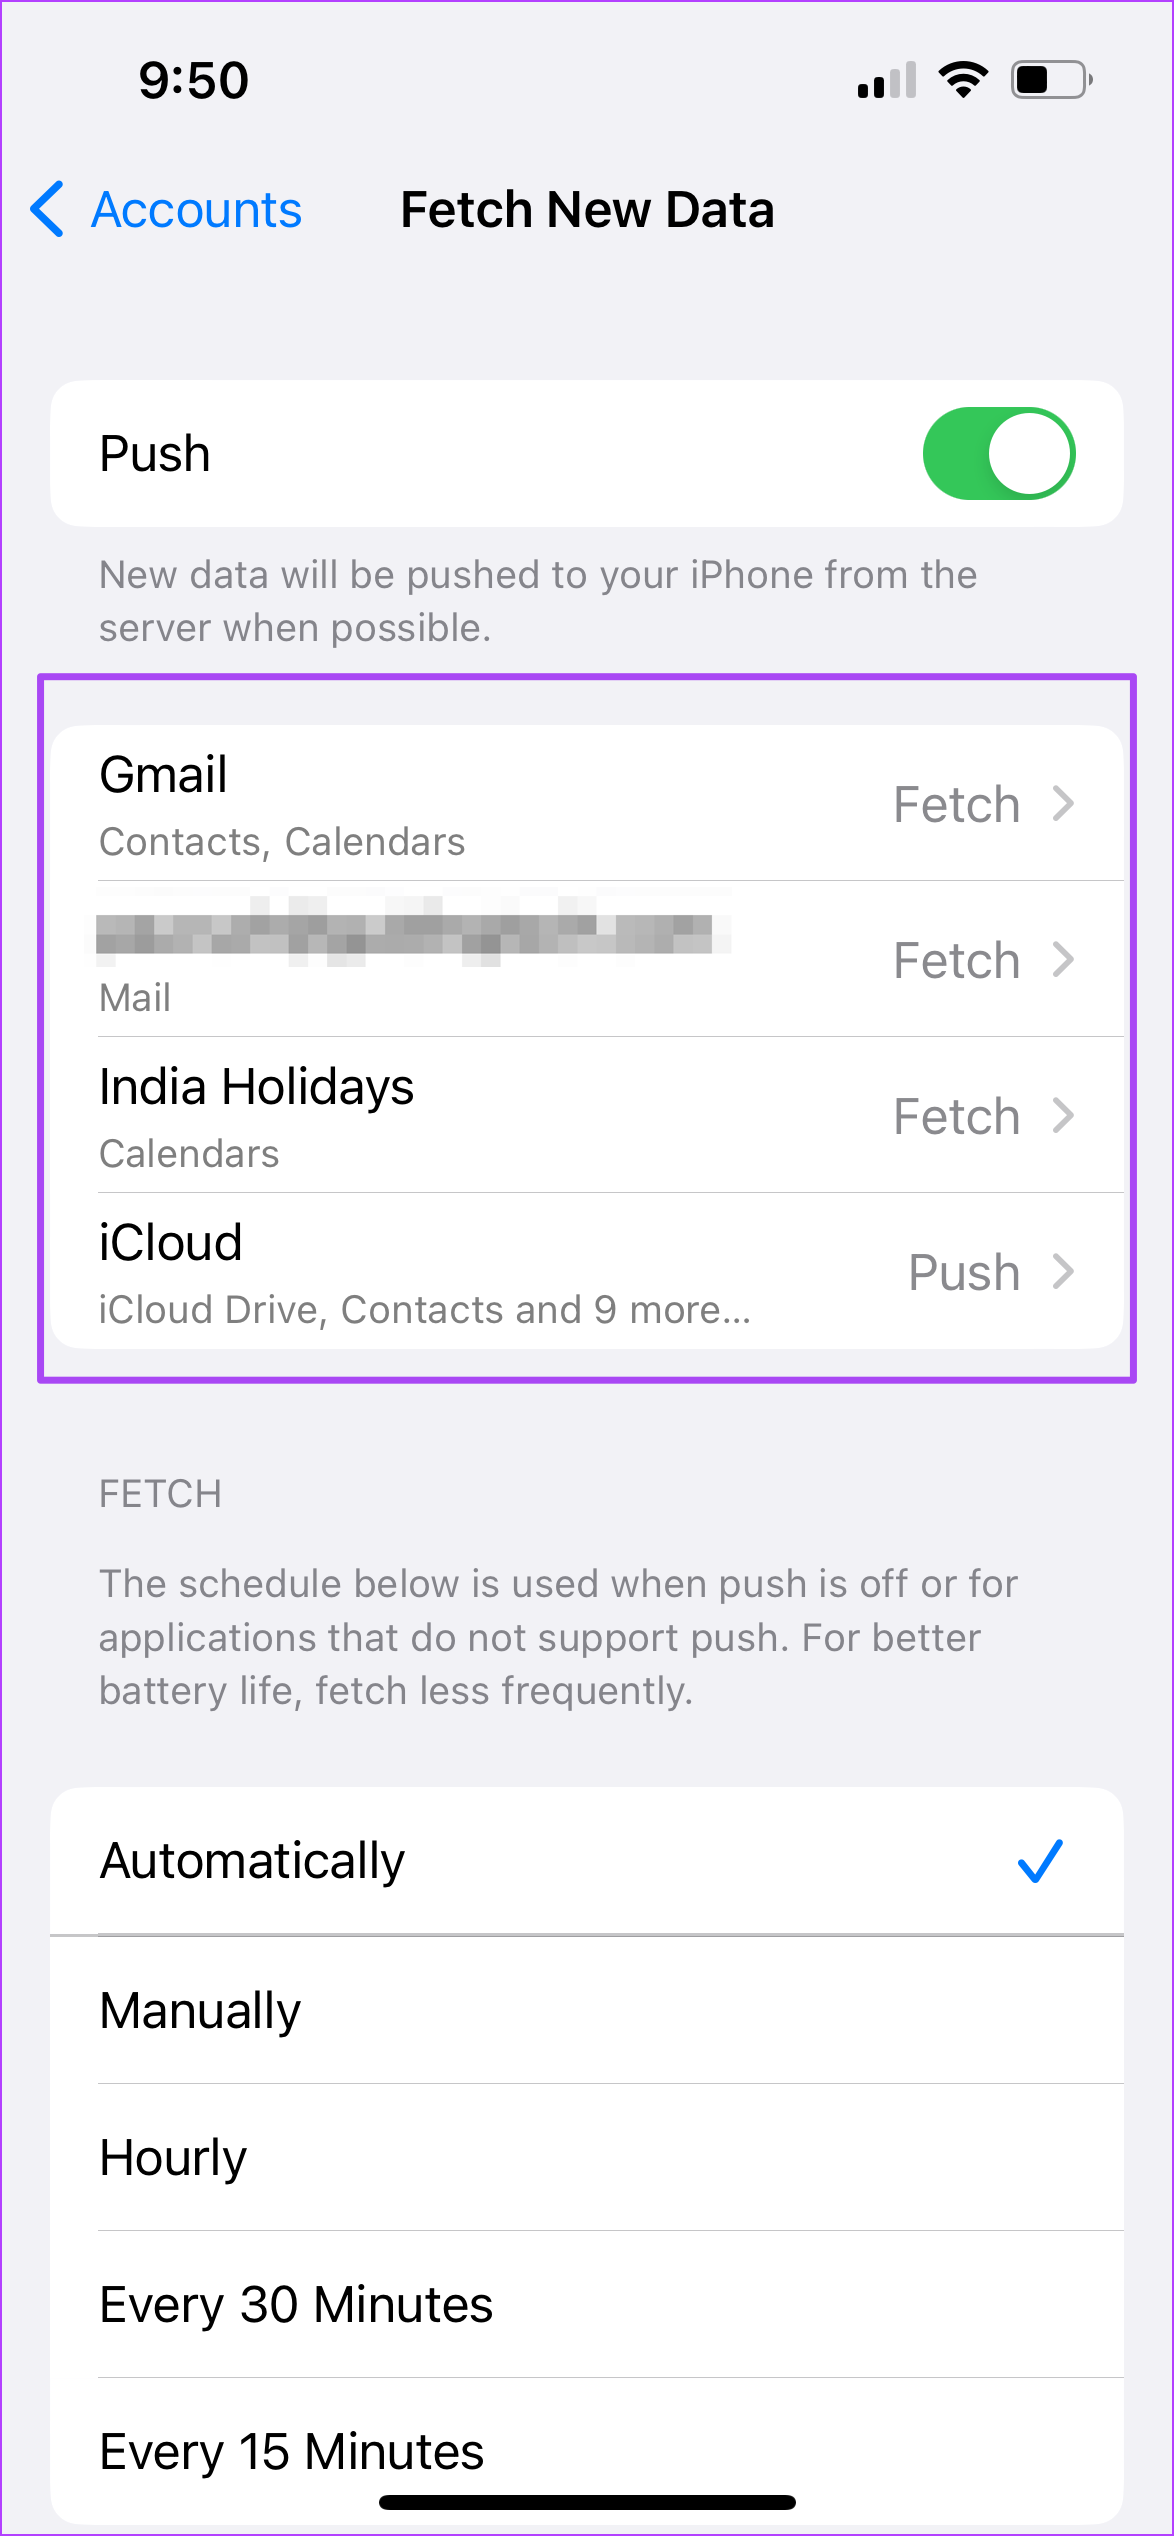

Step 5: Return to the previous screen and ensure that Automatically is selected under the Fetch section. This allows the Mail app to automatically fetch all new emails and notify you about them. For Gmail users, 15 minutes of fetching time is recommended.
Please note that automatic fetching might drain your iPhone’s battery, especially if you use the iOS Public Beta builds.
Fix 2: Re-Enable Your Email Account
You can try re-enabling your email account in the Mail app on your iPhone. Note that it will delete all your emails from your iPhone. However, they will all load once again in the Mail app after enabling your email. Here’s how to do that.
Step 1: Open Settings > Mail > Accounts.
Step 2: Select the email account which you want to re-enable.
Step 3: Turn off the toggle for Mail.
Step 4: Wait for some time and then re-enable the toggle for your email account.

Close the Settings app and launch the Mail app to check if this solves the problem.
Fix 3: Clear the Mail App Cache
You do so by offloading the Mail app from your iPhone. It is like reinstalling the app.
Open Settings > General > iPhone Storage > Mail > Offload App > Reinstall the app.


Tip: You can check out our post suggesting the best ways to fix the Mail app not working on your iPhone.
Was this helpful?
Last updated on 21 August, 2024
2 Comments
Leave a Reply
Read Next
 Outlook App vs Apple Mail: Which Is a Better iOS Mail App
Frankly, there are so many mail apps for the iOS platform that it can be difficult to zero in on one.
Outlook App vs Apple Mail: Which Is a Better iOS Mail App
Frankly, there are so many mail apps for the iOS platform that it can be difficult to zero in on one.
 3 Ways to Fix Apple Mail Stuck on Checking for Mail on iPhone
Basic Fixes: Check the network connection: First, check the network connection quality on your iPhone. If you face network issues, you can enable Airplane mode on your iPhone and disable it
3 Ways to Fix Apple Mail Stuck on Checking for Mail on iPhone
Basic Fixes: Check the network connection: First, check the network connection quality on your iPhone. If you face network issues, you can enable Airplane mode on your iPhone and disable it
 3 Fixes for Images Not Loading in Mail App for iPhone
Try Basic Fixes Turn off VPN: Since VPNs route your internet traffic through different servers, they can sometimes lead to delays or issues loading content, such as images in emails.
3 Fixes for Images Not Loading in Mail App for iPhone
Try Basic Fixes Turn off VPN: Since VPNs route your internet traffic through different servers, they can sometimes lead to delays or issues loading content, such as images in emails.
 How to Fix Mail Notifications Not Working on Mac
Basic Fixes Force quit and relaunch the app: Click on the Apple logo > Force Quit > Mail > Force Quit.
How to Fix Mail Notifications Not Working on Mac
Basic Fixes Force quit and relaunch the app: Click on the Apple logo > Force Quit > Mail > Force Quit.
 5 Ways to Fix Mail App Not Working on iPhone
Basic Fixes Check your network connection: Ensure your iPhone has a good internet connection.
5 Ways to Fix Mail App Not Working on iPhone
Basic Fixes Check your network connection: Ensure your iPhone has a good internet connection.
 5 Fixes if App Notifications Won’t Go away on iPhone
Basic Fixes: Restart your iPhone: Turning your iPhone off and back on can help eliminate temporary glitches that might be causing the notifications to be stuck on your device.
5 Fixes if App Notifications Won’t Go away on iPhone
Basic Fixes: Restart your iPhone: Turning your iPhone off and back on can help eliminate temporary glitches that might be causing the notifications to be stuck on your device.
 Top 9 Fixes for Facebook Notifications Not Working on iPhone and iPad
Imagine getting several comments and likes on your recent profile picture, and Facebook doesn't notify you about the same.
Top 9 Fixes for Facebook Notifications Not Working on iPhone and iPad
Imagine getting several comments and likes on your recent profile picture, and Facebook doesn't notify you about the same.
 4 Fixes for Microsoft Teams Notifications Not Working on iPhone
Fix 1: Enable Notifications in iPhone Settings Ensure you haven't disabled notifications for the Teams app in Settings.
4 Fixes for Microsoft Teams Notifications Not Working on iPhone
Fix 1: Enable Notifications in iPhone Settings Ensure you haven't disabled notifications for the Teams app in Settings.
The article above may contain affiliate links which help support Guiding Tech. The content remains unbiased and authentic and will never affect our editorial integrity.

Hey thank you so much I have been losing my mind trying to find out why I couldn’t get mail notifications and apparently I disabled it in settings > mail > notifications > CUSTOM
Amazing article and saved a lot of time…
Nowhere such details were provided not even apple support.
solved my 3 month old issue at once.
again thanks a lot…