If you’re writing in Word in all caps when Caps Lock is off, you might be having a few different issues. Let’s go through the most common troubleshooting steps to solve this.
Fix 1 – Check if the Keyboard Buttons Are Broken
In some cases, you can get All Caps in Word without Caps Lock button if the Shift button is registered to be pressed continuously. Alternatively, your keyboard might be faultily presenting the Caps Lock button as OFF (perhaps due to a bad light).
To verify this, you should use another text editor like Notepad. Just open it and type something, and if you get everything in all caps, the issue is with the system or the keyboard. For best results, you can try using the digital keyboard.
Step 1. Press “Ctrl + Windows + O” to bring up the on-screen keyboard.
Step 2. Press on the buttons like you would with a keyboard and see what happens.
Step 3. Click on the Caps Lock key on the on-screen keyboard to see if it immediately gets unchecked.

The keyboard should be registering which buttons are pressed, so if you get a key signal when away from the actual keyboard, the physical keyboard is faulty. You can try to unstick the Shift or Caps Lock key manually by removing and cleaning it. Alternatively, you can try to disconnect the keyboard and use a different one in a new slot.
Fix 2 – Check Microsoft Word Settings
If you’re getting Word in all caps but Caps Lock is off, you might also need to check current formatting settings.
Step 1. With the Word open, right-click on the area where you’re getting all caps and select “Font.”

Step 2. Make sure that the “All Caps” box is unchecked, then click “OK.”
Alternatively, check the actual font you’re using at the top (in the “Home” tab). Some fonts are only available in all caps, regardless of how you actually type the words into them.
Fix 3 – Troubleshoot the Keyboard for Issues
While a bit rare, Windows does actually update keyboard drivers when needed and can perform setting resets through the troubleshooter.
Step 1. Go to Settings.
Step 2. In the “System” tab, select “Troubleshoot.”

Step 3. Go to “Other troubleshooters,” then select “Keyboard.” Note that this option only exists on PCs with an external keyboard.
Step 4. Follow the instructions in the troubleshooter. Typically, it will recheck the drivers or restore the keyboard to standard settings.
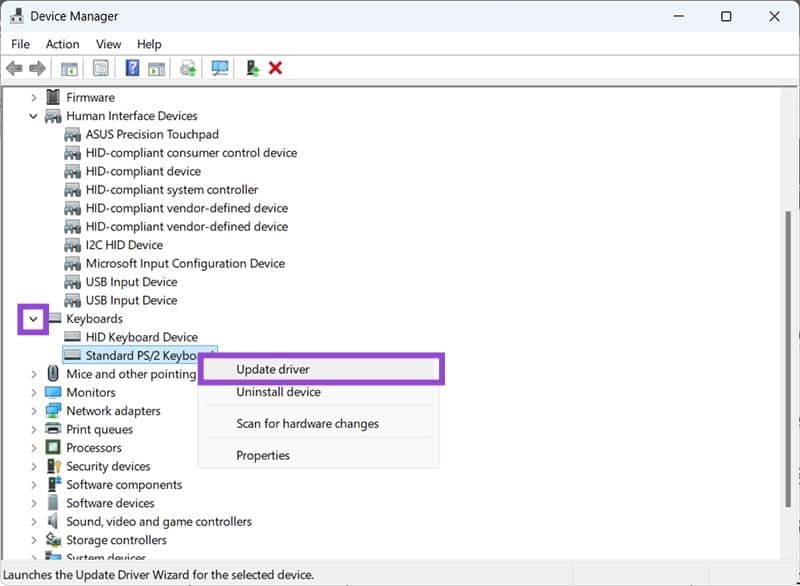
Alternatively, you can use the Device Manager to try to update the keyboard’s driver manually.
Step 1. Right-click on the Start menu and select “Device Manager.”
Step 2. Expand the section for Keyboards and select the keyboard you’re having problems with.
Step 3. Click on “Update driver” and follow the setup instructions.
Was this helpful?
Last updated on 16 August, 2025
Read Next
 Top 5 Ways to Fix Reversed Caps Lock in Windows 11
Caps Lock is one of the most used keys on a keyboard that lets you type in capital letters without holding down the Swift key.
Top 5 Ways to Fix Reversed Caps Lock in Windows 11
Caps Lock is one of the most used keys on a keyboard that lets you type in capital letters without holding down the Swift key.
 2 Fixes When the Windows 11 Caps Lock Light Is Not Working
Basic Fixes: Check for keyboard problems: If the Caps Lock light does not work on Windows 11, it may indicate a physical or mechanical issue.
2 Fixes When the Windows 11 Caps Lock Light Is Not Working
Basic Fixes: Check for keyboard problems: If the Caps Lock light does not work on Windows 11, it may indicate a physical or mechanical issue.
 How to Lock an Image in Microsoft Word
https://youtu.be/n0rtmAPvjOQ Lock an Image Using the Restrict Editing Feature The restrict editing feature allows users to protect an image using a password.
How to Lock an Image in Microsoft Word
https://youtu.be/n0rtmAPvjOQ Lock an Image Using the Restrict Editing Feature The restrict editing feature allows users to protect an image using a password.
 How to Lock Parts of a Microsoft Word Document
Method 1: Using Restrict Editing Feature As the name suggests, this feature lets you set up editing restrictions for your Word document.
How to Lock Parts of a Microsoft Word Document
Method 1: Using Restrict Editing Feature As the name suggests, this feature lets you set up editing restrictions for your Word document.
 Apple Pages vs Microsoft Word: Which Word Processing Software Is Better
Every major tech company out there is offering their version of the productivity suite.
Apple Pages vs Microsoft Word: Which Word Processing Software Is Better
Every major tech company out there is offering their version of the productivity suite.
 Google Docs vs. Microsoft Word Online: Which Word Processor Is Better
Google Docs vs.
Google Docs vs. Microsoft Word Online: Which Word Processor Is Better
Google Docs vs.
 7 Best Ways to Fix Hibernate Goes to Lock Screen Error on Windows 10
The Hibernate mode, not to be confused with the Sleep feature, on Windows OS saves battery, but the best part is, you can close your lid to activate it.
7 Best Ways to Fix Hibernate Goes to Lock Screen Error on Windows 10
The Hibernate mode, not to be confused with the Sleep feature, on Windows OS saves battery, but the best part is, you can close your lid to activate it.
 4 Ways to Enable or Disable Num Lock at Windows Startup
Method 1: Disable Fast Startup Step 1: Click the search icon on the taskbar, type control panel, and press Enter.
4 Ways to Enable or Disable Num Lock at Windows Startup
Method 1: Disable Fast Startup Step 1: Click the search icon on the taskbar, type control panel, and press Enter.
The article above may contain affiliate links which help support Guiding Tech. The content remains unbiased and authentic and will never affect our editorial integrity.

