You signed up for Windows 11 and had the fully enabled version installed on your PC. So why are you now getting a message that your product is deactivated following a major update? If you’re seeing this, you’re not alone. Many Windows users have reported that this issue is caused by the 24H2 update.
More importantly, though, how do you fix it? This article will explain just that.
Where’s the Key?
Product deactivation means that your PC can’t confirm your product registration after contacting the Microsoft servers. This may have to do with your Windows product key. If you see the error code “0xC004f213,” then this is the case. Let’s look at how to get things fixed.
Fixing Windows 11 Deactivated After 24H2 Update
The good news is that this bug is not your fault and can be fixed in a number of ways. We’ve listed the major ones below.
Re-Enter Your Product Key
To confirm that your product key isn’t being accepted, it’s a good idea to try re-entering it. Simply do the following:
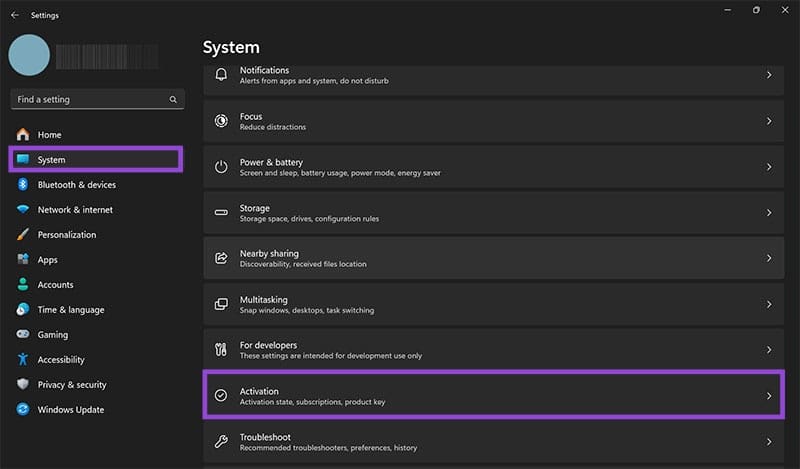
Step 1. Open Settings (Win + I) and choose “System.”
Step 2. Scroll down to “Activation” and select it.
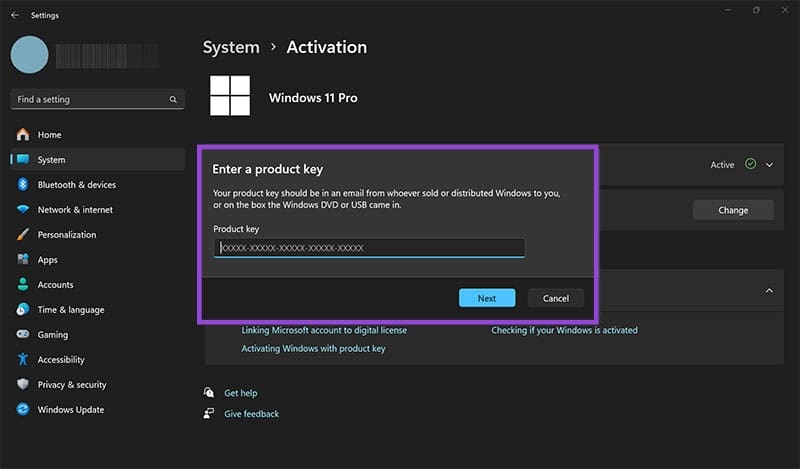
Step 3. Click the “Change” button next to “Change product key” and enter your product key in the dialog box that will display.

Step 4. If it’s refused, you can move on to the other fixes.
Troubleshoot
Your first possible solution should be the Activation Troubleshoot tool. Some users report needing to run this numerous times to finally get their Windows activated again. Here’s what to do:
Step 1. Open Settings (Win + I) and navigate to “System” on the sidebar.
Step 2. Navigate down to “Activation” and select it.
Step 3. Next to your “Activation state,” click the “Troubleshoot” button.

Step 4. Wait for the Troubleshooter to work and see if it resolves the problem. Repeat a few times if necessary.
Update Your Machine
An error like product deactivation would likely be addressed by Microsoft in a new patch or update. Make sure your system is fully up to date by doing the following:
Step 1. Open “Settings” and scroll down to “Windows Update” in the sidebar.
Step 2. Click the “Check for updates” button at the top of the screen.

Step 3. If any updates are recommended, install them and restart your machine.
Reload Your License Configuration File
In the update, your license may have been misplaced or lost. You can instruct Windows 11 to reload it through the Command Prompt:
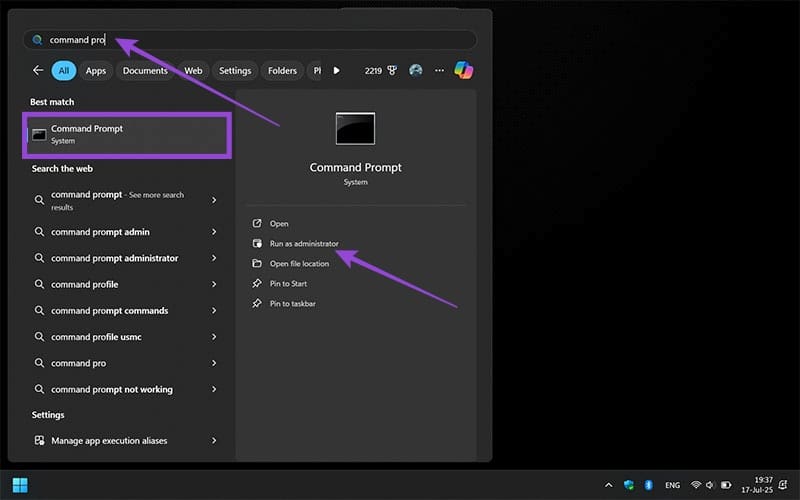
Step 1. Open the Command Prompt in the Search Bar and right click to select “Run as administrator.”
Step 2. In the app, type “slmgr /rilc” and click “Enter.”
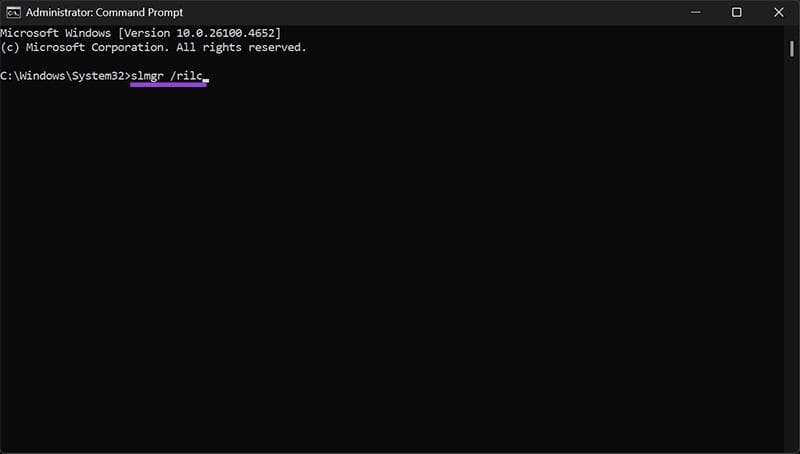
Step 3. Once the process is complete, restart your machine and check your activation status again.
Step 4. If not, click the “Troubleshoot” button one more time to be sure.
Repair System Files With Command Prompt
Command Prompt is also excellent for scanning your hard disk and checking for missing or corrupted files, which might have been altered during the update. Here’s what to do:
Step 1. Open Command Prompt as an administrator.
Step 2. Type “sfc / scannow” to begin the scan of your drive.
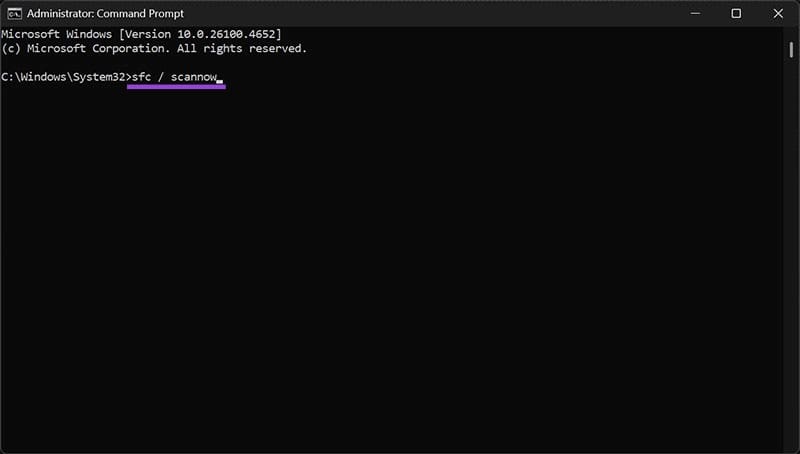
Step 3. Following this type “DISM /Online /Cleanup-Image /CheckHealth”, “DISM /Online /Cleanup-Image /ScanHealth”, and “DISM /Online /Cleanup-Image /RestoreHealth” one after the other, letting them run before inputting the next.
OEM:NSLP Licenses and Contacting Microsoft
If you know you’ve activated your version of Windows (or bought one), then you should have no problem contacting Microsoft Support directly. If you didn’t buy the computer yourself, you probably have an OEM:NSLP License, which is different from the OEM License. Both are valid, but the former is affected by the 24H2 update error.
Contact Microsoft and explain the error, provide your details, and they should be able to reactivate your machine.
Was this helpful?
Last updated on 19 July, 2025
Read Next
 How to Roll Back Windows 11 24H2 Update to 23H2
Did you ever update your system software only to realize you were better off before the move?
How to Roll Back Windows 11 24H2 Update to 23H2
Did you ever update your system software only to realize you were better off before the move?
 How to Find and Remove Deactivated Friends From Facebook
How to Unfriend Deactivated Friends on Facebook First, you must visit the Friends section to remove the deactivated profiles from your Facebook account.
How to Find and Remove Deactivated Friends From Facebook
How to Unfriend Deactivated Friends on Facebook First, you must visit the Friends section to remove the deactivated profiles from your Facebook account.
 3 Ways to Delete Old Windows Update Files From Windows 10 and 11
Method 1: Delete Old Windows Update Files via Settings The Storage section of the Settings app provides a detailed breakdown of all temporary files on your PC, including old Windows
3 Ways to Delete Old Windows Update Files From Windows 10 and 11
Method 1: Delete Old Windows Update Files via Settings The Storage section of the Settings app provides a detailed breakdown of all temporary files on your PC, including old Windows
 5 Best Ways To View Windows Update History In Windows 11
By constantly updating your Windows 11 operating system, you get access to new or improved features to deliver a better user experience.
5 Best Ways To View Windows Update History In Windows 11
By constantly updating your Windows 11 operating system, you get access to new or improved features to deliver a better user experience.
 7 Best Fixes for Windows Update Error 0x800f081f in Windows 11
Microsoft regularly releases Windows updates to introduce new features and fix known issues.
7 Best Fixes for Windows Update Error 0x800f081f in Windows 11
Microsoft regularly releases Windows updates to introduce new features and fix known issues.
 Top 8 Ways to Fix Windows 11 Lag After an Update
While Windows 11 is a welcome change with the start menu, taskbar, and other design improvements, the upgrade didn’t go well with some users.
Top 8 Ways to Fix Windows 11 Lag After an Update
While Windows 11 is a welcome change with the start menu, taskbar, and other design improvements, the upgrade didn’t go well with some users.
 How to Stop a Specific Windows Update From Installing
Method 1: Hide a Windows Update Using the Show or Hide Updates Troubleshooter Microsoft's "Show or hide updates" tool makes it simple to stop a specific Windows Update from installing
How to Stop a Specific Windows Update From Installing
Method 1: Hide a Windows Update Using the Show or Hide Updates Troubleshooter Microsoft's "Show or hide updates" tool makes it simple to stop a specific Windows Update from installing
 How to Fix Update Error 0x80248007 in Windows 11
Are you struggling to update your Windows 11 operating system due to the frustrating error 0x80248007?
How to Fix Update Error 0x80248007 in Windows 11
Are you struggling to update your Windows 11 operating system due to the frustrating error 0x80248007?
The article above may contain affiliate links which help support Guiding Tech. The content remains unbiased and authentic and will never affect our editorial integrity.