If you’ve closed your laptop and found that the audio stopped working, or if you want audio to continue playing while the lid is closed, but it doesn’t, then this is the article for you. The Windows 11 laptop audio not working problem has several fixes that can help, depending on your issue. We’ll be covering as many as possible.
Windows Laptop Audio Not Working – Fixes to Try
Depending on your audio issue, we’ve got fixes below that can help. Let’s get started:
Change Your Power Settings
If you want audio to continue playing after the lid’s been closed, then your go-to solution is your Power Profile. You need to set your laptop to stay powered on after closing. These settings can be changed in the Control Panel. Here’s what to do:
To keep your laptop running when the lid is closed:
Step 1. Open the Control Panel via the search bar.
Step 2. In the window that pops up, scroll down to “Power Options” and select it.
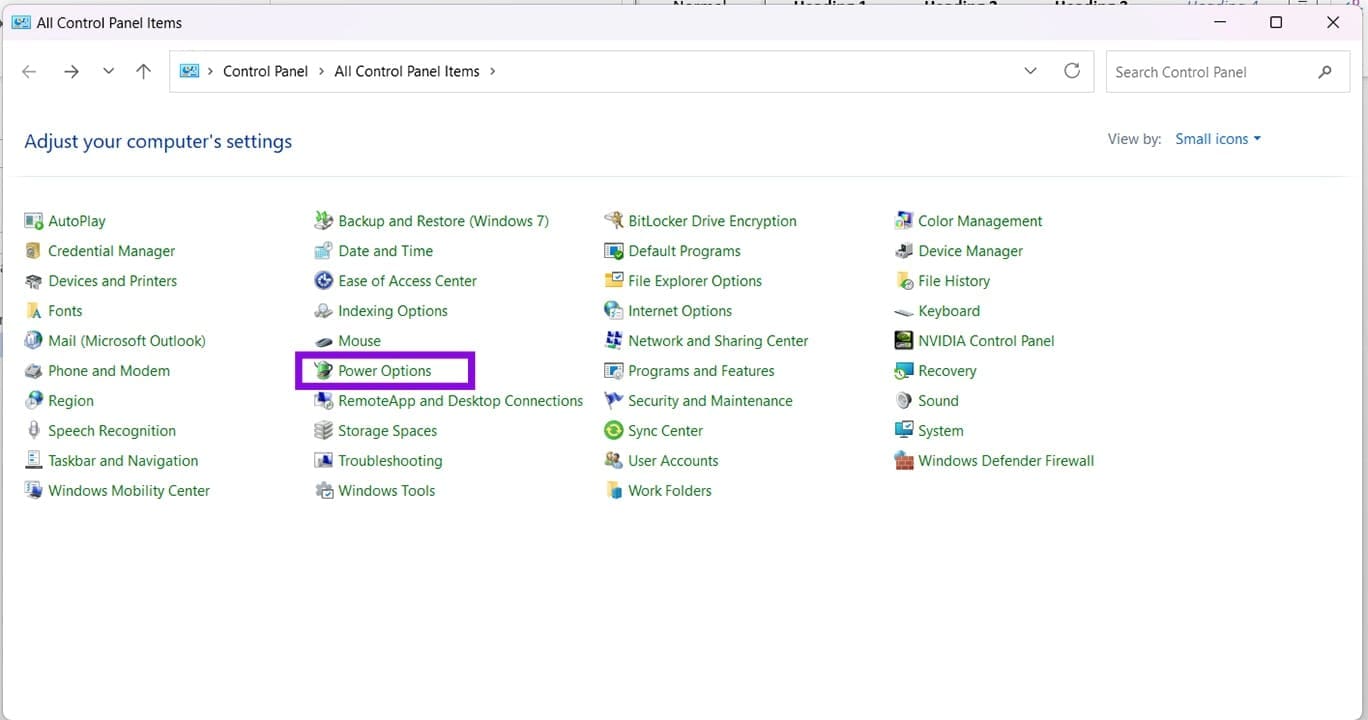
Step 3. In the Power Options menu, click “Choose what closing the lid does” from the sidebar.
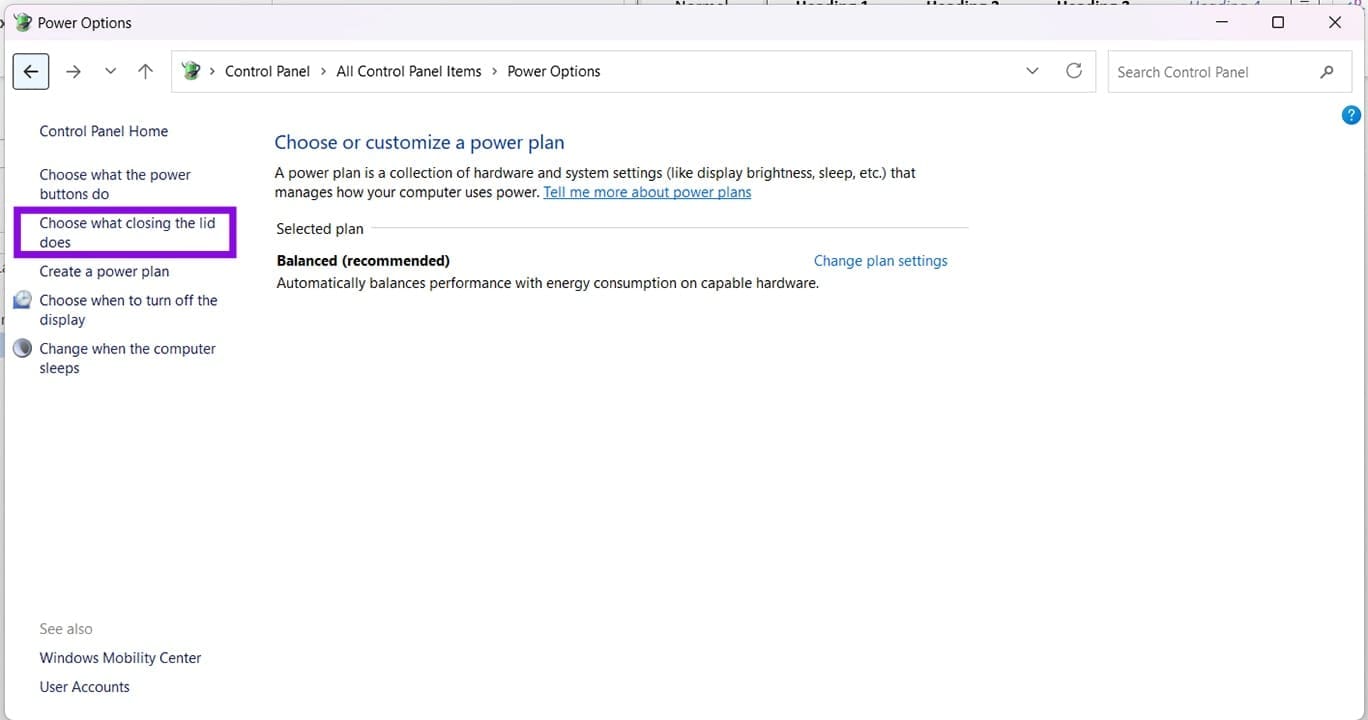
Step 4. You should see two dropdown menus next to “When I close the lid.” Choose the “Do nothing” option, which will keep your laptop running after closing.
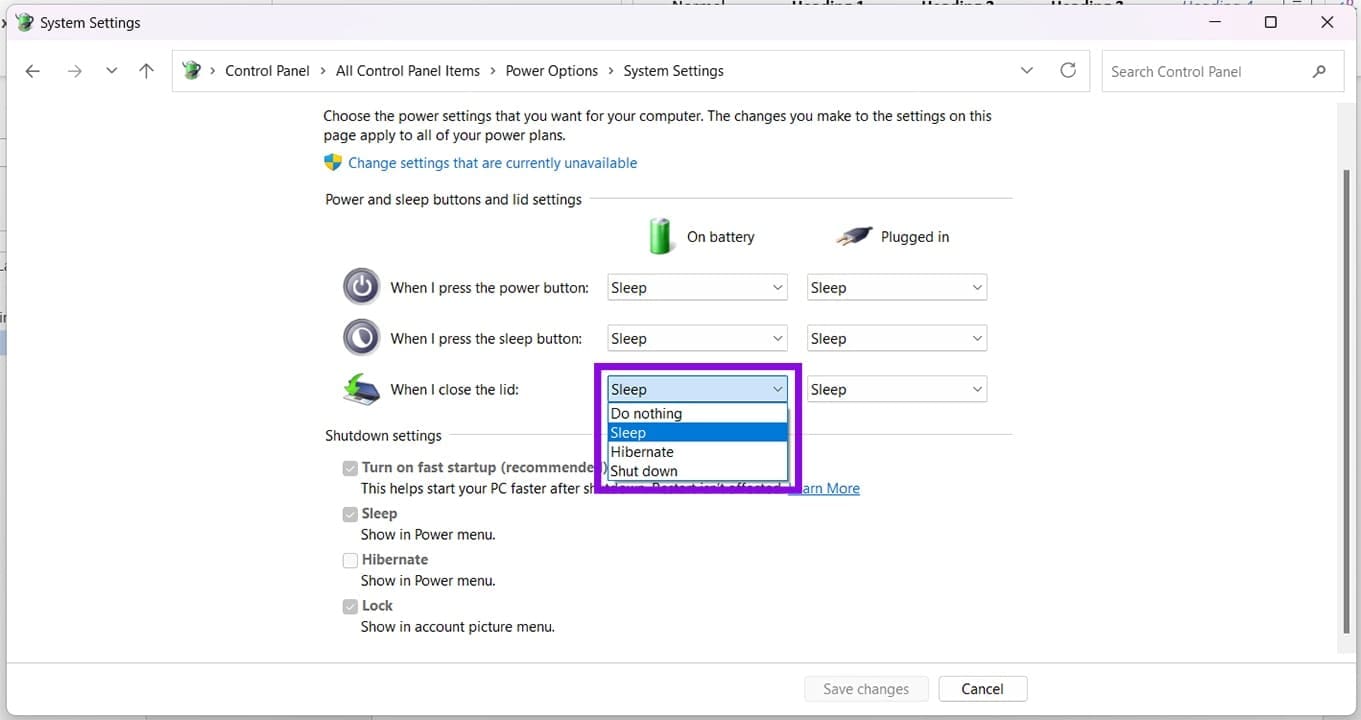
Step 5. Click the “Save changes” button to finalize.
Disable Power Saving
Power-management settings can sometimes cause audio hardware or drivers to enter a low-power state. In some cases, the device may not resume correctly after sleep or after closing and reopening the lid. To check that this isn’t the case, you’ll need to check Power Management Settings in Device Manager:
Step 1. Open the Run Dialog (Win + R) and type “devmgmt.msc” and click “Enter.”
Step 2. In Device Manager, click “Sound, video and game controllers” to expand the menu.
Step 3. Right-click your audio device, and select “Properties” from the context menu.
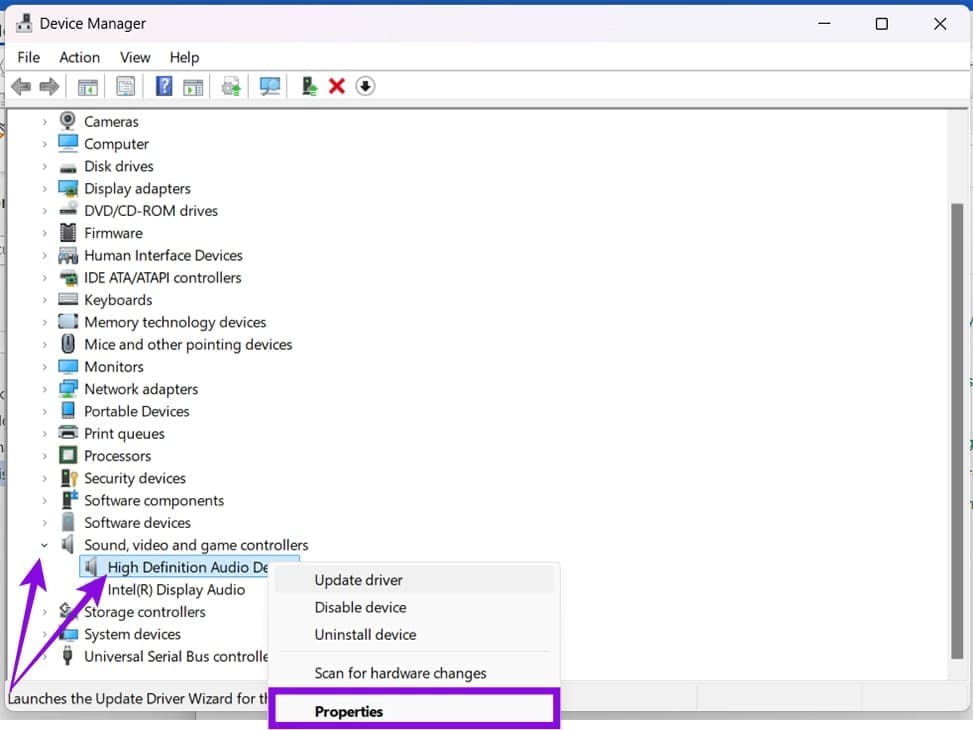
Step 4. In the window that pops up, click the “Power Management” tab.
Step 5. Uncheck “Allow this computer to turn off this device to save power” and click “OK” to finalize.
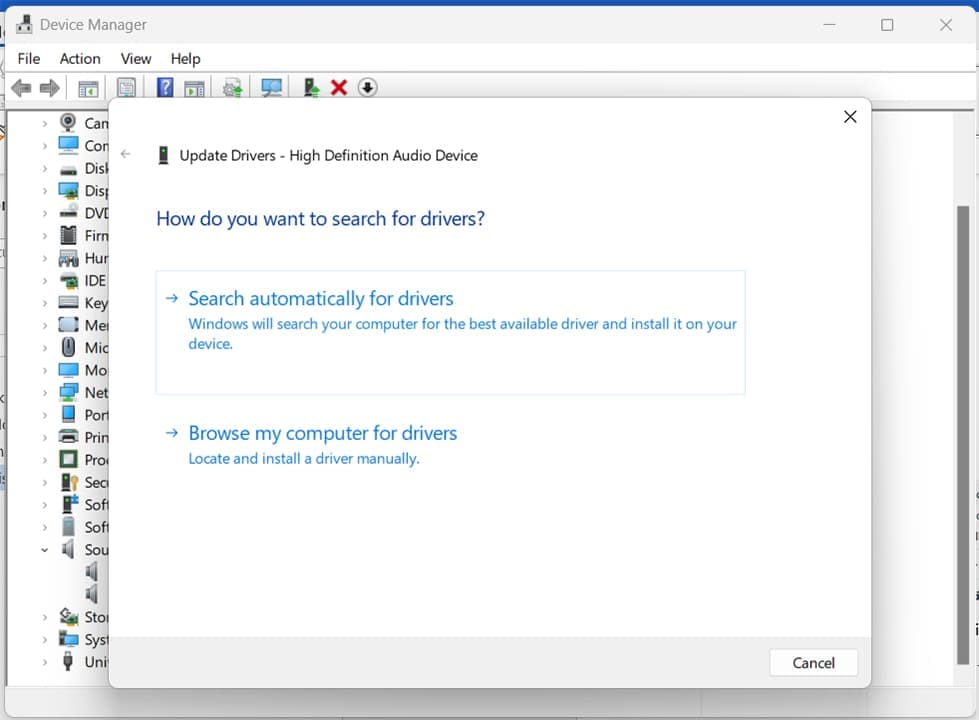
While you’re in Device Management, it’s also a good idea to ensure your Windows 11 laptop audio driver is up to date. Simply right-click your audio device and select “Update driver.” Choose “Search automatically for drivers” and follow the steps.
Restart the Audio Service
If your problem is that the Sound options have completely disappeared upon reopening your laptop, then a quick solution is to restart the Windows audio service completely. Here’s how:
Step 1. Open “Run Dialog” (Win + R) and type “services.msc” before selecting “Enter.”
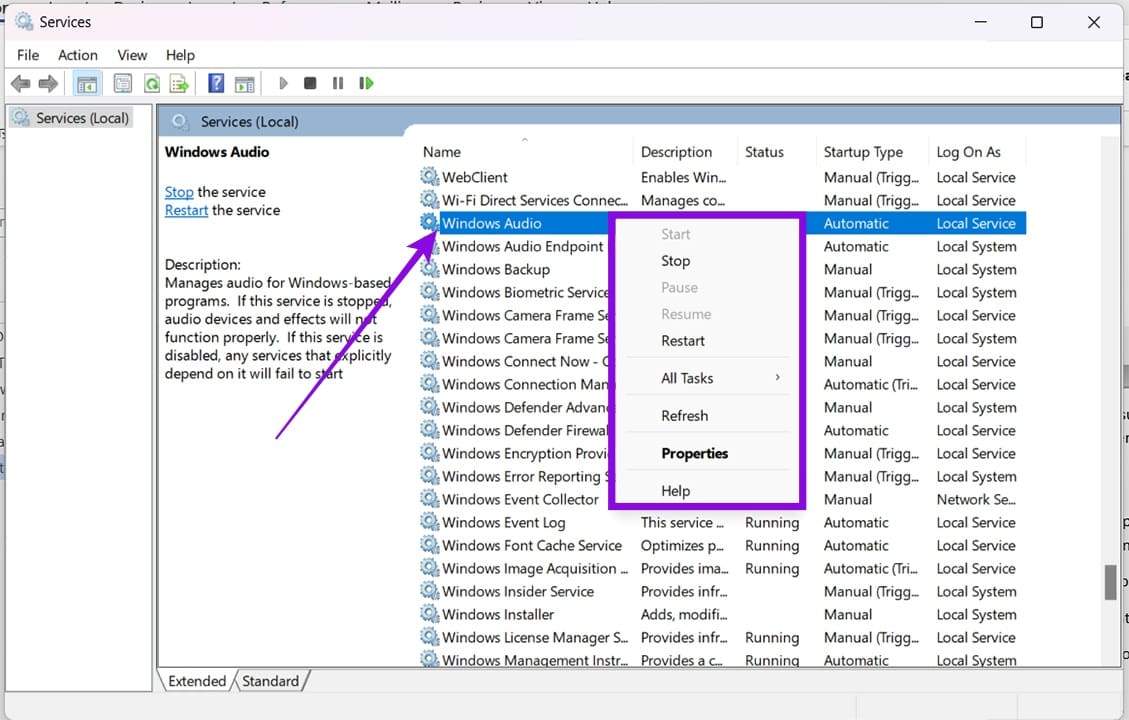
Step 2. In “Services,” navigate down to “Windows Audio” and right-click it.
Step 3. Depending on its current status, you will either need to “Start” or “Restart” it. You can find both options in the context menu.
Run the Audio Troubleshooter
If the problem is a bit more nebulous, you can use the Windows Troubleshooter to help out. Here’s how:
Step 1. Open “Settings” (Win + I) and click “System” in the sidebar.
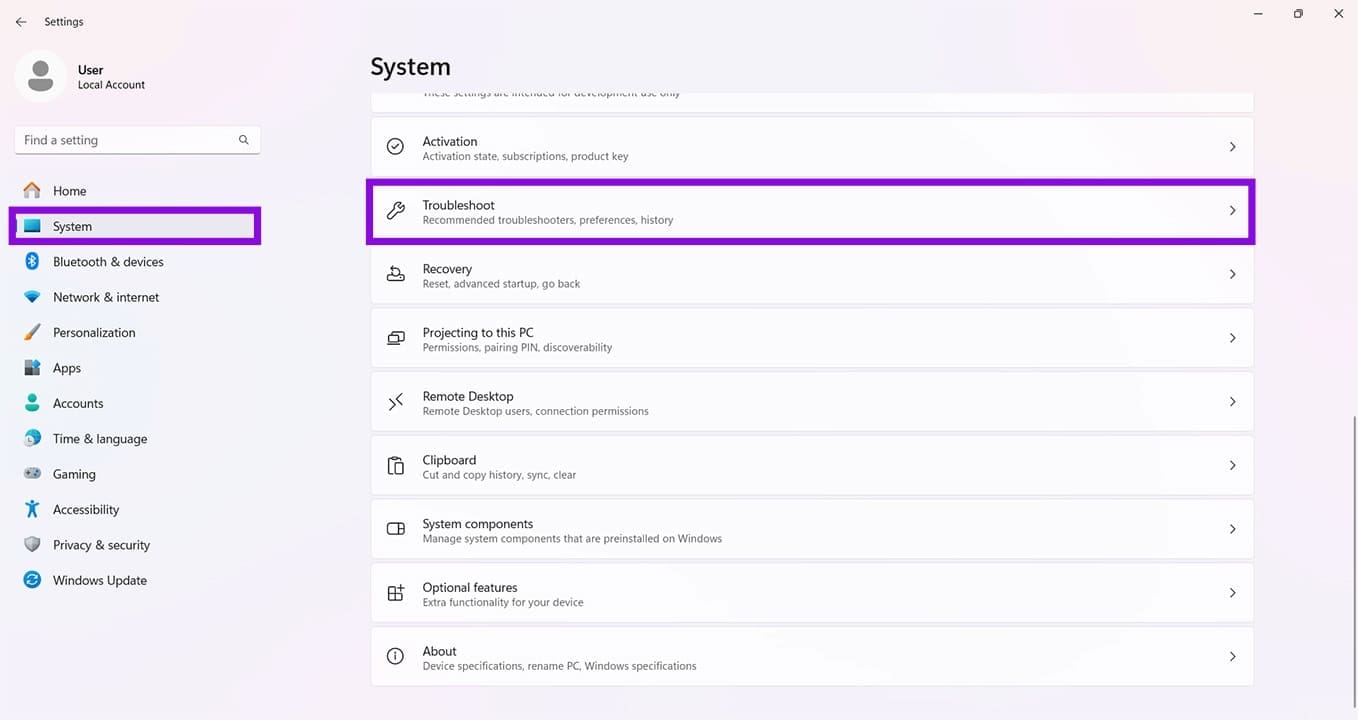
Step 2. Scroll down to “Troubleshoot” and click it.
Step 3. Click “Other troubleshooters.”
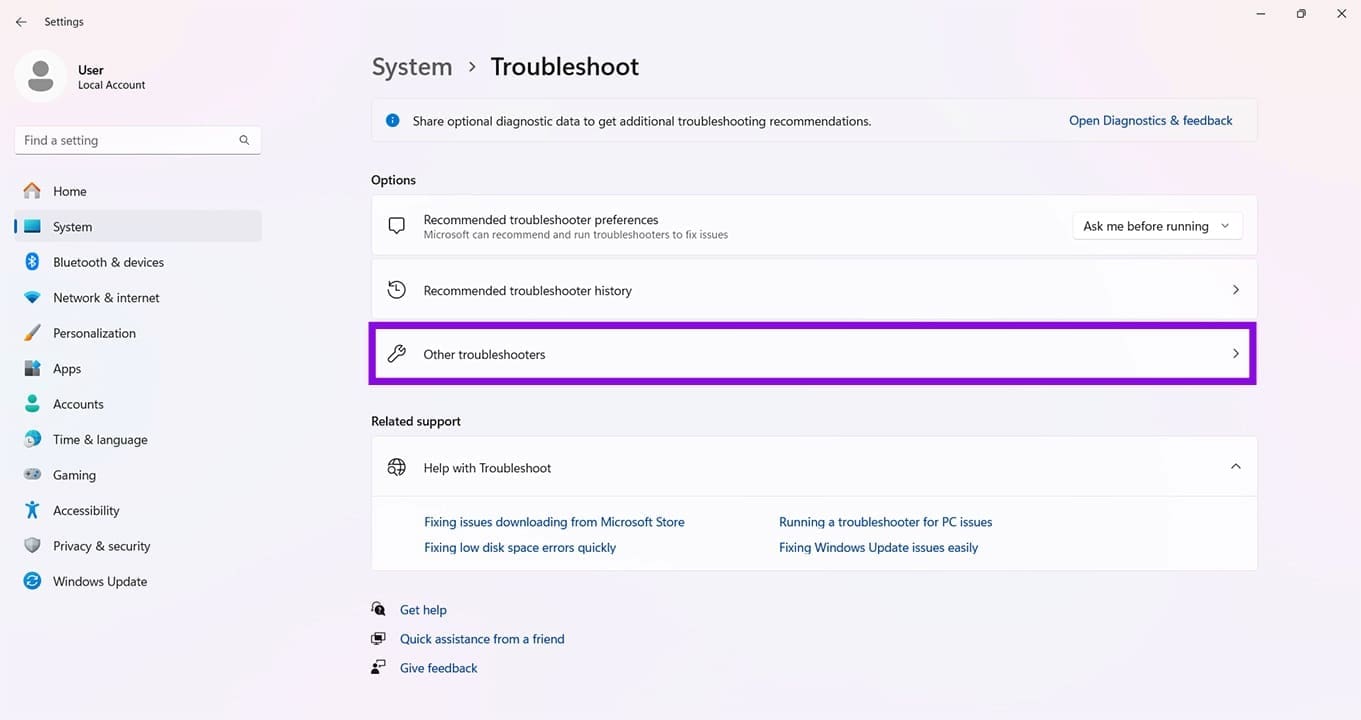
Step 4. Click “Run” next to “Playing Audio” and follow the steps to troubleshoot your audio problem.
Was this helpful?
Last updated on 20 June, 2026
Read Next
 How to Prevent Battery Drain When Windows Laptop Lid Is Closed
Common Fixes Unplug external devices: Disconnect all plugged-in devices (e.g., USB devices, external hard drives, etc.) to prevent them from waking up the laptop when the lid is closed.
How to Prevent Battery Drain When Windows Laptop Lid Is Closed
Common Fixes Unplug external devices: Disconnect all plugged-in devices (e.g., USB devices, external hard drives, etc.) to prevent them from waking up the laptop when the lid is closed.
 4 Fixes if Samsung Phone Stops Playing Music When Screen Turns Off
Basic Fixes: Restart your phone: Restarting your phone can help solve temporary system glitches.
4 Fixes if Samsung Phone Stops Playing Music When Screen Turns Off
Basic Fixes: Restart your phone: Restarting your phone can help solve temporary system glitches.
 2 Ways to Fix Spotify Stops Playing When Screen Is Off Issue
Basic Fixes: Check your internet connection: If you've been facing issues with Spotify, it may be time to check your internet speed.
2 Ways to Fix Spotify Stops Playing When Screen Is Off Issue
Basic Fixes: Check your internet connection: If you've been facing issues with Spotify, it may be time to check your internet speed.
 How to Fix Wi-Fi Stops Working on Windows When an External Monitor Is Connected
Basic Fixes: Check Monitor Cable: Bad connection cables can cause your Wi-Fi to stop working when an external monitor is connected on Windows.
How to Fix Wi-Fi Stops Working on Windows When an External Monitor Is Connected
Basic Fixes: Check Monitor Cable: Bad connection cables can cause your Wi-Fi to stop working when an external monitor is connected on Windows.
 What Happens When Windows Stops Copying Files Halfway
You’re busy copying a file (or two) when suddenly it happens – nothing.
What Happens When Windows Stops Copying Files Halfway
You’re busy copying a file (or two) when suddenly it happens – nothing.
 5 Fixes for Microsoft PowerPoint Not Playing Audio on Windows
Fix 1: Check the Volume Level in PowerPoint and Windows Your first step is double-checking the volume level in PowerPoint and on your Windows computer.
5 Fixes for Microsoft PowerPoint Not Playing Audio on Windows
Fix 1: Check the Volume Level in PowerPoint and Windows Your first step is double-checking the volume level in PowerPoint and on your Windows computer.
 5 Fixes for Closed Captions Not Working on YouTube
Fix 1: Check Captions Font and Style Settings YouTube provides several options for customizing caption colors, styles, sizes, and more.
5 Fixes for Closed Captions Not Working on YouTube
Fix 1: Check Captions Font and Style Settings YouTube provides several options for customizing caption colors, styles, sizes, and more.
 4 Ways to Fix MacBook Draining Battery When Closed
https://youtu.be/fkXYhA950FQ Preliminary Fixes Disable the background process: If you are downloading a large file or installing an app from the Mac App Store, pause the process first and close the
4 Ways to Fix MacBook Draining Battery When Closed
https://youtu.be/fkXYhA950FQ Preliminary Fixes Disable the background process: If you are downloading a large file or installing an app from the Mac App Store, pause the process first and close the
The article above may contain affiliate links which help support Guiding Tech. The content remains unbiased and authentic and will never affect our editorial integrity.