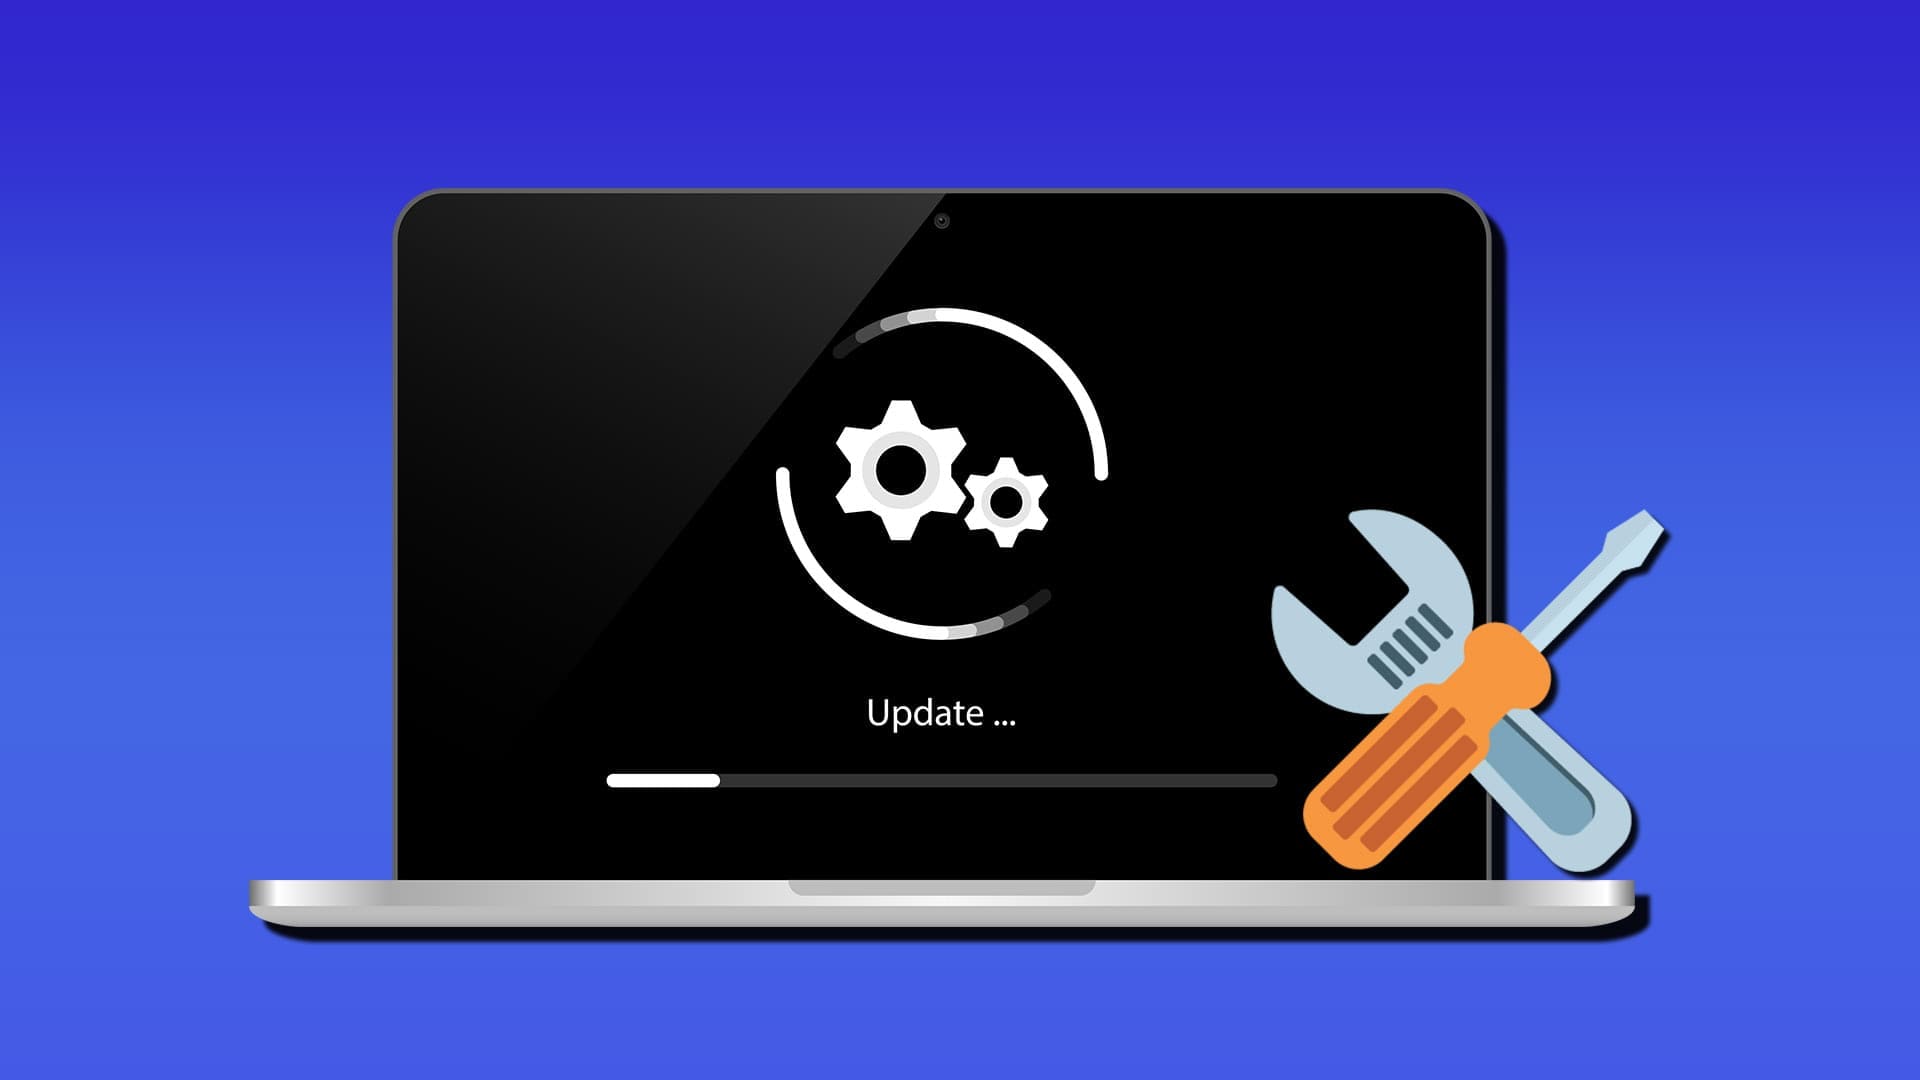
Microsoft’s April 14, 2026 patch is causing a KB5083769 boot loop for some machines that doesn’t get fixed with standard automatic repair. In most cases, Windows will try to enter automatic repair mode, the repair fails and triggers the same crash, and the cycle repeats. Here’s how to remove the update, keep it from reinstalling itself, and what to do if your graphics drivers were the underlying cause.
How to Recognize the KB5083769 Boot Loop
The Windows 11 KB5083769 error doesn’t look like a normal update installation error or a standard Windows crash. Instead, it has a specific sequence:
- The update appears to install successfully, with no error code during the installation phase.
- On the first restart after the update finalizes, the display fills with distorted, pixelated, or mosaic-pattern graphics rather than the normal boot animation.
- A BSOD follows, stating that Windows needs to be recovered.
- The screen goes to “Attempting to repair” or “Preparing Automatic Repair.”
- The repair either fails and crashes back to the pixelated screen or appears to complete, but then reboots straight back into the same failure sequence.
- The loop repeats indefinitely without returning to the Windows desktop.
Some machines skip directly to a black screen with a spinning cursor rather than the pixelated crash.
The only way to fix this is to remove the update through recovery tools before Windows attempts to load normally.
Part 1 – Use the Windows Recovery Environment to Get out of the Loop
If your machine is already cycling through automatic repair attempts on its own, it may drop into WinRE automatically after two or three failed repair cycles. If it isn’t, or if it’s stuck on a black screen, you need to force it.
Step 1. Turn on the PC. As soon as you see the Windows logo, spinning dots, or the manufacturer’s startup screen, hold the power button for 5 to 10 seconds until the machine shuts off completely.
Step 2. Repeat the process above a few more times. On the third repeat, Windows should detect the repeated failed boot attempts and automatically load the Windows Recovery Environment instead of attempting a normal boot. You’ll see a blue screen with “Choose an option.”
Alternatively, you’ll need to use a separate PC to download and create a Windows 11 recovery drive. You can plug the USB into the affected machine, then change the boot order in BIOS to boot from USB first. On the setup screen, choose your language and then select “Repair your computer” rather than “Install now.” This gives you the same WinRE menu.
Fix 1: Uninstall KB5083769 From WinRE
This is the primary fix and the fastest path out of the loop if the update has been fully applied to the system.
Step 1. From the “Choose an option” screen, click “Troubleshoot.”
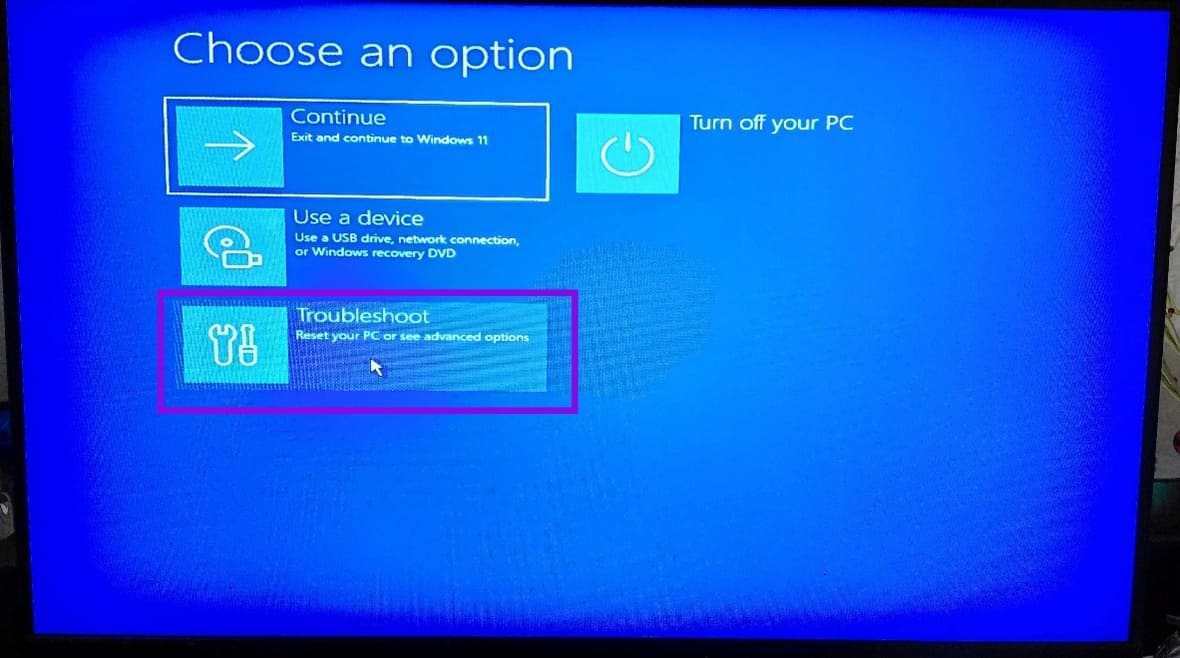
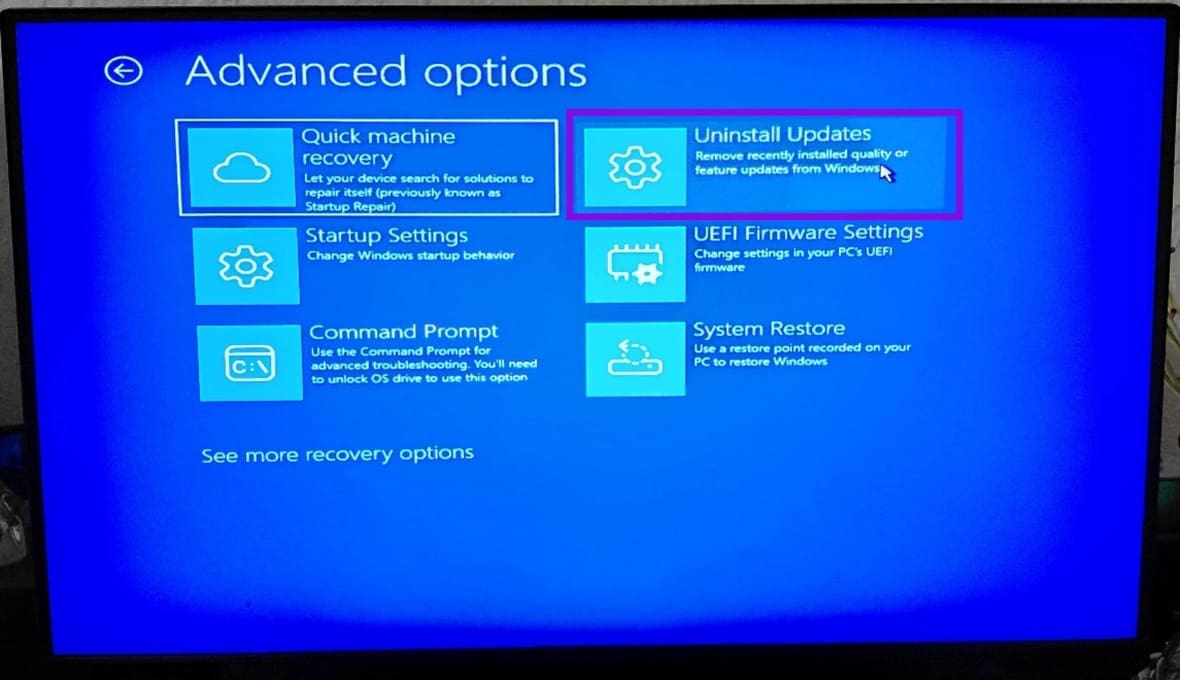
Step 2. Click “Advanced options” on the Troubleshoot screen.

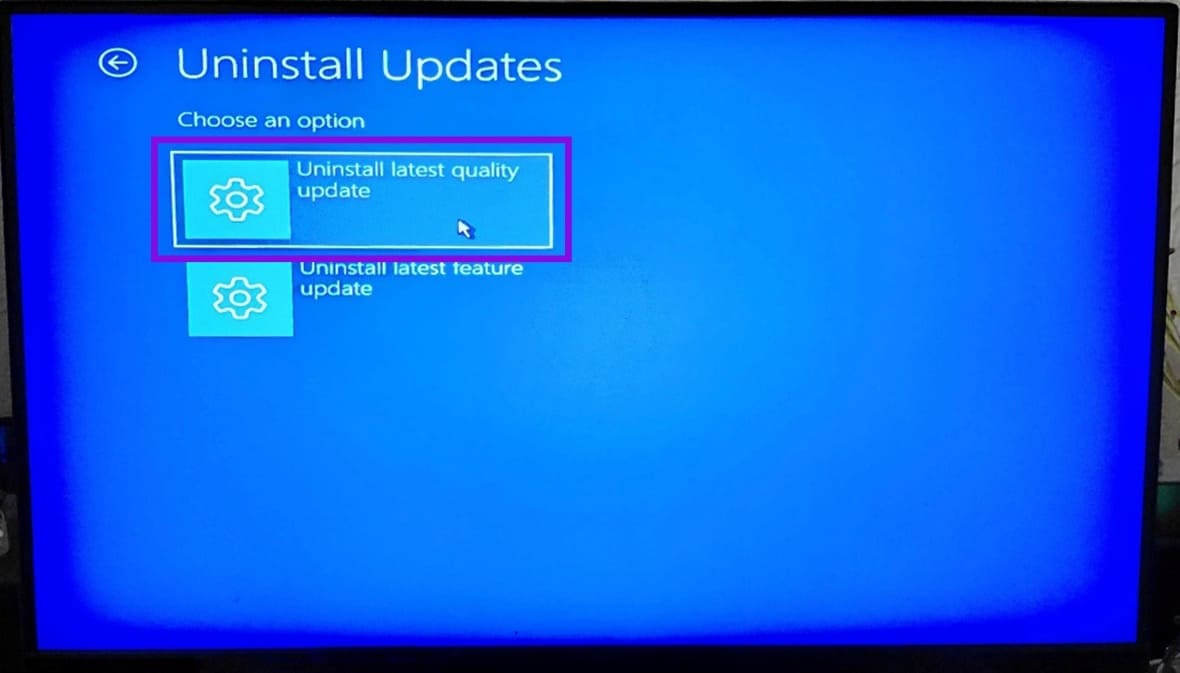
Step 3. Click “Uninstall Updates” from the list.
Step 4. Select “Uninstall latest quality update” and confirm when prompted. Windows will uninstall the patch, then restart automatically.
After the restart, the PC should boot all the way to the sign-in screen. If it does, you need to disable updates (see below).
Fix 2: System Restore
If the “Uninstall Updates” option is missing from the menu, or if the uninstall process runs but the machine still loops afterward, you’ll need to roll back the system to before the update was installed. Notably, this only works if you actually set up System Restore beforehand (since it isn’t enabled by default).
Step 1. Go to “Troubleshoot,” then “Advanced options,” then to “System Restore.”
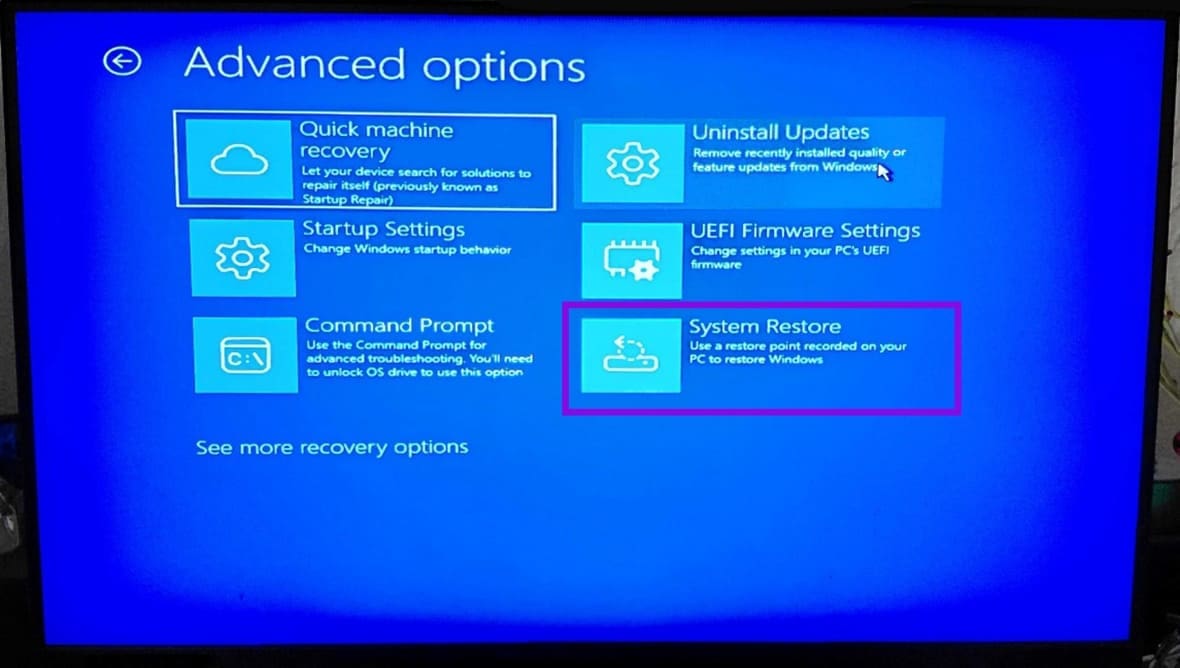
Step 2. The restore point list will show available snapshots with dates and labels. Choose one dated before April 13, 2026. Look for entries labeled “Windows Update” or “Automatic Restore Point.”
Step 3. Click “Next,” then “Finish.”
System Restore takes several minutes. The PC will restart automatically when it’s done.
Fix 3: Reset This PC (Last Resort)
Resetting Windows reinstalls it from scratch and rolls it to the “base” 24H2 or 25H2 update, but gives you the option to keep your personal files.
Step 1. Go to “Troubleshoot,” then to “Reset this PC.”
Step 2. Select “Keep my files.” You can technically choose “Remove everything” only if you want a completely clean install and don’t have files to preserve or have them backed up elsewhere.
Step 3. Choose “Local reinstall” to reinstall Windows from the recovery partition on the drive, without needing a network connection or USB. If the local reinstall fails, use “Cloud download,” but this needs an internet connection (preferably over Ethernet).
Part 2 – Preventing KB5083769 From Reinstalling Itself
Windows may try to reinstall the update since it’s technically mandatory. While you can’t stop it from updating eventually, you can delay it enough until there’s a permanent patch available.
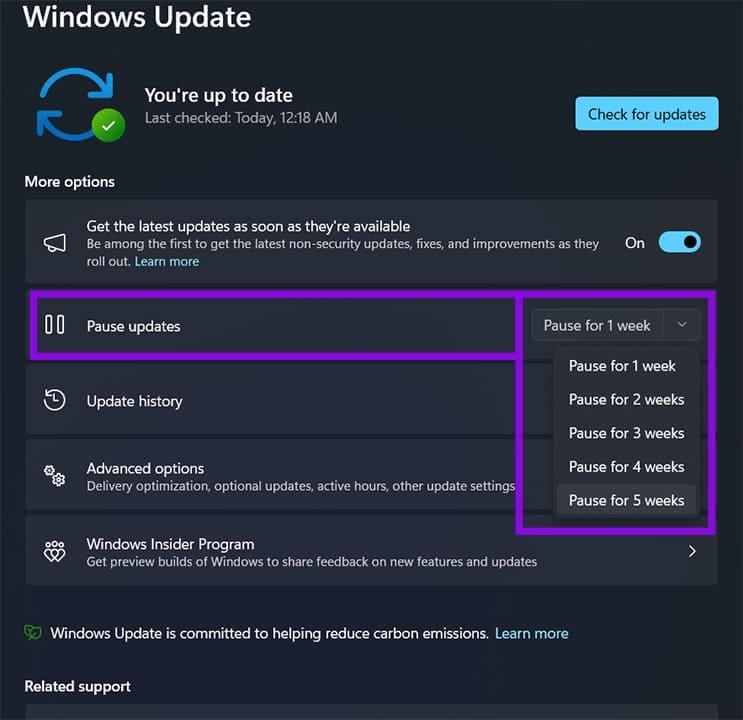
Step 1. Go to Windows Update.
Step 2. Click on “Pause updates.”
Step 3. Select the longest possible window of time (typically five weeks).
Part 3 – Reinstall Graphics Drivers
In some cases, you may need to go to your graphics driver app (Nvidia app or AMD Adrenalin) and update your graphics drivers. The update may have corrupted the driver, which sometimes causes the boot loop or graphical issues.
Was this helpful?
Last updated on 29 May, 2026
Read Next
 6 Best Fixes for Windows 10 Stuck in Automatic Repair Loop
Windows 10 PC runs fun until a bad system update, a corrupted file, and even a driver update can cause your it to stop working abruptly.
6 Best Fixes for Windows 10 Stuck in Automatic Repair Loop
Windows 10 PC runs fun until a bad system update, a corrupted file, and even a driver update can cause your it to stop working abruptly.
 4 Ways to Fix Android Phone Stuck on Boot Screen
https://youtu.be/JaOC_-u7kdM Try Basic Fixes Perform a force reboot: In most cases, performing a force reboot should resolve any temporary glitches with your OnePlus, Samsung, Motorola, or any other phone, allowing
4 Ways to Fix Android Phone Stuck on Boot Screen
https://youtu.be/JaOC_-u7kdM Try Basic Fixes Perform a force reboot: In most cases, performing a force reboot should resolve any temporary glitches with your OnePlus, Samsung, Motorola, or any other phone, allowing
 7 Ways to Get out of ‘Diagnosing Your PC’ Loop on Windows 11
Method 1: Turn off Your PC and Run Automatic Repair Step 1: Unplug all the external devices connected to your computer.
7 Ways to Get out of ‘Diagnosing Your PC’ Loop on Windows 11
Method 1: Turn off Your PC and Run Automatic Repair Step 1: Unplug all the external devices connected to your computer.
 13 Best Tips to Get Started with Microsoft Loop
Tip 1: Create a Workspace and Manage Pages Content organization is a bit different on Microsoft Loop as it tends to focus on co-creation and collaboration.
13 Best Tips to Get Started with Microsoft Loop
Tip 1: Create a Workspace and Manage Pages Content organization is a bit different on Microsoft Loop as it tends to focus on co-creation and collaboration.
 Steps to Make a Presentation Loop in PowerPoint
PowerPoint is a fantastic tool for presenting your ideas in exciting ways.
Steps to Make a Presentation Loop in PowerPoint
PowerPoint is a fantastic tool for presenting your ideas in exciting ways.
 What to Do if Windows Won’t Boot With a New GPU
If you’ve just upgraded your PC with a new graphics card (GPU) and it won’t boot, there are several possible reasons for that, each with a varying difficulty of fixing
What to Do if Windows Won’t Boot With a New GPU
If you’ve just upgraded your PC with a new graphics card (GPU) and it won’t boot, there are several possible reasons for that, each with a varying difficulty of fixing
 How to Boot Windows From an External SSD
If you’re looking to install Windows from scratch, the good news is that it’s easy to do with any external drive, including an SSD.
How to Boot Windows From an External SSD
If you’re looking to install Windows from scratch, the good news is that it’s easy to do with any external drive, including an SSD.
 Add Safe Mode to Windows 11 Boot Menu for Easier Troubleshooting
When something goes wrong in Windows, Safe Mode is an excellent way to troubleshoot by isolation.
Add Safe Mode to Windows 11 Boot Menu for Easier Troubleshooting
When something goes wrong in Windows, Safe Mode is an excellent way to troubleshoot by isolation.
The article above may contain affiliate links which help support Guiding Tech. The content remains unbiased and authentic and will never affect our editorial integrity.