Fix 1. Remove and Add Your Account Again
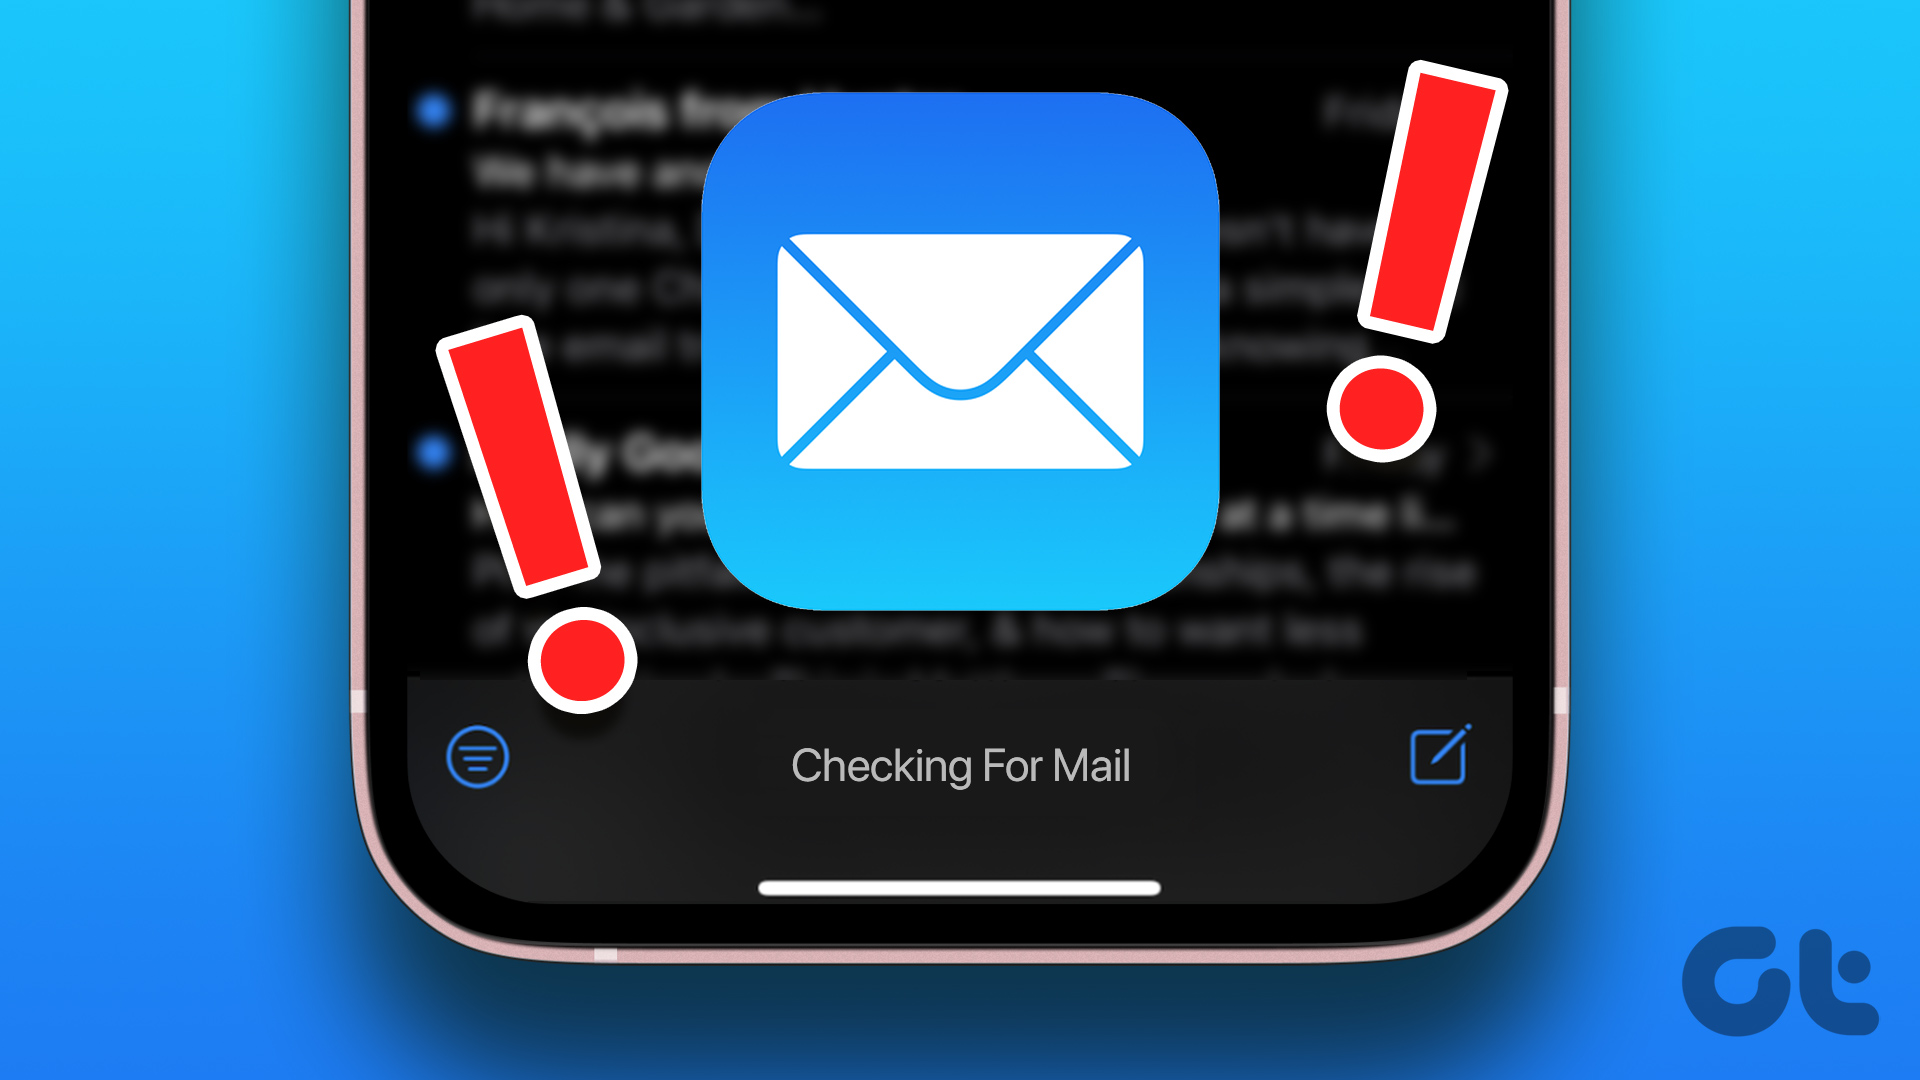
Are you still facing the Mail asking for password issues on your iPhone? You should delete the email account from the app and add it again to fix the problem.
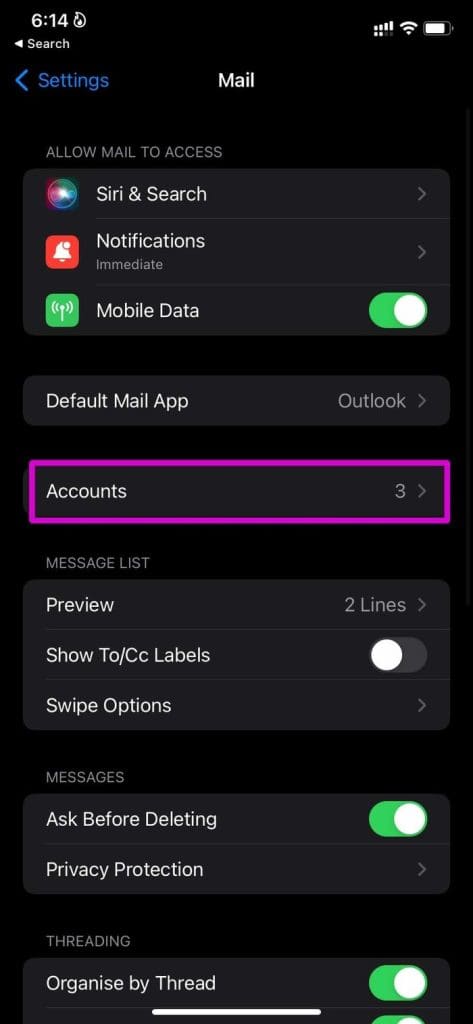
Step 1: Open iPhone Settings → Mail menu.
Step 2: Select Accounts. Open email account settings.
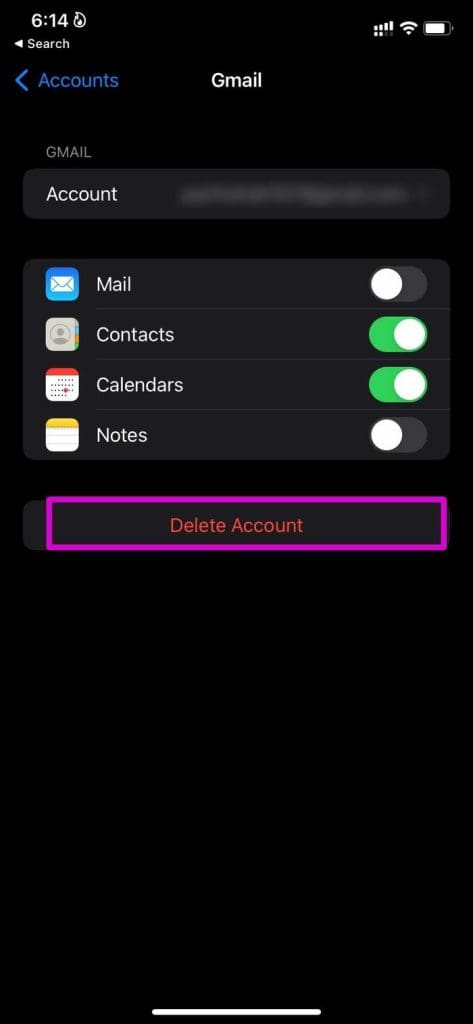
Step 3: Tap Delete Account and confirm your decision.
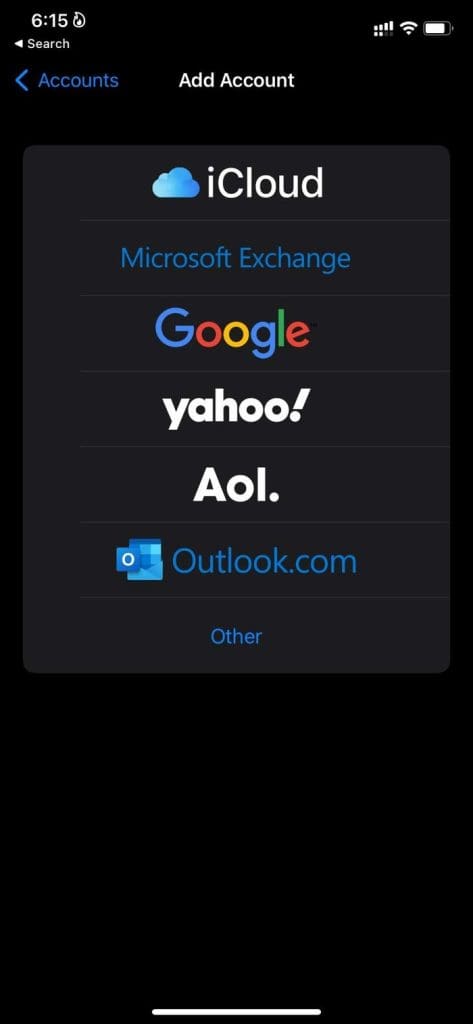
Step 4: Go back to the Account menu. Select the Add Account option.
Step 5: Select your email provider and sign in using login details.
You won’t see the Mail keeps asking for a password repeatedly.
Fix 2. Disable and Enable Mail Toggle
When you use Gmail or Outlook with the Mail app, you can sync Mail, Contacts, Calendars, and Notes with other Apple apps. Temporarily disable the Mail toggle and enable it after some time. The Mail app syncs your emails and shouldn’t bother you with prompts now.
Step 1: Open Settings. Select the Mail menu.
Step 2: Go to Accounts and select an email provider that is bothering you.
Step 3: Disable Mail toggle, and after some time, enable it.


Fix 3. Switch Sync Settings For Mail
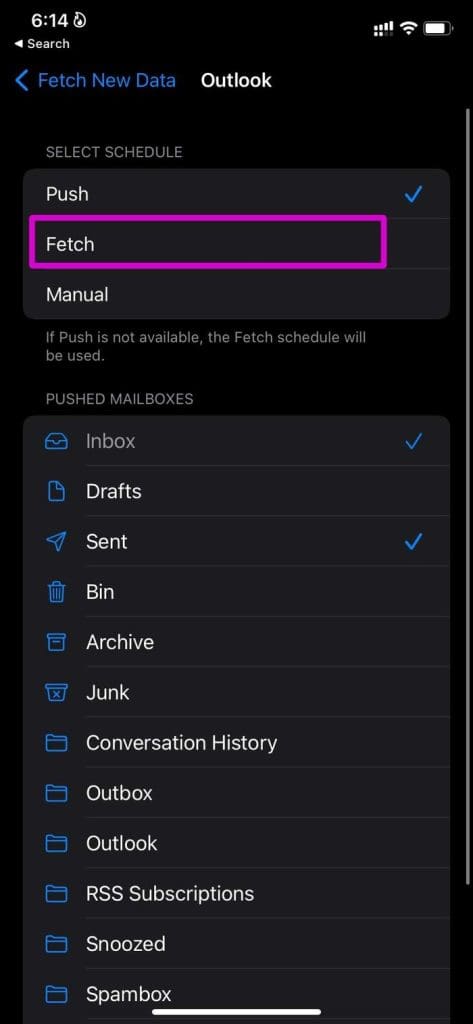
There are a couple of options for syncing email data to the Mail app. You can either use the Push option, which sends new emails as soon as they are available, or the Fetch option, which delivers new emails on a timely schedule.
If you have issues with the email Push option, use Fetch to sync new emails.
Step 1: Open Settings and navigate to the Mail menu.
Step 2: Select Accounts. Tap the Fetch New Data option.
Step 3: Go to the email account and select Fetch or Push from the following menu. You can also manually set the fetch time from the Fetch New Data menu.


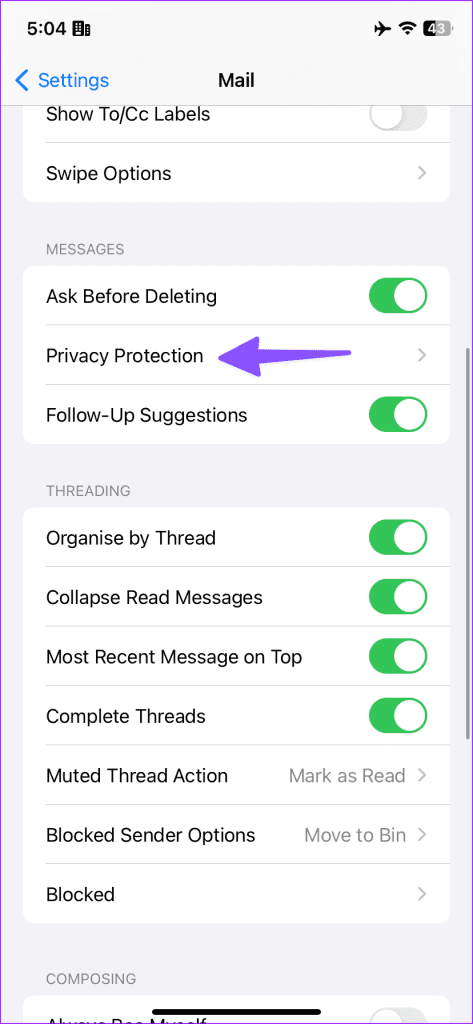
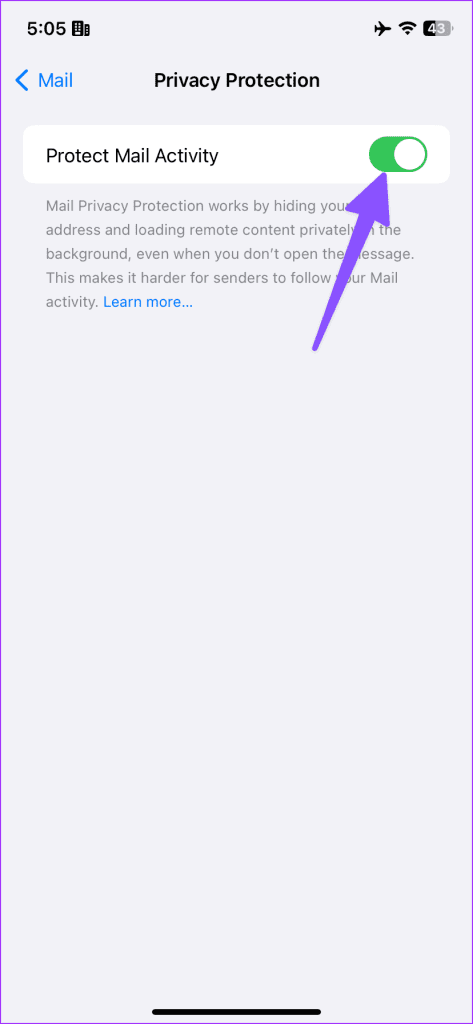
Fix 4. Disable Privacy Protection
Apple offers privacy protection to iCloud+ users. It hides your IP address and loads remote content privately in the background, essentially hiding your Mail activity from senders.
When the function doesn’t work properly due to a server outage, you may see the iPhone asking for an email password. It’s time to disable the option.
Step 1: Open Settings and scroll to Mail.
Step 2: Scroll to Privacy Protection. Disable the Protect Mail Activity toggle.
Was this helpful?
Last updated on 20 August, 2024
2 Comments
Leave a Reply
Read Next
 5 Ways to Fix iCloud on Windows 10 Keeps Asking for Password Issue
Basic Fixes: Check iCloud Server Status: As a starting point, you should check whether iCloud's servers are running normally.
5 Ways to Fix iCloud on Windows 10 Keeps Asking for Password Issue
Basic Fixes: Check iCloud Server Status: As a starting point, you should check whether iCloud's servers are running normally.
 5 Fixes if Outlook Keeps Asking For Password on Windows
Fix 1: Open Outlook in Safe Mode Opening Outlook in Safe Mode allows you to run the application without add-ins.
5 Fixes if Outlook Keeps Asking For Password on Windows
Fix 1: Open Outlook in Safe Mode Opening Outlook in Safe Mode allows you to run the application without add-ins.
 4 Ways to Fix Google Keeps Asking to Fill Image Captcha
Fix 1: Disable Active VPN The Google search algorithm knows common VPN servers used by bots.
4 Ways to Fix Google Keeps Asking to Fill Image Captcha
Fix 1: Disable Active VPN The Google search algorithm knows common VPN servers used by bots.
 4 Ways to Fix Microsoft Teams Keeps Asking to Sign in on Windows 10/11
Fix 1: Clear Teams Cache Microsoft Teams collects cache in the background to improve loading times and the overall app experience.
4 Ways to Fix Microsoft Teams Keeps Asking to Sign in on Windows 10/11
Fix 1: Clear Teams Cache Microsoft Teams collects cache in the background to improve loading times and the overall app experience.
 3 Ways to Fix Apple Mail Stuck on Checking for Mail on iPhone
Basic Fixes: Check the network connection: First, check the network connection quality on your iPhone. If you face network issues, you can enable Airplane mode on your iPhone and disable it
3 Ways to Fix Apple Mail Stuck on Checking for Mail on iPhone
Basic Fixes: Check the network connection: First, check the network connection quality on your iPhone. If you face network issues, you can enable Airplane mode on your iPhone and disable it
 How to Create an Email Group in Mail App on iPhone
Create a New Group Using Contacts App Let's start by creating a new group using the Contacts app on your iPhone to create an email group.
How to Create an Email Group in Mail App on iPhone
Create a New Group Using Contacts App Let's start by creating a new group using the Contacts app on your iPhone to create an email group.
 Outlook App vs Apple Mail: Which Is a Better iOS Mail App
Frankly, there are so many mail apps for the iOS platform that it can be difficult to zero in on one.
Outlook App vs Apple Mail: Which Is a Better iOS Mail App
Frankly, there are so many mail apps for the iOS platform that it can be difficult to zero in on one.
 Why Chrome is Asking for Sync Passphrase and How to Fix That
Chrome Sync arguably is the best feature in Google Chrome.
Why Chrome is Asking for Sync Passphrase and How to Fix That
Chrome Sync arguably is the best feature in Google Chrome.
The article above may contain affiliate links which help support Guiding Tech. The content remains unbiased and authentic and will never affect our editorial integrity.

Greetings,
Thanks so much for this information!
Truly helpful!
Sincerely,
Pamela
Flicking off the mail account, opening mail, then flicking the mail account back on did the trick. Thank you ????