How to Configure Wi-Fi and Ethernet to Work at the Same Time in Windows
We need to configure the network adapter settings in Windows to use Wi-Fi and ethernet simultaneously. Here’s a step-by-step guide on the same.
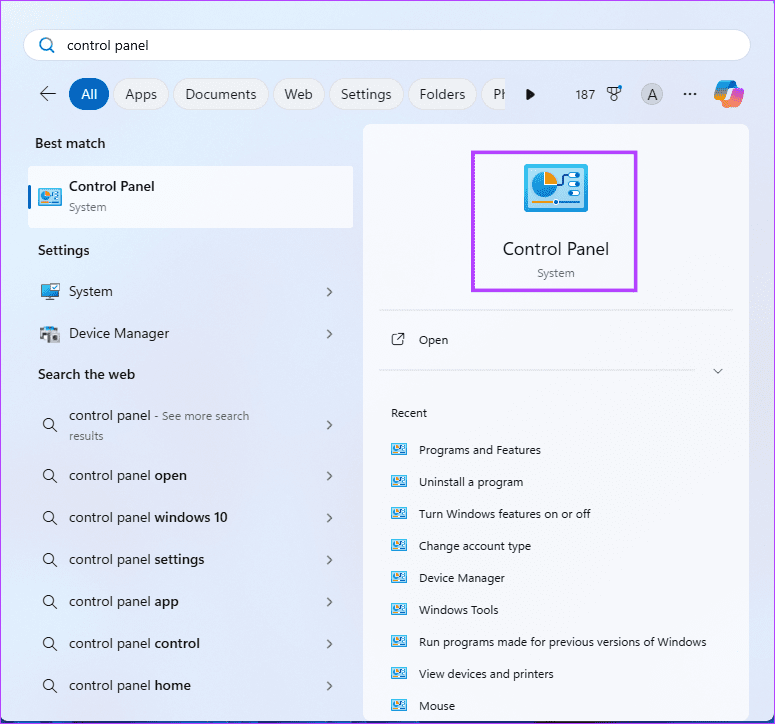
Step 1: Press Windows + S, type Control Panel in the search bar, and click the Control Panel option.
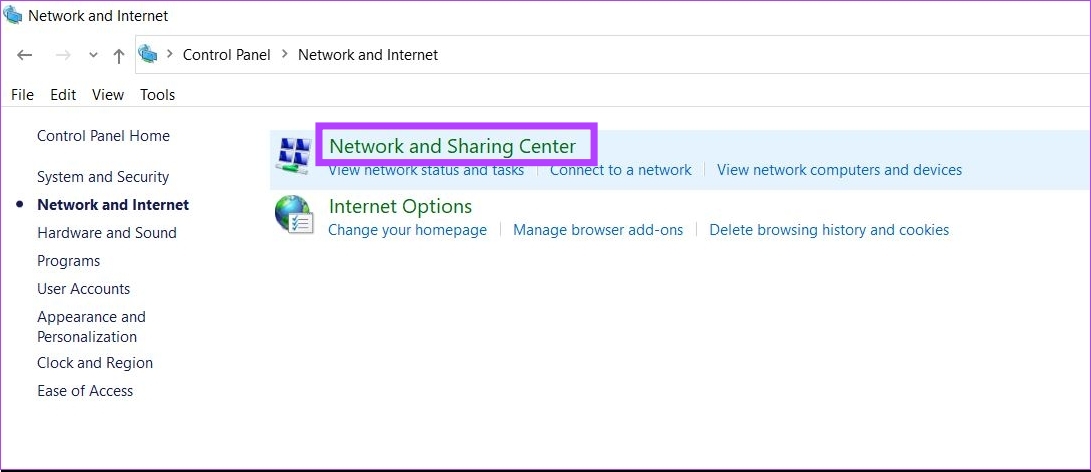
Step 2: Click on Network and Internet.

Step 3: Now, click on Network and Sharing Center. This will open the settings of your currently active network connection.
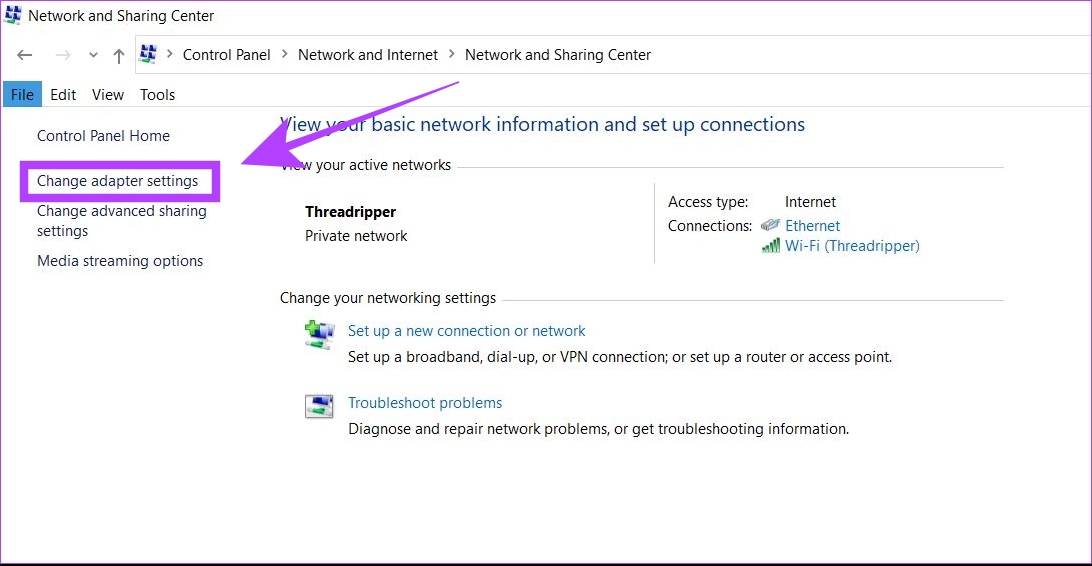
Step 4: Click on Change adapter settings. This will show all the network connections on your Windows computer.
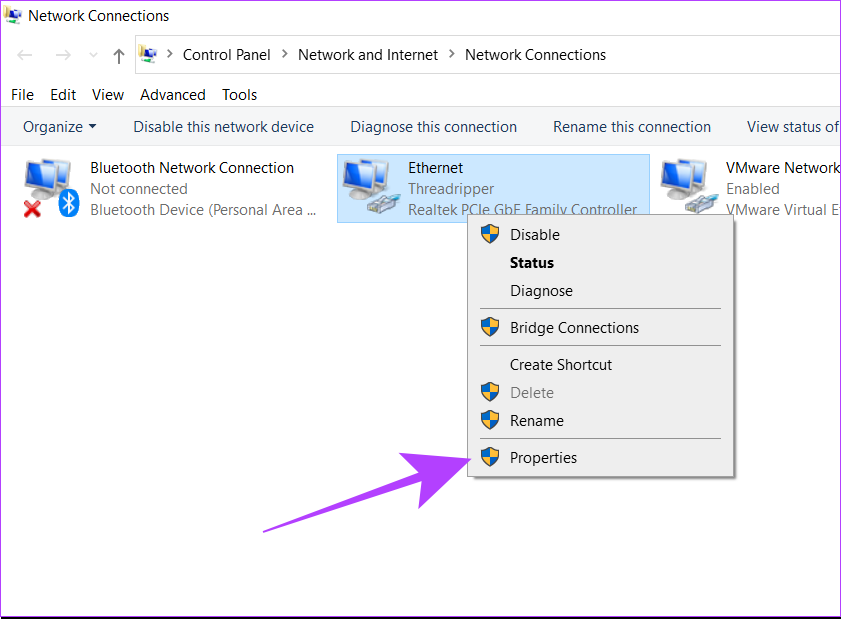
Step 5: Now, right-click on your Ethernet connection and select Properties.
Step 6: Click on Configure.

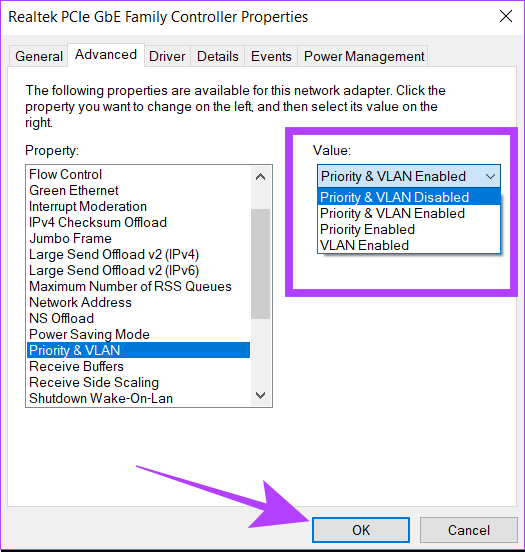
Step 7: Click on Advanced. A list will appear with all the properties of your ethernet adapter.

Step 8: From that list, search for and click Priority & VLAN.

Step 9: Select Priority & VLAN Disabled for the Value drop-down menu and click on OK.
Step 10: Reboot your computer.
This will ensure that your Windows machine will now use more than one network connection simultaneously. You can revert these settings anytime from network connections. Not sure where to access them? Refer to our guide to find the easiest ways to open network settings in Windows.
Set Network Priority in Windows
Even after being connected to two networks simultaneously, Windows still searches for the best possible network to use an internet connection. However, you can set a priority in network settings to instruct Windows on using a particular connection when it’s connected to multiple networks. Here’s how you can do that.
Step 1: Press Windows + R to open the Run dialog.
Step 2: Type ncpa.cpl in the box. Click on Ok.

Step 3: Select the network which you want to prioritize. Right-click on it and go to Properties.

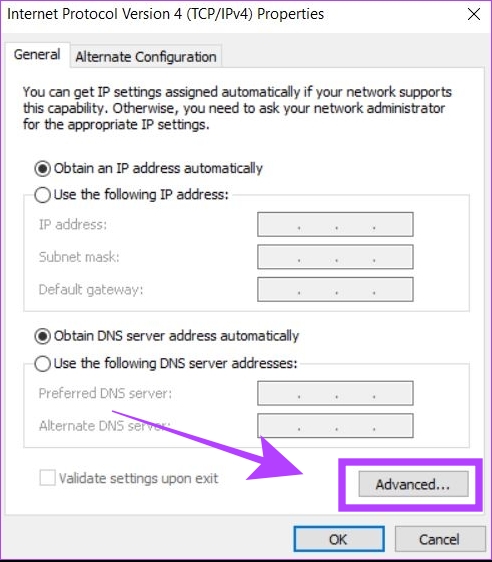
Step 4: Search for Internet Version Protocol 4 (TCP/IPv4) and click on it.

Step 5: Now, click on Properties.

Step 6: Click on Advanced. This will open the TCP/IP priority settings.
Step 7: Uncheck the Automatic metric box. This will let you enter a value in Interface Metric.
Step 8: Enter 5 in the box next to the Interface metric. Click on Ok.

Your Windows computer has now been configured to use two connections simultaneously, along with a network priority between the two.
FAQ
1. Why am I not getting internet connectivity after trying to use Wi-Fi and ethernet at the same time?
Ensure that the network you selected as priority in interface metrics has internet connectivity. Otherwise, you should change the priority to a different network.
2. Why is Windows not using my selected network priority for internet connectivity?
This can happen if you are using the IPv6 protocol for your internet connection. In such a case, repeat the network priority settings for Internet Version Protocol 6(TCP/IPv6), which can be found just below the IPv4 settings.
3. Why am I getting an error, “your network administrator doesn’t allow simultaneous connections”.
It indicates that you have configured your network to restrict the number of simultaneous connections. This may be a licensing restriction or for network security.
Was this helpful?
Last updated on 30 July, 2024
Read Next
 8 Best Ways to Fix Windows 10 Ethernet Keeps Disconnecting
On Windows 10 computers, both wired and wireless connections come with their respective problems.
8 Best Ways to Fix Windows 10 Ethernet Keeps Disconnecting
On Windows 10 computers, both wired and wireless connections come with their respective problems.
 5 Ways to Fix Ethernet Connection Not Working on Windows 11
Basic Fixes Check the Ethernet port and cable: Inspect the Ethernet plug and cable for wear and tear.
5 Ways to Fix Ethernet Connection Not Working on Windows 11
Basic Fixes Check the Ethernet port and cable: Inspect the Ethernet plug and cable for wear and tear.
 How to Disable Network Adapter (Ethernet) in Windows 11
Method 1: Using Settings Step 1: Press the Windows key on your keyboard, type Settings, and press Open.
How to Disable Network Adapter (Ethernet) in Windows 11
Method 1: Using Settings Step 1: Press the Windows key on your keyboard, type Settings, and press Open.
 4 Ways to Fix Ethernet Speed Capped at 100Mbps on Windows 11
Basic Fixes: Ensure your router and plan support 100Mbps: Connect to your Wi-Fi network and run a speed test via Fast.
4 Ways to Fix Ethernet Speed Capped at 100Mbps on Windows 11
Basic Fixes: Ensure your router and plan support 100Mbps: Connect to your Wi-Fi network and run a speed test via Fast.
 Top 6 Wi-Fi Extender Wall Plugs With Ethernet Port
A wall Wi-Fi extender is useful when you want to expand and improve the wireless network's quality inside your home.
Top 6 Wi-Fi Extender Wall Plugs With Ethernet Port
A wall Wi-Fi extender is useful when you want to expand and improve the wireless network's quality inside your home.
 6 Best CAT 8 Ethernet Cables You Can Buy
Investing in a high-quality ethernet cable is one way to ensure you get the best possible connection.
6 Best CAT 8 Ethernet Cables You Can Buy
Investing in a high-quality ethernet cable is one way to ensure you get the best possible connection.
 Top 5 Ethernet Adapters for Amazon Fire TV Stick
If your Fire TV Stick buffers media frequently, you may need to connect it to a high-speed Wi-Fi network.
Top 5 Ethernet Adapters for Amazon Fire TV Stick
If your Fire TV Stick buffers media frequently, you may need to connect it to a high-speed Wi-Fi network.
 7 Best USB to Ethernet Adapters for Laptops and MacBooks
Ethernet is the most reliable way to connect to the internet.
7 Best USB to Ethernet Adapters for Laptops and MacBooks
Ethernet is the most reliable way to connect to the internet.
The article above may contain affiliate links which help support Guiding Tech. The content remains unbiased and authentic and will never affect our editorial integrity.