No matter if they’re regular as clockwork, or good for your computer’s health and security, there’s no denying that Windows Updates can put a wrench in any workday. Particularly for those with older machines or HDD hard drives, the process can be slow and keep you from using your machine for a good few hours.
In this article, we’ll show you a neat way to permanently pause Windows updates indefinitely so you can keep control over your workflow.
A Major Annoyance
Windows users have grown accustomed to, if not irritated by, regular cumulative and security updates for their operating system on the second Tuesday of every month. In addition, there may also be hotfixes and patches in between. All these can put tremendous strain on your machine’s hardware to the point of not being able to do anything else while updates are happening.
Windows does give users the chance to pause these updates for a few days, or even choose the hours their PCs can restart. But you may not know that you can pause these updates permanently for both Windows 10 and 11.
How to Permanently Pause Windows Updates
There are two major ways of how to permanently pause Windows updates. We’ll show you both the simple and more complicated methods below.
Disable via Services
You can permanently pause Windows Updates via the Services Console. Here’s what to do:
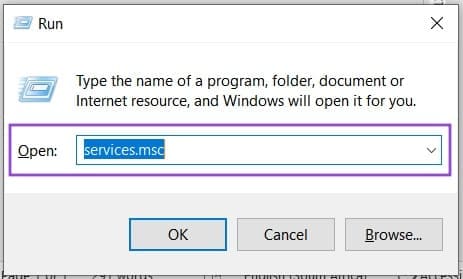
Step 1. Open the Run Dialog box by pressing Win + R.
Step 2. Enter “services.msc” and press Ctrl + Shift + Enter to open as an Administrator.
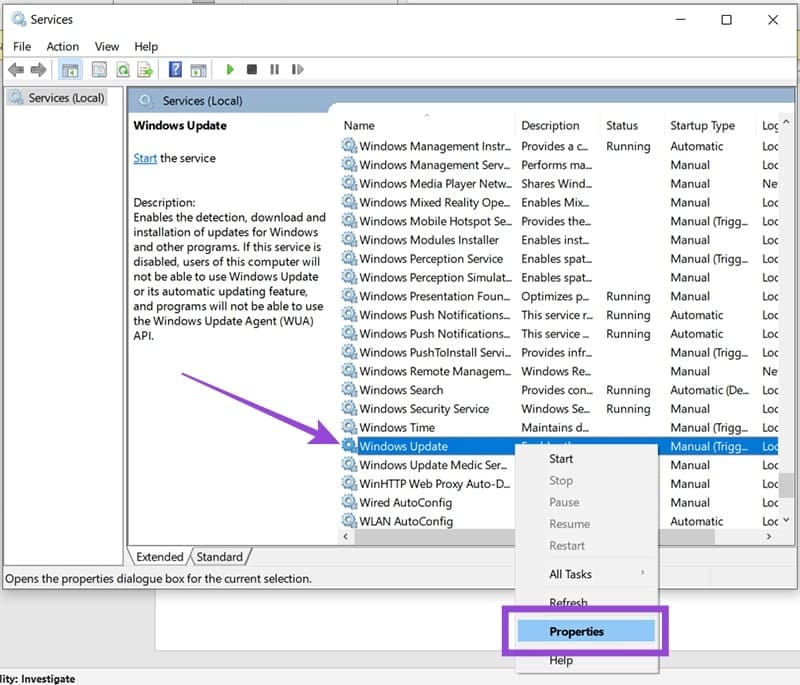
Step 3. In the Services window, scroll down to “Windows Update.”
Step 4. Right-click this option and choose “Properties” from the context menu.
Step 5. In the new window, stop the update process by clicking the “Stop” button if needed.
Step 6. Click the dropdown menu next to “Startup type” and change the option to “Disabled.”
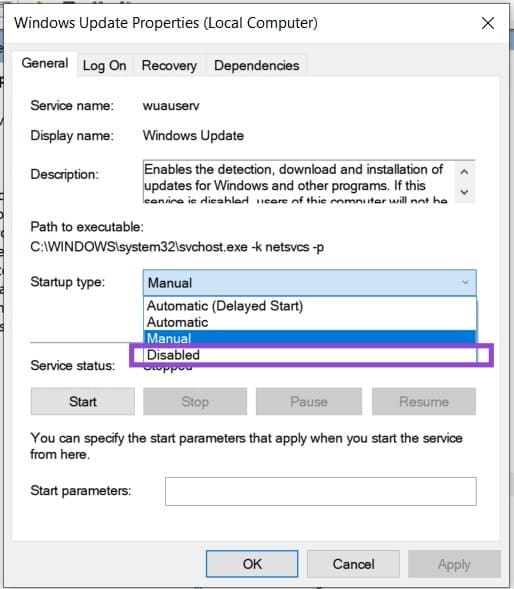
Step 7. Click the “Apply” button to make the changes and “OK” to confirm. Windows Updates should now be disabled.
Step 8. Restart your machine to implement the changes.
Pause via the Registry
The Windows Registry is where important system settings are located. You can also permanently pause updates here. This is how:
Step 1. Open the Run Dialog box (Win + R) and type “regedit” into the text box.

Step 2. Hit (Ctrl + Shift + Enter) to run as Administrator.
Step 3. In the Registry Editor Window, navigate to the following folder: HKEY_LOCAL_MACHINE > Software > Policies > Microsoft.
Step 4. Right-click the “Windows” folder and select “New,” then “Key.”

Step 5. A new key folder will be added to the Windows folder. Name it “WindowsUpdate.”
Step 6. Right-click on the “WindowsUpdate” folder and then “New” and “Key” to create another folder. Name this “AU.”

Step 7. Right-click anywhere in the window on the right and select “New” and “DWORD (32-bit) Value.”

Step 8. Name the file “NoAutoUpdate” and press “Enter” to confirm.

Step 9. To enable this value, double-click it and change the “Value data” to “1.”

Step 10. Press “OK” and your Windows will no longer automatically update. No restart is required.
A Necessary Evil
Windows Updates are a vital, if not aggravating, part of keeping your operating system healthy and secure. If you pause updates indefinitely, your PC will be at increased risk over time. It’s a good idea to re-enable Windows Updates every now and then to keep your machine up to date.
Was this helpful?
Last updated on 16 June, 2025
Read Next
 This Hidden iPhone Trick Lets You Create a 3D Model of Your Room
Note: To use this trick, you will need an iPhone equipped with a LiDAR scanner, limiting compatibility to the iPhone 12 Pro, iPhone 13 Pro, iPhone 14 Pro, and iPhone
This Hidden iPhone Trick Lets You Create a 3D Model of Your Room
Note: To use this trick, you will need an iPhone equipped with a LiDAR scanner, limiting compatibility to the iPhone 12 Pro, iPhone 13 Pro, iPhone 14 Pro, and iPhone
 How to Add Columns Permanently to All Folders in Windows 10 File Explorer
File Explorer in Windows usually shows just a few columns such as name, date, and type.
How to Add Columns Permanently to All Folders in Windows 10 File Explorer
File Explorer in Windows usually shows just a few columns such as name, date, and type.
 How to Pause or Disable OneDrive in Windows 11
Microsoft OneDrive is a cloud storage solution, included and enabled by default on all Windows 11 devices.
How to Pause or Disable OneDrive in Windows 11
Microsoft OneDrive is a cloud storage solution, included and enabled by default on all Windows 11 devices.
 How to Hide or Remove the Adobe Reader DC Tools Pane Permanently
Just launch a PDF in Adobe Reader DC, and you should find a Tools pane pop up to the right of the screen.
How to Hide or Remove the Adobe Reader DC Tools Pane Permanently
Just launch a PDF in Adobe Reader DC, and you should find a Tools pane pop up to the right of the screen.
 How to Delete WhatsApp Group Permanently (Desktop and Mobile)
How to Delete WhatsApp Group Permanently as Admin As an admin, you are authorized to delete the group from its existence.
How to Delete WhatsApp Group Permanently (Desktop and Mobile)
How to Delete WhatsApp Group Permanently as Admin As an admin, you are authorized to delete the group from its existence.
 How to Remove Chrome Extensions Permanently
Method 1: Remove Extensions Directly From the Extension Bar The easiest way to remove a Chrome extension is to click its icon in the Chrome browser's extension bar.
How to Remove Chrome Extensions Permanently
Method 1: Remove Extensions Directly From the Extension Bar The easiest way to remove a Chrome extension is to click its icon in the Chrome browser's extension bar.
 How to Delete a LinkedIn Account Permanently
Things to Know Before Deleting Your LinkedIn Account Before you delete your LinkedIn account, you should know a few things.
How to Delete a LinkedIn Account Permanently
Things to Know Before Deleting Your LinkedIn Account Before you delete your LinkedIn account, you should know a few things.
 How to Disconnect iPhone From Mac (Temporary or Permanently)
Basic Ways Unpair Bluetooth connection: Do note that turning off Bluetooth will also disconnect your Mac and iPhone from other Apple devices.
How to Disconnect iPhone From Mac (Temporary or Permanently)
Basic Ways Unpair Bluetooth connection: Do note that turning off Bluetooth will also disconnect your Mac and iPhone from other Apple devices.
The article above may contain affiliate links which help support Guiding Tech. The content remains unbiased and authentic and will never affect our editorial integrity.