We’ve all been there when we revisit older photographs, only to be troubled by the smaller resolution. A little zooming in and bam – it’s all blurry. This is a bigger issue if you wish to resize images, but the bigger sizes always pixelate. Whether you’re a budding photographer, a graphic designer, or someone who loves sharing pictures, the need to upscale an image might arise. Thankfully, there are easy ways to upscale an image on Windows and macOS. And that’s what we’ll be talking about today.

In this guide, we’ll highlight some of the easiest and most user-friendly methods to enhance your visuals without breaking a sweat. We’ll guide you through easy and effective ways to upscale your images on Windows and macOS systems. These methods will ensure that your shots look sharper and more impressive. So, grab your mouse and prepare to witness the magic of image upscaling.
Method 1: Using an Online Tool – Pixelcut
For those seeking a quick and effortless solution, Pixelcut emerges as a shining beacon in the online realm. While its mobile apps serve well to add stickers to Instagram posts and stories, the online tool has added features. This free, user-friendly tool lets you upscale images in a matter of clicks without downloading any software. Here’s how to use Pixelcut to enlarge images without losing quality for free.
Step 1: Open the web browser of your choice on your Windows or macOS device. Head over to Pixelcut’s website.
Step 2: Click on ‘Upload image’. Now, browse your computer and select the image you wish to upscale. Alternatively, you can drag and drop the image to this window.

Step 3: Once the image is uploaded, Pixelcut will automatically upscale it to a higher resolution. By default, the upscaled image will be 2x (twice) the resolution of the original image. However, you can upscale the image to 4x by clicking on the option in the left pane.
Step 4: And that’s it. With your image upscaled, you can save the image to your PC by clicking on the Download button in the top-right corner.

Method 2: Using an Offline Tool – Upscayl
As seamless as Pixelcut is, not everyone is comfortable uploading their images on the internet. If you prefer to keep your images offline and use your system’s resources for the needful, you can try Upscayl. This software boasts advanced upscaling algorithms and intuitive controls, making it a perfect choice for beginners and seasoned adventurers. Here’s how to upscale an image without losing quality.
Step 1: Go to Upscayl’s official website. You can download the application to your system based on your operating system. It’s available for Windows, macOS, and Linux. Once downloaded, install it on your system like any other application.
Step 2: Once installed, launch Upscayl. Click on Select Image and find the image you wish to upscale.

Step 3: Now, click on the button below Select Model. There are multiple models to select from here, varying from general photos to digital art. Select the model that best matches your image. If you’re unsure, select ‘General Photo (Ultrasharp)’.

Step 4: Next, change the output folder’s path. To do that, click on ‘Set Output Folder’, and select your preferred location. By default, the upscaled image will be outputted to the same folder as the original image.
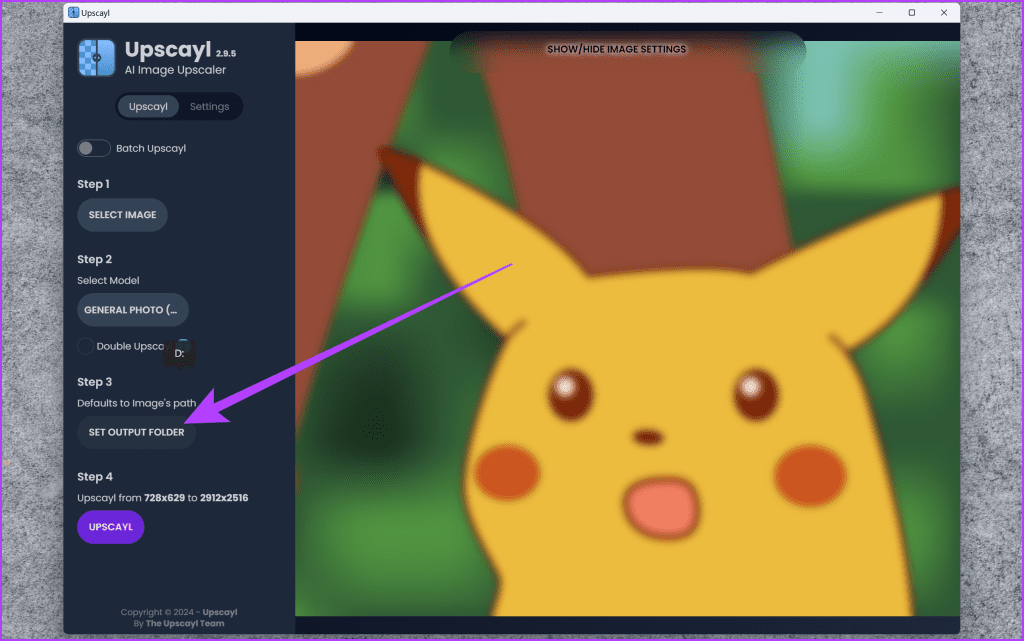
Step 5: Finally, click on Upscayl.

The app will now process and upscale your image using AI along with the model you specified. If you’re unhappy with the results, try using a different model, as mentioned in Step 3.
Method 3: Using Adobe Photoshop
When working with offline software, one thing to note is that the processing time largely depends on the available resources. If you own a system with high-end specifications, the app should upscale images faster. However, if you don’t mind paying, try using Adobe Photoshop. It’s the industry-standard software that offers unparalleled control and customization. While paid, it allows you to fine-tune your image to perfection. Here’s how to upscale an image in Photoshop.
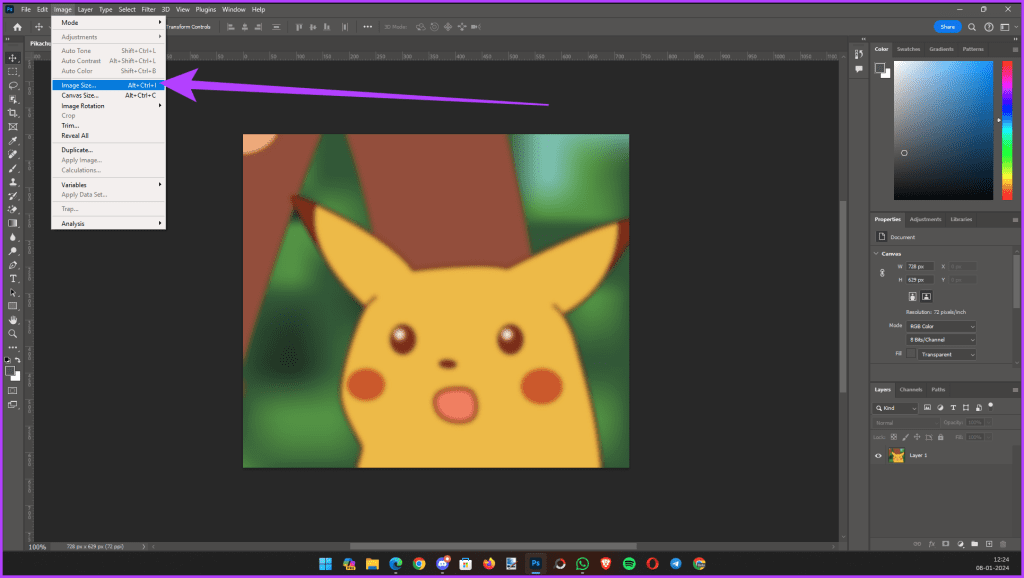
Step 1: Launch Adobe Photoshop on your system. Open the image you wish to upscale. Now, navigate to the Image menu and click on Image Size.
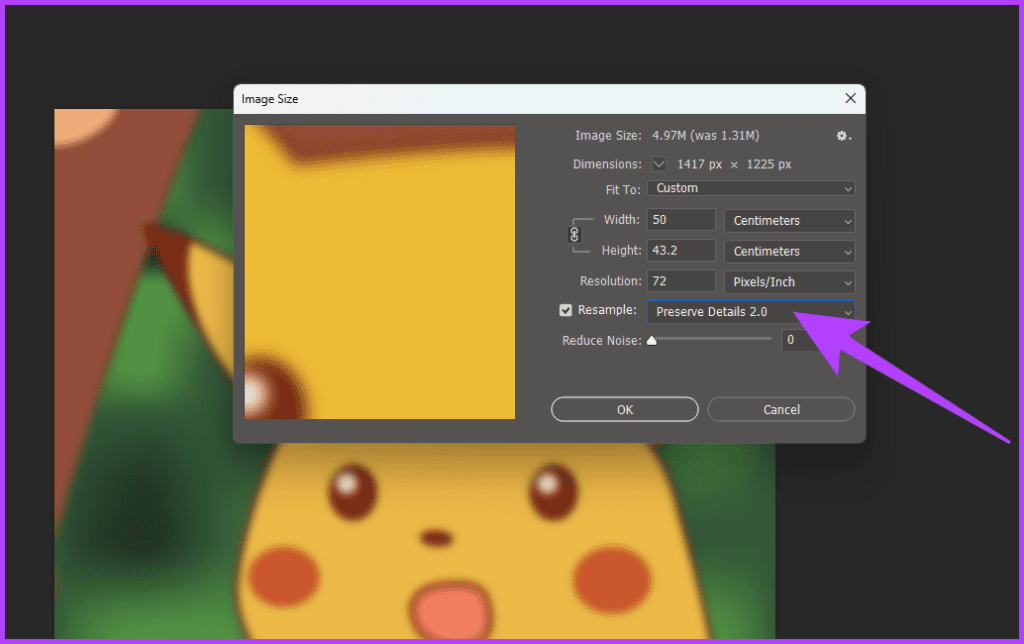
Step 2: In the new box that appears, enter your desired dimensions in the Width and Height fields. Ensure to maintain your image’s proportions.

Step 3: Now, select the Resample option and choose ‘Preserve Details 2.0’.
Step 4: Finally, click on OK. And that’s it.
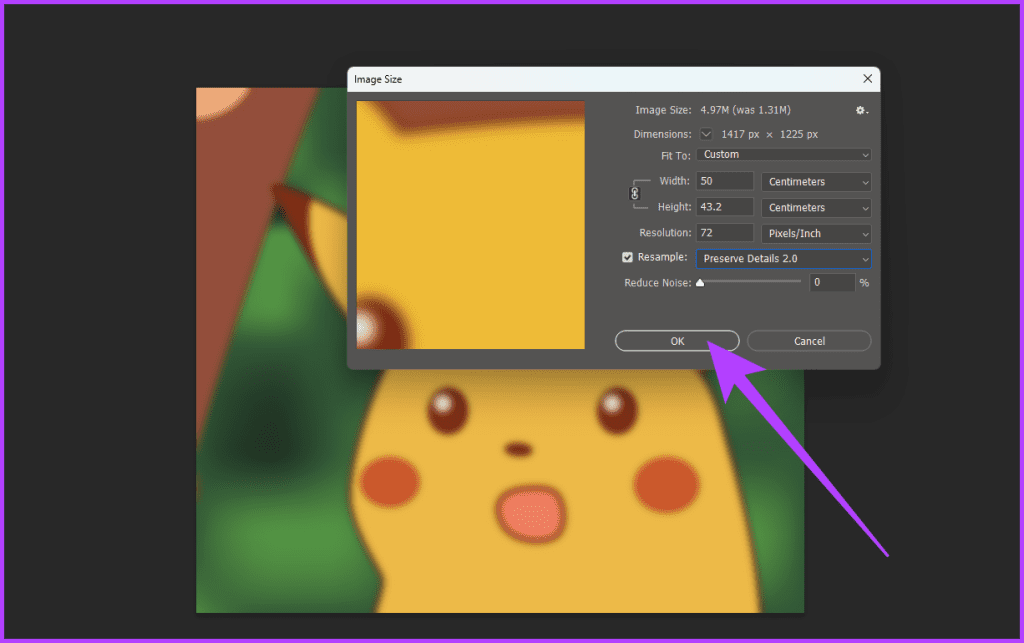
Photoshop will now process the image and upscale it based on your settings. Also, if you’re unhappy with the processing, you can use a different resample model, as mentioned in Step 3. You can also edit it further as per your needs or save it to your chosen location.
Method 4: Using GIMP
Now, what if you like the fine-tuning of Photoshop, along with the enhanced privacy, but don’t want to spend money on paid software? For budget-conscious heroes, GIMP stands as a valiant alternative to Photoshop. This powerful, free image editor offers surprisingly robust upscaling capabilities. Here’s how to upscale an image to 4K or other resolutions easily using GIMP.
Step 1: Download and install GIMP on your system. It’s free software available for all platforms.
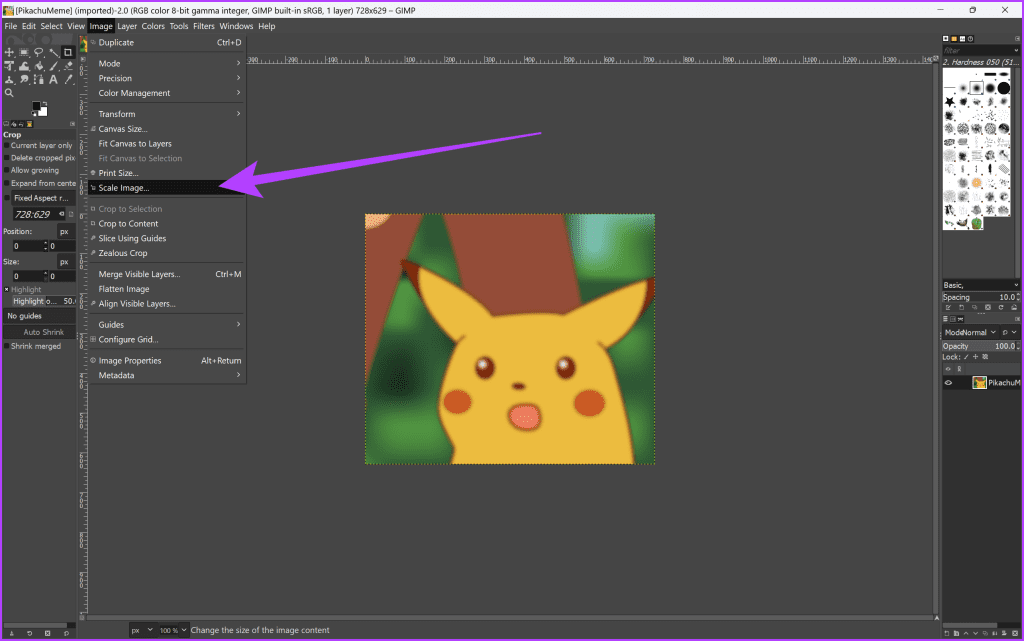
Step 2: Once done, open your image inside GIMP. Now, head to the Image menu and select Scale Image.
Step 3: Similar to Photoshop, modify the width and height parameters to achieve the desired upscale effect. Then, in the Interpolation dropdown menu, choose Cubic.

Step 4: Finally, click on Scale.

And that’s it. GIMP will automatically enhance and upscale your image.
Say No to Pixelation
And there you have it – a plethora of options to effortlessly upscale your images on both Windows and macOS. Whether you prefer the simplicity of online tools like Pixelcut, the offline capabilities of Upscayl, the precision of Adobe Photoshop, or the freedom of GIMP, enhancing your visuals has never been easier. Happy editing!
Was this helpful?
Last updated on 19 February, 2024
Read Next
 macOS Sonoma vs macOS Ventura: What’s the Difference
As of writing this post, Apple has released the macOS Sonoma Public Beta for all users who want to try out the new Mac software upgrade.
macOS Sonoma vs macOS Ventura: What’s the Difference
As of writing this post, Apple has released the macOS Sonoma Public Beta for all users who want to try out the new Mac software upgrade.
 Best Ways to Capture Scrolling Screenshots on macOS
When you want to capture an entire webpage, document, or any content that extends beyond the visible screen, a scrolling screenshot is the best route.
Best Ways to Capture Scrolling Screenshots on macOS
When you want to capture an entire webpage, document, or any content that extends beyond the visible screen, a scrolling screenshot is the best route.
 How to Disable Chrome Incognito Mode on Windows, macOS, and Android
There’s little doubt in regards to the versatility that Chrome’s Incognito mode brings to the table.
How to Disable Chrome Incognito Mode on Windows, macOS, and Android
There’s little doubt in regards to the versatility that Chrome’s Incognito mode brings to the table.
 How to Disable Dark Mode in Windows 10, macOS, Android, and iOS
Few things are more jarring than opening a program or app on your computer, phone, or tablet, and a burst of brightness hits your eyes.
How to Disable Dark Mode in Windows 10, macOS, Android, and iOS
Few things are more jarring than opening a program or app on your computer, phone, or tablet, and a burst of brightness hits your eyes.
 How to Record Your Screen with Zoom on Windows 10 and macOS
Whatever your reasons for wanting to record your screen with Zoom on your computer, the tool is much better than its competitors.
How to Record Your Screen with Zoom on Windows 10 and macOS
Whatever your reasons for wanting to record your screen with Zoom on your computer, the tool is much better than its competitors.
 How to fix Bluetooth Connectivity Issues on macOS Monterey
macOS Monterey brought several exciting features such as Universal Control, Live Text, Focus Mode, Shortcuts, etc.
How to fix Bluetooth Connectivity Issues on macOS Monterey
macOS Monterey brought several exciting features such as Universal Control, Live Text, Focus Mode, Shortcuts, etc.
 macOS: How to Set Environment Variable
On the Mac, environmental variables store information, like who the current user is, default paths to commands and the name of the host computer.
macOS: How to Set Environment Variable
On the Mac, environmental variables store information, like who the current user is, default paths to commands and the name of the host computer.
 Download Official macOS Sonoma Wallpapers (4K)
Apple has unveiled some interesting hardware and software products in WWDC 2023, including iOS 17 and macOS Sonoma.
Download Official macOS Sonoma Wallpapers (4K)
Apple has unveiled some interesting hardware and software products in WWDC 2023, including iOS 17 and macOS Sonoma.
The article above may contain affiliate links which help support Guiding Tech. The content remains unbiased and authentic and will never affect our editorial integrity.