Hey you! Welcome to what’s probably going to be my shortest post for a long time. Today, I’m just going to show you how to fix Automator folder actions that have stopped working. Skip to the next section for a quick and easy solution to this problem!

I have been uploading a lot of Automator and Shortcuts content over the last month in preparation for the Shortcuts release on macOS Monterey. While writing these posts and using these apps, I ran into a super frustrating issue.
A folder action I had created in Automator wasn’t running.
At first, I thought maybe I had just created a broken Automator routine. But I noticed that whenever I ran it manually from within the Automator app, it would work fine. It wasn’t that my folder action was bad – it was that, for some reason, it wasn’t running on its own. In other words, it wasn’t automating.
I tried to find a solution to this issue online and could find next to no information on this issue. It makes sense, considering that Automator isn’t a very popular app. But this only made things even more frustrating.
Eventually, though, I was able to find a fix using an app I had never heard of – Folder Actions Setup. That’s the fix I’m going to be sharing with you.
To be clear, this is the only solution we’re going to be covering. I’m not going to show you how to fix a folder action that isn’t working because it wasn’t created properly. We’re specifically going to be focusing on Automator folder actions that won’t run unless you force them to.
For other issues, I recommend sharing screenshots of your folder action on the appropriate StackExchange and Reddit forums! They’ll be able to read your workflow and spot the issue.
Alright, let’s get started!
How to fix Automator folder actions that aren’t working
To fix this issue, we’re going to use the Folder Actions Setup app. This is an app that lets you manage all of the Automator folder actions you’ve created. To find it, press cmd + spacebar to open Spotlight, then type “Folder Actions Setup” and press return.

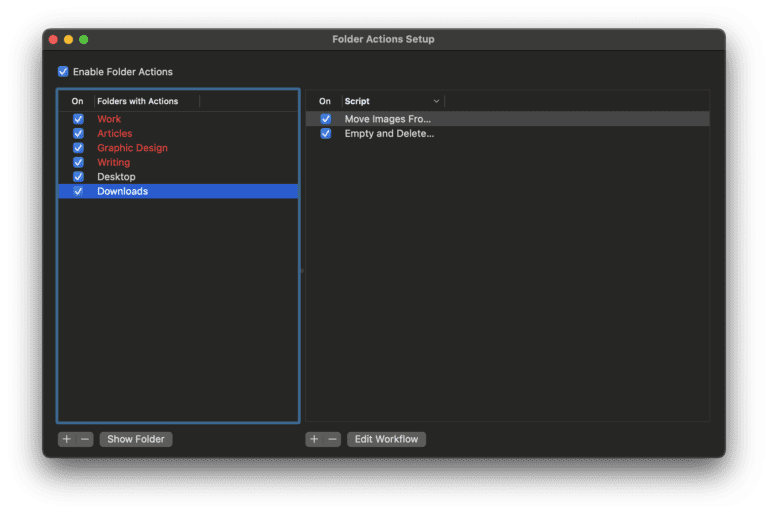
Once you do that, this app will open:
You’ll notice a few things here.
First, some of the folders listed might be red. If a folder is red, it means that there aren’t any folder actions attached to that folder. Even if a folder has an action tied to it that isn’t turned on, it still won’t appear red.
Second, you’ll notice that there are checkmarks everywhere. Each checkmark is used to control which folder actions are activated and which aren’t. If every box has a check in it, then your folder action probably is running. It just isn’t working properly, which means you need to keep editing it in Automator.
If you’re like me, then you’ll notice that a checkmark might be missing next to the folder action you are trying to get to work. As you’ve probably guessed already, go ahead and add a check next to that workflow! Then, test that action and see if your workflow is working now.
Here’s a quick process you can follow to make sure your folder action is activated:
- Make sure that the Enable Folder Actions checkbox has a check in it. It’s located in the top-left of the window.
- Find the folder that your folder action should be attached to on the left-hand side of the window. In my example above, the action I was trying to get to work was attached to the Downloads folder, so I selected that folder in the left-hand pane.
- If you can’t find the folder you’re looking for, click the + icon in the bottom-left of the screen. Then, navigate through Finder to find the folder you’re looking for and click Open. That will add it to the list of folders in the left-hand pane of this window.
- Make sure there is a checkmark next to the folder that contains the folder action you are trying to get to run. If there isn’t, click the box next to the folder’s title to add a checkmark.
- Select that folder from the left-hand pane. When you do, you’ll see a list of all of the folder actions that have been attached to this folder. There will be a checkbox next to each action. Make sure there is a checkmark next to each folder action you want to run. Conversely, remove checkmarks from the action that you don’t want to run.
- If you want to delete a folder action, select that action in the right-hand pane of the Folder Actions Setup window and click the – icon at the bottom of the right-hand pane. Don’t click the – icon on the bottom-left side of the window or you will remove a folder from the list, not the action.
- To edit a folder action, select it and click the Edit Workflow button at the bottom-right of the window. That will open the folder action in Automator.
Your Automator folder actions should be working now!
And that’s it! That’s probably a bit more detail than most of you need to get your Automator folder actions working again. I wanted to make sure that everyone could find the solution to their issue here, though, so hopefully, this solved your issue!
Again, if you weren’t able to fix your folder action using this method, I recommend sharing it on a StackExchange forum. The users there are pretty good about helping you find a quick solution to your problem.
Was this helpful?
Last updated on 22 June, 2023
Read Next
 How to Personalize Siri’s Response and Actions on iPhone
Siri is a virtual assistant available on Apple products.
How to Personalize Siri’s Response and Actions on iPhone
Siri is a virtual assistant available on Apple products.
 How to Use Snipping Tool Text Actions in Windows 11
The ability to capture bite-sized or specific information from your screen and share it across has never been easier, thanks to Snipping Tool.
How to Use Snipping Tool Text Actions in Windows 11
The ability to capture bite-sized or specific information from your screen and share it across has never been easier, thanks to Snipping Tool.
 How to Fix Mac Folder With Question Mark
Few things are as frustrating as trying to start your Mac and ending up with the dreaded Mac folder with a question mark.
How to Fix Mac Folder With Question Mark
Few things are as frustrating as trying to start your Mac and ending up with the dreaded Mac folder with a question mark.
 How to Set Up Local Folder Sharing Between Windows and Mac
If you use both a Windows PC and a Mac, you might be spending quite some time fumbling around with flash drives to transfer data between them.
How to Set Up Local Folder Sharing Between Windows and Mac
If you use both a Windows PC and a Mac, you might be spending quite some time fumbling around with flash drives to transfer data between them.
 Top 6 Ways to Fix Cannot Expand Folder Error in Outlook
Microsoft Outlook users have been facing a particular error for the past decade.
Top 6 Ways to Fix Cannot Expand Folder Error in Outlook
Microsoft Outlook users have been facing a particular error for the past decade.
 How to Fix the Black Folder Background Issue in Windows 10
Do you have black squares show up all of a sudden behind certain folders in Windows 10?
How to Fix the Black Folder Background Issue in Windows 10
Do you have black squares show up all of a sudden behind certain folders in Windows 10?
 9 Best Ways to Fix OneDrive Can’t Delete Folder on Windows 10
Most Windows users often rely on OneDrive since it comes preloaded.
9 Best Ways to Fix OneDrive Can’t Delete Folder on Windows 10
Most Windows users often rely on OneDrive since it comes preloaded.
 How to Fix Compressed Folder Is Invalid Error on Windows 11
Compressed folders ensure you can store much data in comparatively less space.
How to Fix Compressed Folder Is Invalid Error on Windows 11
Compressed folders ensure you can store much data in comparatively less space.
The article above may contain affiliate links which help support Guiding Tech. The content remains unbiased and authentic and will never affect our editorial integrity.