What Does Browser Hijacker Do?
A browser hijacker alters your web browser configurations, redirecting you to revenue-generating sites for hackers or installing spyware on your system to steal sensitive data. It can affect your browser in the following ways:
- Changes your default search engine: You’ll be redirected to an unsafe website/webpage containing malicious links, each time you perform a web search.
- Installs unknown toolbars and browser extensions: Browser hijackers install unknown toolbars and extensions, bombarding you with frequent pop-ups and ruining your web browsing experience.
- Tracks your online activity: It tracks your location and web searches, helping scammers build a profile on you.
- Steals your data: Browser hijackers steal saved passwords from your browser and can even take over your system by installing ransomware.
- Makes the browser sluggish: It drastically slows down your web browser and web pages take forever to load.
Common Fixes
- Remove unnecessary installed software: An installed software on your PC may be rigged with browser hijacker malware. Head to Windows Settings > Apps > Installed apps, and review all installed applications to uninstall the unnecessary ones.
- Run a Windows security scan: Open the Windows Security app from the Search Menu, select ‘Virus & threat protection’ from the left sidebar, and click Quick scan to scan and remove the browser hijacker malware.
Fix 1: Check Search Engine Settings
A browser hijacker changes your default web search engine to redirect you to a malicious website. Head to Google Chrome settings to check and change your default search engine.
Step 1: Click the three-dot menu at the top right of Google Chrome and open Settings.
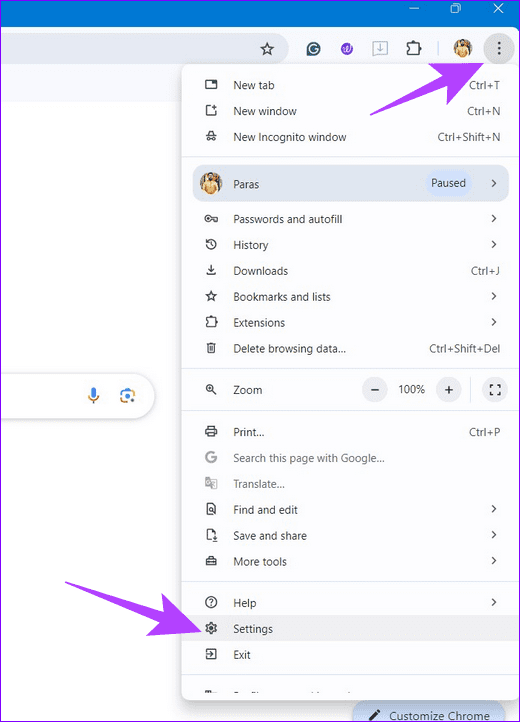
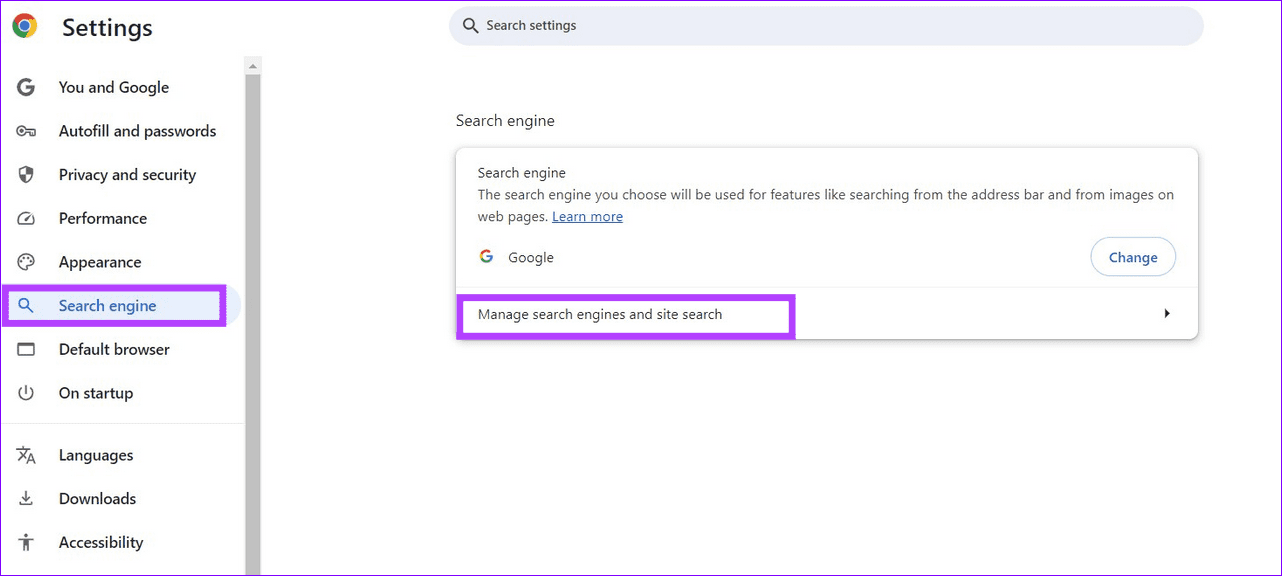
Step 2: Select Search engine from the left sidebar and click Manage search engines and site search.
Step 3: Click the three-dot menu next to the search engine you wish to use and select Make default.

Fix 2: Disable Chrome Extensions and Reload
If your default web search engine is unaltered, the hijacker malware has installed a browser extension to force redirect your web searches. To fix it, review all installed extensions in Google Chrome and disable or remove them.
Step 1: Open Google Chrome, click its three-dot menu at the top-right, and select Extensions > Manage Extensions.

Step 2: Toggle off all installed extensions to disable them and retry searching the web. If you notice any extension you haven’t installed, click Remove to delete it.

Fix 3: Clear Cache, Cookies, and Browsing History
If the search engine in Google Chrome keeps changing randomly, clearing your web browsing history, cookies, and cache files should fix it. Here’s how to do it:
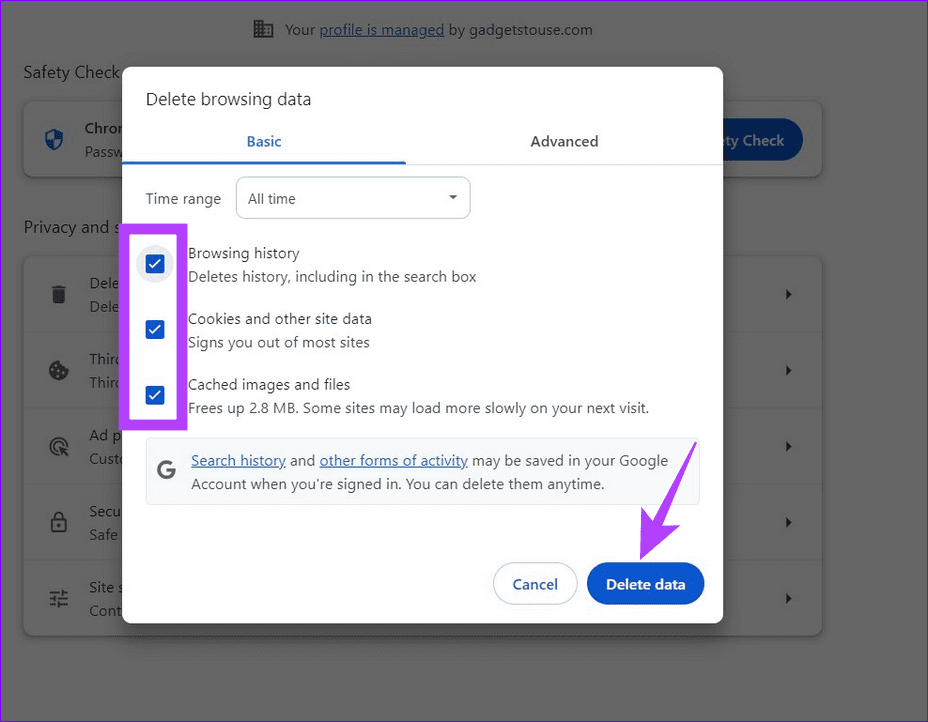
Step 1: Access Google Chrome settings from the three-dot menu at the top right corner.

Step 2: Select Privacy and security from the left sidebar, and click Delete browsing data.

Step 3: Mark ‘Browsing history‘, ‘Cookies and other site data‘, ‘Cached images and files‘, and click Delete data to remove them.
Fix 4: Flush Out Google Chrome DNS Cache
A browser hijacker may corrupt Google Chrome’s DNS cache records, causing your web searches to redirect to an unsafe webpage. Flush out its DNS cache manually to restore normalcy.
Step 1: Open a new tab in Google Chrome, paste the below path in the address bar, and hit Enter.
chrome://net-internals/#dns
Step 2: Click the Clear host cache to flush Google Chrome’s DNS cache.

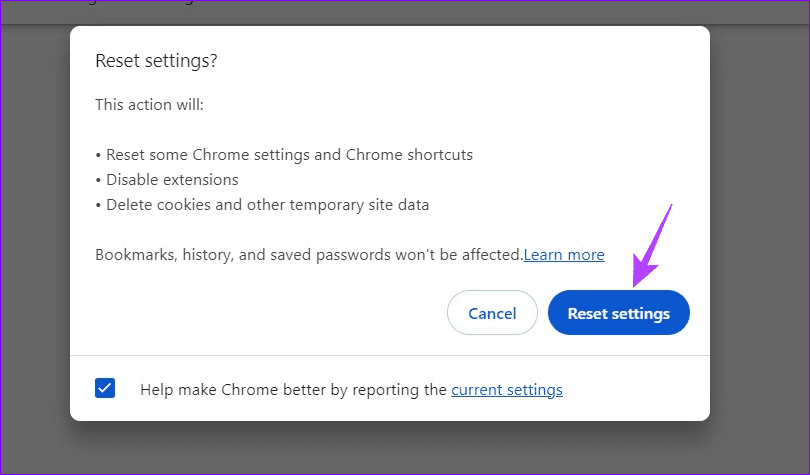
Fix 5: Reset Google Chrome Settings
Resetting Google Chrome settings is another nifty technique to eliminate any adware or hijacker affecting it. This also reverts Chrome to the default Google search engine.
Note: Resetting Google Chrome won’t remove your bookmarks, history, and saved passwords.
Step 1: Open Google Chrome settings, select Reset settings from the left sidebar, and click Restore settings to their original defaults.
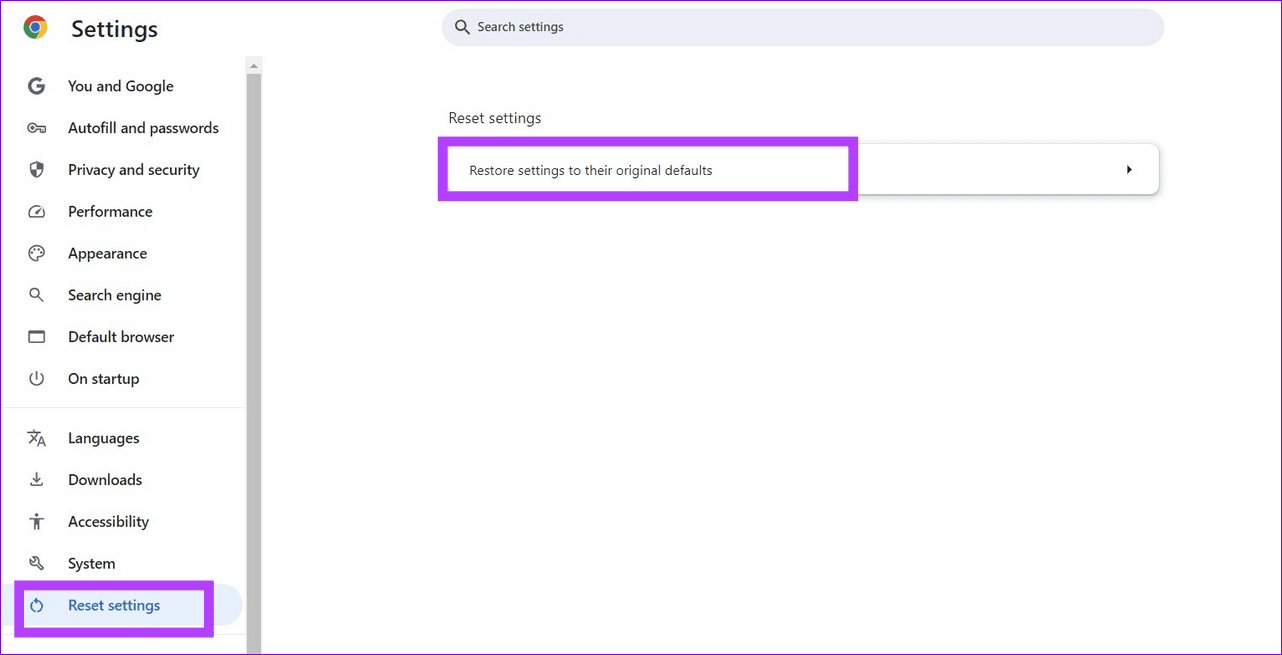
Step 2: Click Reset settings to restore Google Chrome to its factory defaults.
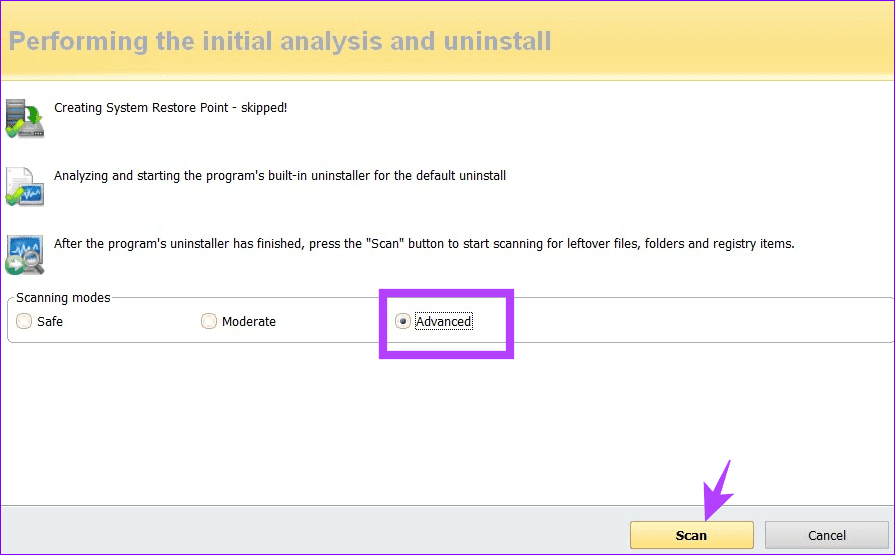
Fix 6: Remove Chrome Using Revo Uninstaller
Lastly, if nothing works, I recommend removing Google Chrome and deep cleaning its registry keys and leftover files using Revo Uninstaller to install it from scratch.
Note: Uninstalling Google Chrome using the Revo Uninstaller app will erase everything, including bookmarks, which will need to be set up again.
Step 1: Download the Portable Revo Uninstaller app and extract its contents.

Step 2: Double-click the RevoUPort.exe file to launch the Revo Uninstaller.

Step 3: Select Google Chrome under the Application list and click Uninstall.

Step 4: Enable ‘Make a System Restore Point before uninstall‘ and click Continue.

Step 5: Select Advanced under ‘Scanning modes’ and click Scan.
Step 6: Click Next to delete the leftover Google Chrome registry entries.

Step 7: Finally, click Finish to flush all the leftover Google Chrome files and folders. Exit the app and reinstall Google Chrome.

Tips to Prevent Browser Hijackers
Hijackers taking over Google Chrome surely isn’t an ideal experience. Once you remove them from your browser, follow these easy tips to prevent them from re-entering.
- Avoid downloading third-party software from unknown and unofficial websites.
- Don’t click and download apps from affiliate links.
- Keep Google Chrome up to date.
- Scan your computer for viruses and malware periodically.
Was this helpful?
Last updated on 21 August, 2024
1 Comment
Leave a Reply
Read Next
 Kiwi Browser vs Google Chrome: Which Android Browser Should You Use
The Google Play store is chock-full of browser apps, all of which boast of a single stand out feature that differentiates them from the rest.
Kiwi Browser vs Google Chrome: Which Android Browser Should You Use
The Google Play store is chock-full of browser apps, all of which boast of a single stand out feature that differentiates them from the rest.
 Mi Browser vs Google Chrome: Which One Should You Use
Google Chrome leads the mobile web browser race by a larger market share.
Mi Browser vs Google Chrome: Which One Should You Use
Google Chrome leads the mobile web browser race by a larger market share.
 How to Import Chrome Bookmarks to Samsung Internet Browser
Samsung Internet Browser is one of the finest alternatives to Chrome on Android, answering many of the persistent usability issues in Google’s flagship browser.
How to Import Chrome Bookmarks to Samsung Internet Browser
Samsung Internet Browser is one of the finest alternatives to Chrome on Android, answering many of the persistent usability issues in Google’s flagship browser.
 How to Remove Mi Browser From Swipe up Gesture and Disable the App
Stop Mi Browser From Opening When You Swipe up on Home Screen Step 1: Open the Settings app.
How to Remove Mi Browser From Swipe up Gesture and Disable the App
Stop Mi Browser From Opening When You Swipe up on Home Screen Step 1: Open the Settings app.
 How to Remove a Google Account From Chrome
Note: It’s best to review the Chrome Sync settings and back up any unsynced data to your Google Account before proceeding.
How to Remove a Google Account From Chrome
Note: It’s best to review the Chrome Sync settings and back up any unsynced data to your Google Account before proceeding.
 How to Remove Saved Passwords From Google Chrome
Method 1: Use Google Chrome Desktop Step 1: Open Google Chrome, click the three-dot menu, and select Settings.
How to Remove Saved Passwords From Google Chrome
Method 1: Use Google Chrome Desktop Step 1: Open Google Chrome, click the three-dot menu, and select Settings.
 How to Install Chrome Extensions in Kiwi Browser and Other Cool Tips
How to Install Chrome Extensions on Kiwi Installing extensions on the Kiwi browser is straightforward.
How to Install Chrome Extensions in Kiwi Browser and Other Cool Tips
How to Install Chrome Extensions on Kiwi Installing extensions on the Kiwi browser is straightforward.
 How to Turn Off Trending Searches in Google App and Browser
Google products are fantastic, but certain features are just a pain to deal with or outright distracting.
How to Turn Off Trending Searches in Google App and Browser
Google products are fantastic, but certain features are just a pain to deal with or outright distracting.
The article above may contain affiliate links which help support Guiding Tech. The content remains unbiased and authentic and will never affect our editorial integrity.


I’ve done all of that. Nothing works. I have now been living with this for over three years. I have deleted email addresses, Got new services, new one, new email and one time I moved ar the same time. It took a week and my browser and setting were one again.