Common Fixes
- Disconnect the Docking Station: If your PC is connected to monitor via a docking station, disconnect it, and connect the monitor directly to your PC to resolve Night light issues.
- Check the Night light intensity: Open Windows Settings, select System from the sidebar, and click Display. Select Night light, and drag its Strength meter to adjust the Night light intensity.
- Enable the location services: If location services are disabled on your PC, some Night light features such as ‘Sunset to sunrise’ schedule remains greyed out. Enable location services from Windows Settings > Privacy & security > Location, and turn on the Location services toggle.
- Adjust the monitor display settings: Certain new-age monitors such as Samsung M7 and Benq models come with an in-built eye-saver mode which works similar to the Night light feature. Disable it from monitor settings to notice Windows 11’s Night light feature in action.
- Update Windows 11: Open Windows Settings, select Windows Update from the left sidebar, and install available system updates.
Fix 1: Turn off the Night Light Schedule
If you’ve automated the Night light schedule before, the feature will only work at set times, which may seem like its not working accurately. Disable the Night light schedule and turn on the feature manually to experience it.
Step 1: Press the Windows + I shortcut to open Settings, select System from the left sidebar, and click Display.

Step 2: Select Night light under ‘Brightness & color’.
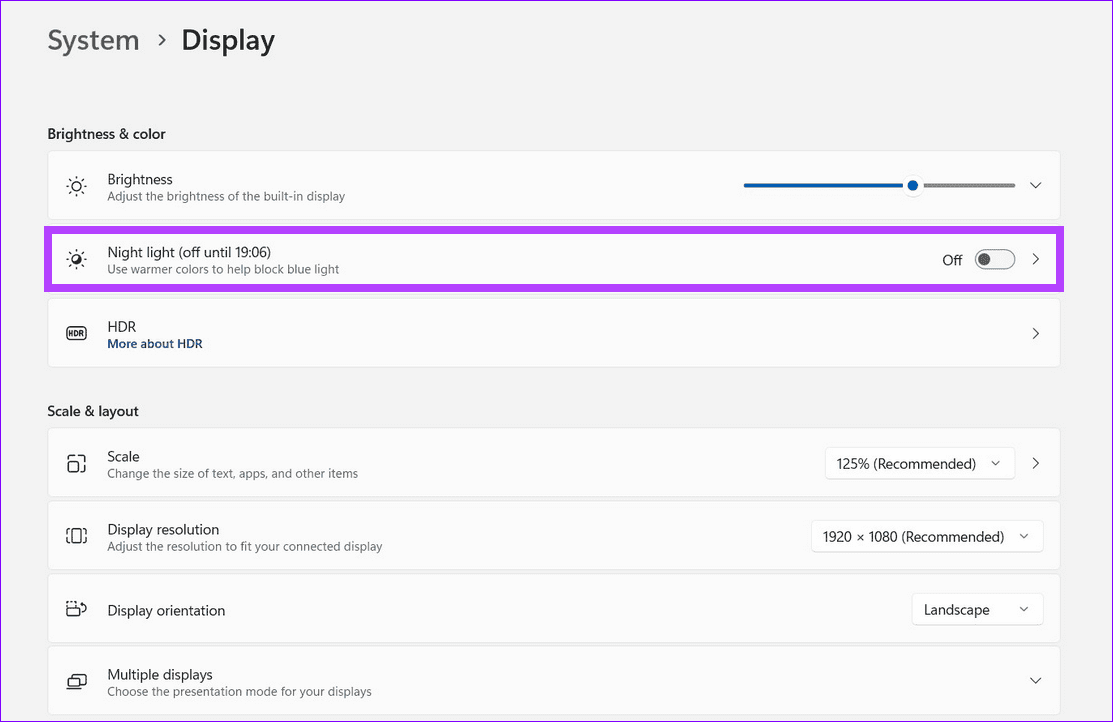
Step 3: Turn off the Schedule night light toggle to disable it. Finally, enable the Night light toggle to activate it.

Fix 2: Correct Device Date and Time
Wrong date and time settings on your PC can result in errors with default Windows functions such as Night light. Correct them using Windows Settings to restore normalcy.
Step 1: Open Windows Settings using the Windows + I shortcut, select Time & language from the sidebar, and click Date & time.

Step 2: Toggle on Set time automatically to correct it.

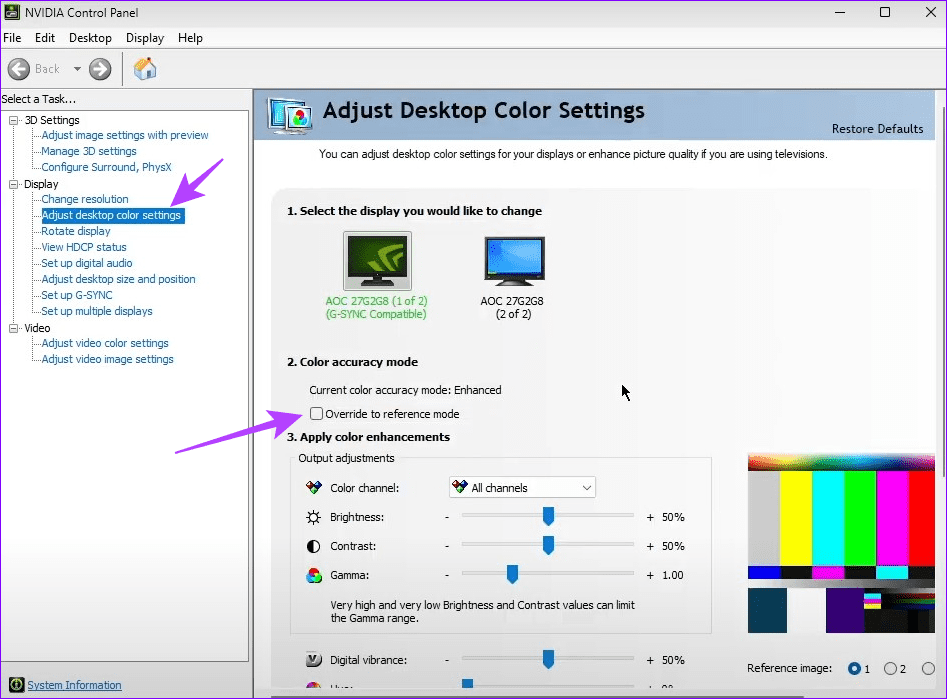
Fix 3: Disable ‘Override to Reference Mode’ in Nvidia Control Panel
If your PC has a dedicated NVIDIA graphics processor with ‘Override to Reference Mode’ enabled in its settings, it will ignore color adjustments from the OS such as Night light. Disable it from the NVIDIA Control Panel app to resolve the Night light not working issue.
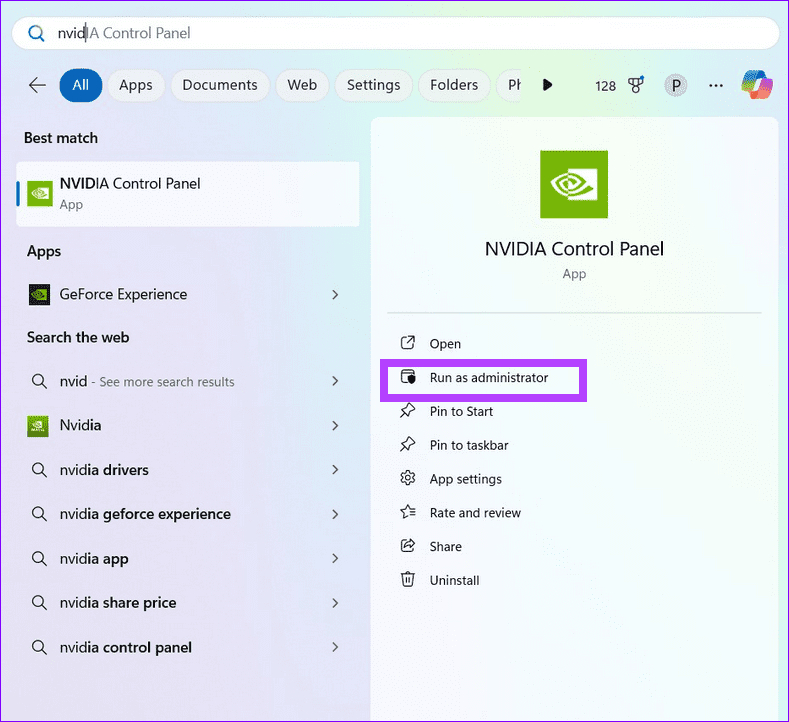
Step 1: Press the Windows key, search NVIDIA Control Panel, and click Run as administrator.
Step 2: Expand Display, select Adjust desktop color settings, and disable Override to reference mode under the ‘Color accuracy mode’ section.
Fix 4: Reinstall the Display Drivers
Corrupt or buggy display drivers can malfunction the Night light feature on Windows 11. Reinstall display drivers using the Device Manager app and try again.
Step 1: Search Device Manager in the Windows Search Menu and click to open it.

Step 2: Expand Display adapters, right-click your adapter, and select Uninstall device.

Step 3: Reboot PC and let Windows 11 automatically install new compatible display adapter drivers. If your PC has a dedicated graphics card, head to its product website to install the latest drivers.
Fix 5: Reset Night Light Settings
Lastly, if nothing works, tweak the Windows registry files to reset Night light settings, fixing issues preventing you from enabling it.
Note: Backup Windows Registry using File > Export in the Registry Editor app before making any changes.
Step 1: Press the Windows + R shortcut to open the Run dialog, type regedit, and press Enter.

Step 2: Paste the below path in the navigation bar, hit Enter, and locate two registry keys containing the name ‘bluelightreduction‘.
HKEY_CURRENT_USER\Software\Microsoft\Windows\CurrentVersion\CloudStore\Store\DefaultAccount\Cloud

Step 3: Right-click the first key and select Delete. Repeat the action with the second key and reboot your PC to save changes.

Was this helpful?
Last updated on 05 August, 2024
3 Comments
Leave a Reply
Read Next
 2 Fixes When the Windows 11 Caps Lock Light Is Not Working
Basic Fixes: Check for keyboard problems: If the Caps Lock light does not work on Windows 11, it may indicate a physical or mechanical issue.
2 Fixes When the Windows 11 Caps Lock Light Is Not Working
Basic Fixes: Check for keyboard problems: If the Caps Lock light does not work on Windows 11, it may indicate a physical or mechanical issue.
 7 Ways to Fix Red Light Error on Motherboard
In the intricate world of computer hardware, the motherboard is your system's backbone.
7 Ways to Fix Red Light Error on Motherboard
In the intricate world of computer hardware, the motherboard is your system's backbone.
 4 Fixes for Night Shift Not Working on iPhone and Mac
Basic Fix Update software version: Update the software version on your iPhone or Mac to fix bugs causing the issue.
4 Fixes for Night Shift Not Working on iPhone and Mac
Basic Fix Update software version: Update the software version on your iPhone or Mac to fix bugs causing the issue.
 Top 6 Ways to Fix Amazon Echo Stuck on Blue Light
An Amazon Echo speaker or display can be of great help if you wish to add a touch of smartness to your home.
Top 6 Ways to Fix Amazon Echo Stuck on Blue Light
An Amazon Echo speaker or display can be of great help if you wish to add a touch of smartness to your home.
 Why Is My Chromebook Battery Light Blinking White: 4 Ways to Fix the Issue
Many Chromebook users noticed the LED near the power cord connector sometimes blinks white.
Why Is My Chromebook Battery Light Blinking White: 4 Ways to Fix the Issue
Many Chromebook users noticed the LED near the power cord connector sometimes blinks white.
 Top 4 PDF Readers with Night Mode
After a long day of work or while late at night, our eyes do need some much-needed respite from the otherwise strong glare on our screens.
Top 4 PDF Readers with Night Mode
After a long day of work or while late at night, our eyes do need some much-needed respite from the otherwise strong glare on our screens.
 How to Get LED Notification Light on Samsung Galaxy Smartphones
https://youtu.be/-0j_UPYcV_Y Note: This trick is valid only on Galaxy phones with an OLED display, like the S23, S24 series, etc.
How to Get LED Notification Light on Samsung Galaxy Smartphones
https://youtu.be/-0j_UPYcV_Y Note: This trick is valid only on Galaxy phones with an OLED display, like the S23, S24 series, etc.
 5 Best Rechargeable Light Bulbs for Emergency You Can Buy
A dependable light source is indispensable during a power outage.
5 Best Rechargeable Light Bulbs for Emergency You Can Buy
A dependable light source is indispensable during a power outage.
The article above may contain affiliate links which help support Guiding Tech. The content remains unbiased and authentic and will never affect our editorial integrity.

None of these suggestions work – I’ve even completely reinstalled windows 11 Pro and this feature still does not turn itself on and off.
Another broken windows feature.
You’re listing the particularly obvious items in #1 and #2, and then going into obscure and usually irrelevant solutions after that — all while ignoring the most important question to ask: “Is the computer connected directly to the monitor via a cable, or is it connecting to a docking station?” If the answer is “I’m connected to a docking station,” then … ding-ding-ding … that’s your problem 99 times out of 100. No need to uninstall device drivers (how the heck are you supposed to see to reboot when you’ve just uninstalled your drivers and lost all visuals???), or edit obscure registry keys, or any of the other silly stuff. If you’re connecting via a docking station, even if you’ve been successfully using that docking station for awhile, just disconnect it and connect your computer directly to the monitor. Odds are that’s your problem every time. If you don’t use a docking station, then feel free to go down this list, but you should always check the most likely culprit FIRST and quit wasting people’s time and energy with the other stuff.
Mine was absolutely the docking station. At first, though I disconnected & reconnected it before and after rebooting, it still didn’t work on the monitors or the laptop itself.
I was about to start fiddling with the registry when I decided to try all the methods at the same time.
I disconnected the docking station, then rebooted, then got it working on the laptop alone first, then reconnected the docking station & it started working again as normal… think Ill get a new station.