Fix 1: Clear the Cache of the Google App
This is a simple solution you can try before moving to more rigorous methods of controlling battery drain. Clearing the cache won’t impact your login data and other settings. It’s different from clearing data of apps so you don’t have to be worried.
Step 1: Open the Settings app > go to Apps > scroll through the list of apps and select Google.


Step 2: Tap on Storage > select Clear cache at the bottom-left corner.


Fix 2: Prevent Background Data Usage
If the Google app or Google Play Services keeps consuming Wi-Fi or mobile data in the background, your battery can drain quickly. Here’s how to turn off the app’s background data usage.
Step 1: Open the Settings app > go to Apps > scroll through the list of apps > tap on Google.
Step 2: Tap on Mobile data > turn off the toggle for Allow background data usage.


3. Restrict Battery Usage
The Google app’s battery optimization setting is disabled. This means the app can run in the background and also consume data. Optimizing the battery usage of the app can help save extra battery juice and resources.
Step 1: Open Settings > Apps. Scroll through the list of apps and tap on Google.
Step 2: Tap on Battery > select the Restricted option.


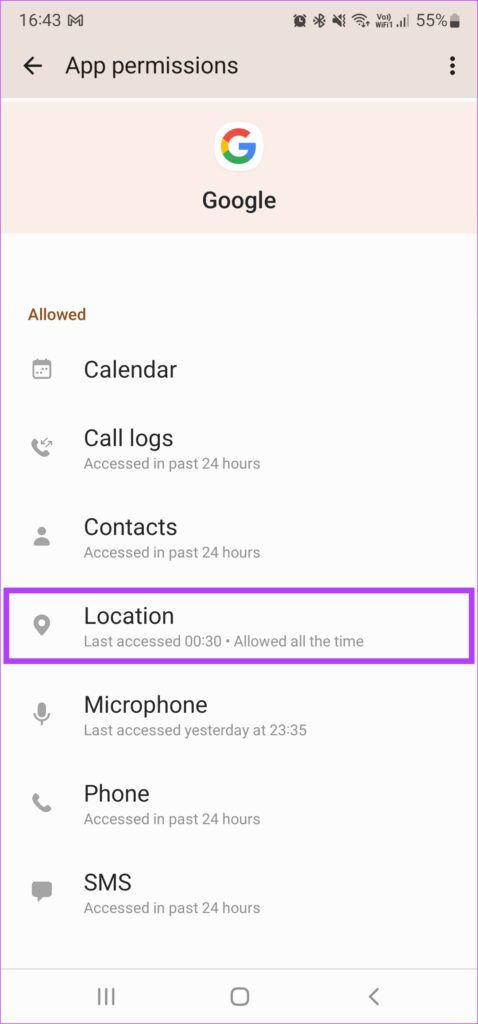
4. Change Location Access
Constant location access for an extended period can drain your battery fast. This is why it is best to allow the Google app to access your location only when it is in use.
Step 1: Open the Settings app and head to the Apps section. Scroll through the list of apps and tap on Google.
Step 2: Tap on Permissions > select Location > select Allow only while using the app.

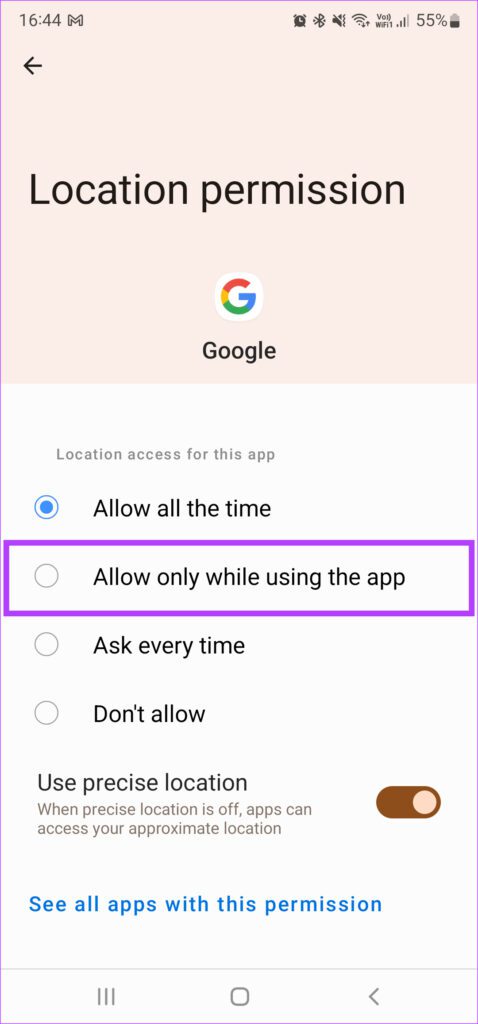
Step 3: Select Don’t allow anyway in the prompt.
5. Disable Physical Activity and Nearby Devices Permissions
The Google app can detect physical activity and perform certain functions related to it. It can also scan for nearby devices in the background. These two activities drain the battery throughout the day. You can avoid it by turning off permissions to these two settings.
Step 1: Open the Settings app and head to the Apps section. Scroll through the list of apps and tap on Google.
Step 2: Tap on Permissions. Select Physical activity.


Step 3: Change the selection to Don’t allow. Go back and tap on Nearby Devices. Select Don’t allow here as well.


6. Uninstall Updates for the Google App
Since the Google app is a system app, you cannot uninstall it completely. However, you can uninstall the app update and restore it back to its original version. Ideally, this should be the last resort if none of the above solutions work.
Note that once you do this, you must set up the Google Assistant again and re-enter the password to your Google account on some apps.
Step 1: Open the Settings app and head to the Apps section. Scroll through the list of apps and tap on Google.
Step 2: Tap on Uninstall updates. Wait till the uninstallation process is complete.
Was this helpful?
Last updated on 22 July, 2024
Read Next
 5 Ways to Fix Chrome Battery Drain Issue on Android
Basic Fixes: Force stop Google Chrome app: Chrome can still operate in the background even if you close the app.
5 Ways to Fix Chrome Battery Drain Issue on Android
Basic Fixes: Force stop Google Chrome app: Chrome can still operate in the background even if you close the app.
 How to Fix Overnight Battery Drain on Android Phone
Basic Fixes: Close background apps and restart your phone: Often, we ignore basic solutions that may be effective.
How to Fix Overnight Battery Drain on Android Phone
Basic Fixes: Close background apps and restart your phone: Often, we ignore basic solutions that may be effective.
 5 Ways to Fix Samsung One UI Battery Drain
Basic Fixes: Turn off Always On Display: While Always On Display gives you an easy view of all your current notifications, date, time, etc., keeping it on increases the battery
5 Ways to Fix Samsung One UI Battery Drain
Basic Fixes: Turn off Always On Display: While Always On Display gives you an easy view of all your current notifications, date, time, etc., keeping it on increases the battery
 8 Ways to Fix Battery Drain on Samsung Galaxy Phones
Basic Fixes: Disable 5G: While 5G provides faster data transfer speeds, it can increase the device's battery drain.
8 Ways to Fix Battery Drain on Samsung Galaxy Phones
Basic Fixes: Disable 5G: While 5G provides faster data transfer speeds, it can increase the device's battery drain.
 How to Fix MIUI Battery Drain Issue on Redmi Devices
Basic Fixes: Check for software updates: If you've recently updated to a new MIUI version, software-related bugs can cause higher-than-normal battery drain.
How to Fix MIUI Battery Drain Issue on Redmi Devices
Basic Fixes: Check for software updates: If you've recently updated to a new MIUI version, software-related bugs can cause higher-than-normal battery drain.
 7 Ways to Fix Battery Drain Issue on Windows 11
Fix 1: Change Power Plan The first thing you need to do is set the default power plan on your laptop to prioritize longer battery life over performance.
7 Ways to Fix Battery Drain Issue on Windows 11
Fix 1: Change Power Plan The first thing you need to do is set the default power plan on your laptop to prioritize longer battery life over performance.
 11 Ways to Fix iOS 17 Battery Drain Issue on iPhone
If you have an eligible device, installing the latest iOS 17 update seems a no-brainer.
11 Ways to Fix iOS 17 Battery Drain Issue on iPhone
If you have an eligible device, installing the latest iOS 17 update seems a no-brainer.
 How to Prevent Battery Drain When Windows Laptop Lid Is Closed
Common Fixes Unplug external devices: Disconnect all plugged-in devices (e.g., USB devices, external hard drives, etc.) to prevent them from waking up the laptop when the lid is closed.
How to Prevent Battery Drain When Windows Laptop Lid Is Closed
Common Fixes Unplug external devices: Disconnect all plugged-in devices (e.g., USB devices, external hard drives, etc.) to prevent them from waking up the laptop when the lid is closed.
The article above may contain affiliate links which help support Guiding Tech. The content remains unbiased and authentic and will never affect our editorial integrity.