Smart App Control is a useful way to ensure that the apps you’re installing on Windows 11 can be trusted. If you’re looking for protection and find instead that the options aren’t available, you’re no doubt looking for answers and fixes. In this article, we’ll be looking at the Smart App Control greyed out.
What Causes This Error
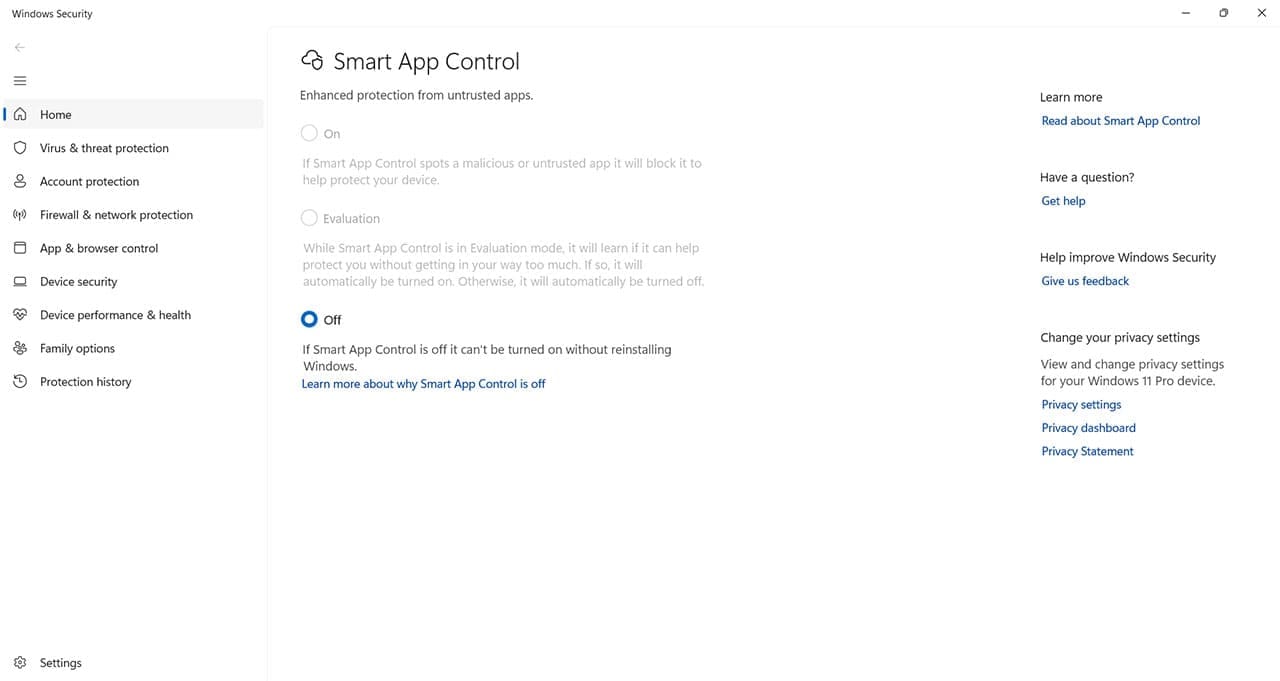
Smart App Control Evaluation Mode greyed out can have a few different causes. Major ones include:
- An upgrade from Windows 10 to 11 rather than a clean install of Windows 11
- You’ve somehow disabled the settings in a previous pre-configuration state
- Windows isn’t fully up to date
- Your organization or Group Policy has disabled the feature
How to Fix Smart App Control Greyed Out
Now you know some of the causes, let’s get straight into how to fix things. We’ve got some troubleshooters below:
Restart Your Machine
The quickest and easiest fix is to restart your machine. Any PC left on for too long can cause errors in Windows 11, so it’s worth a shot to investigate.
Update Windows
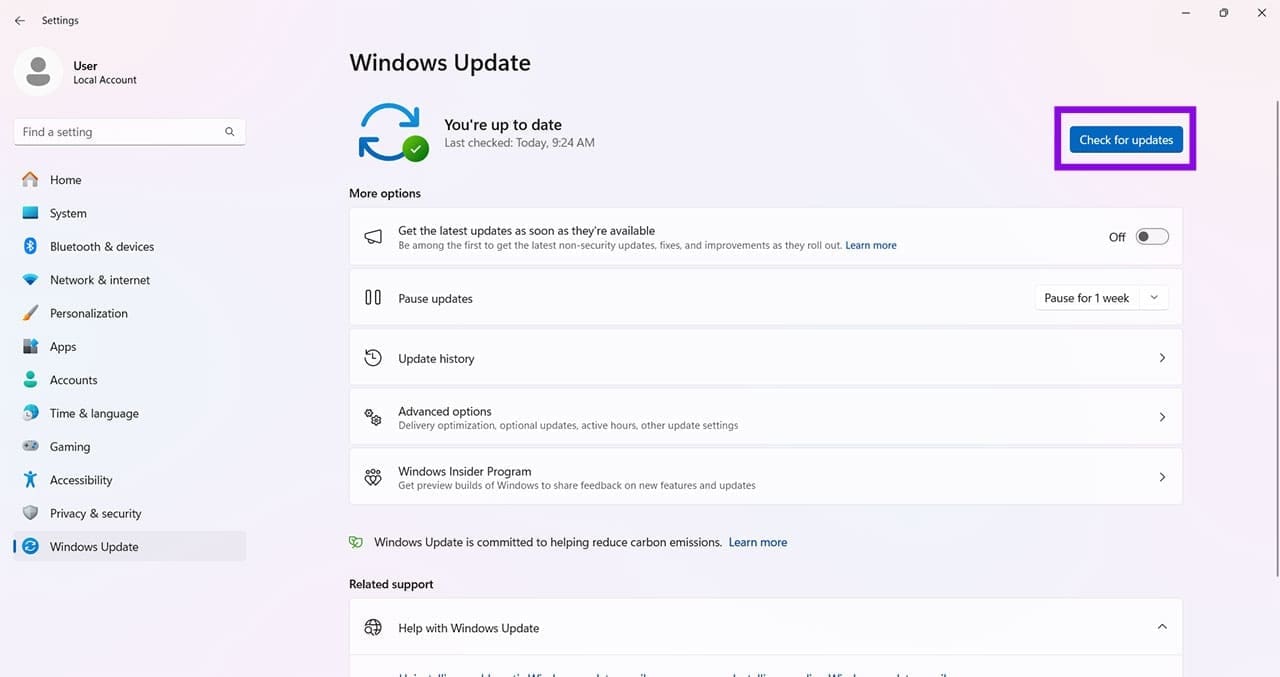
Perhaps the next quickest and easiest fix is to ensure your PC is fully updated. Sometimes an update is the issue. Some users reported problems with Smart App Control being greyed out after the update KB5007651. The feature is also being rolled out gradually to different users and regions.
To ensure this isn’t the case, head to “Windows Updates” in “Settings” (Win + I) and click the “Check for updates” button.
Enable Smart App Control via the Registry
If Smart App Control is greyed out, you can use the Registry to check its status. On qualified systems, changing the value can update the mode, but if it doesn’t meet Microsoft’s requirements (such as upgraded installations), Windows may ignore or reset the change. For Smart App Control, how to turn on is a matter of changing registry value data.
A word of caution: editing the Registry incorrectly can result in system instability, so follow the steps carefully.
Step 1. Open the “Run” dialog (Win + R) and type “regedit” into the box, then press Ctrl + Shift + Enter to run it as Admin.
Step 2. In the Registry Editor, navigate to the following path at the top of the window: “HKEY_LOCAL_MACHINE\SYSTEM\CurrentControlSet\Control\CI\Policy.” You can just copy and paste in.
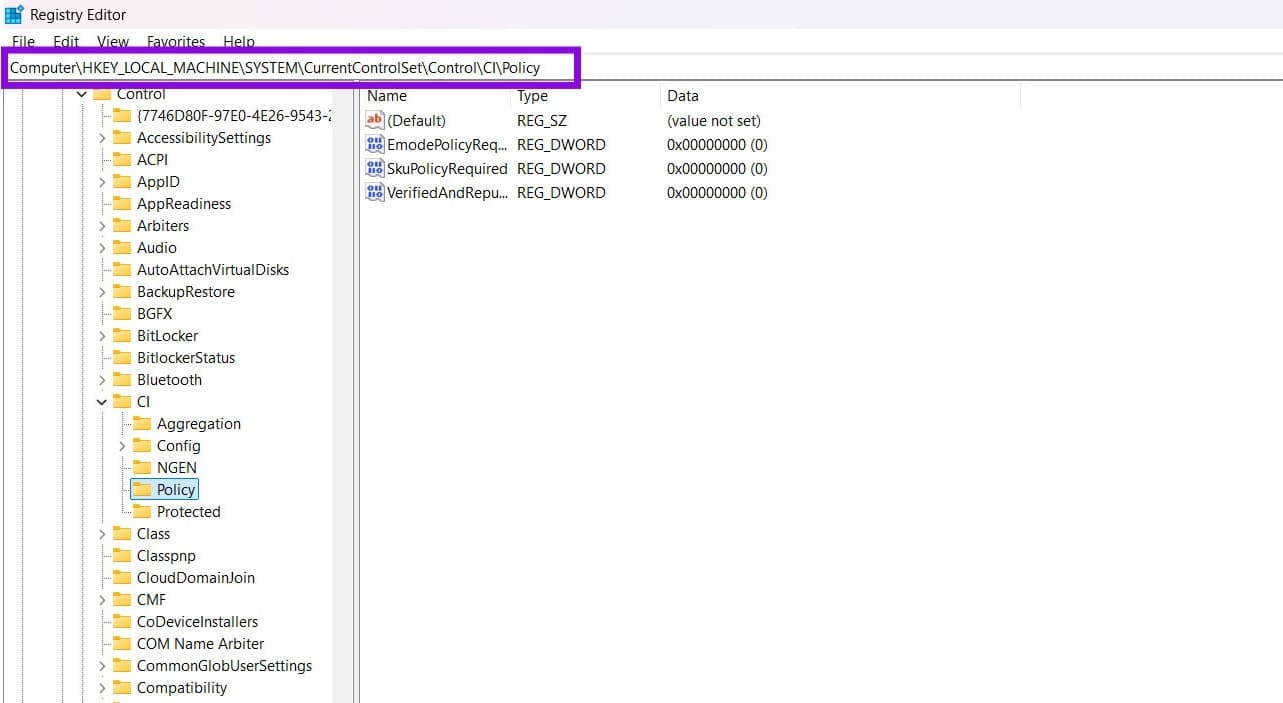
Step 3. Look for the value “VerifiedAndReputablePolicyState.” If it doesn’t exist, right-click in the right pane, choose “New > DWORD (32-bit) Value,” and name it “VerifiedAndReputablePolicyState.”
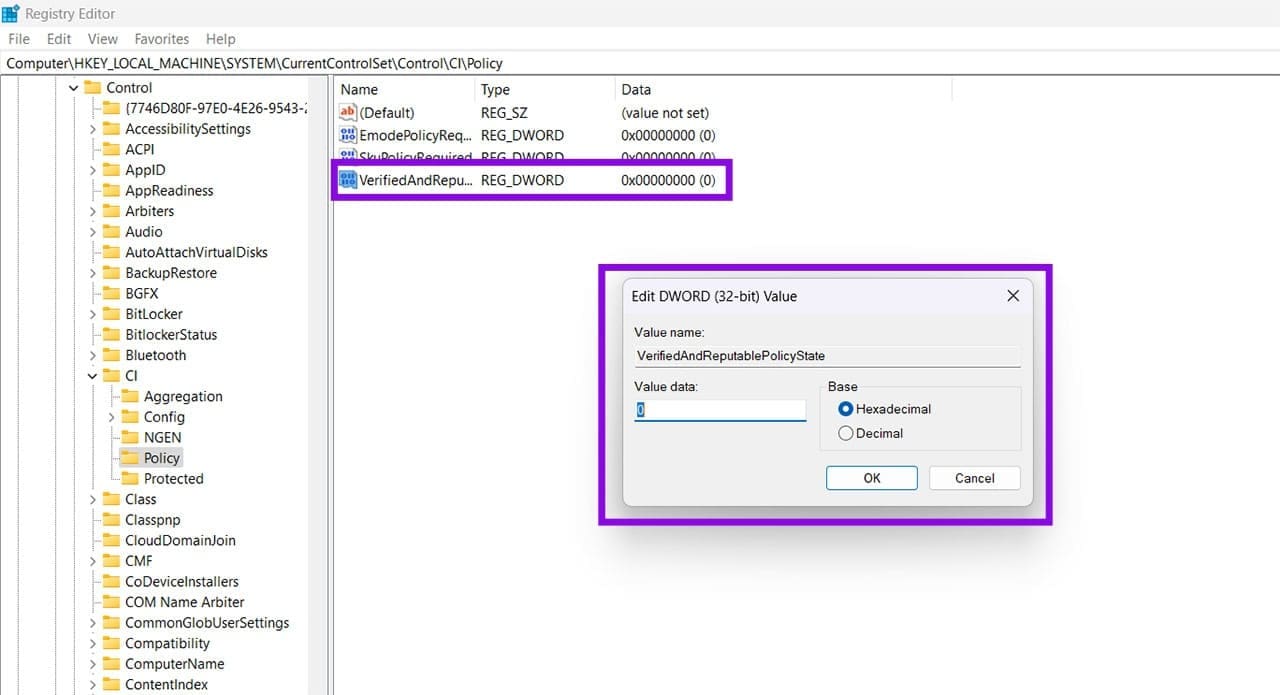
Step 4. Double-click the value and select one of the available settings are:
0 = Off
1 = On
2 = Evaluation mode
Click “OK” after making any changes.
Step 5. Restart your PC and reopen Windows Security to see whether Smart App Control is available.
Note: If Smart App Control remains greyed out, your installation may not be able to enable it. Microsoft requires a clean installation (or “Reset this PC”) of Windows 11 for Smart App Control to be activated.
Was this helpful?
Last updated on 23 July, 2026
Read Next
 How to Fix Display Resolution Greyed out on Windows 11
Basic Fixes: Restart the computer: Rebooting is effective because minor bugs may trigger the problem, and a reboot often kills the problematic services or processes.
How to Fix Display Resolution Greyed out on Windows 11
Basic Fixes: Restart the computer: Rebooting is effective because minor bugs may trigger the problem, and a reboot often kills the problematic services or processes.
 3 Fixes When the Windows 11 Screen Saver Settings Is Greyed Out
Fix 1: Delete the ScreenSaveActive Registry Key If screen saver options are greyed out in Windows, incorrect registry edits are likely causing the issue.
3 Fixes When the Windows 11 Screen Saver Settings Is Greyed Out
Fix 1: Delete the ScreenSaveActive Registry Key If screen saver options are greyed out in Windows, incorrect registry edits are likely causing the issue.
 How to Fix Wi-Fi Greyed Out on iPhone
https://youtu.be/E66FRW2dtuM Basic Fixes Restart iPhone - Sometimes all it needs to fix an issue like Wi-Fi greyed-out is to restart your iPhone.
How to Fix Wi-Fi Greyed Out on iPhone
https://youtu.be/E66FRW2dtuM Basic Fixes Restart iPhone - Sometimes all it needs to fix an issue like Wi-Fi greyed-out is to restart your iPhone.
 7 Ways to Fix Wi-Fi Greyed Out on Mac
Let's check the solutions to fix the Wi-Fi greyed out issue on your Mac. Fix 1: Restart Mac and Enable Wi-Fi Restarting your Mac is an effective way to fix
7 Ways to Fix Wi-Fi Greyed Out on Mac
Let's check the solutions to fix the Wi-Fi greyed out issue on your Mac. Fix 1: Restart Mac and Enable Wi-Fi Restarting your Mac is an effective way to fix
 4 Fixes for ‘Set Automatically’ for Date and Time Greyed Out on iPhone
Basic Fixes Remove configuration profile: Configuration profiles define settings for using iPhones with corporate or school networks or accounts.
4 Fixes for ‘Set Automatically’ for Date and Time Greyed Out on iPhone
Basic Fixes Remove configuration profile: Configuration profiles define settings for using iPhones with corporate or school networks or accounts.
 5 Best Smart Relay Switches to Make Your Existing Sockets Smart
Smart relay switches connect to the internet and can control the socket they are attached to -- be it a wall outlet, a light bulb, or your air conditioner.
5 Best Smart Relay Switches to Make Your Existing Sockets Smart
Smart relay switches connect to the internet and can control the socket they are attached to -- be it a wall outlet, a light bulb, or your air conditioner.
 How to Enable or Disable Smart App Control in Windows 11
Have you ever downloaded an app that was more trouble than it's worth?
How to Enable or Disable Smart App Control in Windows 11
Have you ever downloaded an app that was more trouble than it's worth?
 4 Best Ways to Fix Smart View Not Working on Samsung Galaxy Phones
Basic Fixes: Restart devices: If the Smart View feature isn’t working on your Samsung Galaxy phone, the first thing you must do is restart it.
4 Best Ways to Fix Smart View Not Working on Samsung Galaxy Phones
Basic Fixes: Restart devices: If the Smart View feature isn’t working on your Samsung Galaxy phone, the first thing you must do is restart it.
The article above may contain affiliate links which help support Guiding Tech. The content remains unbiased and authentic and will never affect our editorial integrity.