Google Drive and Photos are two similar yet distinct products for storing photos and videos. Google provides a native option to sync files in both while you can add images and videos exists as well. It does look convenient, but is a bit complicated.
Once you’ve connected Drive and Photos, it’s not easy to delete synced pictures from either of them. If you remove a synced image from one platform, Google will erase it from both of them.
Yup, you read that right. So in this post, we will be taking up the scenario where you can delete photos and videos only from Google Drive without removing the same files from Google Photos.
Let’s get started.
Case 1: Photos Uploaded from Google Drive App
If you upload photos and videos to the Drive app, Google will count it against the overall Google Drive storage. Unless you sync them with Google Photos by enabling the setting ‘Sync photos & videos from Google Drive’ in the app, the images and videos won’t show up there.

When you do that, deleting those synced photos becomes tough. As noted earlier, deleting a picture from one platform will remove it from the other platform too.

To delete photos only from Drive without removing them from Google Photos, you need to add those photos to a Google Photos Album (steps below). Once you do that, Google will consider those images as a part of Photos. You can then safely delete it from Google Drive without worrying about their presence in Google Photos.
Add Photos to Albums
To add a photo to Google Photos album, follow these steps:
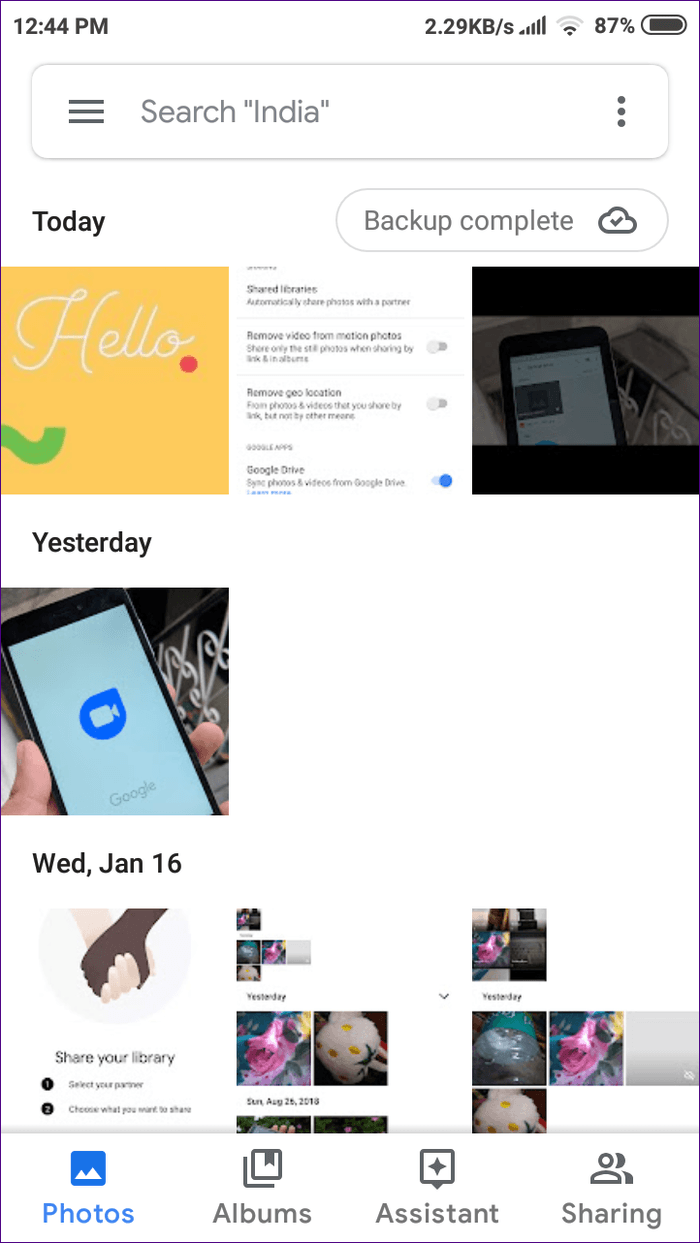
Step 1: Launch the Photos app and under the Photos tab, open the synced photo from Google Drive.
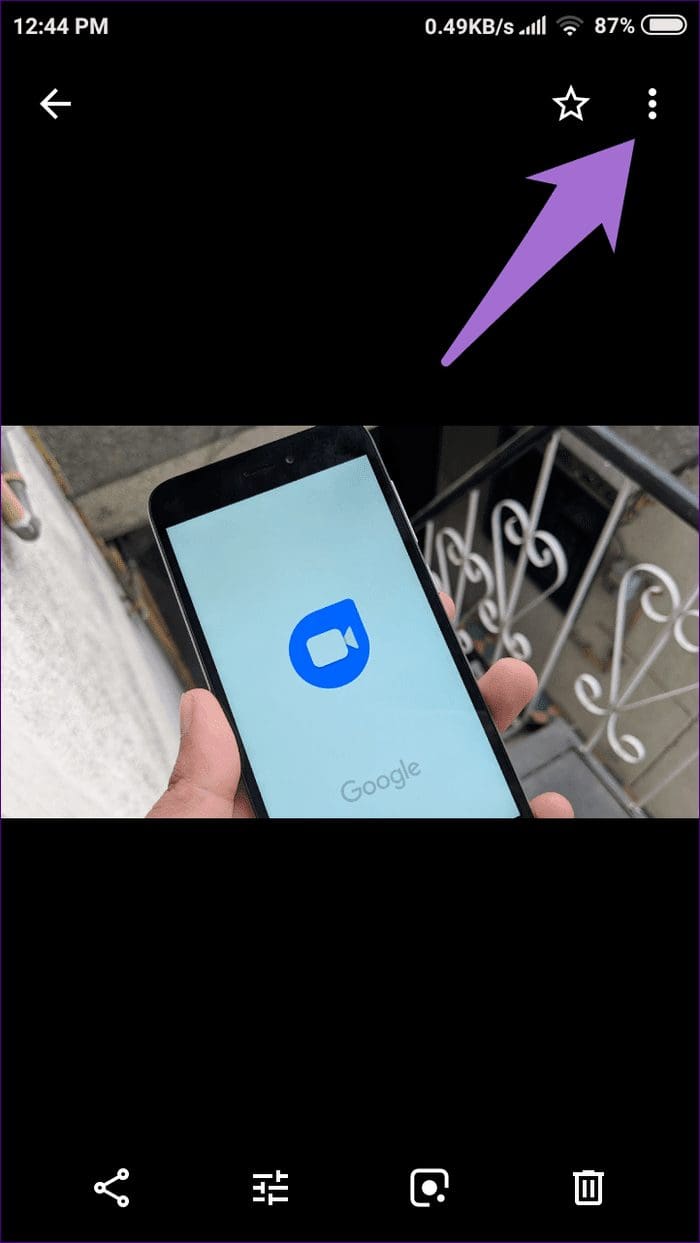
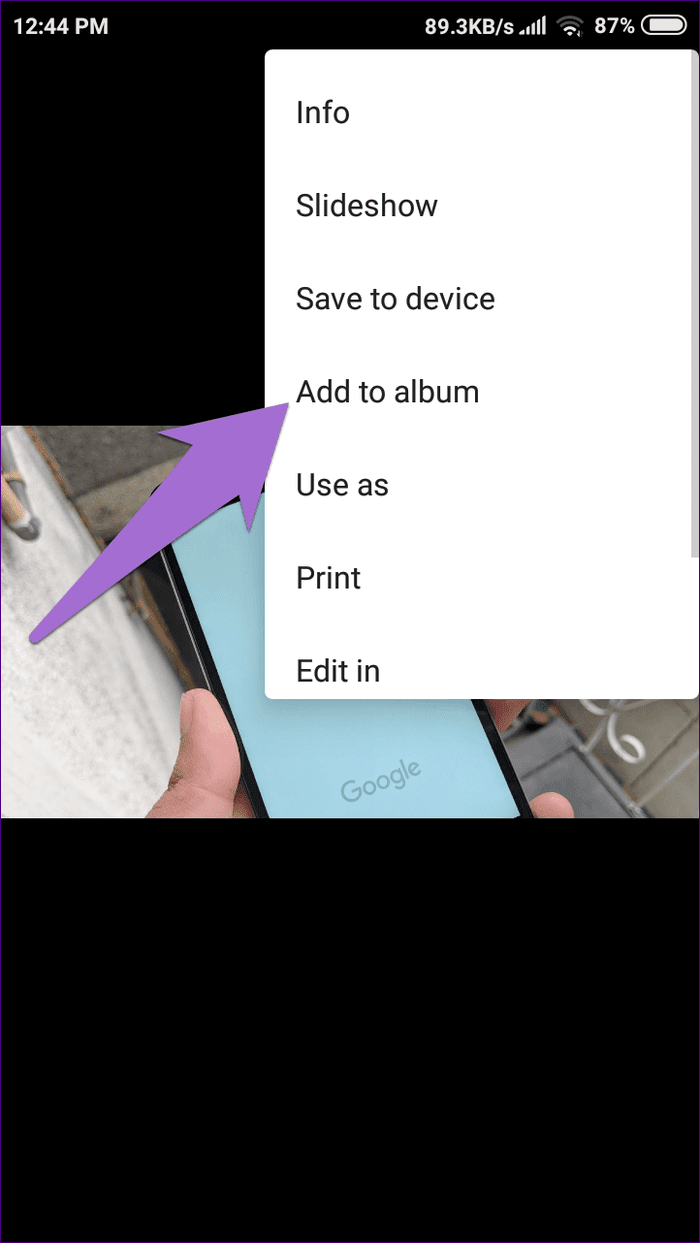
Step 2: Tap on the three-dot icon at the top-right corner and select Add to album from the menu.
Step 3: Create a new album by tapping on New album or add it to an existing album.
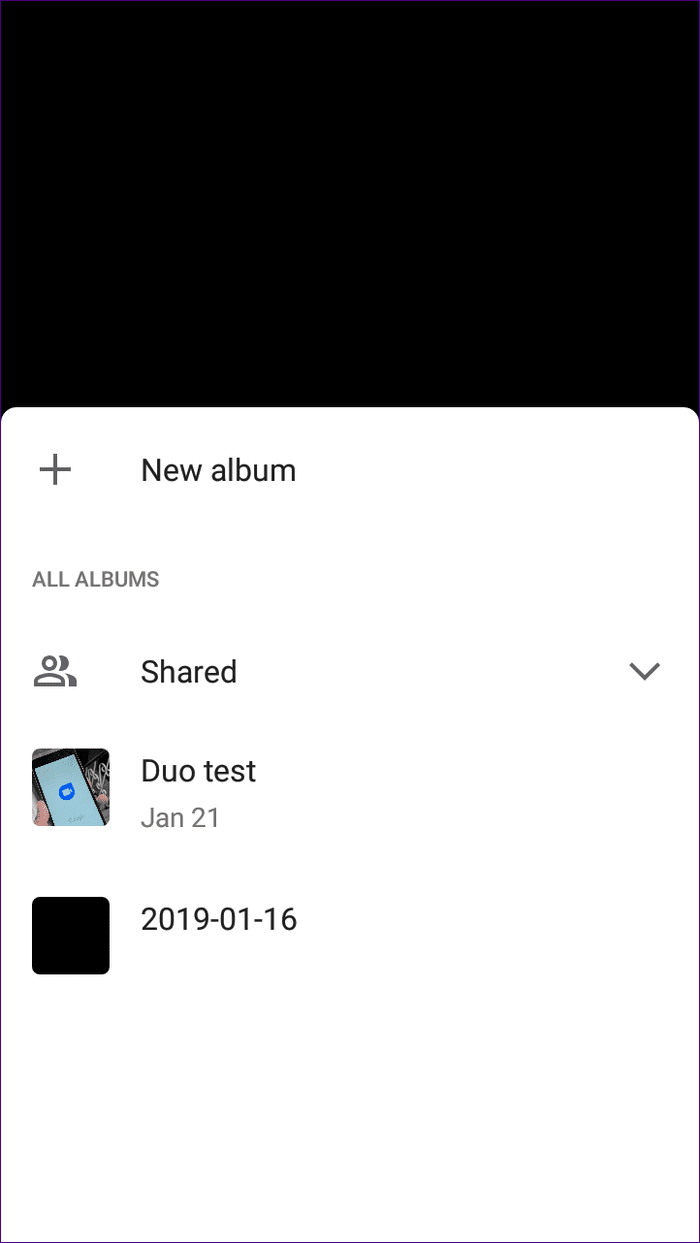
Step 4: Access the newly created album from the Albums tab.

Alternatively, tap on the New album under Albums and add multiple photos to it.
To recap, here’s what happens:
- Delete photos from Drive — Gets deleted from everywhere.
- Delete from Google Photos — Gets deleted from everywhere.
- Add photos to Google Photos Album and delete from Drive — Gets deleted from Google Drive only.
- Add photos to Google Photos Album and delete from Photos — Gets deleted from everywhere.
Case 2: Photos Uploaded from Google Photos App
When you add photos and videos to Google Photos with the Back up & sync enabled, they won’t show in Google Drive. But if you are a staunch Google Drive user who wants to see files from Photos in Drive, a feature called Auto Add exists for that. Enabling it will create a new folder known as Google Photos in Google Drive.

If you’ve unknowingly enabled the Auto Add setting, all the images from Google Photos will be visible in Drive. It’s not just photos from the Google Photos tool but every photo from Google products such as Blogger, Google Maps, Google+, etc., linked with your account will appear there.
When you disable the setting, any photos before that point will continue to appear in Google Drive, but the new pictures taken after disabling the setting won’t be visible.
If you’ve unknowingly enabled the Auto Add setting, all the images from Google Photos will be visible in Drive.
But what about the existing files of Google Photos that are now in Drive? How do you remove them while retaining in Google Photos? Do you directly delete it from the Google Photos folder on Drive? No. Doing so will delete them from Google Photos as well. Moving photos to a different folder on Google Drive and then removing them will have the same result — Google will delete them from both the platforms.
Disabling the feature also doesn’t help. If you delete photos from Drive after disabling it, they are still removed from Google Photos as notified by Google.

So what’s the solution? Basically, you need to delete the Google Photos folder in Google Drive. As mentioned on the Google support page, deleting the entire Google Photos folder on Drive doesn’t remove its contents from Photos.
Here are the steps for the same.
1. Disable the Auto Add setting
On Android devices, open Google Drive settings and disable Auto Add.

On iOS devices, open the Drive app, head to the three-bar menu, tap on the gear-shaped Settings icons and tap on Photos. Then turn off Google Photos option.
2. Delete Google Photos Folder
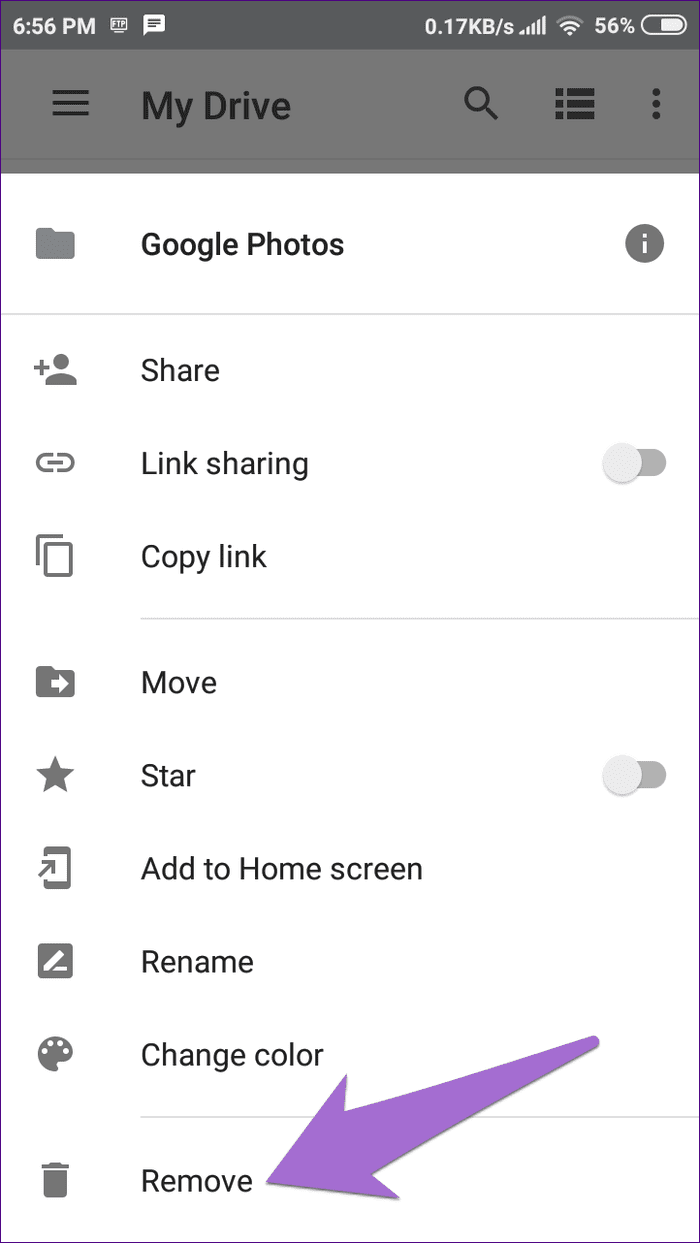
Once disabled, force-quit the Google Photos and Drive apps. Then open the Drive app, and tap on the three-dot icon next to the Google Photos folder. Select Remove from the menu. The folder will be deleted immediately from the Drive without affecting anything in Google Photos.

For me, the dreadful folder was deleted from Drive while retaining my pictures in Google Photos. Unfortunately, for some users deleting the album resulted in images getting removed from Google Photos too. If that happens with you, restore the folder from the trash in Google Drive.
Be Careful What You Sync!
Frankly, I would suggest keeping Google Drive and Photos files separate. Since adding images on Photos in high quality offers unlimited backup with the ability to access them across platforms, you won’t be missing on anything if you use them separately. You can use the album feature of Photos to organize your snaps. Use Drive for other types of files such as ZIP, PDF, audio files, etc., that are not supported in Photos.
What do you think about linking Drive and Photos? Let us know in the comments below.
Next up: Looking for Google Photos alternatives for storing pictures? Check how OneDrive differs from Google Photos.
Was this helpful?
Last updated on 03 February, 2022
Read Next
 Google Drive vs Google Photos: Which Is Best for Storing Photos
Google Drive vs Google Photos Comparison Key Differences Feature Google Drive Google PhotosFile Types All types Photos, Videos, GIFsOrganization Folders & Subfolders AlbumsPhoto Quality Original Original, High (compressed), Express (compressed)Storage
Google Drive vs Google Photos: Which Is Best for Storing Photos
Google Drive vs Google Photos Comparison Key Differences Feature Google Drive Google PhotosFile Types All types Photos, Videos, GIFsOrganization Folders & Subfolders AlbumsPhoto Quality Original Original, High (compressed), Express (compressed)Storage
 How to Remove an Account from Google Photos
How to Remove a Google Account Unfortunately, you cannot remove an account from Google Photos.
How to Remove an Account from Google Photos
How to Remove a Google Account Unfortunately, you cannot remove an account from Google Photos.
 How to Delete Photos From Google Photos But Not From Phone
What Happens When You Delete Photos?
How to Delete Photos From Google Photos But Not From Phone
What Happens When You Delete Photos?
 How to Move Photos from Email to Google Photos
Earlier, when you received photos on Gmail, it was easy to move them to Google Photos.
How to Move Photos from Email to Google Photos
Earlier, when you received photos on Gmail, it was easy to move them to Google Photos.
 What Happens When You Delete Photos from Google Photos
If you use the gallery app on your phone without the cloud storage service, things are pretty easy.
What Happens When You Delete Photos from Google Photos
If you use the gallery app on your phone without the cloud storage service, things are pretty easy.
 How to Upload Photos to Google Photos on Android, iPhone, PC
How to Upload Photos on Google Photos From Mobile There are two ways to add pictures to Google Photos from Android or iOS devices.
How to Upload Photos to Google Photos on Android, iPhone, PC
How to Upload Photos on Google Photos From Mobile There are two ways to add pictures to Google Photos from Android or iOS devices.
 How to Download Photos From Google Photos on Desktop and Mobile
If you save photos in Cloud services like Google Photos, you may want to download your precious memories to your local storage.
How to Download Photos From Google Photos on Desktop and Mobile
If you save photos in Cloud services like Google Photos, you may want to download your precious memories to your local storage.
 How to Move Photos From iPhone to Google Photos
Method 1.
How to Move Photos From iPhone to Google Photos
Method 1.
The article above may contain affiliate links which help support Guiding Tech. The content remains unbiased and authentic and will never affect our editorial integrity.