Method 1: Prevent Users From Running Certain Programs via the Group Policy Editor
The Local Group Policy Editor on Windows makes it easy to apply system-wide changes on a computer. One of the many options it includes is a policy that prevents users from running specific programs or EXE files on Windows 11.
Note: The Local Group Policy Editor is only available on Windows 11 Professional, Enterprise, and Education editions. If your PC runs Windows Home, this method will not work for you.
Step 1: Press the Windows key + R to open the Run dialog box. Type gpedit.msc in the text box and hit OK.
Step 2: Use the left pane to navigate to the following folder:
User Configuration\Administrative Templates\System\
Step 3: Double-click the Don’t run specified Windows applications policy in the right pane.

Step 4: Select Enabled and click the Show button under Options.

Step 5: Add the programs you want to block in the List of disallowed applications section. Enter the file name you double-click to launch the app, such as itunes.exe, bittorent.exe, notepad.exe, and so on. Then, click OK.

Step 6: Click Apply > OK to save your changes.

Once you complete the above steps, the specified programs will be blocked on your Windows 11 PC. To restore access to the blocked programs at any time, repeat the above steps and set the “Don’t run specified Windows applications” policy to Not Configured or Disabled.
Method 2: Prevent Users From Running Certain Programs Using the Registry Editor
If you can’t access the Local Group Policy Editor or want to use a different method, edit a few registry files to prevent users from running certain apps and programs on your Windows 11 PC.
Step 1: Click the search icon on the taskbar > type registry editor > select Run as administrator.

Step 2: Paste the following path in the address bar at the top and press Enter to quickly navigate to the Explorer key.
HKEY_CURRENT_USER\SOFTWARE\Microsoft\Windows\CurrentVersion\Policies\Explorer
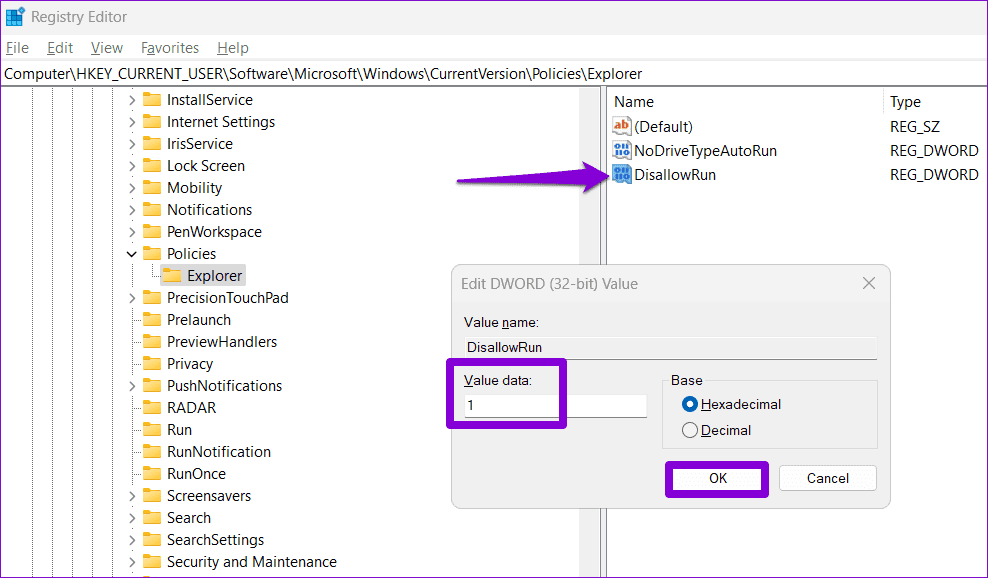
Step 3: Right-click on the Explorer key > select New > DWORD (32-bit) Value > name it DisallowRun.

Step 4: Double-click the newly created DWORD > enter 1 in the value data field > click OK.
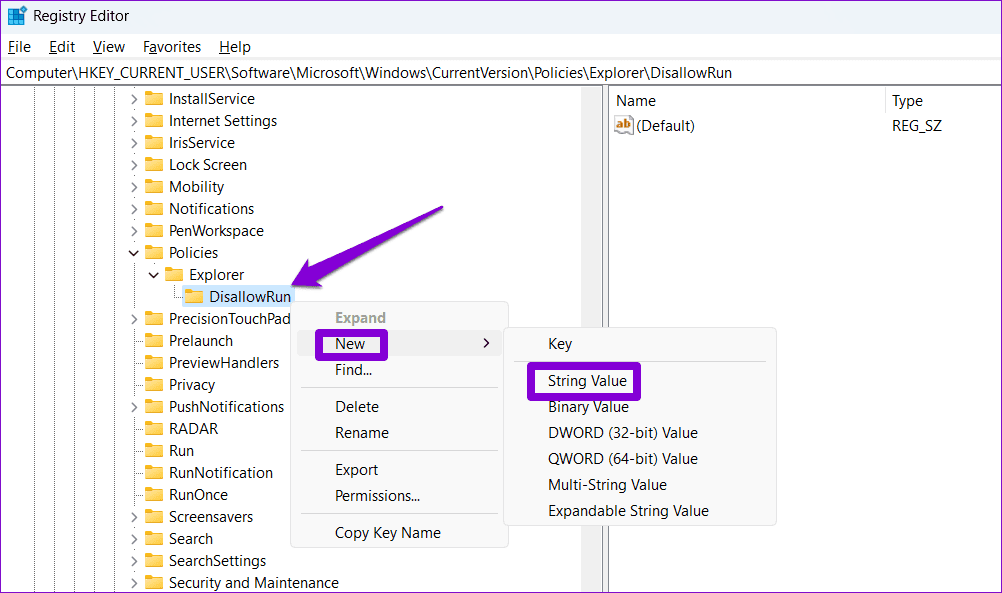
Step 5: Right-click the Explorer key again > select New > Key > name the new key DisallowRun.
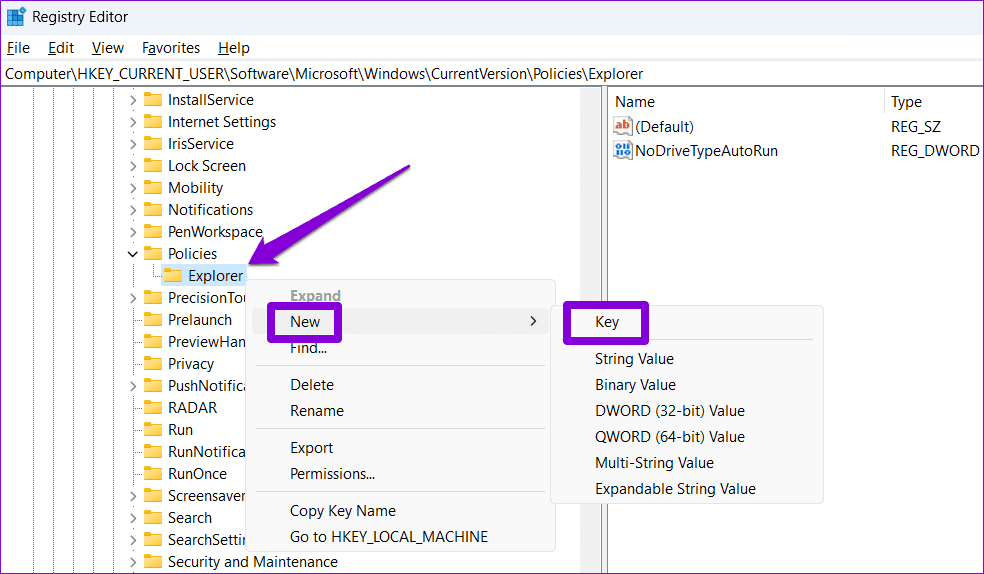
Step 6: Right-click the DisallowRun key > select New > String Value > name the value 1.
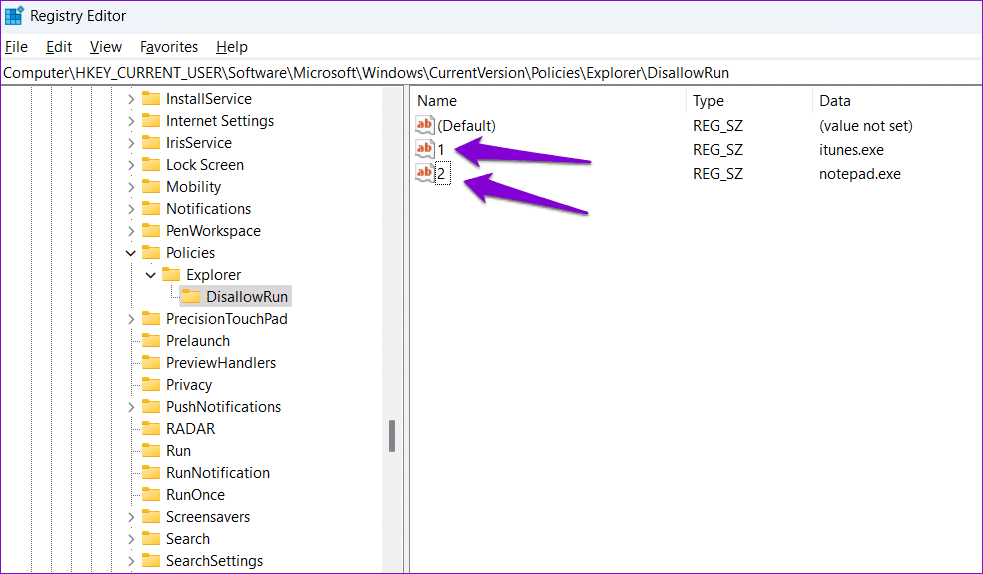
Step 7: Double-click the newly added string value named 1. In the value data field, type the name of the program you want to block and click OK. For instance, if you want to block iTunes, enter itunes.exe in the text field.

Step 8: Repeat the previous step to add more string values, such as 2, 3, 4, and more. In their respective value data fields, enter the executable names of the programs you want to block.
After this, restart your PC, and the specified apps and programs will be blocked for the user account. To unblock an app later, go to the DisallowRun key in the Registry Editor and delete the string value associated with the program.
Was this helpful?
Last updated on 07 August, 2024
Read Next
 3 Ways to Prevent Users From Installing New Software on Windows 11
Method 1: Turn Off Windows Installer via Group Policy The Group Policy Editor on Windows lets you make various administrative-level changes.
3 Ways to Prevent Users From Installing New Software on Windows 11
Method 1: Turn Off Windows Installer via Group Policy The Group Policy Editor on Windows lets you make various administrative-level changes.
 7 Ways to Fix if You Can’t Access Certain Websites on Any Browser
Preliminary Fixes Your IP Address is Blocked: Websites sometimes block specific IP addresses for suspicious activity, security reasons, or geographic restrictions.
7 Ways to Fix if You Can’t Access Certain Websites on Any Browser
Preliminary Fixes Your IP Address is Blocked: Websites sometimes block specific IP addresses for suspicious activity, security reasons, or geographic restrictions.
 How to Prevent Battery Drain When Windows Laptop Lid Is Closed
Common Fixes Unplug external devices: Disconnect all plugged-in devices (e.g., USB devices, external hard drives, etc.) to prevent them from waking up the laptop when the lid is closed.
How to Prevent Battery Drain When Windows Laptop Lid Is Closed
Common Fixes Unplug external devices: Disconnect all plugged-in devices (e.g., USB devices, external hard drives, etc.) to prevent them from waking up the laptop when the lid is closed.
 3 Ways to Change Priority Levels for Programs on Windows 10 and Windows 11
When Should You Change the Priority Level of a Program By default, Windows 11 assigns different priority levels to each process based on its importance.
3 Ways to Change Priority Levels for Programs on Windows 10 and Windows 11
When Should You Change the Priority Level of a Program By default, Windows 11 assigns different priority levels to each process based on its importance.
 How to Create and Share Link of YouTube Videos Starting at a Certain Time
YouTube, one of the most popular video-streaming community, actually has a lot of tricks that power users like you must be aware of, but if you’re specifically looking for a
How to Create and Share Link of YouTube Videos Starting at a Certain Time
YouTube, one of the most popular video-streaming community, actually has a lot of tricks that power users like you must be aware of, but if you’re specifically looking for a
 4 Ways to Fix “We Restrict Certain Activity to Protect Our Community” on Instagram
Basic Fixes Check if Instagram is down: Check if Instagram is facing downtime.
4 Ways to Fix “We Restrict Certain Activity to Protect Our Community” on Instagram
Basic Fixes Check if Instagram is down: Check if Instagram is facing downtime.
 6 Ways to Fix Certain Websites Not Loading on Mac
Basic Fixes Restart your Mac: Start the solution hunt by restarting your Mac.
6 Ways to Fix Certain Websites Not Loading on Mac
Basic Fixes Restart your Mac: Start the solution hunt by restarting your Mac.
 3 Fixes for “We Limit How Often You Can Do Certain Things on Instagram” Error
What Does the "We Limit How Often You Can Do Certain Things on Instagram" Error Mean Instagram takes various measures to protect its platform from the annoying and harmful presence
3 Fixes for “We Limit How Often You Can Do Certain Things on Instagram” Error
What Does the "We Limit How Often You Can Do Certain Things on Instagram" Error Mean Instagram takes various measures to protect its platform from the annoying and harmful presence
The article above may contain affiliate links which help support Guiding Tech. The content remains unbiased and authentic and will never affect our editorial integrity.