How to See Your Photos in Google Photos Map View
Google Photos creates an interactive heat map based on all the photos and videos you’ve captured in different places. You can explore this map to view all the photos and videos taken in a particular location.
First, let’s see how you can access and use the map view in the Google Photos app.
Step 1: Open the Google Photos app, navigate to the Search tab at the bottom, and tap on Your map under Places.
Step 2: You’ll notice hotspots highlighting the areas where you’ve captured the most photos and videos. In the bottom half, all your geotagged photos will be displayed in reverse chronological order.
Step 3: You can navigate your heat map similarly to how you would on Google Maps. Use the pinch gesture to zoom into the map and explore different locations where you’ve taken photos or videos. At the bottom of the screen, you’ll see how many photos and videos you’ve captured in that particular area.


Step 4: Tap a heat map spot to view all the photos or videos captured around that location. You can tap on the bubble if you want to expand that photo. Optionally, you can tap on the three-dot menu icon to change the map view to switch to Satellite or Terrain.


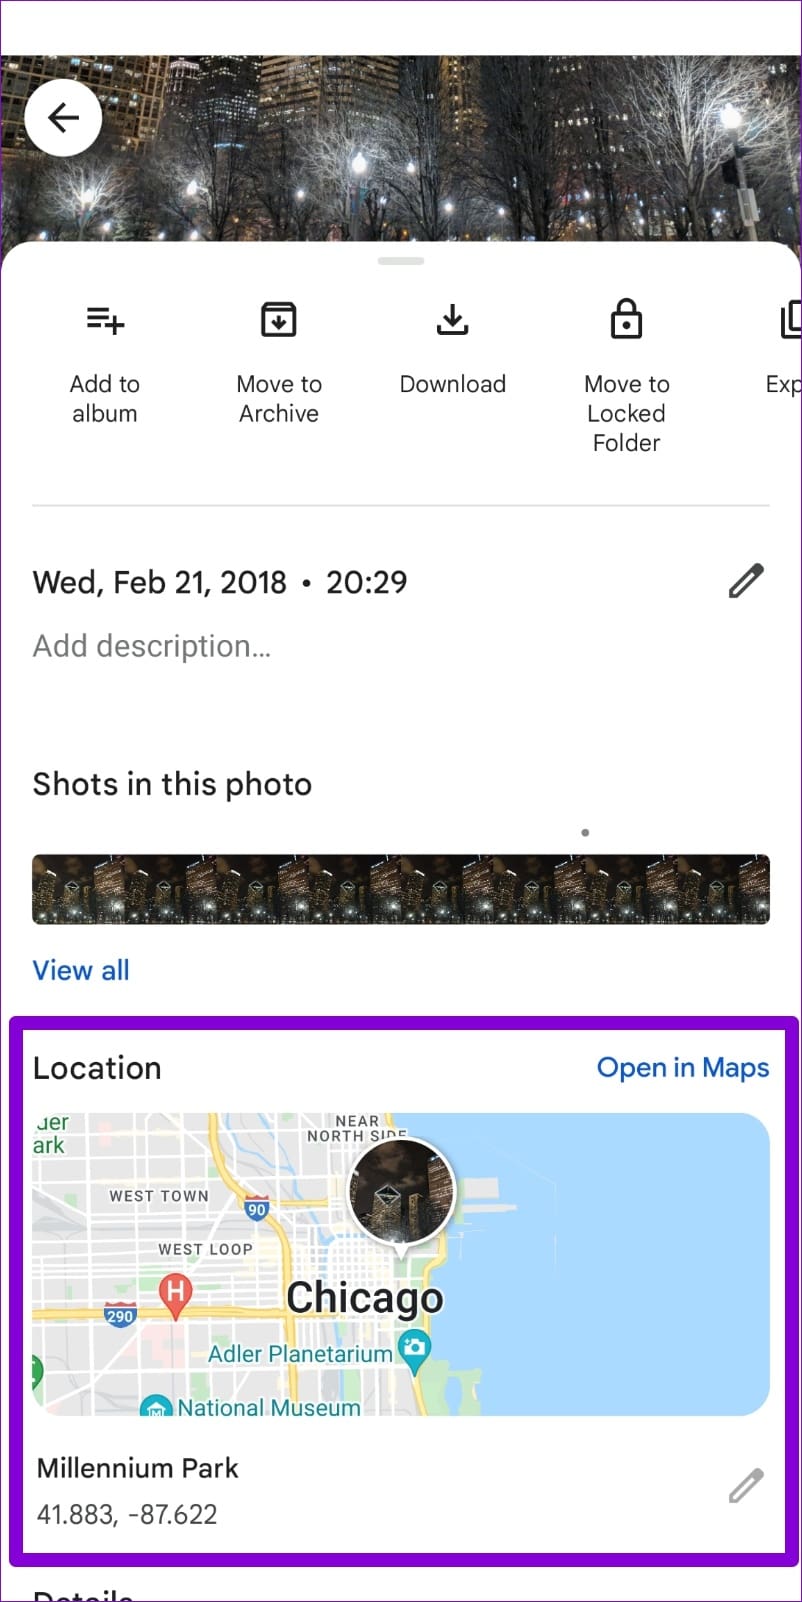
Google Photos allows you to pinpoint the location of a specific photo or video on a map. To access the location details, open the photo or video and tap the three-dot menu icon located in the top right corner. Then, tap on the map under the Location section to see the photo in the Google Photos map view.


How to Add Photos in Google Photos Map
If you can’t locate your favorite photos and videos on the heat map, it’s likely they don’t have any location data associated with them. If you wish to see those photos or videos on the map, you’ll have to edit their location data manually.
Step 1: Open the Google Photos app and navigate to the photo or video you’d like to see in the map view.
Step 2: Tap the three-dot menu in the top right corner and select Add a location option at the bottom. If you haven’t backed up your photo yet, tap on Back up now option to continue.


Step 3: Use the search bar at the top to locate the city or locality where the photo was taken. Tap on that location to add it to the photo.


Once added, your photo should appear on the Google Photos map view.
How to Remove Photos From Google Photos Map
If you don’t want certain pictures to appear on the Google Photos map view, it’s easy to remove them. All you have to do is delete their location data using these steps:
Step 1: Open the Google Photos app and locate the photo or video you want to remove from the map view.
Step 2: Tap the three-dot menu in the top right corner. Tap on the pencil icon under the map and select Remove Location.


Was this helpful?
Last updated on 28 May, 2024
Read Next
 How to Create and Manage a Custom Map in My Maps and Google Drive
Most users are familiar with Google Maps, which offers real-time GPS navigation and information about landmarks and transport conditions.
How to Create and Manage a Custom Map in My Maps and Google Drive
Most users are familiar with Google Maps, which offers real-time GPS navigation and information about landmarks and transport conditions.
 How to Use Snap Map on Snapchat
How to Set Up Snap Map First, let’s see how you can access and set up Snap Map on Snapchat.
How to Use Snap Map on Snapchat
How to Set Up Snap Map First, let’s see how you can access and set up Snap Map on Snapchat.
 Google Drive vs Google Photos: Which Is Best for Storing Photos
Google Drive vs Google Photos Comparison Key Differences Feature Google Drive Google PhotosFile Types All types Photos, Videos, GIFsOrganization Folders & Subfolders AlbumsPhoto Quality Original Original, High (compressed), Express (compressed)Storage
Google Drive vs Google Photos: Which Is Best for Storing Photos
Google Drive vs Google Photos Comparison Key Differences Feature Google Drive Google PhotosFile Types All types Photos, Videos, GIFsOrganization Folders & Subfolders AlbumsPhoto Quality Original Original, High (compressed), Express (compressed)Storage
 How to Remove Photos from Google Drive but Not Google Photos
Google Drive and Photos are two similar yet distinct products for storing photos and videos.
How to Remove Photos from Google Drive but Not Google Photos
Google Drive and Photos are two similar yet distinct products for storing photos and videos.
 How to Delete Photos From Google Photos But Not From Phone
What Happens When You Delete Photos?
How to Delete Photos From Google Photos But Not From Phone
What Happens When You Delete Photos?
 How to Move Photos from Email to Google Photos
Earlier, when you received photos on Gmail, it was easy to move them to Google Photos.
How to Move Photos from Email to Google Photos
Earlier, when you received photos on Gmail, it was easy to move them to Google Photos.
 What Happens When You Delete Photos from Google Photos
If you use the gallery app on your phone without the cloud storage service, things are pretty easy.
What Happens When You Delete Photos from Google Photos
If you use the gallery app on your phone without the cloud storage service, things are pretty easy.
 How to Upload Photos to Google Photos on Android, iPhone, PC
How to Upload Photos on Google Photos From Mobile There are two ways to add pictures to Google Photos from Android or iOS devices.
How to Upload Photos to Google Photos on Android, iPhone, PC
How to Upload Photos on Google Photos From Mobile There are two ways to add pictures to Google Photos from Android or iOS devices.
The article above may contain affiliate links which help support Guiding Tech. The content remains unbiased and authentic and will never affect our editorial integrity.