If you want more control over your AWS management and the ability to automate certain tasks to be faster, the CLI (command line interface) is a natural solution. While it does require a bit of learning the syntax and time getting used to, it’s much faster than the web client. And once you learn how to use AWS CLI on Windows PC, it’ll likely become one of your main shortcuts. Here’s a brief Windows AWS CLI guide to get you started.
Part 1 – Installing AWS CLI on Windows
AWS has a relatively simple installation process. While the installer comes with its own Python runtime in the most recent version, you’ll need to download Python separately from its website if you want to use the “legacy” AWS Version 1 and enable it on the PATH variable. Any version of Python will do since AWS supports 3.6, which is already obsolete.
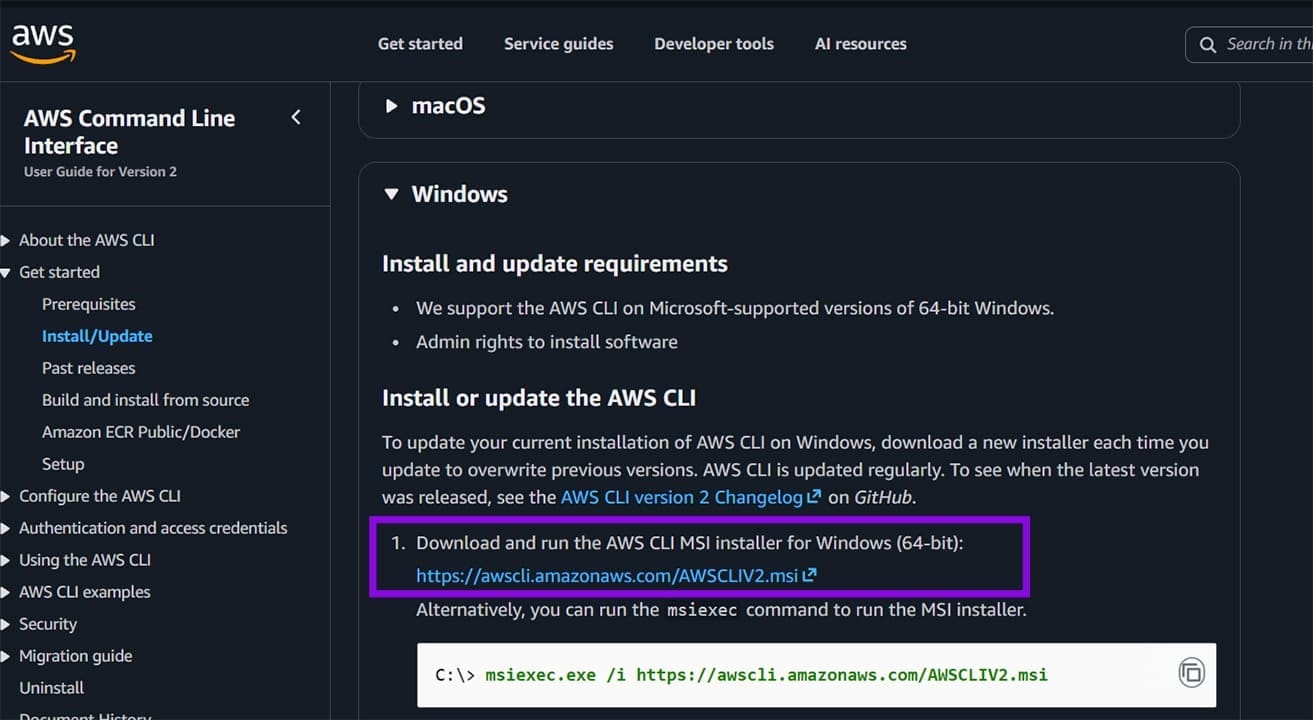
Step 1. Go to AWS’s Documentation website and click on the download link for Windows.
Step 2. Open the downloaded file and go through the Setup Wizard. Accept the terms of the license agreement and go “Next.”

Step 3. Keep the storage setting to the default, click on “Next,” click on “Install,” then accept the User Account Control prompt when it pops up.
Step 4. Wait for the process to complete and click on “Finish.”
Alternatively, you can use the Command Prompt to get a similar result without going through the menus.
Step 1. Open the Command Prompt with administrator permissions (you can search for “cmd” and select the option from the menu). You’ll need to accept the UAC prompt.

Step 2. Paste in the following command and press “Enter.”
msiexec.exe /i https://awscli.amazonaws.com/AWSCLIV2.msi /qn
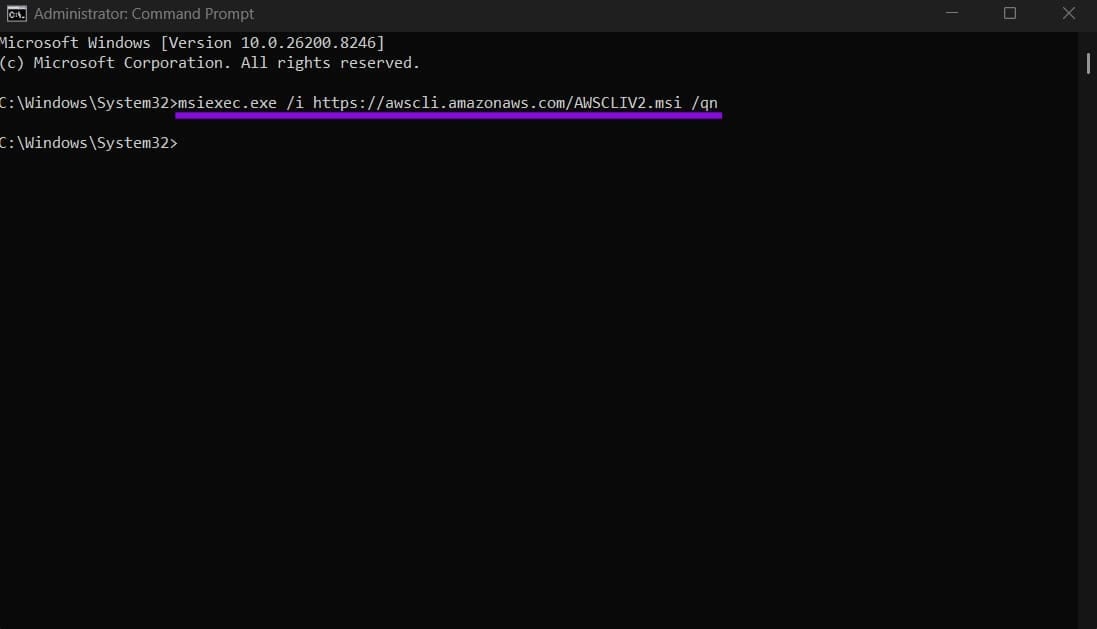
Note that the “qn” modifier at the end means this is a silent installation, and it provides no feedback on its success.
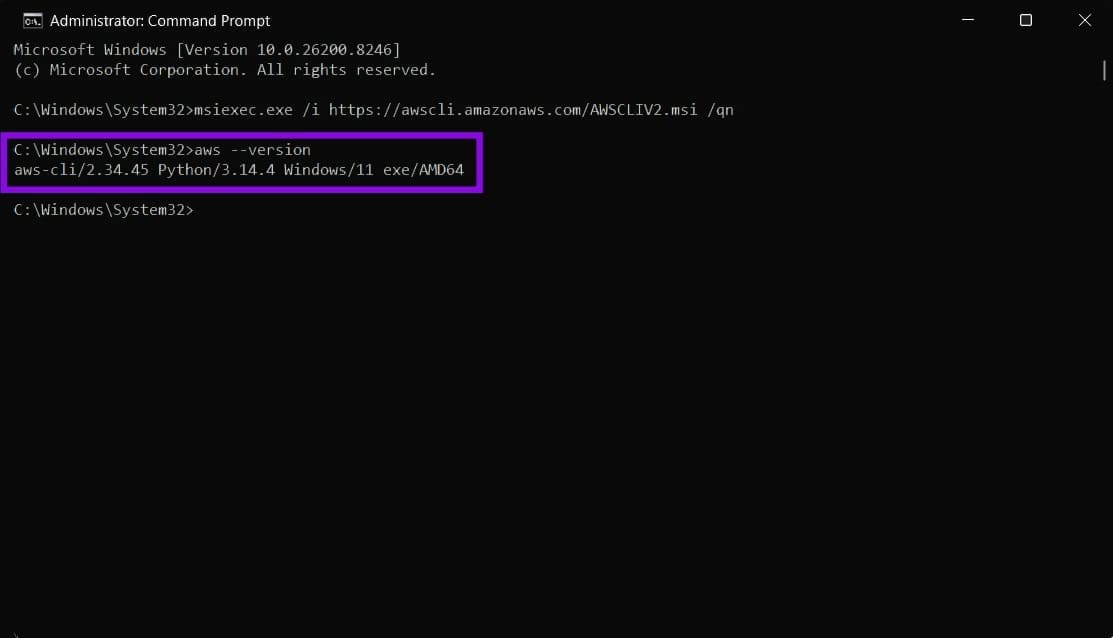
You can verify the installation version (and whether AWS was installed successfully) by opening Command Prompt and running the following command:
aws –version
You should see a result with the version similar to aws-cli/2.x.x Python/3.x.x Windows/11.
If you want to update AWS CLI, download a fresh file from the website or run the command-line installer again.
Part 2 – Adding an Access Key
Before you can actually use the CLI, you need to align it with your AWS account credentials.
Step 1. Open the AWS management console online and go to “IAM.”
Step 2. Select “Users,” then go to “Security credentials,” and click on “Create access key.”
Step 3. Save both keys listed on-screen externally (outside the browser), as closing the tab and reopening it will create new keys.
Step 4. Open the Command Prompt and run this command: aws configure
Step 5. You’ll be asked for four values, and will need to input or paste them:
- Access Key: the first value copied from the Access Key tab
- Secret Access Key: the second value from the management tab
- Region: the region where you want to create deployables. Users for the U.S. can use us-west-1, us-west-2, us-east-1, and us-east-2, but here’s a complete list of regions
- Output format: use “json” as the default, and “table” or “text” for a more graphical output
Step 6. Run a test command: aws s3 ls.
Part 3 – How to Use AWS CLI on Windows
Once installed, you can use AWS commands to do everything the web console can (and more). You can use Amazon’s guide for more complete information.
Was this helpful?
Last updated on 10 May, 2026
Read Next
 How to Tile Windows Vertically on a Windows PC
Method 1: Using the Snap Assist Feature The Snap Assist feature allows you to arrange multiple windows on your computer, such as to tile your windows vertically.
How to Tile Windows Vertically on a Windows PC
Method 1: Using the Snap Assist Feature The Snap Assist feature allows you to arrange multiple windows on your computer, such as to tile your windows vertically.
 5 Ways to Fix Error 0x8007003B on Windows 10 and Windows 11
Fix 1: Check Disk Format Windows may throw the error 0x8007003B message while transferring large files over a network if the destination drive is FAT32 formatted.
5 Ways to Fix Error 0x8007003B on Windows 10 and Windows 11
Fix 1: Check Disk Format Windows may throw the error 0x8007003B message while transferring large files over a network if the destination drive is FAT32 formatted.
 3 Ways to Change Priority Levels for Programs on Windows 10 and Windows 11
When Should You Change the Priority Level of a Program By default, Windows 11 assigns different priority levels to each process based on its importance.
3 Ways to Change Priority Levels for Programs on Windows 10 and Windows 11
When Should You Change the Priority Level of a Program By default, Windows 11 assigns different priority levels to each process based on its importance.
 9 Ways to Open Task Manager on Windows 10 and Windows 11
Task Manager is one of the most commonly used programs on Windows, regardless of its version.
9 Ways to Open Task Manager on Windows 10 and Windows 11
Task Manager is one of the most commonly used programs on Windows, regardless of its version.
 3 Ways to Launch Windows Terminal on Windows 11
Method 1: Launch Windows Terminal Using the Run Dialog The Run dialog lets you execute any program or command within the same network on your computer.
3 Ways to Launch Windows Terminal on Windows 11
Method 1: Launch Windows Terminal Using the Run Dialog The Run dialog lets you execute any program or command within the same network on your computer.
 5 Ways to Fix Windows Explorer High CPU Usage on Windows 11
Try Basic Fixes Restart the Windows Explorer process: There's a chance that Windows Explorer's high CPU usage is a one-time glitch.
5 Ways to Fix Windows Explorer High CPU Usage on Windows 11
Try Basic Fixes Restart the Windows Explorer process: There's a chance that Windows Explorer's high CPU usage is a one-time glitch.
 5 Fixes for Windows Security App Showing White Screen on Windows 11
Common Fixes Reboot PC: Press the Windows + X shortcut to open the Power User Menu, select Shut down or sign out, and click Restart.
5 Fixes for Windows Security App Showing White Screen on Windows 11
Common Fixes Reboot PC: Press the Windows + X shortcut to open the Power User Menu, select Shut down or sign out, and click Restart.
 Windows Focus Assist (Windows 11) Keeps Turning On – How to Fix It
Usually, not getting notifications while you’re hard at work is a good thing.
Windows Focus Assist (Windows 11) Keeps Turning On – How to Fix It
Usually, not getting notifications while you’re hard at work is a good thing.
The article above may contain affiliate links which help support Guiding Tech. The content remains unbiased and authentic and will never affect our editorial integrity.