
Even when you first set up a Windows 11 PC, chances are you’ll see several different apps already installed or being added after you log in. A lot of those are from Microsoft itself, like music players and game control modules. But some also come from your motherboard or laptop manufacturer, designed to give a laptop more diagnostic or tinkering tools. Some of these apps may be useful, but others can take up storage space or run in the background unnecessarily. Here’s what to do when you see bloatware automatically installs on Windows 11 likes to do.
Fix 1 – Prevent Bloatware Automatically Installs From Windows 11 via Settings
Windows can download certain applications associated with your device’s metadata. You can disable this feature to prevent Windows from automatically downloading these associated apps. This might mean you’ll still need to remove them after you complete the process.
Step 1. Go to “Settings” and click on the “System” tab.
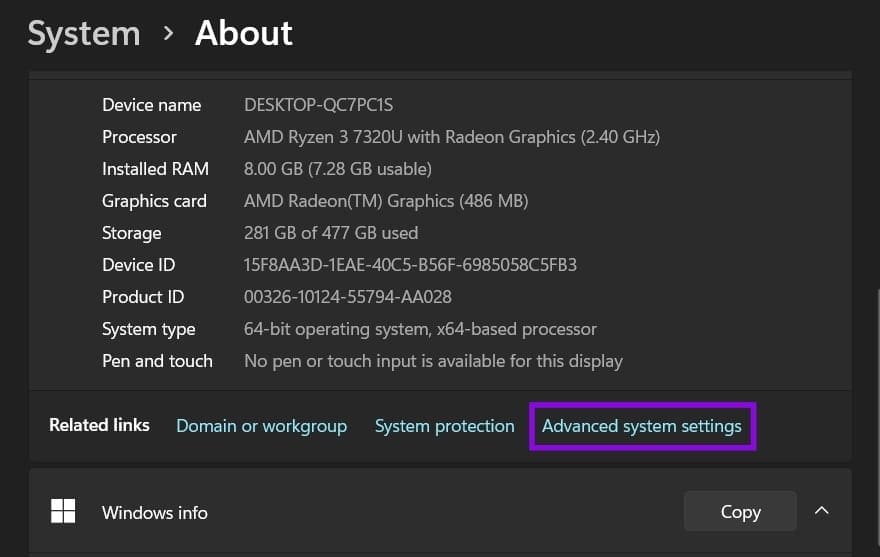
Step 2. Go to “About” at the bottom, then click on “Advanced system settings.”
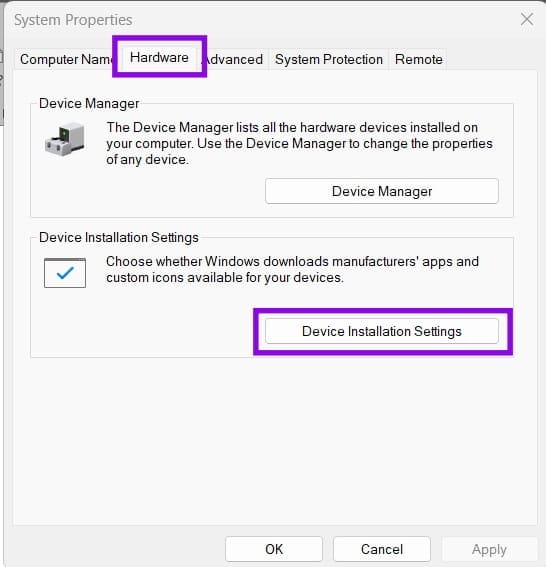
Step 3. Click on the “Hardware” tab and then click on “Device Installation Settings.”
Step 4. Select “No” to prevent Windows from automatically downloading applications associated with device metadata, then click “Save Changes.” If prompted by User Account Control, confirm the change.

Step 5. Click on “Apply” in the dialog window and close it.
Step 6. Find the app in the “Installed Apps” section of “Settings” and uninstall it.
This should ensure you don’t see the issue where Windows 11 bloatware keeps coming back.
Fix 2 – Use the Registry Editor to Prevent Bloatware Installations
The Registry Editor allows you to put a similar lock on installing apps across all user profiles on the PC (even future ones).
Step 1. Open the “Registry Editor.” It should automatically run in administrator mode.
Step 2. Drag over the address in the navigation bar and replace it with the following:
Computer\HKEY_LOCAL_MACHINE\SOFTWARE\Policies\Microsoft\Windows\Device Metadata
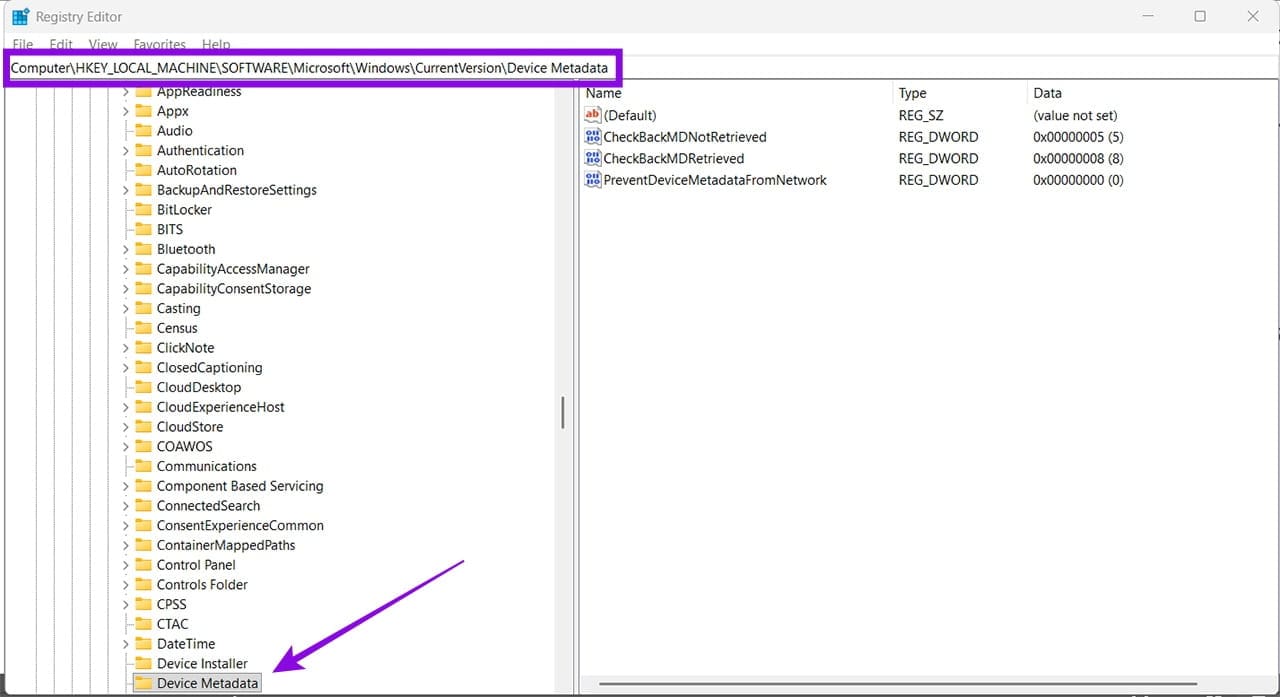
Step 3. Double-click on the “PreventDeviceMetadataFromNetwork” setting in the right panel, then set its value to 1 and hit “OK.”
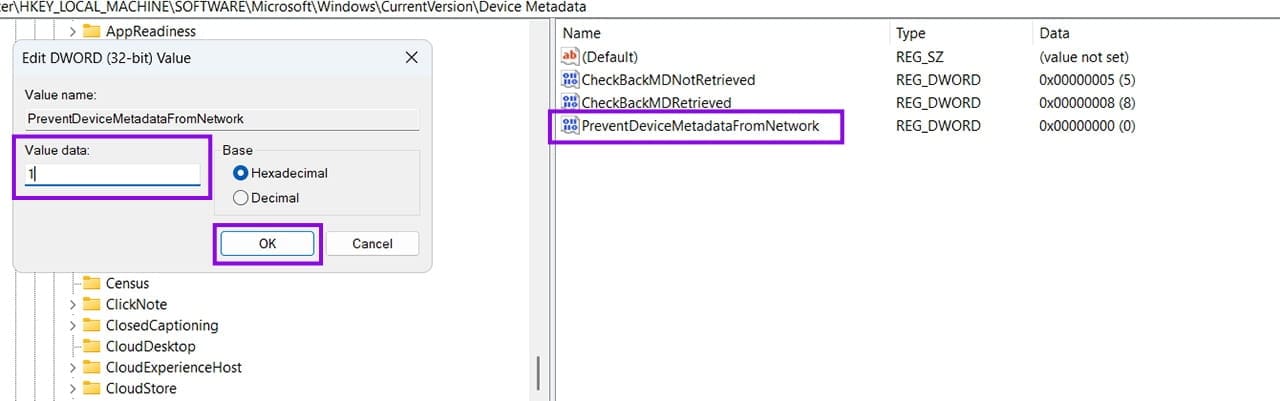
Step 4. Exit the Registry Editor, which automatically saves changes.
You may want to use the “Export” option at the top (in “File”), which creates a registry file that loads the current settings into the Registry. You can use this file to restore the previous settings if needed. However, it will undo any changes you make to the Registry later, as well.
To undo this change, double-click the modified value to 0.
Fix 3 – Using Group Policy to Prevent Windows 11 Bloatware
Group Policy allows you to propagate a change to a laptop or PC you’re connected to remotely (usually via corporate networks and management). Group Policy is only available for Windows 11 Pro and above.
Step 1. Open the Local Group Policy Editor by searching for gpedit.msc in the Start menu.
Step 2. Go to the following address:
Computer Configuration > Administrative Templates > System > Device Installation
Step 3. Double-click the setting “Prevent automatic download of applications associated with device metadata.”
Step 4. Change the setting to “Enabled” and apply the change, then close the Group Policy Editor.
Fix 4 – Use a Third-Party Script if Bloatware Automatically Installs Windows 11 Apps
If you want more control over what exactly you’re disabling, as well as the ability to modify Microsoft’s stock apps and advertisements, you can crawl through various privacy settings.
Alternatively, you can use a third-party script such as this Windows 11 Debloat utility. The GitHub repository that it goes to should be safe (and it comes with detailed instructions), but it’s best used on a device that doesn’t have any private data yet in case something does go wrong.
Was this helpful?
Last updated on 06 November, 2026
Read Next
 How to Remove Bloatware in Windows 11
Many devices come with a range of applications installed by default.
 How to Install Windows 11 Without Bloatware
If you can’t delay upgrading Windows 10 to Windows 11 any longer, you might be worried about all the extra programs that were added to help you navigate the operating
 Top 3 Ways to Stop Microsoft Teams From Starting Automatically on Windows 10
Microsoft Teams app is great for team management and communication.
 3 Ways to Stop OneDrive From Deleting Files Automatically on Windows 11
Basic Fixes: Check for Windows updates: An out-of-date Windows version can also cause issues, such as OneDrive moving files to the recycle bin by itself. So, install the latest software updates
 How to Fix Windows 10’s This Action Is Only Valid for Products That Are Currently Installed Error
Windows 10 users usually face the error 'This action is only valid for products that are currently installed' when working with a version of Office suite of apps.
 5 Ways to Fix No Audio Device Is Installed Error on Windows 11
Fix 1: Enable Your Audio Device on Windows The first thing to do is ensure that you haven’t accidentally disabled the audio device on Windows.
 5 Fixes When Xbox App Is Not Showing Installed Games on Windows
Fix 1: Flush DNS and Reset TCP/IP Several users on the Microsoft forums reported fixing this specific issue by flushing the DNS cache and resetting the TCP/IP (Transmission Control Protocol/Internet
 Steam Game Is Installed on PC But Not Showing in The App – How to Fix
If you have a Steam game not showing on the app, trying to open it manually might not actually do anything if the client doesn’t recognize the application.
The article above may contain affiliate links which help support Guiding Tech. The content remains unbiased and authentic and will never affect our editorial integrity.