
There are a few important reasons why you might want to set different audio outputs for apps Windows 11 can use. Most notably, it allows you to use a stream-capturing app like OBS while avoiding copyrighted music playing through the same system as the game. Or you can listen to voice chat while putting music out for other people in the room. Either way, here’s how to change app audio device settings in Windows.
How to Set Different Audio Outputs for Apps in Windows – Step-by-Step
While Windows inherited the advanced Sound Control options through the Control Panel, the more recent Volume Mixer option in Settings is what you’ll need. However, Control Panel can still be useful in determining the default audio device if you regularly use headphones and speakers.
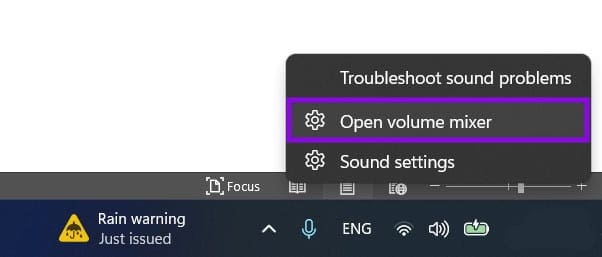
Step 1. Right-click on the audio/volume icon on the taskbar and select “Open volume mixer.” Alternatively, you can get there by going to Settings (“Win + I”) and then going to the “Sound” option in the System tab.
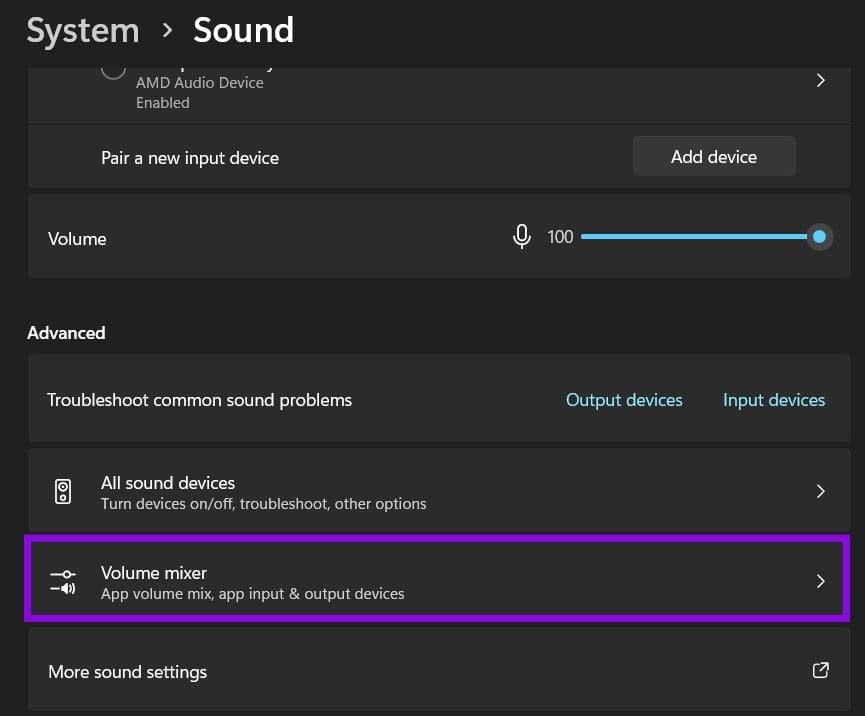
Step 2. Scroll down and select “Volume mixer.”
Step 3. Scroll down to the “Apps” section and click on the app you want to change (it has to be open or running). If your app doesn’t appear on the list, try opening it and streaming sound through it for a bit. Windows might not detect an app that isn’t actively outputting sound, but that is rare.
Unfortunately, there’s no way to make separate instances of the app switch audio settings.

Step 4. For the “Output device” option, click on the dropdown and select an audio output device.
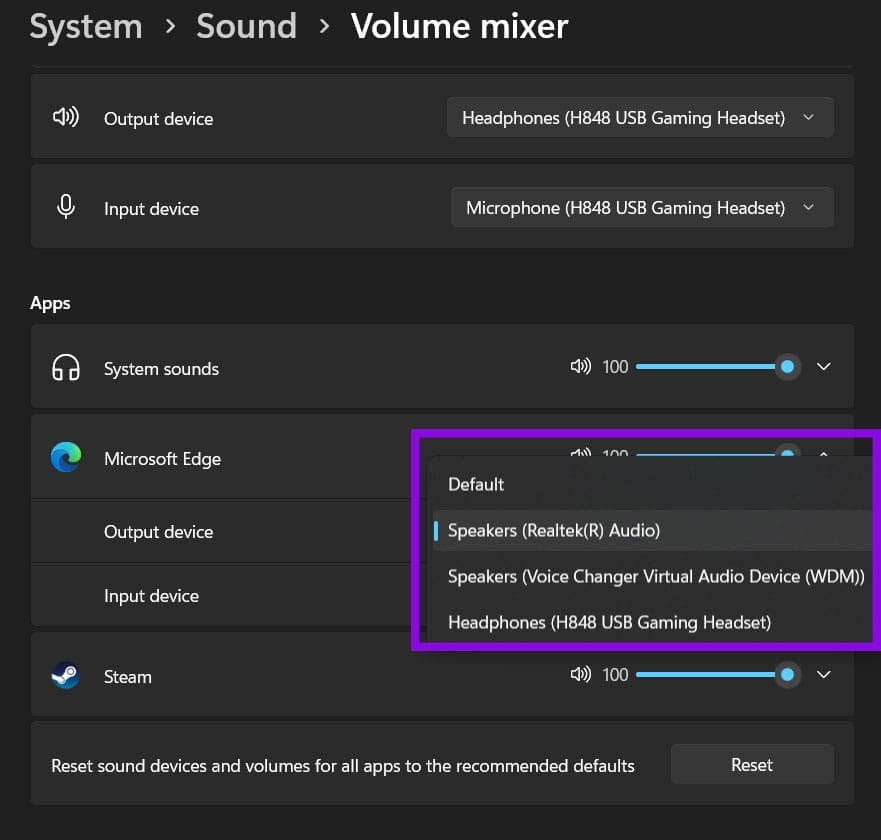
Step 5. You can adjust the volume slider for each app here, which will be applied in tandem with the global audio control settings for the device (for example, speakers running at 50% volume with an app running at 50% will result in an overall 25% volume of the maximum).
You can also change an app’s input device by selecting the “Input device” dropdown and choosing a connected microphone or headset with a built-in microphone.
How to Set Different Audio Output Devices for Browser Windows
Since browsers are treated as an instance or an app, one sound setting on Windows will be used for all tabs and windows. There are a few workarounds if you want to separate them:
- You can use different browsers for different sound streams (for example, music on Edge and YouTube videos on Chrome). This amps up the RAM usage a bit, but it should work well without additional downloads.
- Some web apps like Zoom, Discord, Google Meet, and Teams allow you to pick an output device similarly to how the desktop app behaves. This overrides the browser’s device output setting.
- Chrome’s AudioPick and Firefox’s “Per-Tab Volume Control” are extensions that give you granular control over per-tab audio, including the ability to separate them to different output devices. Edge can also install AudioPick.
- A third-party app like CheVolume can separate browser windows into instances for volume controls. However, CheVolume is a paid app after a limited trial. You can try using a free clone in Audio Router (downloadable through GitHub), but it’s no longer updated and might stop working.
Was this helpful?
Last updated on 18 November, 2026
Read Next
 5 Best Android Apps to Extract Audio from Video
Don't you wish you could get the audio from the latest music videos?
 5 Best Ways to Extract Audio from Video on Windows 10
We’ve all been in a situation where we have thought of extracting the audio part playing in a video background.
 4 Ways to Fix Zoom Audio Delay on Windows 11
Basic Fixes Check your network connection: Ensure your PC has a good internet connection.
 11 Easy Ways to Fix HDMI Audio Not Working in Windows 11
When watching a movie, series, show, etc., using HDMI audio seems to have become a staple.
 4 Fixes for Audio Not Working in Microsoft Teams on Windows 11
Common Fixes Reboot Windows - Open the Start Menu, click Power in the bottom right, and select Restart.
 How to Change Audio Output on Windows With a Hotkey
Change Audio Output on Windows Using SoundSwitch If you need more flexibility and customization options, third-party software like SoundSwitch can help.
 5 Fixes When Discord Is Picking Up Game Audio in Windows 11
Before going into the fixes, ensure the USB connector is connected to the motherboard USB port.
 Windows 11: How to Output Audio to Multiple Devices
Usually, when you want to play any kind of audio from your Windows 11 device, it’ll come out of one device at a time, which might be your speakers or
The article above may contain affiliate links which help support Guiding Tech. The content remains unbiased and authentic and will never affect our editorial integrity.