
Windows’s constant suggestions of updates that you can’t or don’t want to install can become tiresome. But how to permanently remove suggested Windows Update isn’t immediately obvious.
Here’s how to do it.
Fix 1 – Hide the Suggested Update So Windows Stops Offering It
You can set a “hidden” flag on individual updates to stop them being offered with the Windows Update troubleshooter.
Step 1. Download and save the file wushowhide.diagcab to your desktop.
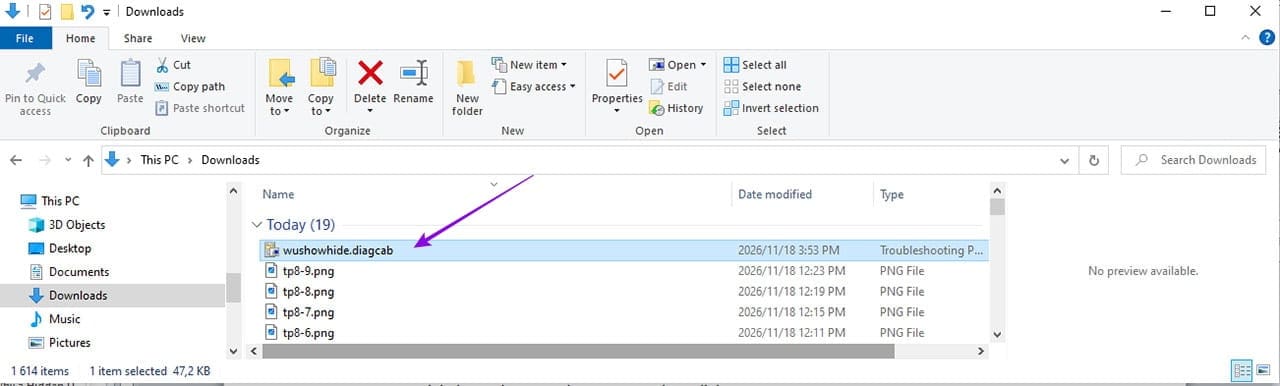
Step 2. Double-click the file, then click “Next” when the troubleshooter opens.

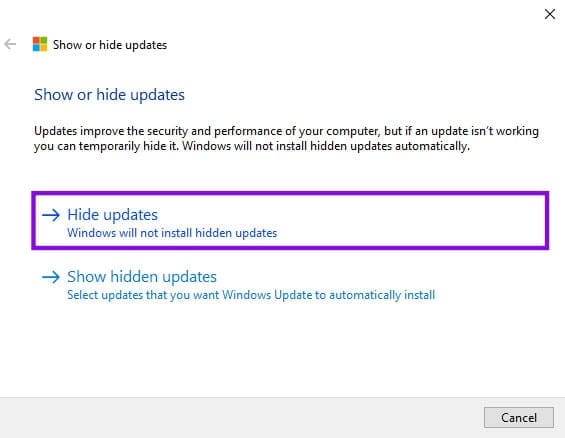
Step 3. Click “Hide updates.”
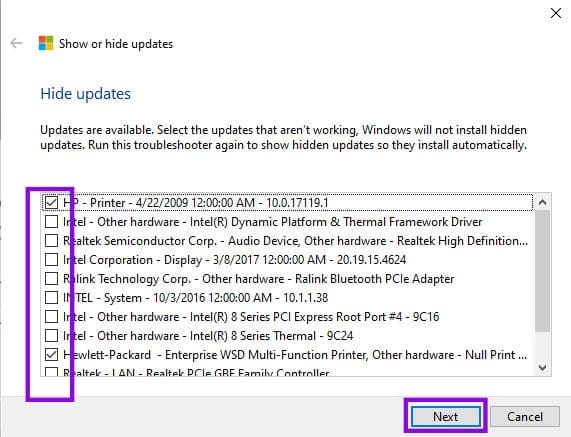
Step 4. Tick the updates you want removed, then click “Next.”
Step 5. When the troubleshooter reports that it has fixed the problem, click “Close.”
Step 6. Open Settings > Windows Update and click “Check for updates” — the update should no longer be offered.
Tip: If the update has already downloaded and is sitting in a “Pending restart” state, hiding may not prevent it from installing the next time you restart. To prevent this, hide the update before it downloads.
Fix 2 – Hide Updates With PowerShell, Drivers Included
You can also hide suggested updates using the Terminal (Windows 11) or PowerShell (Windows 10). If the first fix didn’t hide the update as required, it’s likely because it’s a driver that doesn’t have a KB number. Using Terminal or PowerShell, you can hide drivers too.
Step 1. Right-click “Start” and click on “Terminal (Admin)” or “Windows PowerShell (Admin)” in Windows 10.

Step 2. Type
“Set-ExecutionPolicy RemoteSigned -Scope LocalMachine -Force” and press “Enter.” You can also copy the text and paste it by right-clicking the Terminal or PowerShell prompt.
Step 3. Enter “Install-Module PSWindowsUpdate -Force -SkipPublisherCheck”.
Step 4. If prompted, answer “Y” for NuGet and/or A to trust the repository.

Step 5. Enter “Import-Module PSWindowsUpdate”.
Step 6. Enter “Get-WindowsUpdate”. When the response loads, note the exact Title of the update you want to hide, or its KB number if it has one.
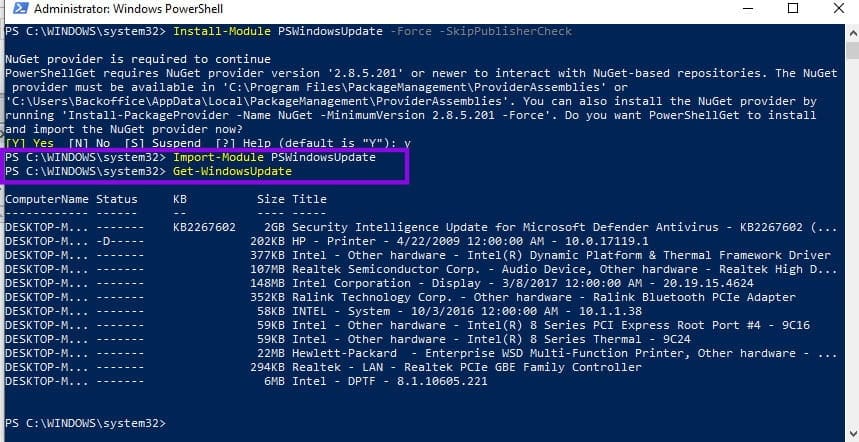
Step 7. Hide the update by KB number, for example, by entering “Hide-WindowsUpdate -KBArticleID “KB5034123” -Confirm:$false”.
Step 8. You can also hide a driver by title, for example, by entering “Hide-WindowsUpdate -Title “Intel Corporation – Display – 31.0.101.5388” -Confirm:$false”.
Step 9. Confirm by entering Get-WindowsUpdate -IsHidden”.
Fix 3 – Stop a Feature Update Being Suggested (Version Pin)
There’s one problem with hiding an update this way. An in-place upgrade rebuilds the Windows Update store, and anything hidden before it is offered again afterwards.
Using a version pin will keep the upgrade off the suggestion list more permanently. Here’s how to delete Windows update suggestion.
Step 1. Press Win+R, type “regedit” to open the Registry Editor, and press “Enter.”

Step 2. Go to HKEY_LOCAL_MACHINE\SOFTWARE\Policies\Microsoft\Windows\WindowsUpdate.

Step 3. Right-click the WindowsUpdate key > New > DWORD (32-bit) Value, name it TargetReleaseVersion, and set it to 1.

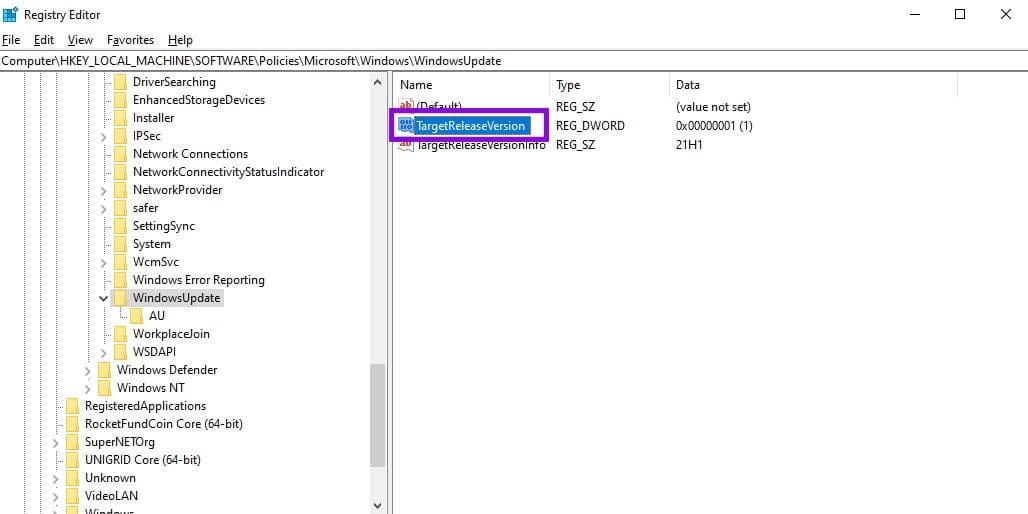
Step 4. Right-click the WindowsUpdate key again and select New > String Value. Name it TargetReleaseVersionInfo and set its data to your current Windows version (for example, 25H2; check Settings > System > About) to confirm your version.

Step 5. Optional, but recommended by Microsoft alongside the PIN: add another String Value named ProductVersion, set to Windows 11.
Step 6. Close the Registry Editor, restart, then open Settings > Windows Update and click “Check for updates.” No feature update should be offered.
Step 7. To undo, delete the newly inserted values and then restart.
The above steps are for Home versions of Windows. The process for Pro and Enterprise versions is different and beyond the scope of this article.
Fix 4 – Stop Driver Suggestions as a Class
If you don’t want Windows to include driver updates with its regular quality updates, you can use this setting to exclude them as a group.
Step 1. As in Fix 3, open regedit and navigate to HKEY_LOCAL_MACHINE\SOFTWARE\Policies\Microsoft\Windows\WindowsUpdate.
Step 2. Right-click the WindowsUpdate key and select New > DWORD (32-bit) Value. Name it “ExcludeWUDriversInQualityUpdate,” and set it to 1.
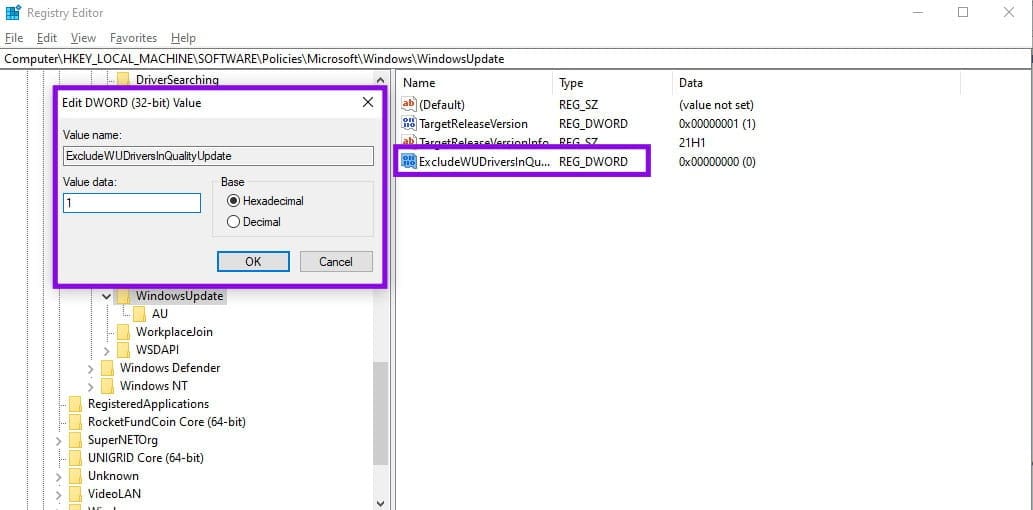
Step 3. Close regedit and restart the PC. Windows Update should no longer install drivers with quality updates.
Step 4. To undo, set the value of the new key to “0” or delete the value.
Note: The fix is supposed to eliminate update suggestions, but some users report that it reduces their number rather than removing every one.
Was this helpful?
Last updated on 20 November, 2026
Read Next
 How to Remove Someone From Suggested on Facebook Messenger
What Happens When You Hide Someone From Suggested You see less of your contact.
 How to Hide or Remove the Adobe Reader DC Tools Pane Permanently
Just launch a PDF in Adobe Reader DC, and you should find a Tools pane pop up to the right of the screen.
 How to Remove Chrome Extensions Permanently
Method 1: Remove Extensions Directly From the Extension Bar The easiest way to remove a Chrome extension is to click its icon in the Chrome browser's extension bar.
 How to Disable “Suggested for You” Posts on Facebook
What Are Suggested For You Posts on Facebook Facebook does everything it can to keep you doom-scrolling, from search suggestions to suggesting posts.
 How to Add Columns Permanently to All Folders in Windows 10 File Explorer
File Explorer in Windows usually shows just a few columns such as name, date, and type.
 Use This Trick to Permanently Pause Windows Updates
No matter if they’re regular as clockwork, or good for your computer’s health and security, there’s no denying that Windows Updates can put a wrench in any workday.
 How to Delete WhatsApp Group Permanently (Desktop and Mobile)
How to Delete WhatsApp Group Permanently as Admin As an admin, you are authorized to delete the group from its existence.
 How to Disconnect iPhone From Mac (Temporary or Permanently)
Basic Ways Unpair Bluetooth connection: Do note that turning off Bluetooth will also disconnect your Mac and iPhone from other Apple devices.
The article above may contain affiliate links which help support Guiding Tech. The content remains unbiased and authentic and will never affect our editorial integrity.