BitLocker is the built-in full-disk encryption tool for Windows and one of the most reliable ways to protect laptops from losing data. Once enabled, it encrypts everything on the drive so that nobody can access your files without your Windows login credentials or a recovery key. If you’ve been meaning to figure out how to install BitLocker on Windows 11 but weren’t sure where to start, here’s a full walkthrough from setup to everyday management.
Part 1 – Check if Your Edition of Windows 11 Supports BitLocker
BitLocker is not available on Windows 11 Home, so you’ll be stuck with the regular encryption methods and protection. Here’s how you can check.
Step 1. Press “Win + I” to open Settings.
Step 2. Go to System, then scroll down and click on “About.”
Step 3. Under Windows specifications, check the Edition field. If it says Windows 11 Pro, Enterprise, or Education, you’re good to go.
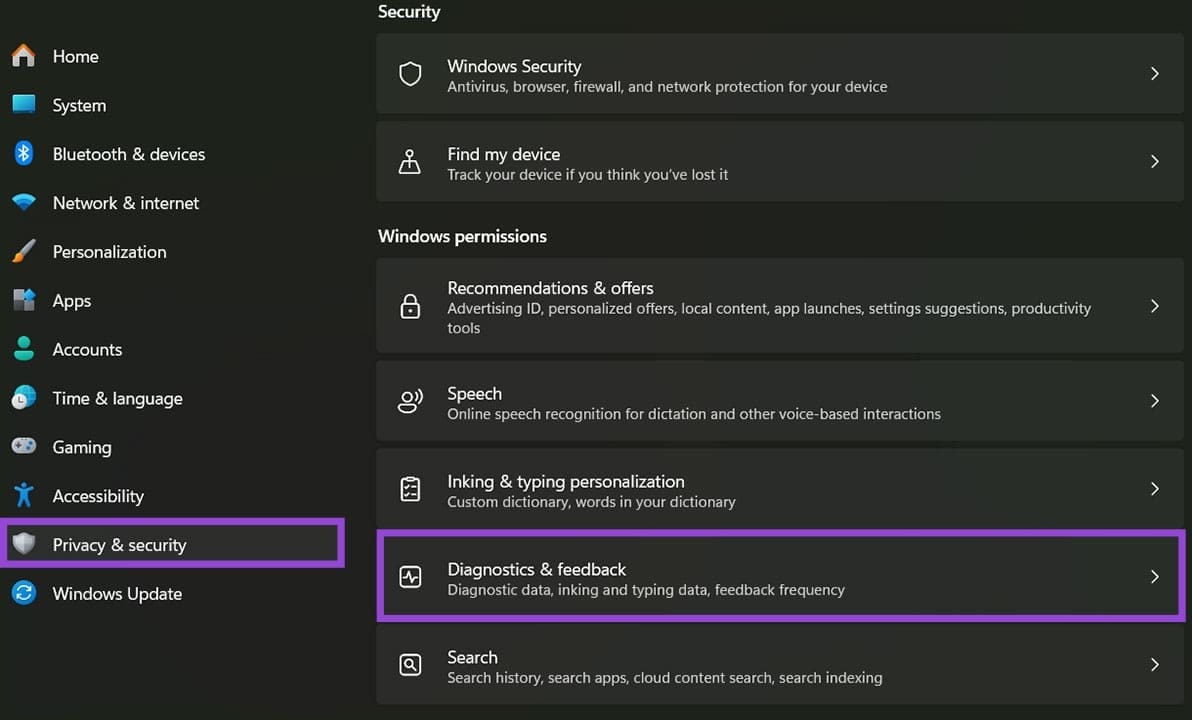
If you’re on Windows 11 Home, Microsoft offers a limited version called Device Encryption on compatible hardware. You can check for it under “Privacy & Security.” Notably, you need to have a Microsoft account and turn on Secure Boot, TMP 2.0, and Windows Recovery set up as well for this.
How to Install BitLocker on Windows
BitLocker isn’t installed so much as enabled on all devices that are compatible with it. In most cases, you’ll want to use it on your C: drive (the drive Windows is installed on).
Step 1. Open Settings with “Win + I” and go to the “System” tab.
Step 2. Click on “Storage,” then scroll down and select “Advanced storage settings,” followed by “Disks & volumes.”
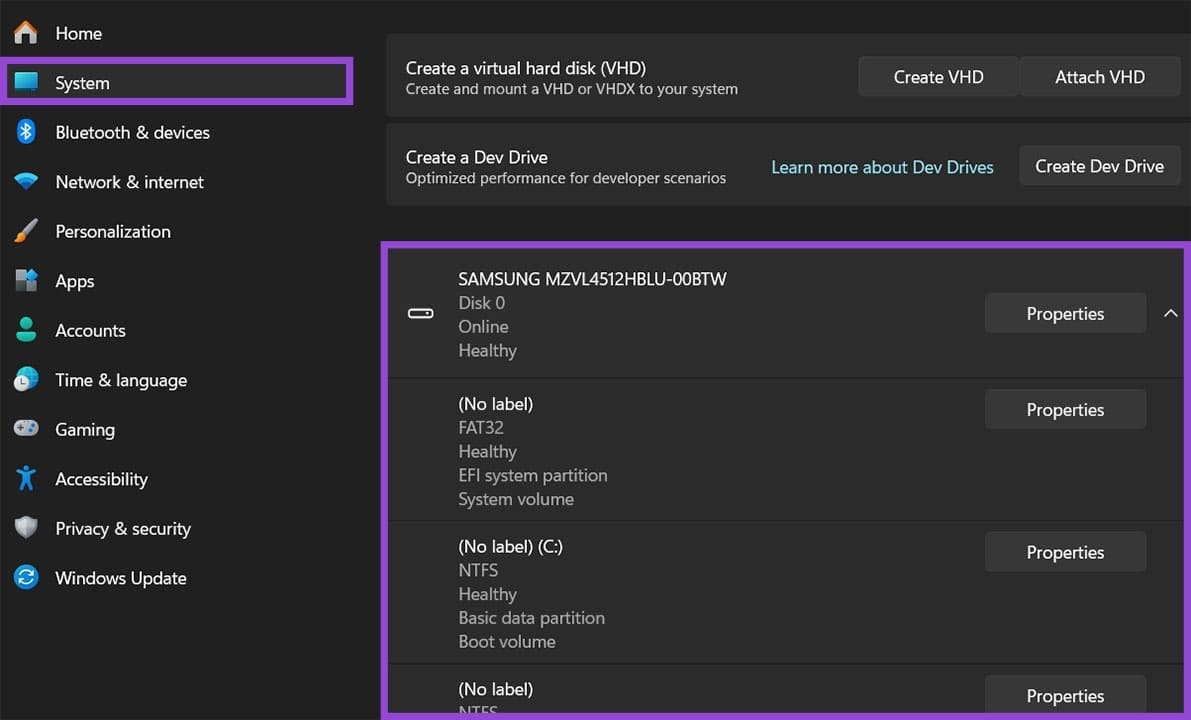
Step 3. Select the “Properties” option for the disk you want to encrypt, then choose “Turn on BitLocker.”
Alternatively, when discovering how to use BitLocker, Windows 11 requires you to open the Start menu, search for “Manage BitLocker,” and open it directly. This is the quicker route. In the BitLocker Drive Encryption panel, find your C: drive and click “Turn on BitLocker.”
Step 4. Windows will run a compatibility check. If your system has a TPM chip (most modern PCs do), the setup will proceed automatically. If not, you’ll be prompted to use a USB drive or a password as an alternative unlock method.
Step 5. Follow the on-screen prompts to choose how you want to unlock the drive at startup and how to back up your recovery key.
Step 6. Choose whether to encrypt either the used disk space or the entire drive (this is entirely up to you).
Step 7. Select “New encryption mode” if this is a fixed internal drive, or “Compatible mode” if you’re encrypting a drive that might be used on older Windows versions.
Step 8. Click on “Start encrypting” and wait for the process to complete.
You can repeat the process for any other drives.
Note: Save Your BitLocker Recovery Key
After turning on BitLocker, you’ll get a recovery key, a 48-digit code that can unlock your drive if Windows can’t verify your identity automatically. Usually, this is after you change hardware (the CPU, graphics card, or even the drive Windows is on) or a failed login. This is basically how to use BitLocker Windows 11 storage protection for your system.
During setup, Windows will offer four options for saving the recovery key.
- Save to your Microsoft account: The key is stored online and accessible from account.microsoft.com. This is the easiest option for most users and the one Microsoft recommends by default.
- Save to a USB flash drive: Writes the key in a file on a separate USB drive.
- Save to a file: Creates a text file you can store on another drive.
- Print the recovery key: Produces a physical printout file.
Was this helpful?
Last updated on 16 April, 2026
Read Next
 How to Fix BitLocker Keeps Asking for Recovery Key
BitLocker is an excellent security feature to protect your files, but it can be a bit odd if you get an issue where BitLocker keeps asking for recovery key out
How to Fix BitLocker Keeps Asking for Recovery Key
BitLocker is an excellent security feature to protect your files, but it can be a bit odd if you get an issue where BitLocker keeps asking for recovery key out
 How to Install Linux on Windows for Dual Booting or Avoiding Windows 11
If you’re still on the fence about upgrading from Windows 10 to Windows 11 due to the increased number of apps that constantly track and share your information, you might
How to Install Linux on Windows for Dual Booting or Avoiding Windows 11
If you’re still on the fence about upgrading from Windows 10 to Windows 11 due to the increased number of apps that constantly track and share your information, you might
 How to Install VirtualBox on Windows 11 and 10
Prerequisites for Installing VirtualBox on Windows CPU: x86-compatible hardware (most modern Intel and AMD CPUs are supported) RAM: The minimum requirement of the host operating system (Windows 11: 4GB) plus
How to Install VirtualBox on Windows 11 and 10
Prerequisites for Installing VirtualBox on Windows CPU: x86-compatible hardware (most modern Intel and AMD CPUs are supported) RAM: The minimum requirement of the host operating system (Windows 11: 4GB) plus
 How to Clean Install Windows 11: A Step-By-Step Guide
Are you looking to give your computer a fresh start by installing the latest version of Windows?
How to Clean Install Windows 11: A Step-By-Step Guide
Are you looking to give your computer a fresh start by installing the latest version of Windows?
 How to Change Epic Games Install Location on Windows
Where Are Epic Games Installed on Your System?
How to Change Epic Games Install Location on Windows
Where Are Epic Games Installed on Your System?
 How to Install Active Directory Users and Computers on Windows
What Is Active Directory Users and Computers (ADUC) on Windows Simply put, think about a big address book for a company's computer network and everything that is a part of
How to Install Active Directory Users and Computers on Windows
What Is Active Directory Users and Computers (ADUC) on Windows Simply put, think about a big address book for a company's computer network and everything that is a part of
 4 Fixes for Windows 11 Won’t Install on Your PC
We’ve seen many versions of Microsoft’s Windows operating system over the years, from the likes of Windows 95 and 98 through to the more recent releases of Windows 10 and
4 Fixes for Windows 11 Won’t Install on Your PC
We’ve seen many versions of Microsoft’s Windows operating system over the years, from the likes of Windows 95 and 98 through to the more recent releases of Windows 10 and
 How to Install Windows 11 Without Bloatware
If you can’t delay upgrading Windows 10 to Windows 11 any longer, you might be worried about all the extra programs that were added to help you navigate the operating
How to Install Windows 11 Without Bloatware
If you can’t delay upgrading Windows 10 to Windows 11 any longer, you might be worried about all the extra programs that were added to help you navigate the operating
The article above may contain affiliate links which help support Guiding Tech. The content remains unbiased and authentic and will never affect our editorial integrity.

