Fix 1: Delete the ScreenSaveActive Registry Key
If screen saver options are greyed out in Windows, incorrect registry edits are likely causing the issue. You must access the Registry Editor and properly edit certain keys to fix the issue.
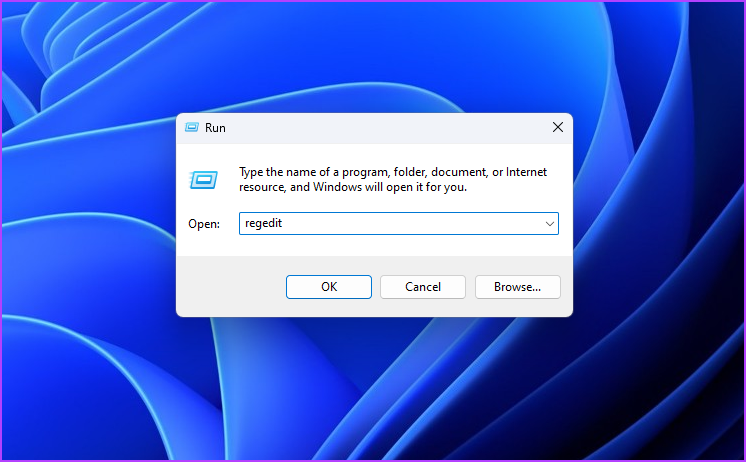
Step 1: Press the Windows + R keyboard shortcut to open the Run tool, type regedit in the search bar, and click OK.
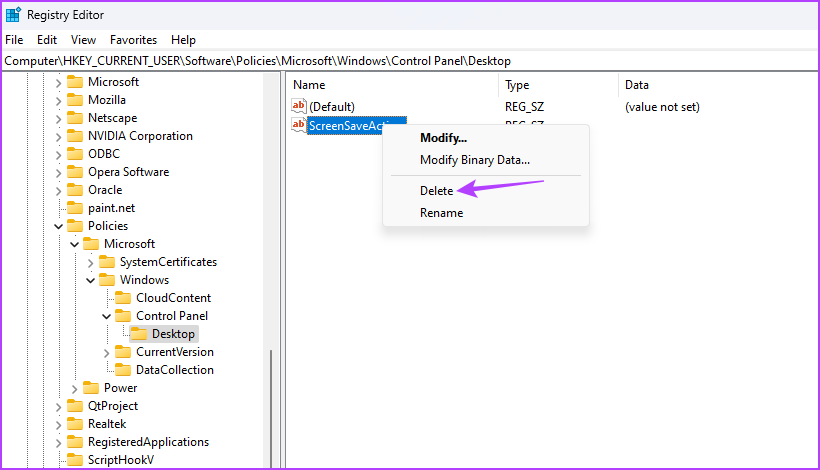
Step 2: In the Registry Editor, navigate to the following location:
HKEY_CURRENT_USER\Software\Policies\Microsoft\Windows\Control Panel\Desktop
Step 3: Right-click on the ScreenSaveActive string value > choose Delete.
Step 4: Click Yes to confirm your selection.

Similarly, delete the following string values as well if available in the same location:
ScreenSaverIsSecure
ScreenSaveTimeout
SCRNSAVE.EXE
Fix 2: Configure the Screen Saver Policy
Enable screen saver is an important policy that lets you change screen savers on your Windows PC. If you’ve mistakenly disabled this policy, you can’t change the screen saver and face various issues, including the one at hand. You may enable it from the Local Group Policy Editor.
Step 1: Press the Windows + R keyboard shortcut to open the Run tool.
Step 2: Type gpedit.msc in the search bar and click OK.

Step 3: In the Local Group Policy Editor, navigate to the following location:
User Configuration > Administrative Templates > Control Panel > Personalization
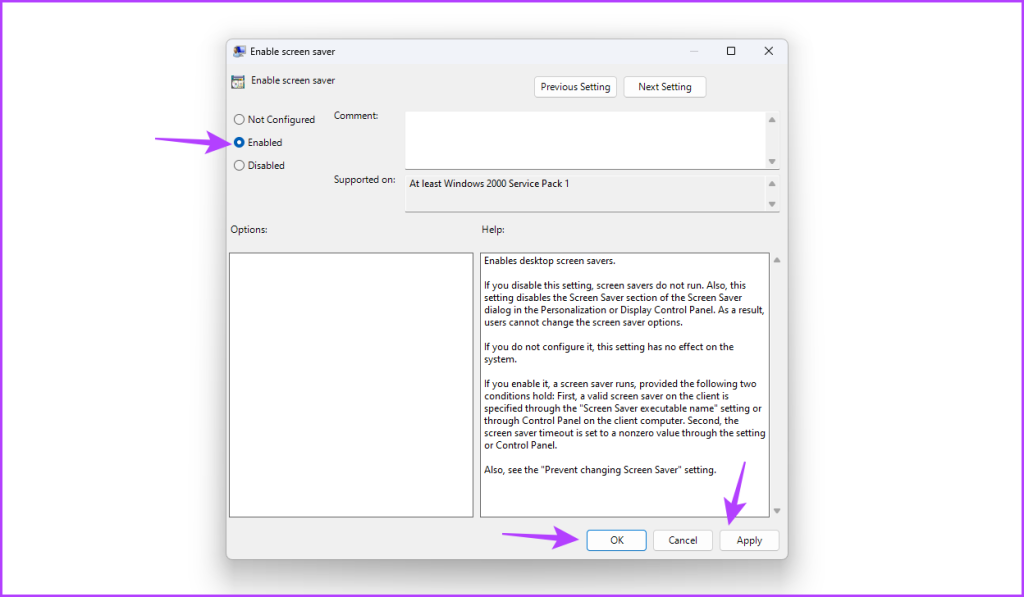
Step 4: Double-click on the Enable screen saver policy in the right pane.

Step 5: Choose Enabled > click Apply > OK.
Note: The Local Group Policy Editor is exclusive to Windows Pro, Enterprise, and Education editions. You may take a few extra steps if gpedit.msc is missing on your PC.
Fix 3: Update or Reinstall Display Drivers
Another prime reason behind the issue can be a corrupt graphics driver. The best way to fix that is to update the graphics driver or reinstall it. Here’s a step-by-step instructions to do that:
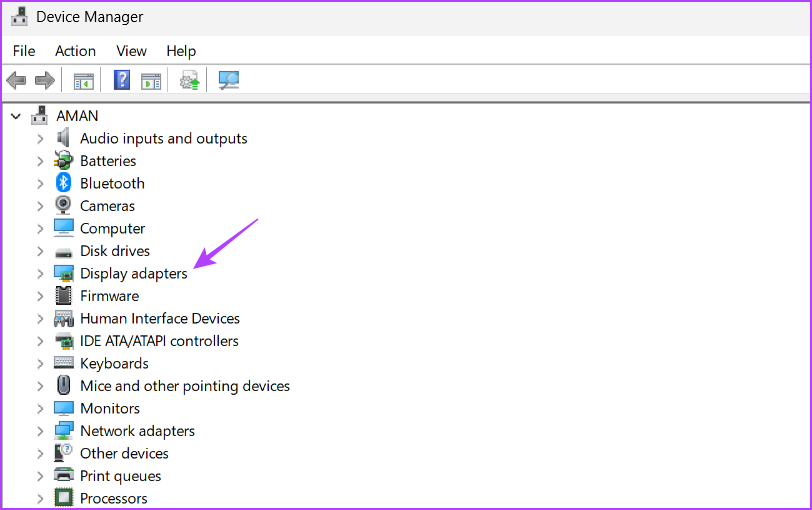
Step 1: Right-click the Windows icon in the Taskbar > choose Device Manager from the Power User menu.

Step 2: Double-click on the Display adapters.
Step 3: Right-click on the installed graphics driver and choose Update driver.

Step 4: Select Search automatically for drivers in the Update driver window that crops up.
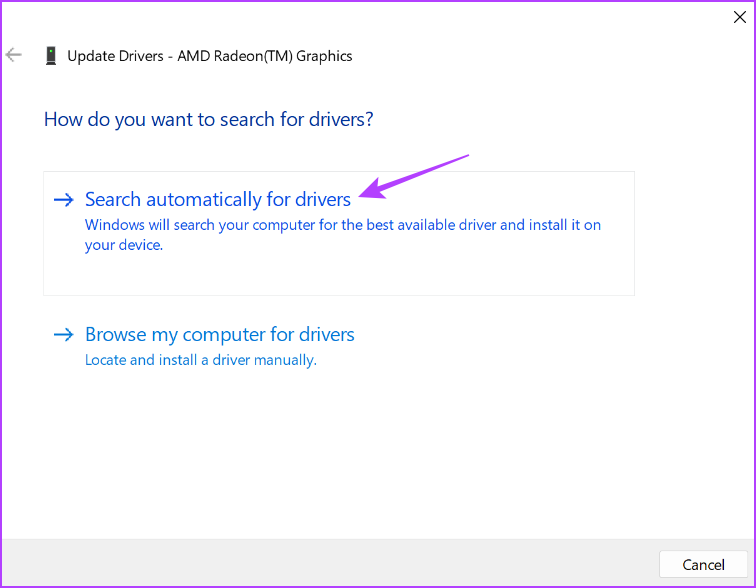
Windows will now search for and download available graphics driver updates.
Alternatively, you may go through steps 1 and 2, right-click on the driver and click Uninstall device. Next, restart the computer to reinstall it.
You can also visit your graphics card manufacturer’s website (AMD, NVIDIA, or Intel) and download the latest update.
Was this helpful?
Last updated on 23 August, 2024
Read Next
 4 Fixes for ‘Set Automatically’ for Date and Time Greyed Out on iPhone
Basic Fixes Remove configuration profile: Configuration profiles define settings for using iPhones with corporate or school networks or accounts.
4 Fixes for ‘Set Automatically’ for Date and Time Greyed Out on iPhone
Basic Fixes Remove configuration profile: Configuration profiles define settings for using iPhones with corporate or school networks or accounts.
 How to Fix Display Resolution Greyed out on Windows 11
Basic Fixes: Restart the computer: Rebooting is effective because minor bugs may trigger the problem, and a reboot often kills the problematic services or processes.
How to Fix Display Resolution Greyed out on Windows 11
Basic Fixes: Restart the computer: Rebooting is effective because minor bugs may trigger the problem, and a reboot often kills the problematic services or processes.
 How to Enable or Disable Battery Saver in Windows 11
How to Turn On or Off Battery Saver Manually Method 1.
How to Enable or Disable Battery Saver in Windows 11
How to Turn On or Off Battery Saver Manually Method 1.
 How to Fix Wi-Fi Greyed Out on iPhone
https://youtu.be/E66FRW2dtuM Basic Fixes Restart iPhone - Sometimes all it needs to fix an issue like Wi-Fi greyed-out is to restart your iPhone.
How to Fix Wi-Fi Greyed Out on iPhone
https://youtu.be/E66FRW2dtuM Basic Fixes Restart iPhone - Sometimes all it needs to fix an issue like Wi-Fi greyed-out is to restart your iPhone.
 7 Ways to Fix Wi-Fi Greyed Out on Mac
Let's check the solutions to fix the Wi-Fi greyed out issue on your Mac. Fix 1: Restart Mac and Enable Wi-Fi Restarting your Mac is an effective way to fix
7 Ways to Fix Wi-Fi Greyed Out on Mac
Let's check the solutions to fix the Wi-Fi greyed out issue on your Mac. Fix 1: Restart Mac and Enable Wi-Fi Restarting your Mac is an effective way to fix
 5 Fixes for Windows Security App Showing White Screen on Windows 11
Common Fixes Reboot PC: Press the Windows + X shortcut to open the Power User Menu, select Shut down or sign out, and click Restart.
5 Fixes for Windows Security App Showing White Screen on Windows 11
Common Fixes Reboot PC: Press the Windows + X shortcut to open the Power User Menu, select Shut down or sign out, and click Restart.
 6 Ways to Get an Off-Screen Window Back on Screen on Windows
While using Microsoft Windows, I had a window that had somehow fallen completely off of my screen.
6 Ways to Get an Off-Screen Window Back on Screen on Windows
While using Microsoft Windows, I had a window that had somehow fallen completely off of my screen.
 5 Fixes for Blue Screen of Death When PC Is Idle on Windows 11
Try Basic Fixes Uninstall Windows update: If you notice the Blue Screen of Death when Windows 11 is idle after an update, you should roll back the Windows update.
5 Fixes for Blue Screen of Death When PC Is Idle on Windows 11
Try Basic Fixes Uninstall Windows update: If you notice the Blue Screen of Death when Windows 11 is idle after an update, you should roll back the Windows update.
The article above may contain affiliate links which help support Guiding Tech. The content remains unbiased and authentic and will never affect our editorial integrity.