Fix 1: Add Your Printer via IP Address and Set It to Default
Step 1: Click the Apple logo at the top-left corner of the menu bar and select System Settings.

Step 2: Click Printers & Scanners from the left sidebar. Click Add Printer, Scanner or Fax button from the right pane.

Step 3: It will open the Add Printer dialog box. Click on the Host menu icon in the center at the top.
Step 4: Enter your printer’s hostname or IP address to let your Mac detect your printer. Next, click the Add button at the bottom right corner.

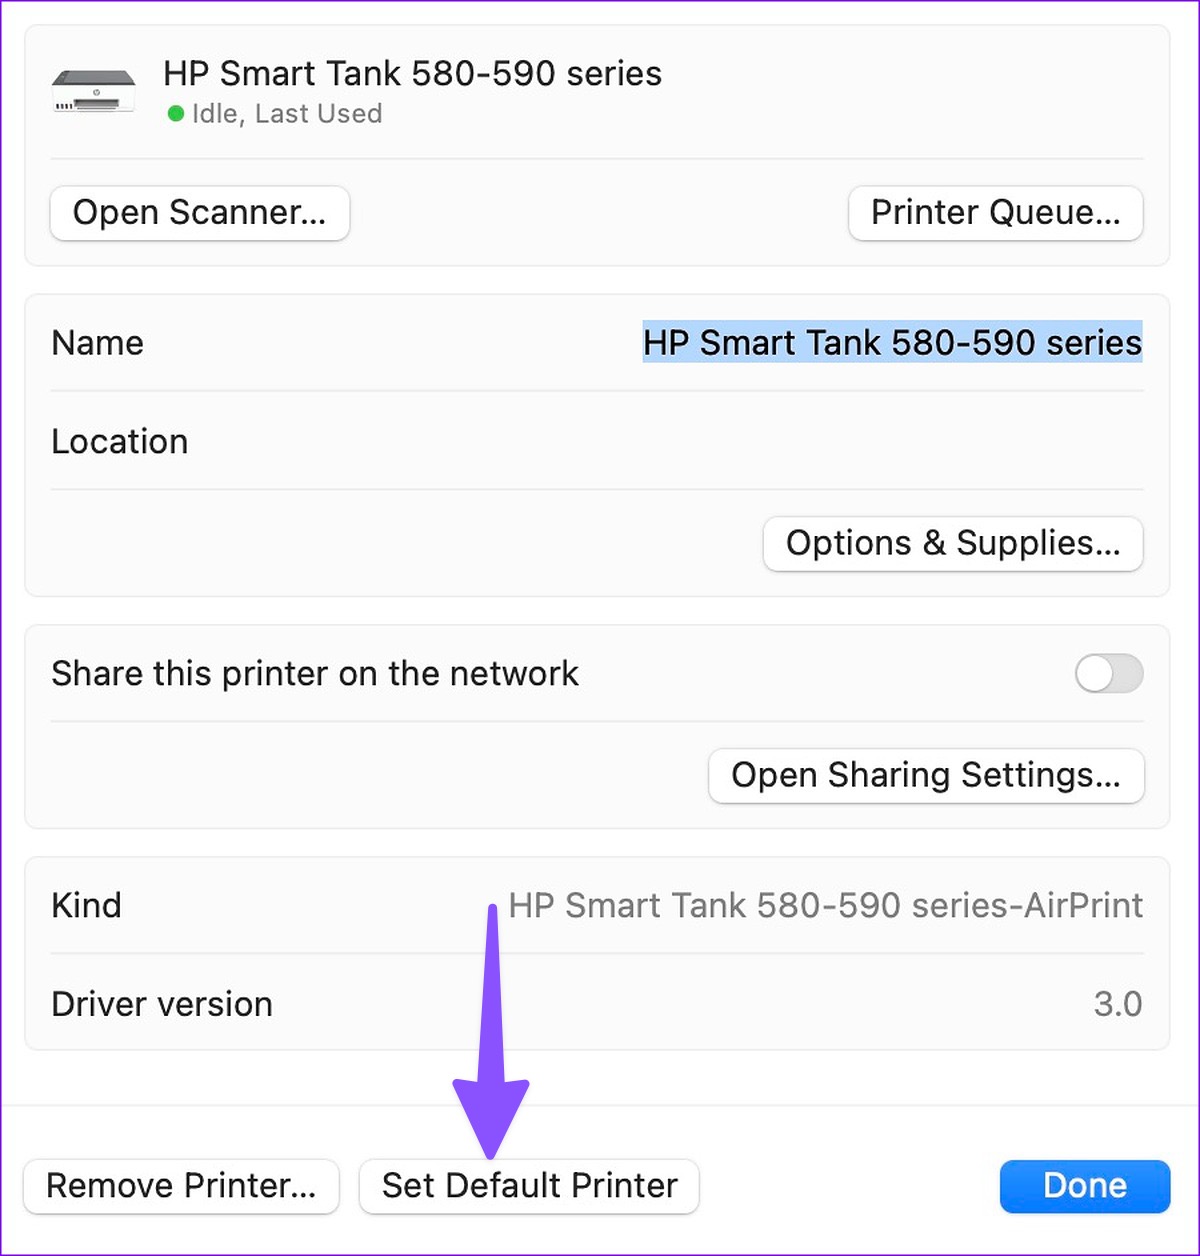
Step 5: Go back and click on your printer name. Then, click on Set As Default and select Done to confirm.
Fix 2: Enable Print Sharing on Local Network
Print sharing is useful for non-wireless printers that are connected to your Mac with a cable. For a wireless or AirPrint-compatible printer, you don’t need to share it on the local network.
Step 1: Click the Apple logo in the top-left corner and select System Settings.
Step 2: Click on Printers and Scanners from the left menu. Then, click on your printer name from the right pane.
Step 3: Enable the Share this printer on the network toggle. Then, click Done to save your changes.

Fix 3: Disable Wi-Fi Isolation or Segregation on Router
AP Isolation is a great way to prevent unwanted hacking of your wirelessly connected devices. But this also means that it can prevent wireless devices connected to the same Wi-Fi from communicating with each other.
Step 1: Open your web browser and enter the IP address for your router.
You can find the IP address by going to System Settings > Wi-Fi > Details and you will see the router IP address.

Step 2: Sign in to the admin panel of the router and find the option of AP isolation.
Step 3: If the setting is enabled, disable it and restart your router.
Once done, connect your printer again to the network and check if the problem is solved.
Fix 4: Reset the Printing System
Does your printer show on your Mac but can’t print a document? It’s time to reset the printer system for your preferred printer.
Step 1: Click the Apple logo at the top-left corner and select System Settings.
Step 2: Click Printers & Scanners from the left sidebar. Then, select your printer from the right pane.

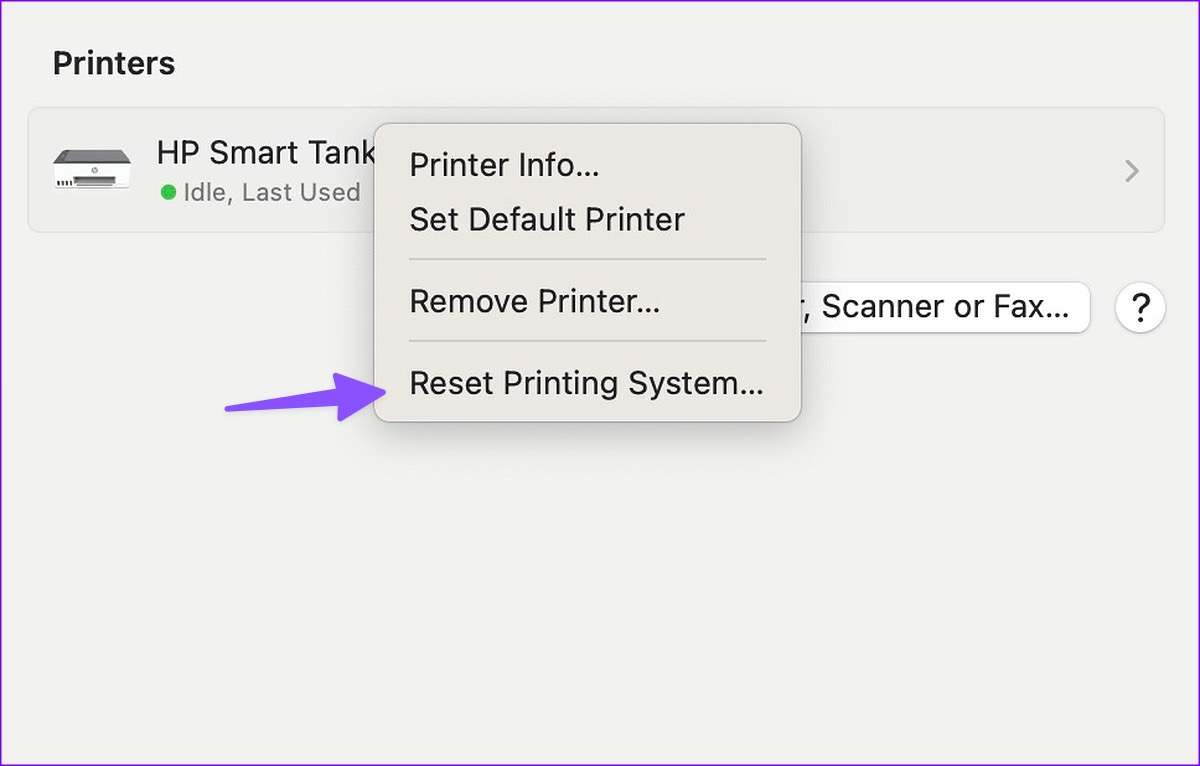
Step 3: Press the Control key and select the default printer. Select Reset Printing System and try again.
Was this helpful?
Last updated on 26 April, 2024
Read Next
 Printer Not Showing up on iPhone? Here Is the Fix
Common Fixes Ensure the printer isn't in Sleep mode - If your printer's power light is blinking or dim or the control panel is dark, it is in sleep mode.
Printer Not Showing up on iPhone? Here Is the Fix
Common Fixes Ensure the printer isn't in Sleep mode - If your printer's power light is blinking or dim or the control panel is dark, it is in sleep mode.
 6 Ways to Fix Unable to Remove Printer on Windows 11
Fix 1: Run the Printer Troubleshooter Start by running Windows' built-in printer troubleshooter to see if it can detect and resolve any pending printing errors.
6 Ways to Fix Unable to Remove Printer on Windows 11
Fix 1: Run the Printer Troubleshooter Start by running Windows' built-in printer troubleshooter to see if it can detect and resolve any pending printing errors.
 5 Ways to Fix Printer Driver Is Unavailable Error on Windows 11
Fix 1: Run the Printer Troubleshooter Windows 11 includes several troubleshooters that can help you fix common system-level issues.
5 Ways to Fix Printer Driver Is Unavailable Error on Windows 11
Fix 1: Run the Printer Troubleshooter Windows 11 includes several troubleshooters that can help you fix common system-level issues.
 4 Ways to Fix HP Printer Not Working on Windows 11
Basic Fixes Check the printer cable: Ensure the connected cable isn't loose.
4 Ways to Fix HP Printer Not Working on Windows 11
Basic Fixes Check the printer cable: Ensure the connected cable isn't loose.
 5 Ways to Fix Printer Isn’t Available Error on Android
Basic Fixes Restart everything: The first thing you must do is quickly restart all the connected devices.
5 Ways to Fix Printer Isn’t Available Error on Android
Basic Fixes Restart everything: The first thing you must do is quickly restart all the connected devices.
 4 Ways to Fix Printer Says Documents Are Waiting Error
Preliminary Fixes Check Printer Connection: You should first try power cycling both your computer and printer.
4 Ways to Fix Printer Says Documents Are Waiting Error
Preliminary Fixes Check Printer Connection: You should first try power cycling both your computer and printer.
 How to Fix Printer Not Activated (Error Code 30) on Windows 11
Basic Fixes Reconnect printer: If you're using a wired printer, its loose USB connection to your PC may result in 'Printer not activated (Error Code 30)'.
How to Fix Printer Not Activated (Error Code 30) on Windows 11
Basic Fixes Reconnect printer: If you're using a wired printer, its loose USB connection to your PC may result in 'Printer not activated (Error Code 30)'.
 How to Fix Windows Printer Error 0x0000011b
1.
How to Fix Windows Printer Error 0x0000011b
1.
The article above may contain affiliate links which help support Guiding Tech. The content remains unbiased and authentic and will never affect our editorial integrity.