Basic Fixes
- Verify app permissions: You can go to Settings > Photos and then check the app access to your photos.
- Force quit and relaunch Photos app: This will the app a fresh start on your iPhone and reload all the features.
- Update iOS version: Go to Settings > General > Software Update to check the same. This will install the latest version of the Photos app.
Fix 1: Check Internal Storage
The first solution we recommend is checking the storage space situation on your iPhone. If you click multiple photos using Burst Mode, you’ll need to have a good amount of storage space on your iPhone. Here’s how to check the storage space on your iPhone.
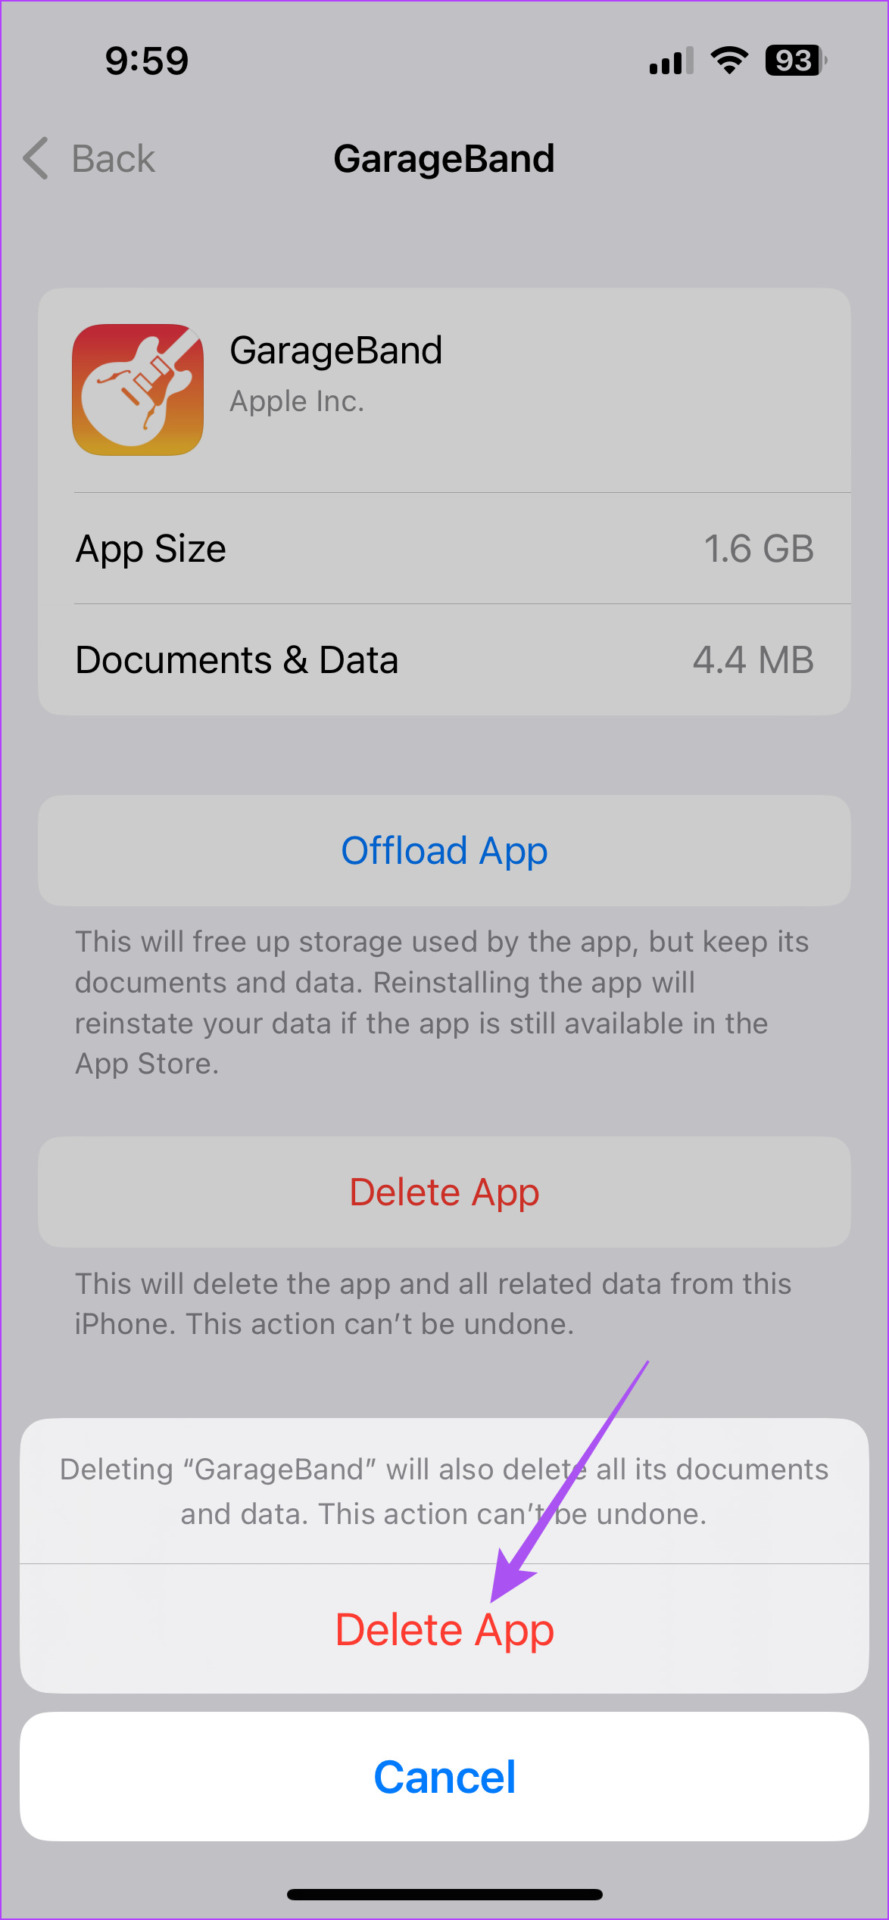
Step 1: Open Settings > General > iPhone Storage.
Step 2: To delete an app from your iPhone, tap on its name and then select Delete App.

Step 6: After that, open the Camera on your iPhone and start clicking pictures to check if the problem is solved.
Fix 2: Enable iCloud Storage
If you can’t remove too much from the internal storage of your iPhone, you may use iCloud storage store some of the photos. The iCloud storage on your iPhone is usable to store data like apps, documents, and photos for quick access from any Apple device connected to your iCloud account.
You’ll need to check if the Photos app has been allowed iCloud access on your iPhone.
Step 1: Open Settings > Profile name > iCloud.
Step 2: Tap on Photos under Apps Using iCloud section. Turn on the toggle next to Sync this iPhone to enable iCloud access.


We suggest selecting the ‘Optimize iPhone Storage’ option. This will replace the full-resolution photos with smaller device-sized versions. You can always download full-resolution images from iCloud anytime.

Step 6: After you enable it, close Settings and open the Camera app to check if the problem is solved.
Fix 3: Send Photos to Yourself or Your Contacts
If none of the solutions work, we suggest sharing the picture with your contact or to yourself on WhatsApp or Telegram. after clicking from your iPhone camera. This will at least save the image in the chat.
Step 1: Open the Camera app on your iPhone.
Step 2: Click a picture and then tap the thumbnail icon at the bottom-left corner.
Step 3: Tap on the Share icon at the bottom-left corner.
Step 4: Select an app like Messages or WhatsApp to share the image.
Fix 4: Reset All Settings
If none of the solutions work for you, we suggest resetting all your iPhone settings. This will restore every Photos app setting to
Open Settings > General > Transfer or Reset iPhone > Reset > Reset All Settings.


Was this helpful?
Last updated on 09 July, 2024
Read Next
 How to Stop Photos From Messages Saving to iPhone’s Camera Roll
Do your friends spam you with their vacation photos on iMessage?
How to Stop Photos From Messages Saving to iPhone’s Camera Roll
Do your friends spam you with their vacation photos on iMessage?
 How to Stop Telegram From Auto-Saving Photos and Videos
Stop Telegram From Auto-Saving on Android Telegram lets you share high-quality photos and videos.
How to Stop Telegram From Auto-Saving Photos and Videos
Stop Telegram From Auto-Saving on Android Telegram lets you share high-quality photos and videos.
 2 Fixes When Google Docs Auto Saving Is Not Working
Basic Fixes: Confirm you have a stable internet: Before exploring further fixes, confirm your internet connection is stable and strong.
2 Fixes When Google Docs Auto Saving Is Not Working
Basic Fixes: Confirm you have a stable internet: Before exploring further fixes, confirm your internet connection is stable and strong.
 4 Fixes for Android Not Saving Contacts
Try Basic Fixes Use the default contacts app: Instant messaging apps like Telegram and WhatsApp also let you add new contacts to your Android.
4 Fixes for Android Not Saving Contacts
Try Basic Fixes Use the default contacts app: Instant messaging apps like Telegram and WhatsApp also let you add new contacts to your Android.
 3 Fixes for iMessage Photos Not Showing in Photos App
Basic Fixes Force quit and relaunch Messages app: You can force quit and relaunch the Messages app to give it a fresh start on your iPhone.
3 Fixes for iMessage Photos Not Showing in Photos App
Basic Fixes Force quit and relaunch Messages app: You can force quit and relaunch the Messages app to give it a fresh start on your iPhone.
 5 Ways to Fix Microsoft Word Stuck on Saving
Basic Fixes Wait for some time: Give it a moment since Word files might take a while to save recent changes, especially when the file size has increased considerably.
5 Ways to Fix Microsoft Word Stuck on Saving
Basic Fixes Wait for some time: Give it a moment since Word files might take a while to save recent changes, especially when the file size has increased considerably.
 5 Ways to Fix Microsoft Excel Not Saving Changes on Windows
Fix 1: Repair Files From File Explorer Step 1: Open the Microsoft Excel app on your computer.
5 Ways to Fix Microsoft Excel Not Saving Changes on Windows
Fix 1: Repair Files From File Explorer Step 1: Open the Microsoft Excel app on your computer.
 How to Fix Discord Profile Theme and Other Changes Not Saving
Basic Fixes Check your network connection: Ensure your device has a good internet connection.
How to Fix Discord Profile Theme and Other Changes Not Saving
Basic Fixes Check your network connection: Ensure your device has a good internet connection.
The article above may contain affiliate links which help support Guiding Tech. The content remains unbiased and authentic and will never affect our editorial integrity.

