If your gaming experience feels a little behind the times (by a few milliseconds, that is), you might be experiencing audio lag. There are a lot of causes for sound that won’t sync, but we’ve got five troubleshooters to help you fix audio lag in games.
What Causes This Issue
We did say there were a few causes behind latency delays in audio for games. These are primarily software-related and caused by:
- Outdated or corrupted drivers
- Latency delays between PC and audio device (particularly Bluetooth ones)
- Any additional audio enhancements and extensions
- Incorrect audio format settings
- Hardware issues, i.e. slow or overheated components
Ways to Fix Audio Lag in Games
If your audio lags when playing games, then try these fixes:
Check Your Audio Device
Your first stop should be your audio device. Whether it’s speakers or headphones, here’s what to do:
- Check the battery levels.
- For Bluetooth devices, make sure they are in range of your PC.
- If you have a cable, try connecting this instead of wireless.
Bluetooth devices will never work as fast as wired devices, but if the difference is getting noticeable, try the alternatives.
Run the Audio Troubleshooter
A good first call for software issues is running the troubleshooter. Windows has a number of these, and they’re very useful for different issues, and more effective than you might believe. Here’s what to do:
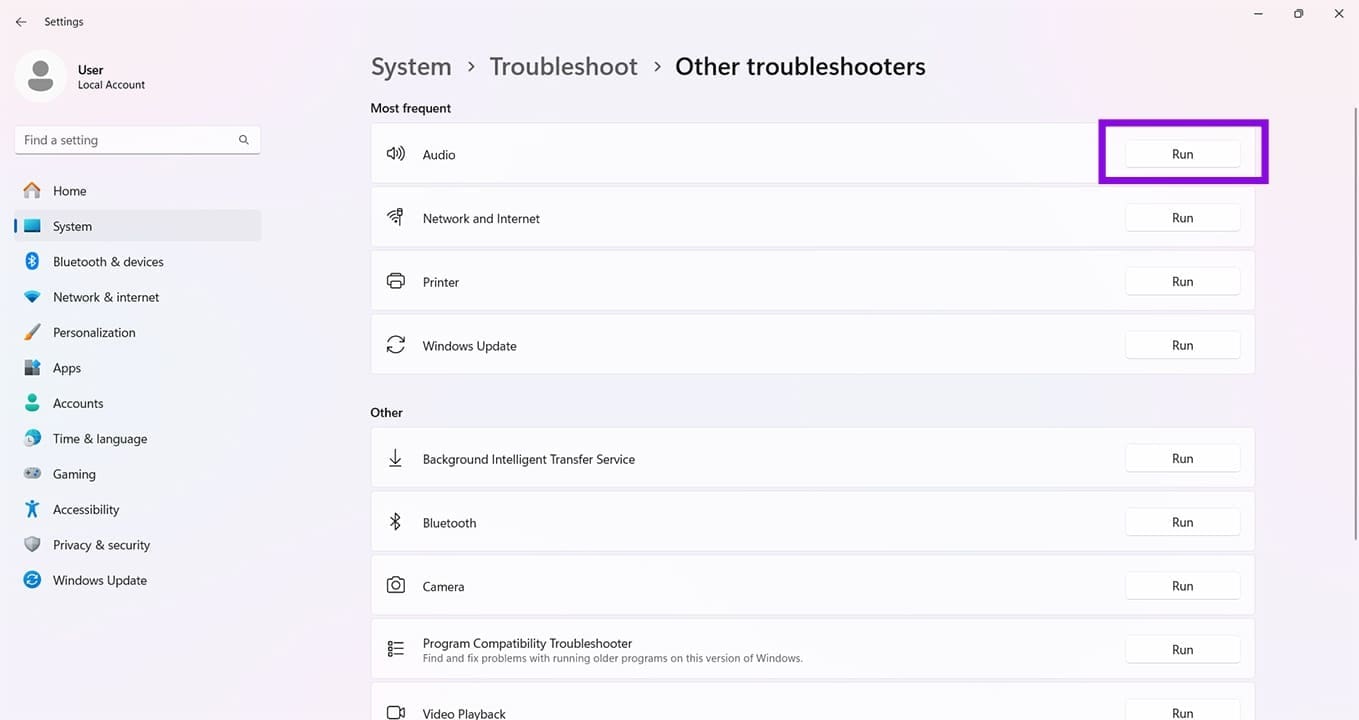
Step 1. Open Settings (Win + I).
Step 2. In the sidebar, click “System.”
Step 3. Scroll all the way down to “Troubleshoot” and click it.
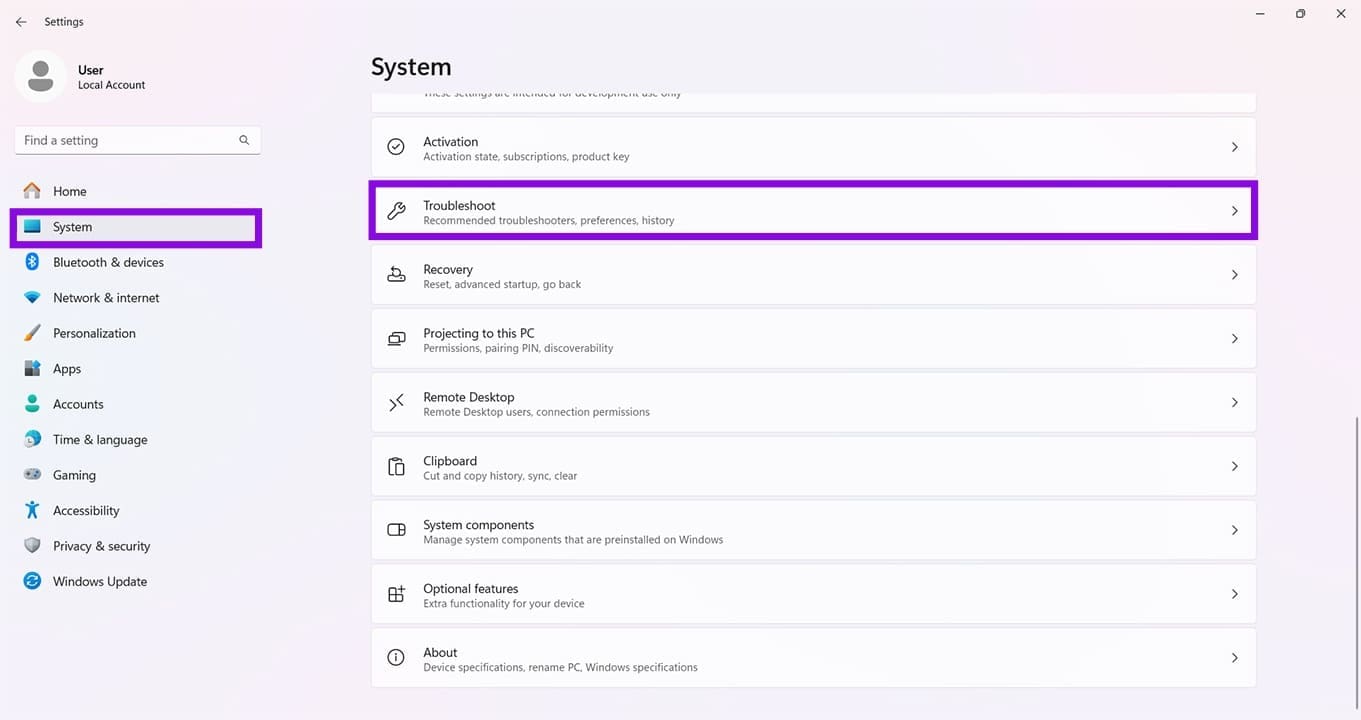
Step 4. Choose “Other troubleshooters.”
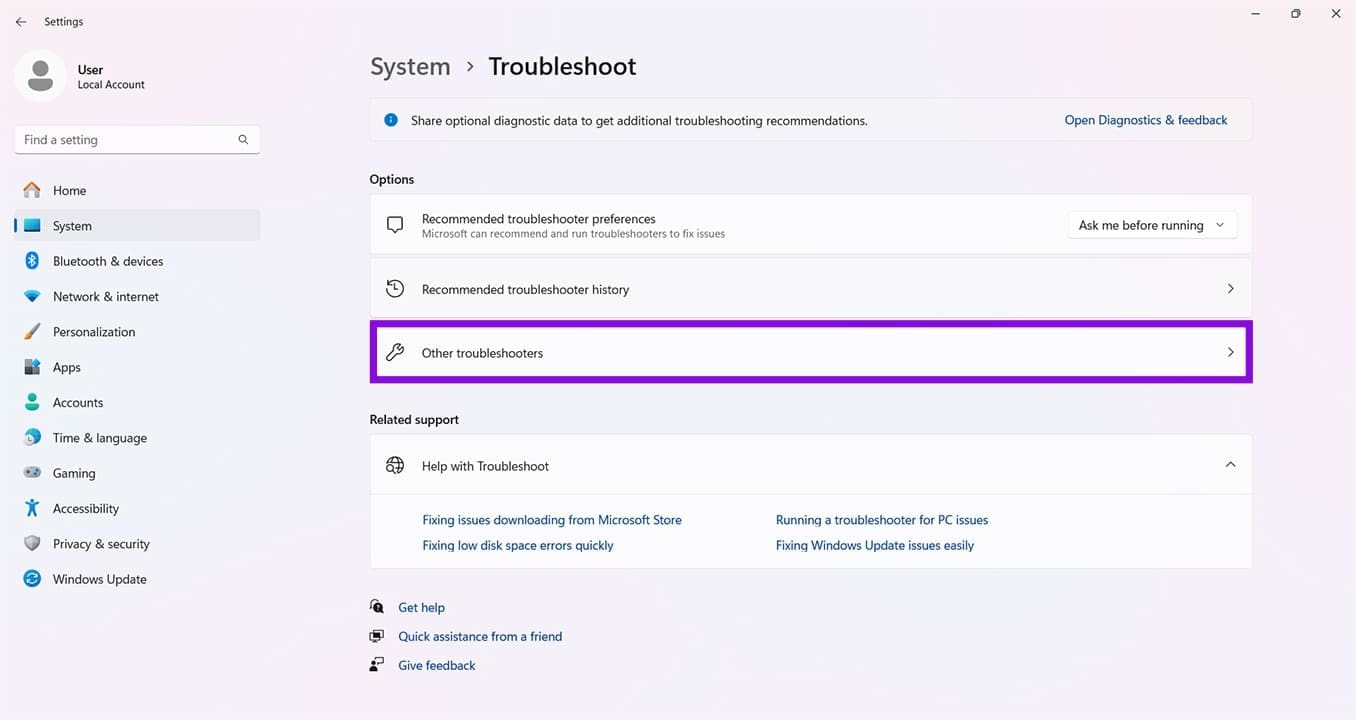
Step 5. Next to “Audio,” click the “Run” button. The troubleshooter will start and detect any potential issues.
Update or Roll Back Your Audio Drivers
Frequent pop-ups may also be a sign of driver errors. To fix this, you can update your audio devices in Device Manager. Here’s how:
Step 1. Open the Run Dialog (Win + R) and type “devmgmt.msc” into the box, and click “OK.”
Step 2. Navigate to “Audio inputs and outputs” and right-click the options below it.
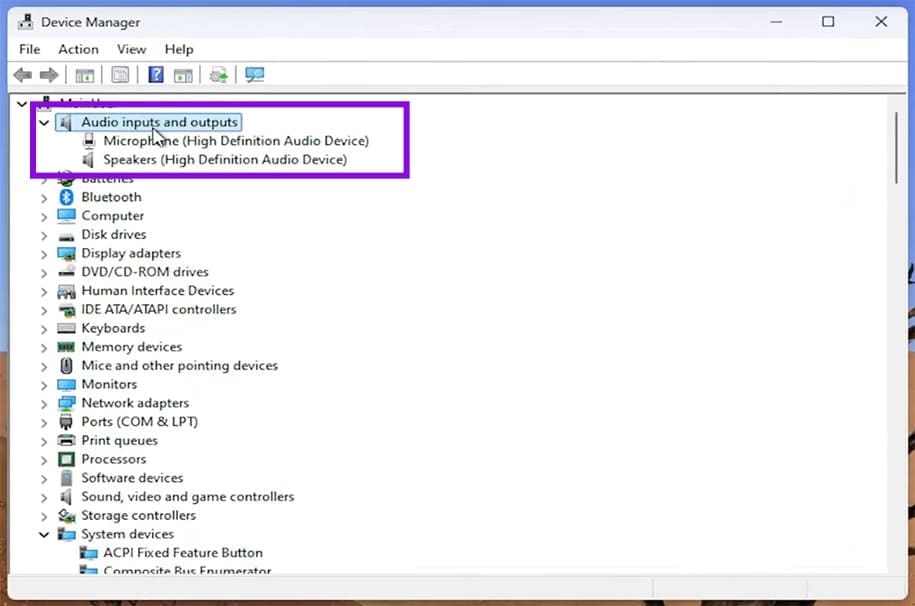
Step 3. Select “Update driver” from the context menu.

Step 4. In the next pop-up, select “Search automatically for drivers” and let the process run. Any new drivers will be shown, and you can install them.
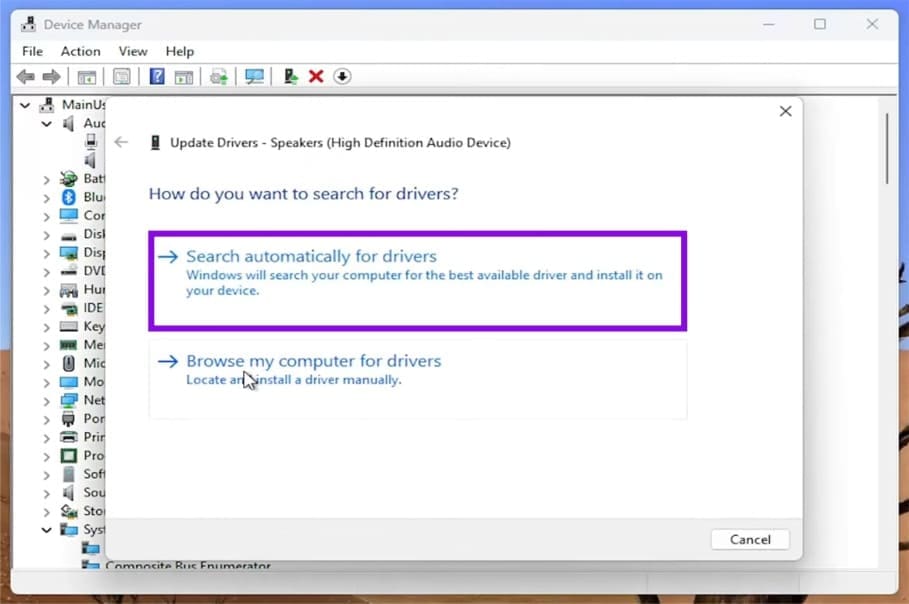
Step 5. To install pre-existing drivers instead, you can click “Browse my computer for drivers.”
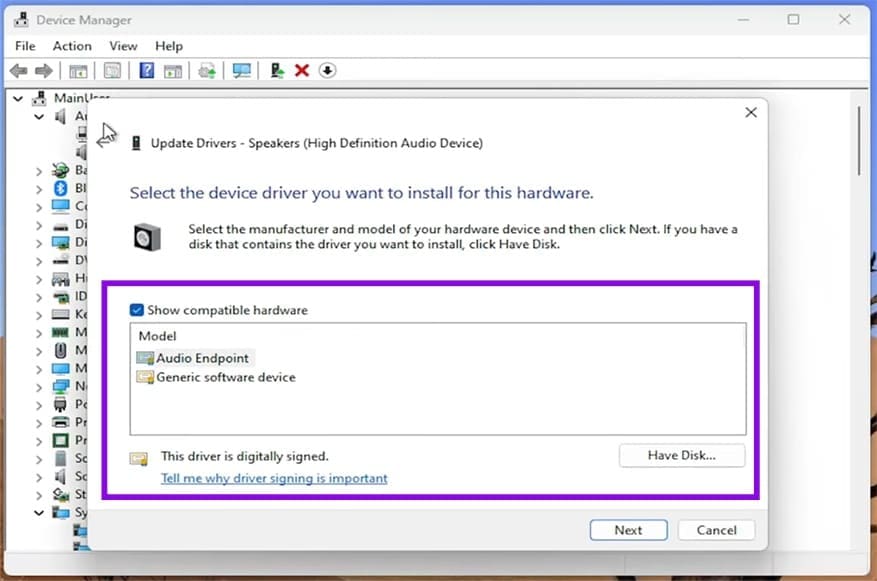
Step 6. Choose from the list provided and follow the prompts to reinstall. After this, reboot your machine.
Disable Audio Enhancement
Windows 11 Audio Enhancement can give better sound, but also cause issues. Disabling it could eliminate lag. Here’s how:
Step 1. Open Settings (Win + I) and go to “System.”
Step 2. Select “Sound” and head to the “Advanced” section.
Step 3. Choose “All sound devices” and select your device’s output
Step 4. Navigate to the “Output settings” subsection and drag the “Enhance audio” slider to “Off.”
Step 5. Test your device again and restart to be sure.
Clean Boot
Clean Boot is a way to run your machine without third-party extensions and enhancements. If your game runs fine in this mode, you know where the problem lies. To do so:
Step 1. Open the Run Dialog (Win + R) and type “msconfig” before clicking “Enter.”
Step 2. In the window that pops up, click the “Services” tab.
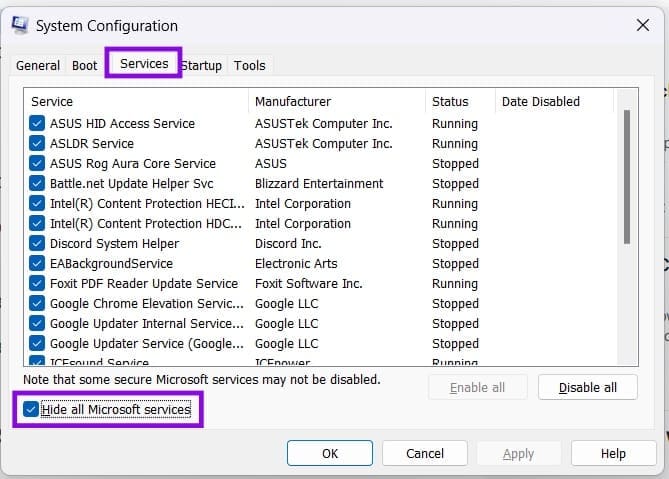
Step 3. Check “Hide all Microsoft services” and disable any remaining third-party services that you think could be causing the issue. Disable them all if you want.
Step 4. Click the “Startup” tab and select “Open Task Manager.”
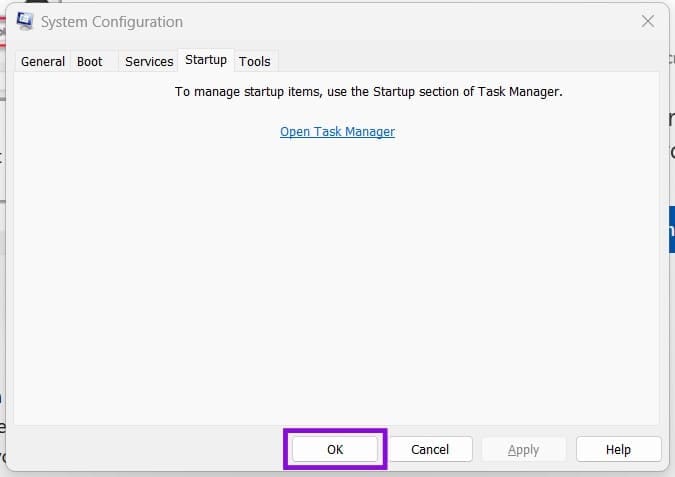
Step 5. Disable each enabled startup item in the Task Manager.
Step 6. Return to System Configuration (msconfig), then click “OK.”
Step 7. Restart your machine, and it will boot into Clean Boot.
Step 8. Test your game.
Was this helpful?
Last updated on 03 June, 2026
Read Next
 Top 8 Ways to Fix Mouse Lag on Windows 11
A mouse that often stutters or lags can result in an unpleasant computing experience.
Top 8 Ways to Fix Mouse Lag on Windows 11
A mouse that often stutters or lags can result in an unpleasant computing experience.
 5 Ways to Fix Keyboard Lag on Windows 11
Basic Fixes Disconnect and reconnect the keyboard: If your keyboard is lagging due to a minor connection issue, disconnecting and reconnecting it should help.
5 Ways to Fix Keyboard Lag on Windows 11
Basic Fixes Disconnect and reconnect the keyboard: If your keyboard is lagging due to a minor connection issue, disconnecting and reconnecting it should help.
 Top 8 Ways to Fix Windows 11 Lag After an Update
While Windows 11 is a welcome change with the start menu, taskbar, and other design improvements, the upgrade didn’t go well with some users.
Top 8 Ways to Fix Windows 11 Lag After an Update
While Windows 11 is a welcome change with the start menu, taskbar, and other design improvements, the upgrade didn’t go well with some users.
 11 Steps to Restore the Windows 11 Classic Context Menu (And a Temporary Fix)
How does it always seems like Microsoft manages to break two things every time it fixes one?
11 Steps to Restore the Windows 11 Classic Context Menu (And a Temporary Fix)
How does it always seems like Microsoft manages to break two things every time it fixes one?
 Can’t Hear Your Games? How to Fix Audio Problems in Steam
Have things gone a little quiet in your games?
Can’t Hear Your Games? How to Fix Audio Problems in Steam
Have things gone a little quiet in your games?
 How to Update Epic Games Launcher and Its Games on Windows
How to Check and Update Epic Games Launcher Epic Games Launcher auto-updates along with its games.
How to Update Epic Games Launcher and Its Games on Windows
How to Check and Update Epic Games Launcher Epic Games Launcher auto-updates along with its games.
 4 Fixes for Roblox Lag on Windows
Fix 1: Change Graphics Preference for Roblox Windows lets you set graphics preferences for each app and program separately.
4 Fixes for Roblox Lag on Windows
Fix 1: Change Graphics Preference for Roblox Windows lets you set graphics preferences for each app and program separately.
 Steps for Creating Action Buttons in Microsoft PowerPoint
What are action buttons in PowerPoint?
Steps for Creating Action Buttons in Microsoft PowerPoint
What are action buttons in PowerPoint?
The article above may contain affiliate links which help support Guiding Tech. The content remains unbiased and authentic and will never affect our editorial integrity.