Snipping Tool has practically revolutionized how you can screenshot in Windows without downloading third-party files. However, it has one little downside: it keeps every single screenshot you take in a dedicated folder. This might not sound like much, but the process is automatic and doesn’t actually depend on hitting the “Save” button, so even a few reshoots can slowly build up your storage usage.
Here’s how to stop that from happening and save up on a bit of storage space and file management.
Disable Snipping Tool Auto Saving Screenshots Step-by-Step
Snipping Tool has its own suite of settings which direct it how it saves screenshots, and you can access them only once you actually take your screenshot.
Step 1. Search for “Snipping Tool” (or just “snip”) in the search bar, then open Snipping Tool. If you haven’t modified your settings from the stock Windows 11 installation, pressing the “Prt Sc” key on the keyboard should also open the app.
Step 2. The Snipping Tool toolbar will open and the selector will show up on the screen. Click and drag over any portion to create a screenshot and get the editing window up. If you’ve screenshotted the desktop, you’ll get a popup notification on the bottom-right of the screen instead, prompting you to open the markup window.
Step 3. In the editing window, click on the three-dots icon on the top-right, then select “Settings.”
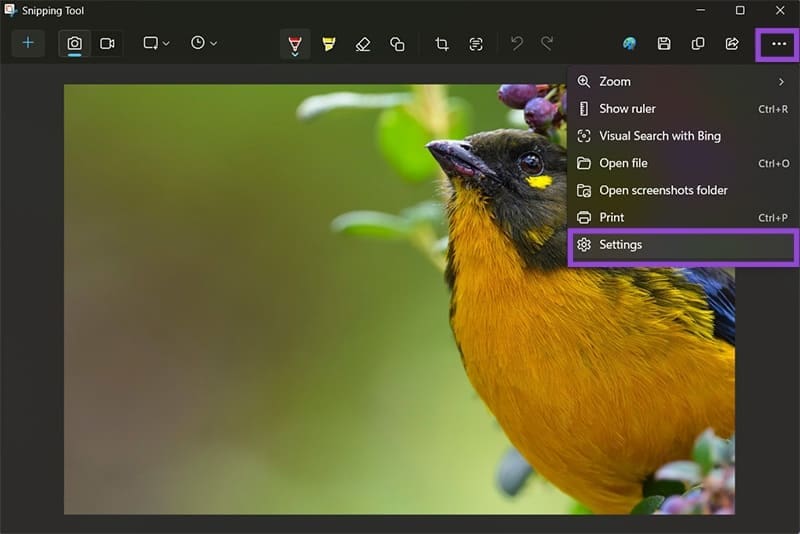
Step 4. Uncheck the option “Automatically save original screenshots,” but keep the rest of the settings as-is.

This will prevent auto save on Snipping Tool for unaltered screenshots, copying them only to the clipboard instead of the hard drive. To keep a permanent copy, you can edit it with any of the editing options and hit the “Save” button on the app’s toolbar. You’ll also get the opportunity to choose where you save the file.
How to Remove Previous Screenshots
Once you disable Snipping Tool auto save, you can also go through old files and manually delete the screenshots you don’t need.
By default, the location of the save folder is in the “Pictures” directory under “Screenshots,” where each file will be named as “Screenshot-[year]-[month]-[day]-[hour][minute][second].” While this makes it easy to locate specific files, it also shows just how many screenshots you can take even in a single session, especially if you need them for work or hobbies.

Extra Tip: Preventing Snipping Tool from Automatically Popping Up
If you want to go back to the pre-Windows 10 experience, where pressing the “Print Screen” button copied a snapshot of your entire desktop to the clipboard, you can disable it as a shortcut for Snipping Tool.
Step 1. Open Settings with “Win + I.”
Step 2. Go to “Accessibility,” then scroll down and select “Keyboard.”
Step 3. Toggle off the option “Use the Print screen key to open screen capture.”

Was this helpful?
Last updated on 11 October, 2025
Read Next
 Snipping Tool vs Snip & Sketch: How Do They Differ
The easiest way to take screenshots on Windows is by using the PrtScn key.
Snipping Tool vs Snip & Sketch: How Do They Differ
The easiest way to take screenshots on Windows is by using the PrtScn key.
 6 Ways to Fix Snipping Tool Not Working on Windows 11
Fix 1: Ensure Snipping Tool Notifications Are Enabled Snipping Tool may fail to show screenshots after capturing them if you have turned off its notification permission.
6 Ways to Fix Snipping Tool Not Working on Windows 11
Fix 1: Ensure Snipping Tool Notifications Are Enabled Snipping Tool may fail to show screenshots after capturing them if you have turned off its notification permission.
 4 Ways to Fix Snipping Tool Keyboard Shortcut Not Working
Basic Fixes: Check your keyboard for damages: Any physical damage to keyboard keys might prevent them from working as expected.
4 Ways to Fix Snipping Tool Keyboard Shortcut Not Working
Basic Fixes: Check your keyboard for damages: Any physical damage to keyboard keys might prevent them from working as expected.
 3 Ways to Fix the “Recording Stopped” Error in Snipping Tool for Windows 11
Try Basic Fixes Disable screen projection: The Snipping Tool may sometimes have trouble recording the screen if you are using multiple displays.
3 Ways to Fix the “Recording Stopped” Error in Snipping Tool for Windows 11
Try Basic Fixes Disable screen projection: The Snipping Tool may sometimes have trouble recording the screen if you are using multiple displays.
 How to Use Snipping Tool Text Actions in Windows 11
The ability to capture bite-sized or specific information from your screen and share it across has never been easier, thanks to Snipping Tool.
How to Use Snipping Tool Text Actions in Windows 11
The ability to capture bite-sized or specific information from your screen and share it across has never been easier, thanks to Snipping Tool.
 How to Draw a (Red) Box Around Text in the Snipping Tool on Windows PC
Steps to Draw a (Red) Box Around Text in the Snipping Tool Step 1: Open the screenshot or any other picture in the Snipping Tool.
How to Draw a (Red) Box Around Text in the Snipping Tool on Windows PC
Steps to Draw a (Red) Box Around Text in the Snipping Tool Step 1: Open the screenshot or any other picture in the Snipping Tool.
 Snipping Tool Keeps Popping Up in Windows 11 Fix
It’s useful to have a tool that makes grabbing screenshots a piece of cake.
Snipping Tool Keeps Popping Up in Windows 11 Fix
It’s useful to have a tool that makes grabbing screenshots a piece of cake.
 How to Stop Telegram From Auto-Saving Photos and Videos
Stop Telegram From Auto-Saving on Android Telegram lets you share high-quality photos and videos.
How to Stop Telegram From Auto-Saving Photos and Videos
Stop Telegram From Auto-Saving on Android Telegram lets you share high-quality photos and videos.
The article above may contain affiliate links which help support Guiding Tech. The content remains unbiased and authentic and will never affect our editorial integrity.