How to Create a Custom Table Template in Microsoft Word
On Microsoft Word, there is a feature called Quick Tables. It contains several pre-created layouts and table designs that you can edit further. Here’s how to create a custom table template to add to Quick Tables in Microsoft Word.
Step 1: Launch your Microsoft Word app.
Step 2: Open any of your needed documents.
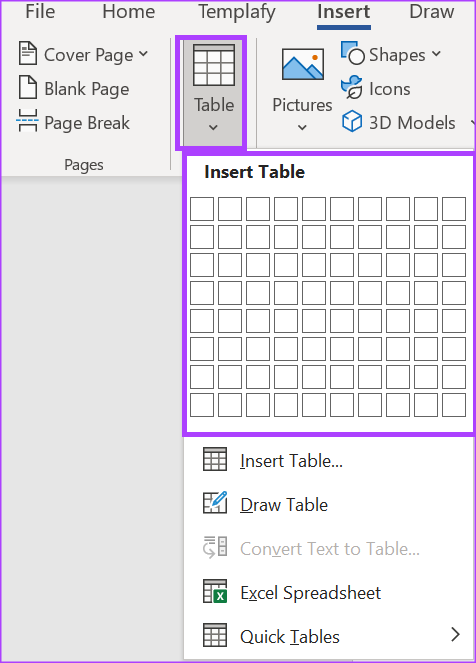
Step 3: Click the Insert tab on the Microsoft Office Ribbon.

Step 4: Click the Table drop-down.

Step 5: Under the Insert Table title, select the number of rows and columns for your custom table. Your new table will then appear in Word.
Step 6: Select the inserted table and click Table Design on the Ribbon.

Step 7: Select your preferred Table Style, Shading, and Border Style for your custom table.

Step 8: On the Ribbon, click Layout and select your preferred Cell Size, Text Direction, and Margin for your custom table.

Step 9: After customizing your table, select it, and on the Ribbon, click the Insert tab again.

Step 10: Click the Table drop-down and click Quick Tables from the options.
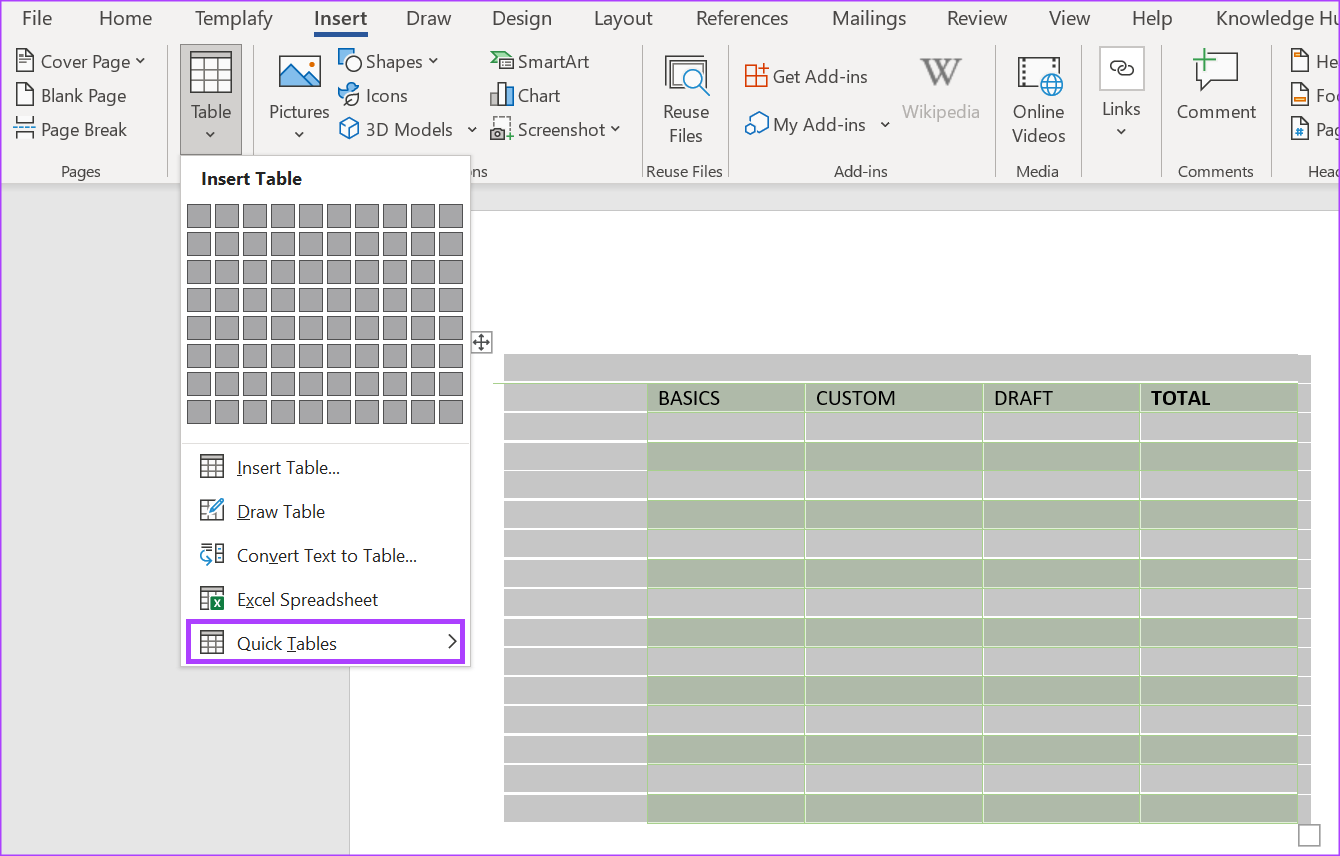
Step 11: Click Save Selection to Quick Tables Gallery from the Quick Tables menu at the bottom, which will launch a pop-up.

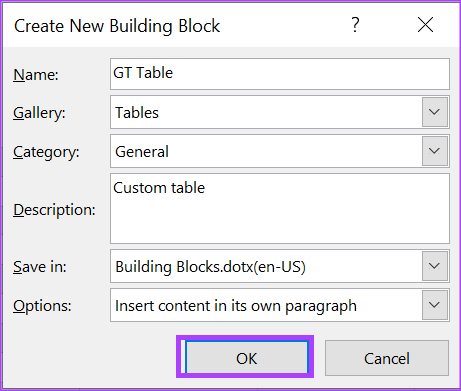
Step 12: Provide a name and description for your custom table on the Create New Building Block pop-up.

Step 13: Click OK to save your changes.
Your new custom table will now be saved in the Quick Tables gallery. You may also include a table of contents to make navigating to parts of your document easier.
How to Use a Custom Table Template in Microsoft Word
After you’ve made a custom table, the next best thing you can do is to make use of it. Here’s how to access your custom table anytime:
Step 1: Launch Microsoft Word.
Step 2: Open the needed document.
Step 3: Click the Insert tab on the Microsoft Office Ribbon.
Step 4: Click the Table drop-down.
Step 5: Click Quick Tables from the options.
Step 6: Scroll to the bottom of the Quick Tables gallery till you see your custom table.

Step 7: Click on your custom table to insert it into your Microsoft Word file.

How to Delete a Custom Table Template in Microsoft Word
If the custom table can no longer serve its intended use, you can delete it from your Quick Tables gallery. Here’s how to do so:
Step 1: Launch Microsoft Word.
Step 2: Open the needed Word file.
Step 3: Click the Insert tab on the Microsoft Office Ribbon.
Step 4: Click the Table drop-down.
Step 5: Click Quick Tables from the options.
Step 6: Scroll to the bottom of the Quick Tables gallery till you see your custom table.
Step 7: Right-click on the custom table intended for deletion.
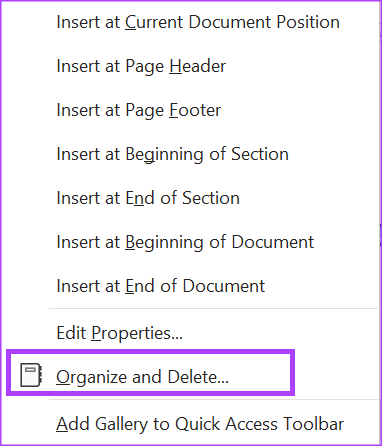
Step 8: Click Organize and Delete from the options to launch a dialog box.
Step 9: Select your custom table and click Delete at the bottom of the Building Blocks Organizer dialog box.
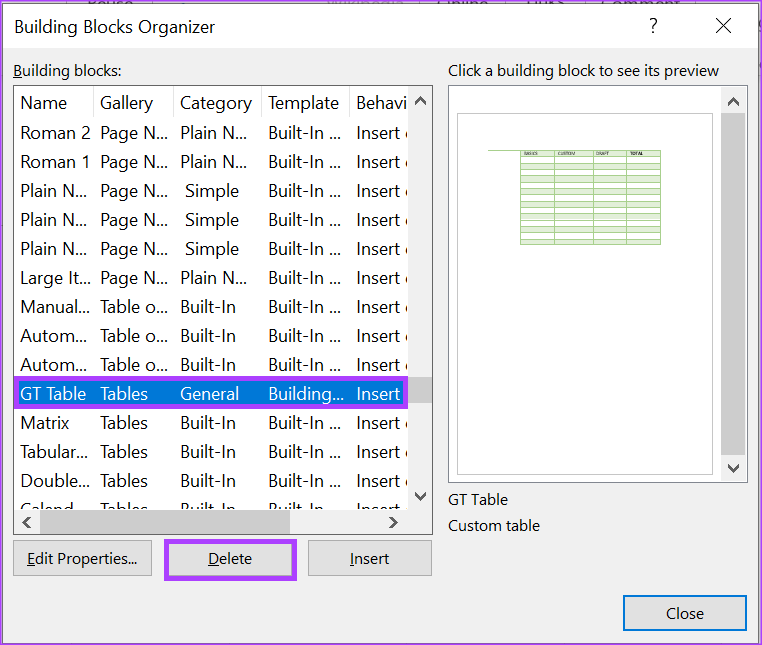
Step 10: On the pop-up window, click Yes to confirm the deletion of the table.

Was this helpful?
Last updated on 04 July, 2024
Read Next
 11 Best Microsoft Word Templates to Create Brochure
Microsoft Office 365 is considered as the gold standard of productivity suite among enterprise and business.
11 Best Microsoft Word Templates to Create Brochure
Microsoft Office 365 is considered as the gold standard of productivity suite among enterprise and business.
 How to Insert a Table of Contents in Microsoft Word
 (Windows and Mac) As a part of the Office redesign, Microsoft revamped the Word app on the desktop.
How to Insert a Table of Contents in Microsoft Word
How to Insert a Table of Contents in Microsoft Word (Windows and Mac) As a part of the Office redesign, Microsoft revamped the Word app on the desktop.
 How to Create a Custom Dictionary in Microsoft Word
Have you ever typed a certain word in Microsoft Word only to get the red zig-zag line underneath?
How to Create a Custom Dictionary in Microsoft Word
Have you ever typed a certain word in Microsoft Word only to get the red zig-zag line underneath?
 How to Create a Custom Color Set and Theme in Microsoft Word
How to Create a Custom Color Set In Microsoft Word, a color set is a collection of colors used to organize and store colors.
How to Create a Custom Color Set and Theme in Microsoft Word
How to Create a Custom Color Set In Microsoft Word, a color set is a collection of colors used to organize and store colors.
 How to Create a Custom Template in Microsoft Word
Create a Custom Template in Word Creating a document template in Microsoft Word is similar to making a guide or model to make tools.
How to Create a Custom Template in Microsoft Word
Create a Custom Template in Word Creating a document template in Microsoft Word is similar to making a guide or model to make tools.
 How to Create Templates in OneNote on Windows and Mac
OneNote Mac and Windows App The OneNote app on Mac and Windows are almost similar looking with the same options and menus.
How to Create Templates in OneNote on Windows and Mac
OneNote Mac and Windows App The OneNote app on Mac and Windows are almost similar looking with the same options and menus.
 4 Best Free Microsoft OneNote Templates You Must Try
Microsoft OneNote is a robust information-gathering and note-taking app available on Windows, Mac, Android, and iOS.
4 Best Free Microsoft OneNote Templates You Must Try
Microsoft OneNote is a robust information-gathering and note-taking app available on Windows, Mac, Android, and iOS.
 5 Fixes for Email Templates Missing in Microsoft Outlook
Fix 1: Check the Email Templates Folder An obvious reason why your Outlook email templates may not show up is that you have accidentally deleted them.
5 Fixes for Email Templates Missing in Microsoft Outlook
Fix 1: Check the Email Templates Folder An obvious reason why your Outlook email templates may not show up is that you have accidentally deleted them.
The article above may contain affiliate links which help support Guiding Tech. The content remains unbiased and authentic and will never affect our editorial integrity.