How to Create Hard Drive Partitions on Windows 11
Windows offers the Disk Management utility to undertake any storage-related tasks on your Windows PC. It’s a solid go-to option to format a storage drive or create a new partition. Here are the steps to create a disk partition using the Disk Management utility on your Windows 11 PC:
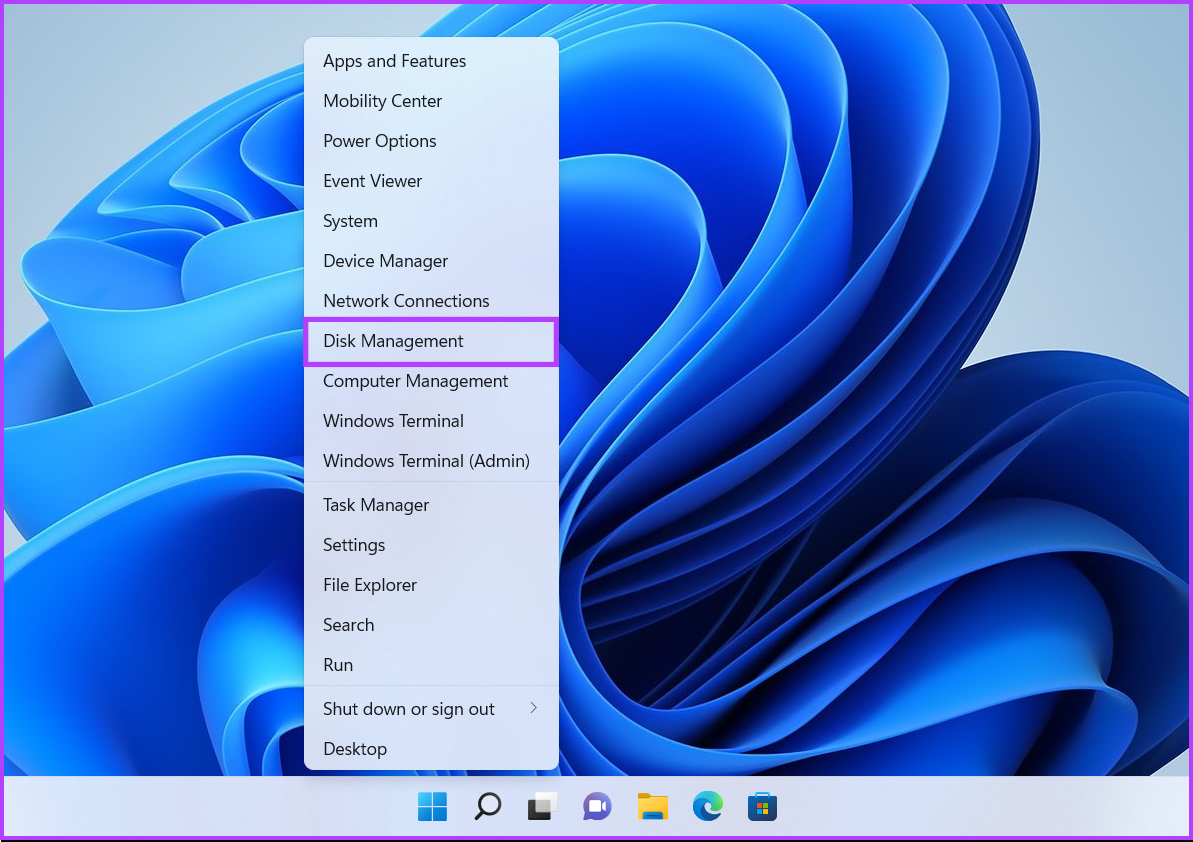
Step 1: Press the Windows + X keys to access the Power User Menu and click on Disk Management.
Step 2: Right-click on the disk to create a partition. Then, click on Shrink volume.

Step 3: Type the amount of space to shrink in MB to determine the partition size. Be mindful of the number you enter. Next, click on Shrink.

Step 4: Right-click on the newly created unallocated partition (one with the grey lines) and select New Simple Volume.

Step 5: When a New Simple Volume Wizard window appears on the screen, click Next.

Step 6: If you plan on creating additional partitions, specify the size you want to create. Then, click on Next.

Step 7: Click on the Assign the following drive letter drop-down list to select a drive letter for your partition. Then, click on Next.

Step 8: Select an applicable File system (by default, choose NTFS) and type a name in the box next to Volume label. Then, click on Next.

After that, a File Explorer window will show you the newly created drive partitions. In our case, they were New Volume (D:) and New Volume (E:). Repeat the process to create more partitions.

How to Merge Hard Drive Partitions on Windows 11
While this is convenient, the partitions sometimes remain unutilized or underutilized. In such cases, you may need to merge your existing hard drive partitions to create a larger space to store more files in a single partition. Here’s how to easily merge hard drive partitions on your Windows 11 PC:
Step 1: Press the Windows + X keys to access the Power User Menu and click on Disk Management.

Step 2: Right-click on the secondary partition (New Volume D: in our case) and select Delete Volume.

Step 3: If you have backed up the data in the chosen partition, click Yes. Meanwhile, if you haven’t taken a backup of the files present on the secondary partition, click on No, and repeat steps 1, 2, and 3 after creating a backup.

Step 4: The tool labels the deleted partition Unallocated. After deleting that partition, right-click on the primary partition you want to extend and click on Extend Volume.

Step 5: When the Extend Volume Wizard appears on the screen, click Next.

Step 6: If you want to merge the entire partition, click Next directly.
However, if you want to merge only a part of it, enter a specific size in the Select the amount of space in MB text box and click on Next.

Step 7: Click on Finish.

After you click finish, the Disk Management utility will merge the unallocated partition with the existing partition.
Was this helpful?
Last updated on 27 August, 2024
Read Next
 How to Merge Two Images in Paint 3D on Windows 10
Paint 3D is a redefined and upgraded version of Microsoft Paint.
How to Merge Two Images in Paint 3D on Windows 10
Paint 3D is a redefined and upgraded version of Microsoft Paint.
 How to Merge and Remove Duplicate Contacts on iPhone
How to Merge Duplicate Contacts Automatically With iOS 16, Apple introduced a feature that automatically merges duplicate contacts on your iPhone.
How to Merge and Remove Duplicate Contacts on iPhone
How to Merge Duplicate Contacts Automatically With iOS 16, Apple introduced a feature that automatically merges duplicate contacts on your iPhone.
 2 Easy Ways to Merge Instagram Accounts
What Happens to Your Followers When You Merge Two Instagram Accounts When you change your username, it will be updated throughout the platform.
2 Easy Ways to Merge Instagram Accounts
What Happens to Your Followers When You Merge Two Instagram Accounts When you change your username, it will be updated throughout the platform.
 9 Ways to Solve 100% Disk Usage Error in Windows 10
You know why you are here, right?
9 Ways to Solve 100% Disk Usage Error in Windows 10
You know why you are here, right?
 5 Ways to Fix Google Chrome High Disk Usage on Windows
Basic Fixes Restart Chrome: Open Task Manager, end the process for Google Chrome, and reopen the browser.
5 Ways to Fix Google Chrome High Disk Usage on Windows
Basic Fixes Restart Chrome: Open Task Manager, end the process for Google Chrome, and reopen the browser.
 3 Ways to Run CHKDSK Utility to Repair Disk Errors on Windows 11
Method 1: Run Check Disk Utility From File Explorer File Explorer provides an easy way to run the Check Disk Utility on your selected system drive to repair its errors.
3 Ways to Run CHKDSK Utility to Repair Disk Errors on Windows 11
Method 1: Run Check Disk Utility From File Explorer File Explorer provides an easy way to run the Check Disk Utility on your selected system drive to repair its errors.
 8 Ways to Fix Windows Stuck on Repairing Disk Errors
If your Windows PC is stuck on repairing disk errors and shows that 'this might take an hour to complete,’ we are here to fix this issue without you having
8 Ways to Fix Windows Stuck on Repairing Disk Errors
If your Windows PC is stuck on repairing disk errors and shows that 'this might take an hour to complete,’ we are here to fix this issue without you having
 6 Ways to Fix Not Enough Disk Space Error in Steam on Windows 11
Why Don’t I Have Enough Disk Space While Running Steam?
6 Ways to Fix Not Enough Disk Space Error in Steam on Windows 11
Why Don’t I Have Enough Disk Space While Running Steam?
The article above may contain affiliate links which help support Guiding Tech. The content remains unbiased and authentic and will never affect our editorial integrity.