Turning an email into a meeting invite in Microsoft Outlook can save time and improve workflow, preventing back-and-forth scheduling and ensuring everyone is on the same page. The setup is straightforward using the built-in features in Outlook, and no extra tools are needed.
Steps to Convert an Email to a Meeting in Outlook
Step 1: Sign into Outlook and open the email.
Step 2: In the toolbar, click ‘Reply all by meeting’.

Step 3: Review auto-filled fields to ensure the content is correct.

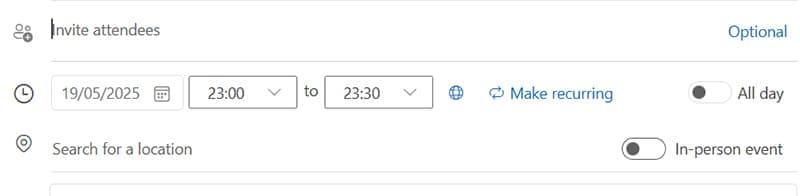
Step 4: Set the date and time.
Step 5: Add or edit the attendees.
Step 6: Add location or link to online meeting platform.
Step 7: Add detail in the Notes.
Step 8: Click ‘Save’.
Steps for Editing the Meeting Invite
After converting an email to a meeting using ‘Reply all by meeting, you can fine-tune the invite to suit your needs. Below is more detail on how to make these edits:
Step 1. Change the Subject
Click into the subject line to change the meeting title. Keep it brief and relevant.

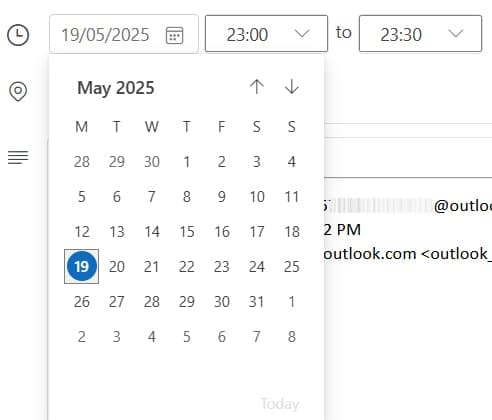
Step 2. Adjust the Date and Time
Use the date and time pickers/calendar to set the meeting.
Step 3. Edit or Add Attendees
Add new participants by typing their email addresses in the ‘Invite attendees’ field. Remove any recipients who don’t need to attend.

Step 4. Add a Location or Meeting Link
Enter a meeting room name or paste a link. Use the ‘Location’ field.

Step 5. Update the Body Text
The original email content appears automatically. Add an agenda, notes, or action items as needed.

Step 6. Set a Reminder
Use the reminder dropdown to choose when attendees receive a notification.

Step 7. Add Attachments
Use the paperclip icon to attach files to the meeting.

Using the Scheduling Assistant
Outlook’s Scheduling Assistant helps you find the best time to meet by showing when attendees are free or busy. It’s especially useful when coordinating with multiple people across different schedules. Here’s how to use it:
Step 1: Open the meeting invite, then click ‘Scheduling Assistant’.
Step 2: You’ll see a timeline view with each attendee’s calendar .
Step 3: Look for white space. This indicates free time while blue blocks show busy periods.
Step 4: Adjust the meeting start and end time by dragging the meeting block.
Step 5: Use the ‘Suggested Times’ on the right.
Step 6: Switch back to the Appointment tab.
Using the Scheduling Assistant helps avoid double-booking and ensures better attendance by picking a time that works for everyone.
Who Would Benefit From This?
Managers and Team Leads
They frequently handle threads that evolve into meetings. Instead of composing a new calendar invite from scratch, they can act directly from the email conversation.
Executive Assistants
They are often tasked with converting email requests into calendar events. This method saves time and keeps the original context intact.
Remote Workers
They can benefit from quick scheduling to reduce delays and confusion across time zones or digital platforms.
Project Coordinators
They can efficiently schedule updates and sync meetings using existing email conversations as a base.
Was this helpful?
Last updated on 25 May, 2025
Read Next
 How to Add Skype Meeting to Outlook Meeting Invite (and Cool Tricks)
There's no denying the fact that Microsoft Outlook and Outlook Web are solid email managers.
How to Add Skype Meeting to Outlook Meeting Invite (and Cool Tricks)
There's no denying the fact that Microsoft Outlook and Outlook Web are solid email managers.
 How to Remove Microsoft Teams Meeting From Outlook Invite
Turn off Team Meetings in Outlook Calendar Outlook Calendar is seamlessly integrated into Outlook.
How to Remove Microsoft Teams Meeting From Outlook Invite
Turn off Team Meetings in Outlook Calendar Outlook Calendar is seamlessly integrated into Outlook.
 4 Ways to Fix Microsoft Teams Meeting Add-in Won’t Appear in Outlook for Windows
Fix 1: Enable the Teams Add-In A common reason the Microsoft Teams meeting option may disappear from Outlook is if you have accidentally disabled the related add-in.
4 Ways to Fix Microsoft Teams Meeting Add-in Won’t Appear in Outlook for Windows
Fix 1: Enable the Teams Add-In A common reason the Microsoft Teams meeting option may disappear from Outlook is if you have accidentally disabled the related add-in.
 How to Fix “Invite Collaborator” Not Showing on Instagram
Basic Fixes Avoid scheduling your post: Instagram can prevent users from scheduling their content if they have added someone as a collaborator.
How to Fix “Invite Collaborator” Not Showing on Instagram
Basic Fixes Avoid scheduling your post: Instagram can prevent users from scheduling their content if they have added someone as a collaborator.
 How to Add and Invite Someone to WhatsApp Group
Note: The steps are the same for Android and iOS, with some minor level changes in the button or option placement.
How to Add and Invite Someone to WhatsApp Group
Note: The steps are the same for Android and iOS, with some minor level changes in the button or option placement.
 3 Ways to Fix Discord Invite Not Working
https://youtu.be/YDUXr_-dSqA Try Basic Fixes Try joining other servers: If you are getting the "Whoops, unable to accept invite" error when trying to join a particular server, you may have been
3 Ways to Fix Discord Invite Not Working
https://youtu.be/YDUXr_-dSqA Try Basic Fixes Try joining other servers: If you are getting the "Whoops, unable to accept invite" error when trying to join a particular server, you may have been
 How to Send or Accept a Calendar Invite on iPhone
How to Send a Calendar Invite on iPhone Before you can send or accept invites on your iPhone, you must set up your Calendar.
How to Send or Accept a Calendar Invite on iPhone
How to Send a Calendar Invite on iPhone Before you can send or accept invites on your iPhone, you must set up your Calendar.
 How to Show Meeting Duration in Zoom
How to See Duration or Remaining Time in Zoom Meetings Desktop By default, Zoom doesn’t enable meeting duration.
How to Show Meeting Duration in Zoom
How to See Duration or Remaining Time in Zoom Meetings Desktop By default, Zoom doesn’t enable meeting duration.
The article above may contain affiliate links which help support Guiding Tech. The content remains unbiased and authentic and will never affect our editorial integrity.