How to Enable Annotations in Zoom
Whenever you share your screen in a Zoom meeting, you can use Annotations to present and explain your ideas or topics better to the participants. If you are a teacher, you can use Annotations during online classes to draw and illustrate better. Working professionals can create an impact during meetings by using Annotations. Annotations work only when you share your screen during a Zoom call.
Step 1: Open your browser and then sign in to your Zoom account.
Step 2: On your Zoom profile page, click on Settings from the left menu.
Step 3: Under the Meeting tab, scroll down and then look for Annotations.

Step 4: Tap the toggle to enable Annotations.

You can also enable Allow sharing of shared screens with Annotations and Only the user who is sharing can annotate. When not required, you can disable these controls.
Tip: Learn how to use the Zoom app on your Apple TV 4K.
How to Start Using Annotations in Zoom
Before you start using Annotations, we recommend checking for the Zoom app update on your Mac or Windows PC. Once done, follow the the steps that remain same for both platforms.
Step 1: Open the Zoom app on your Mac or Windows PC and then start a meeting.
Step 2: Click the Share Screen icon at the bottom Menu Bar to start screen sharing.

Step 3: Once the screen sharing starts, click on Annotate on the bottom Menu Bar.

You will see the Annotations Menu Bar being enabled at the bottom, which can be dragged to the top. The mouse pointer will also transform into a pencil icon to annotate.

Step 4: Click and drag the pencil icon to annotate on your screen.
How to Change Annotation Color on Zoom
Let us now show you some customization options for using Annotations in Zoom. First, let us start with changing the color of your annotations. The steps we mention for all customizations are the same for Mac and Windows users.
Step 1: Open the Zoom app > Start a meeting > Share Screen > Annotate.
Step 2: In the Annotations Menu Bar at the bottom, click on Format.

Step 3: Choose a color of your choice for your annotations.
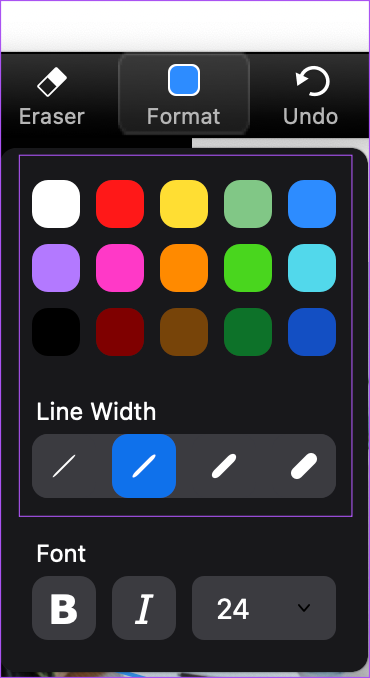
You can also change the Line Width of your annotations.
How to Erase Annotations in Zoom
Here’s how you can erase your line annotations while sharing a screen on Zoom calls.
Step 1: In the Annotations Menu Bar at the bottom, click the Erase icon.
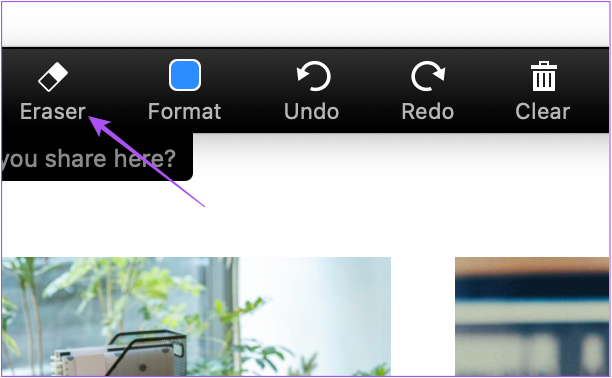
Step 2: Click and drag the mouse pointer, which will now look like an eraser, and remove your annotations.
How to Use Text Annotations in Zoom
Apart from using lines to highlight certain areas, you can also add Text Annotations while sharing your screen during a Zoom call. Adding Text Annotations can help to write notes during your presentations, lectures, and meetings.
Step 1: Open the Zoom app > Start a meeting > Share Screen > Annotate.
Step 2: Click on Text from the Annotations Menu Bar at the bottom.

A Text box will be created on the bottom-left corner of your shared screen to write your annotated text.

After that, you can use the Format option to change the font style and size of your text annotations.

How to Save Annotations in Zoom
After your Zoom meeting, here’s how you can save your annotations on your Mac or Windows PC so you don’t lose any important notes or pointers.
Step 1: Click the arrow next to the Save icon on the right side of the Annotations Menu Bar.
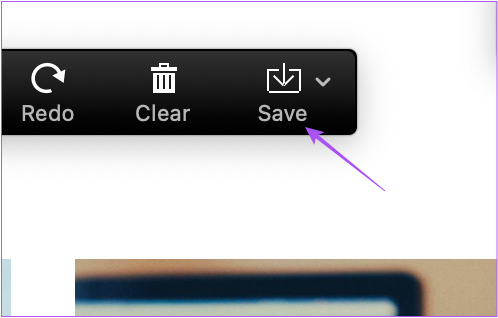
Step 2: Select the file format for saving your annotations.

After Zoom saves your annotations file, you can access it from the Zoom folder that appears in Documents folder on your Mac or Windows PC.
Tip: Learn how to use Notes in your Zoom meeting.
Was this helpful?
Last updated on 14 August, 2024
2 Comments
Leave a Reply
Read Next
 Why Can’t I See Myself on Zoom: A Guide for Fixing Video Problems
It’s safe to say that the video calling apps have taken over the physical company meetings and conferences.
Why Can’t I See Myself on Zoom: A Guide for Fixing Video Problems
It’s safe to say that the video calling apps have taken over the physical company meetings and conferences.
 How to Enable Screen Sharing for Participants on Zoom as a Host
Enable Screen Sharing for Participants on Zoom on Desktop You can allow participants to share their screens for the current meeting using one of the following two methods.
How to Enable Screen Sharing for Participants on Zoom as a Host
Enable Screen Sharing for Participants on Zoom on Desktop You can allow participants to share their screens for the current meeting using one of the following two methods.
 Top 7 Ways to Fix Zoom Lag on Windows 10
Even after fierce competition from the likes of Google Meet and Microsoft Teams, Zoom continues to grow its market share in the video calling market.
Top 7 Ways to Fix Zoom Lag on Windows 10
Even after fierce competition from the likes of Google Meet and Microsoft Teams, Zoom continues to grow its market share in the video calling market.
 How to Share Video With Sound on Zoom, Microsoft Teams, and Google Meet
How to Share Video With Audio in Microsoft Teams The feature to share your screen containing the video and its sound in Microsoft Teams is limited to the Windows app
How to Share Video With Sound on Zoom, Microsoft Teams, and Google Meet
How to Share Video With Audio in Microsoft Teams The feature to share your screen containing the video and its sound in Microsoft Teams is limited to the Windows app
 Top 6 Ways to Fix Zoom Not Responding on Windows 10
Zoom has certainly become an integral part of education and work.
Top 6 Ways to Fix Zoom Not Responding on Windows 10
Zoom has certainly become an integral part of education and work.
 How to Use Animated Reactions in Zoom
Enable and Use Animated Reactions in Zoom on Desktop To start using Animated Reactions during Zoom calls, you must enable the feature in the Zoom app on your computer.
How to Use Animated Reactions in Zoom
Enable and Use Animated Reactions in Zoom on Desktop To start using Animated Reactions during Zoom calls, you must enable the feature in the Zoom app on your computer.
 How to Use Notes in Zoom Meetings on Mobile and Desktop
How to Use Zoom Notes in Meetings on Desktop Before we get started, ensure that you have installed the latest version of the Zoom app on your Mac or Windows
How to Use Notes in Zoom Meetings on Mobile and Desktop
How to Use Zoom Notes in Meetings on Desktop Before we get started, ensure that you have installed the latest version of the Zoom app on your Mac or Windows
 3 Fixes for Background Blur Not Working in Zoom App
Basic Fixes Clean camera lens: This is something that can cause issues with background blur on the Zoom app.
3 Fixes for Background Blur Not Working in Zoom App
Basic Fixes Clean camera lens: This is something that can cause issues with background blur on the Zoom app.
The article above may contain affiliate links which help support Guiding Tech. The content remains unbiased and authentic and will never affect our editorial integrity.


After writing green pen annotations (maths equations) on a shared whiteboard, the zoom program suddenly disappeared but the green pen annotations are still on my personal asus laptop screen. How do I get them off? Thanks.
Hi Cassandra.
The annotations should also be removed along with the Zoom app. We suggest taking a screenshot of your annotations to save them. Then, restart your laptop and launch the Zoom app.