1. Take Macro Shots
One of the biggest new features of Pixel 8 and 8 Pro is the ability to take macro shots. Macro mode allows you to focus on subjects as close as 4cm away, resulting in stunning close-up photos.
The macro mode is set to Auto by default. As such, point your camera at your subject, and the phone should automatically trigger the macro mode, thereby allowing you to take a nice closeup shot.
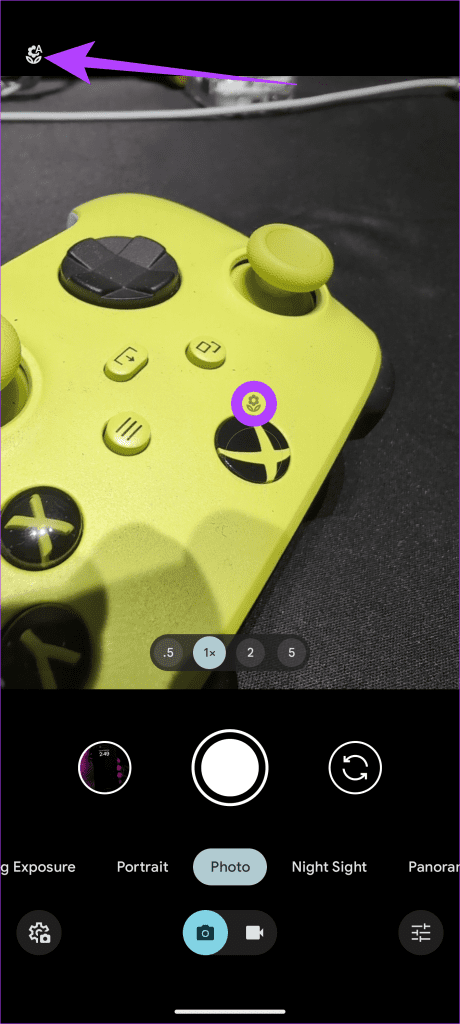
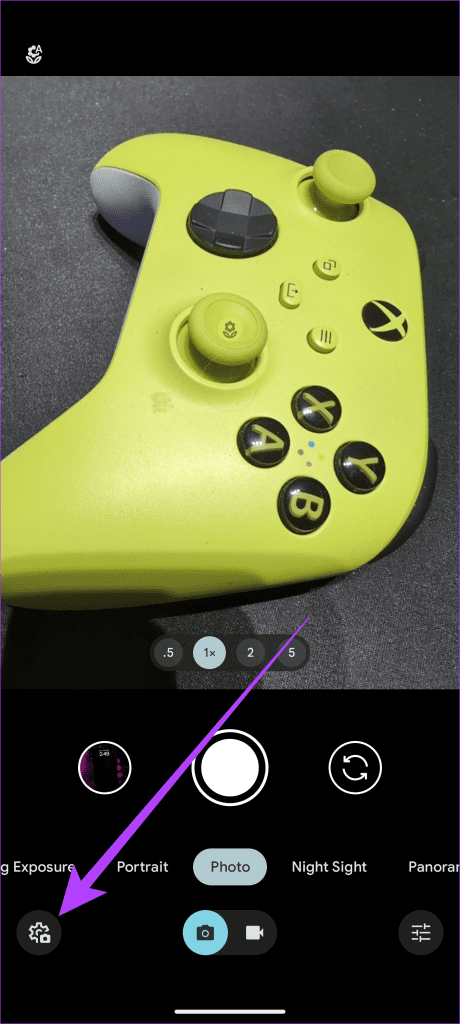
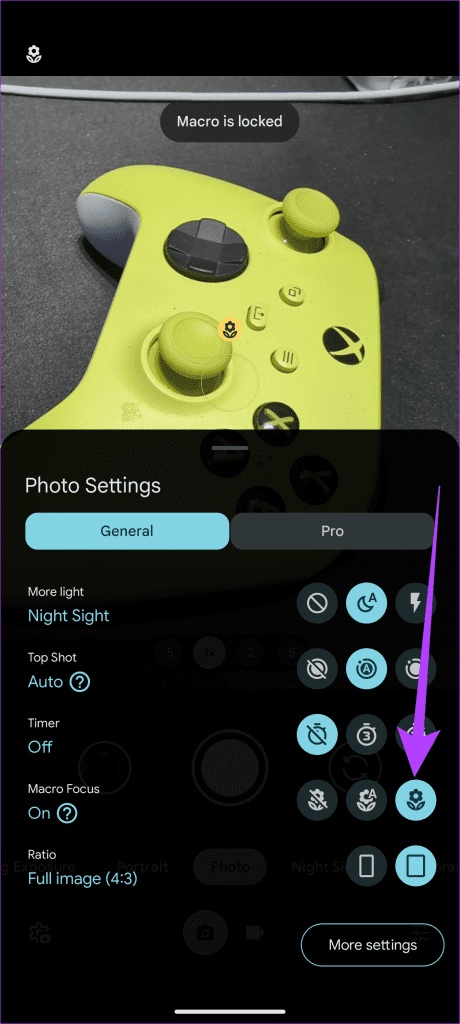
However, if the macro mode doesn’t trigger automatically, you can force it manually, too. Tap on the camera settings icon in the bottom-left corner. From here, change the Macro focus to locked. And that’s it.
2. Shoot in DCI-P3 Color Gamut
The Pixel 8 series also supports the DCI-P3 color gamut, which boasts a wider color space than the sRGB color gamut. As such, your photos will have more vibrant colors and look more true to life.
To shoot photos in the DCI-P3 color gamut, open the camera app and navigate to Settings > More Settings > Advanced. Finally, enable the toggle for Rich color in photos.

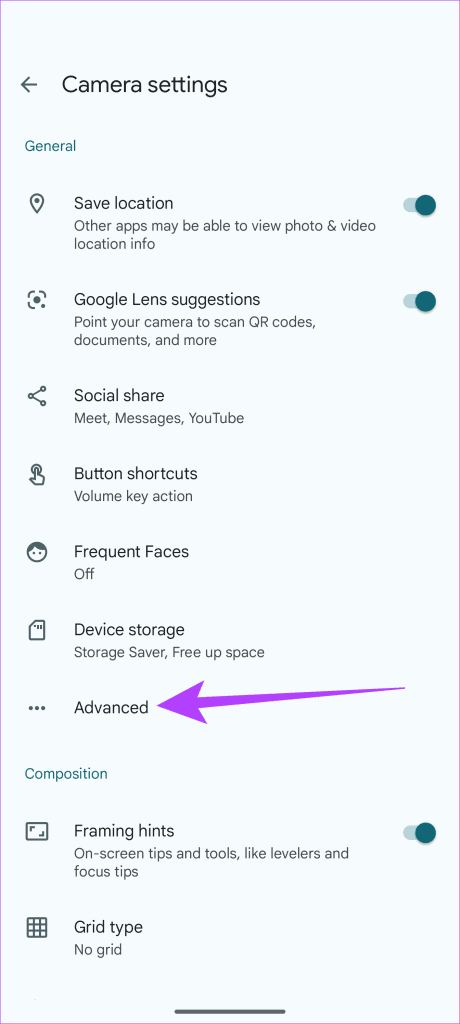
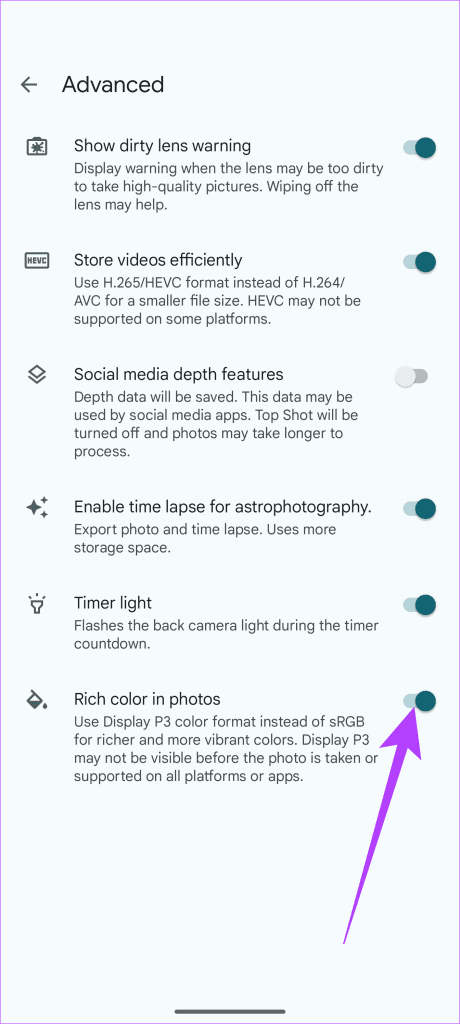
One thing to keep in mind is that not all devices have a good DCI-P3 panel, so your shots may look different on them. However, if you work in the creative space and rely on extremely color-accurate images, this is one of the first things you should do with the smartphone’s camera.
3. Take RAW Images
The Pixel 8’s camera can shoot RAW images. RAW images are unprocessed image files that contain all the data captured by the camera sensor. This gives you more flexibility when editing your photos, as you can adjust all settings without compromising on quality.
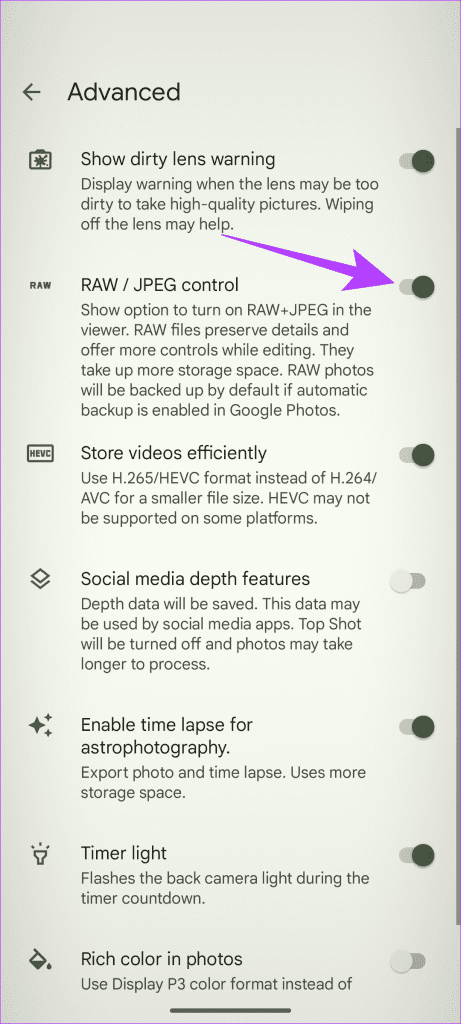
On the Pixel 8, you must first enable the toggle for RAW photos. To do that, open the camera settings, navigate to More Settings > Advanced > enable the toggle for RAW/JPEG control. Thankfully, you don’t have to change any settings on Pixel 8 Pro.
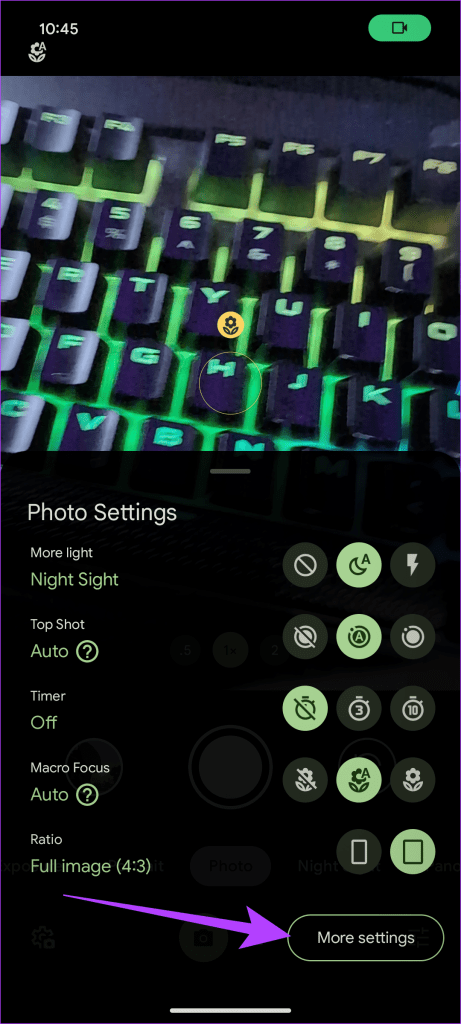
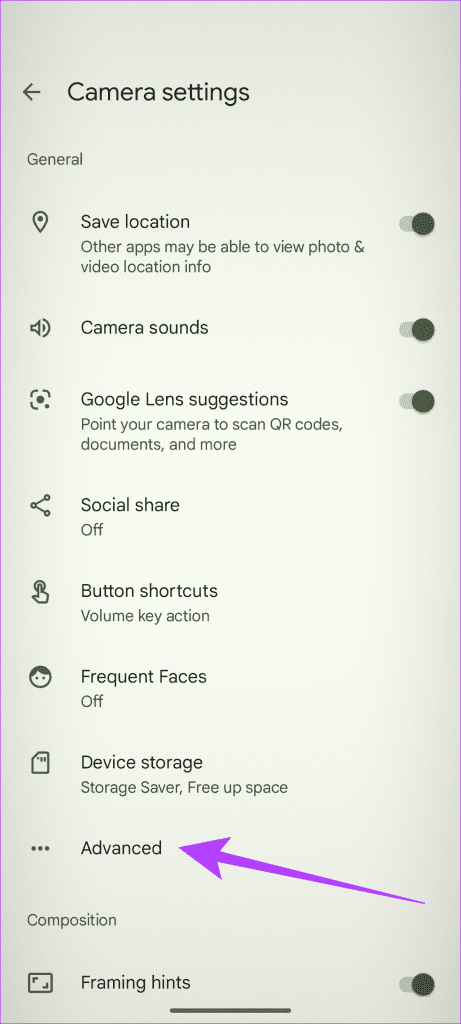
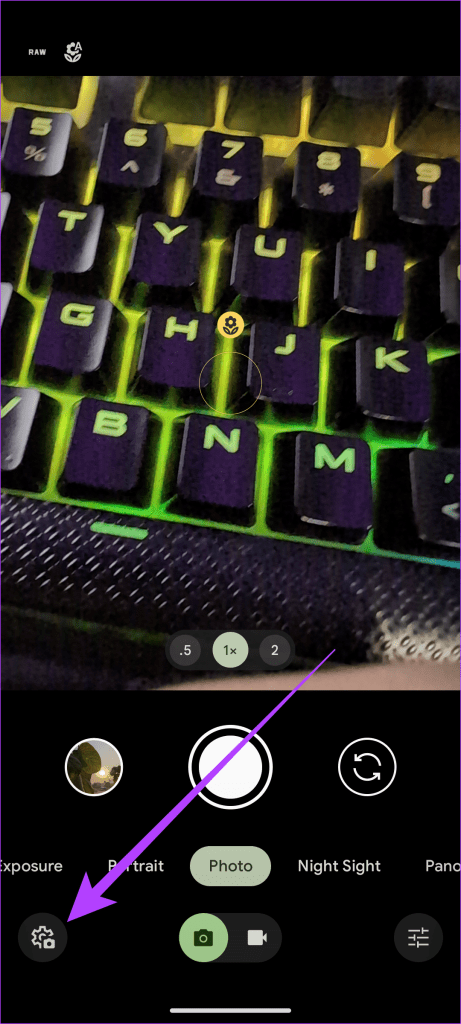
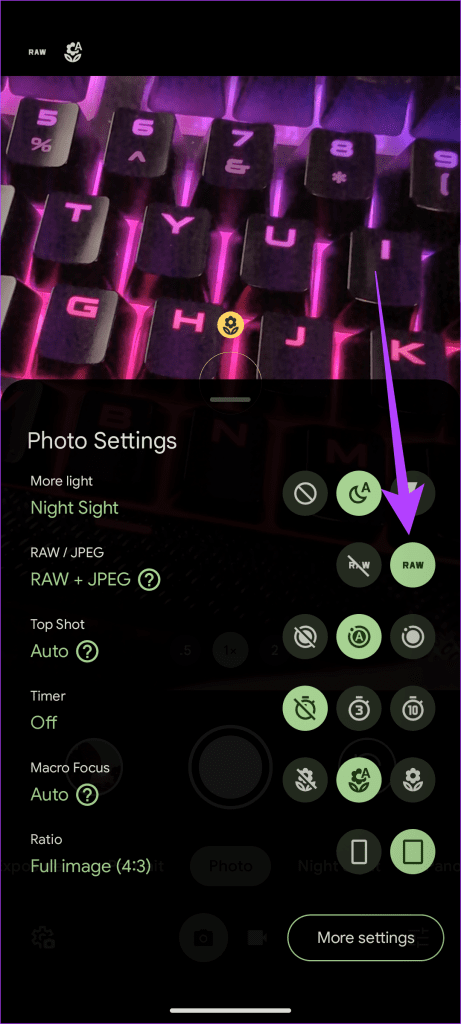
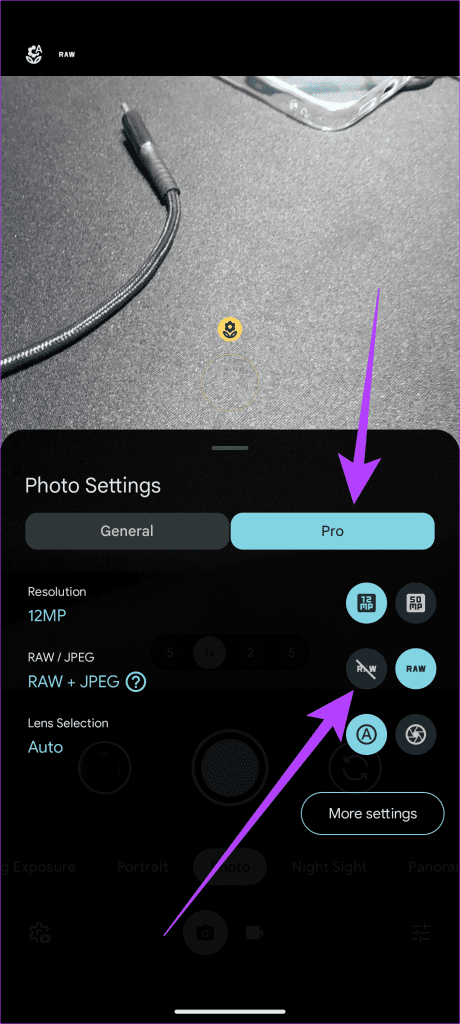
Once you’ve done that, go back to the camera app’s main screen and tap on the camera settings button. You can now switch between JPEG only or RAW + JPEG. On Pixel 8 Pro, you can find this feature under the Pro tab.
4. Adjust the Night Sight Timer
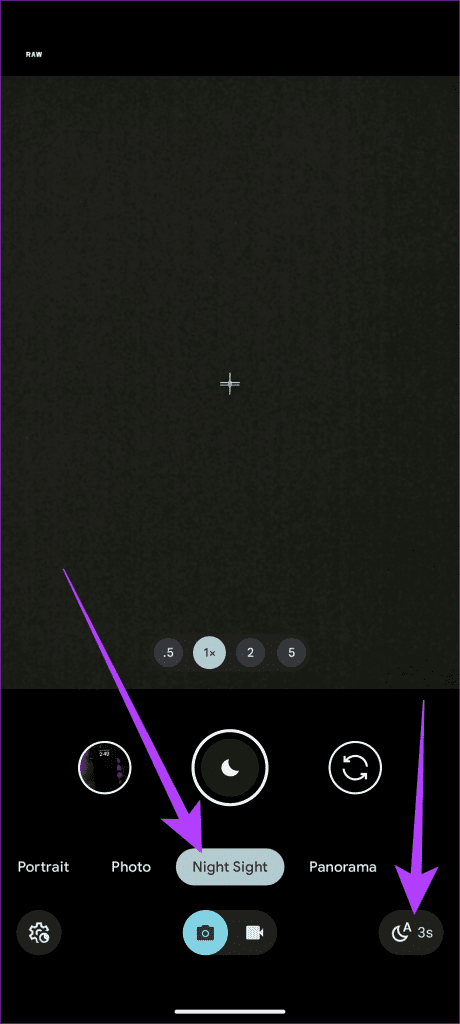
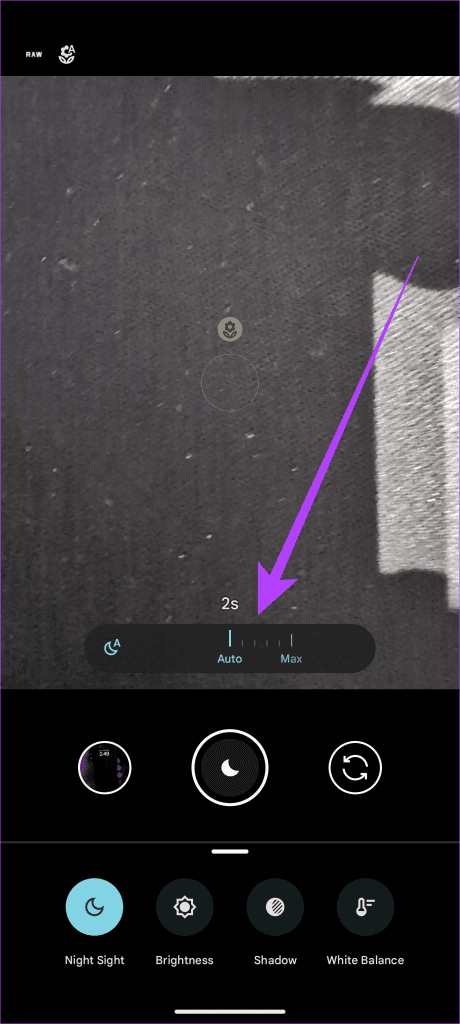
Night Sight is one of the Pixel’s most popular features, and it has gotten better on Pixel 8 and 8 Pro. Now, you can set the exposure time for Night Sight photos with the new timer.
To adjust the Night Sight timer, open the camera app and tap the Night Sight mode. Then, tap the Timer icon in the bottom-right corner and select the desired duration.
5. Use Astrophotography Mode
Astrophotography mode is an extension of the Night Sight mode. It is a fantastic Pixel feature that allows you to take stunning photos of a starry night. On the Pixel 8 and 8 Pro, the Astrophotography mode has been improved to make it easier to take great night sky photos. Unlike previous models, the Astrophotography mode cannot be forced manually. However, you can set it to trigger automatically on both Pixel 8 and 8 Pro.
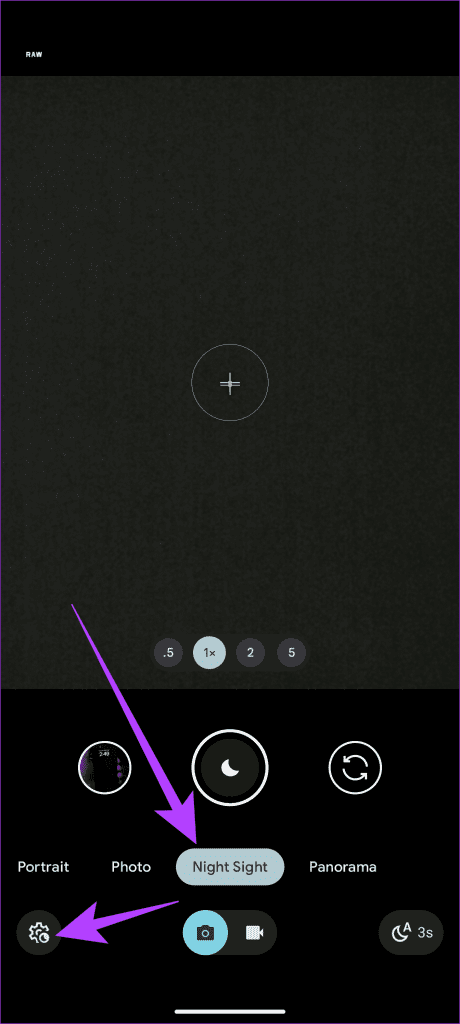
Open the camera app and switch to the Night Sight mode. Now, open the camera settings and change the Astrophotography mode to Auto. Once done, place the phone on a tripod or other stable surface and point it at the night sky. The shutter button will change its icon from a moon to stars.
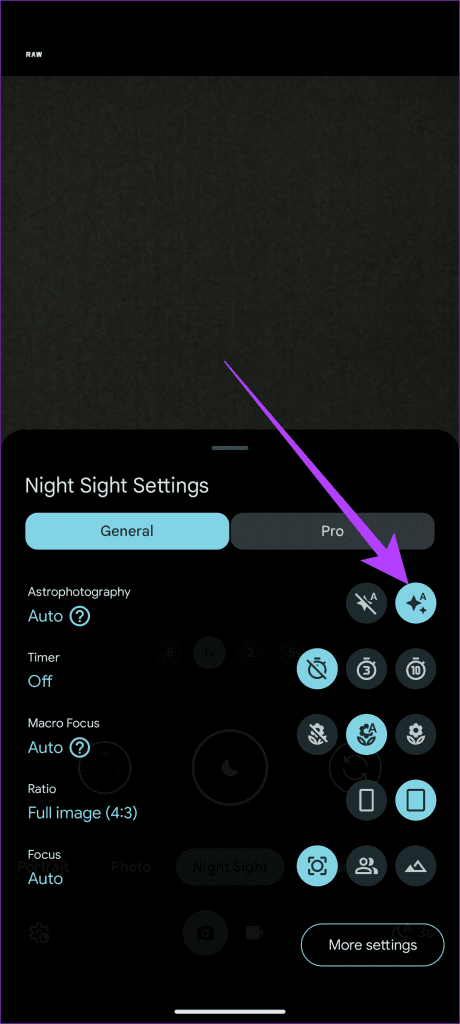
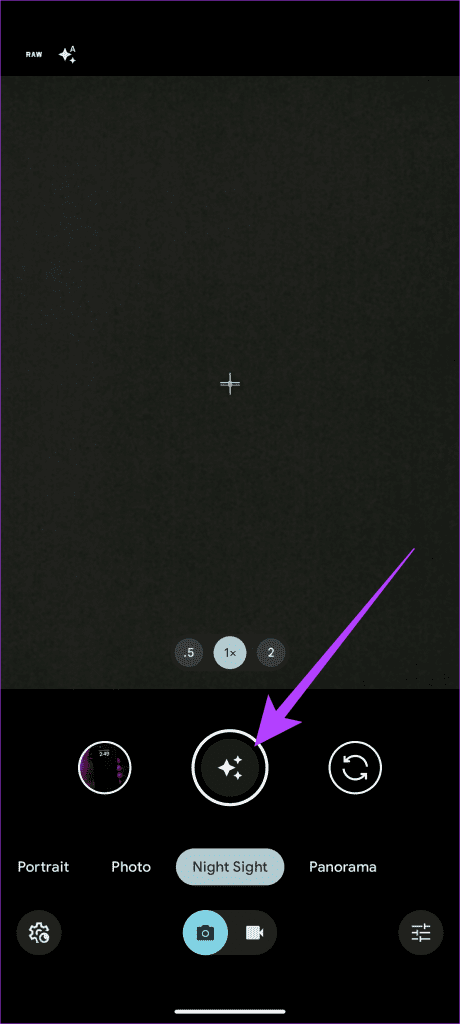
Once done, tap on the shutter button and wait for 2.5 minutes to capture a detailed shot of the night sky. Additionally, the Pixel 8 and 8 Pro will also capture a time-lapse for the footage.
6. Use Pro Mode (Pro Only)
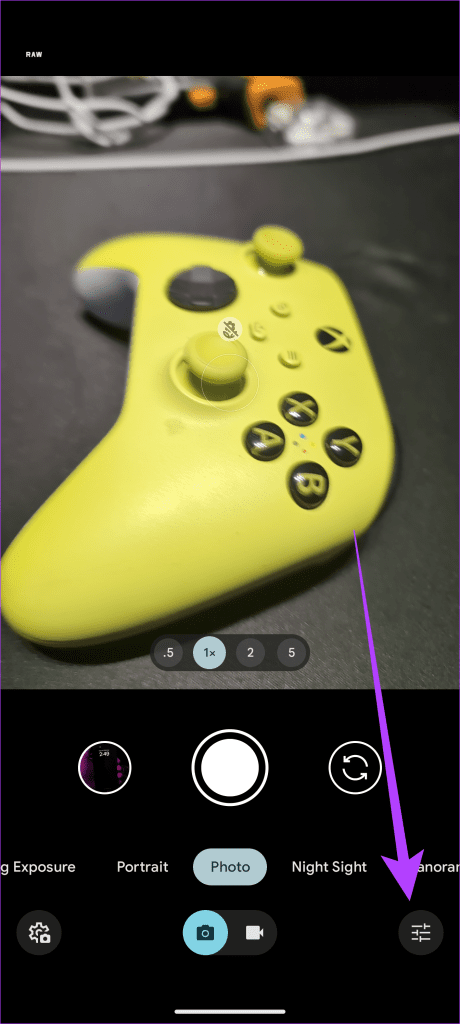
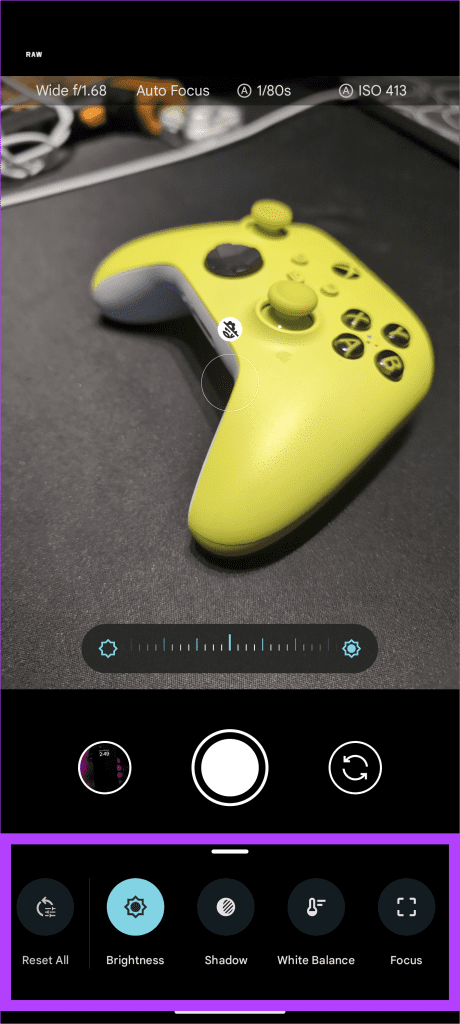
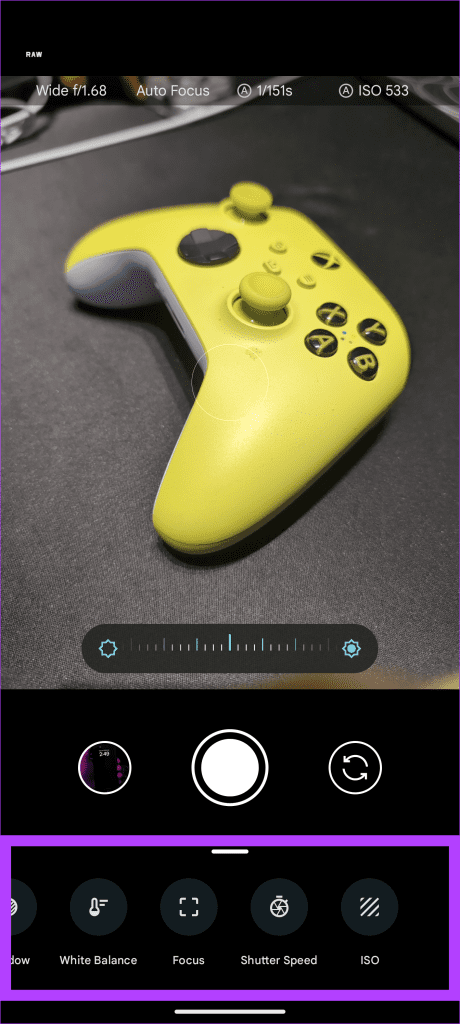
Despite featuring the same primary sensors, only the Pixel 8 Pro gets a Pro mode inside its camera app. Pro mode gives you complete control over the camera settings, such as shutter speed, ISO, and white balance. This is great for experienced photographers who want to take more creative photos.
To access Pro mode, open the camera app and then tap on the Pro mode icon in the bottom-right corner. You can then adjust the camera settings to your liking.
7. Shoot in Full 50MP Resolution (Pro Only)
The Pixel 8 Pro has an exclusive feature that lets users shoot in full 50MP resolution, which is great for capturing high-detail photos to be cropped or printed in large sizes.
To shoot in full 50MP resolution, open the camera app and tap the camera settings icon. Now, switch to the Pro tab. Finally, change the resolution to 50MP.
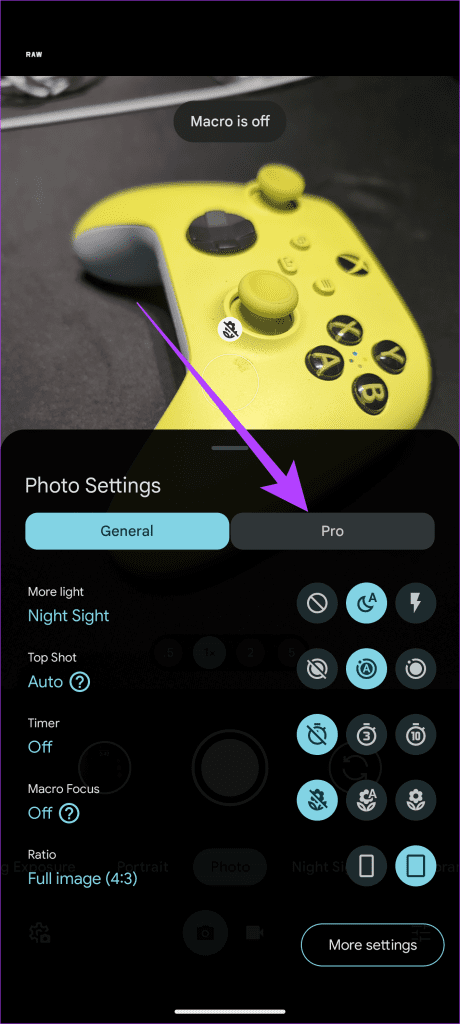
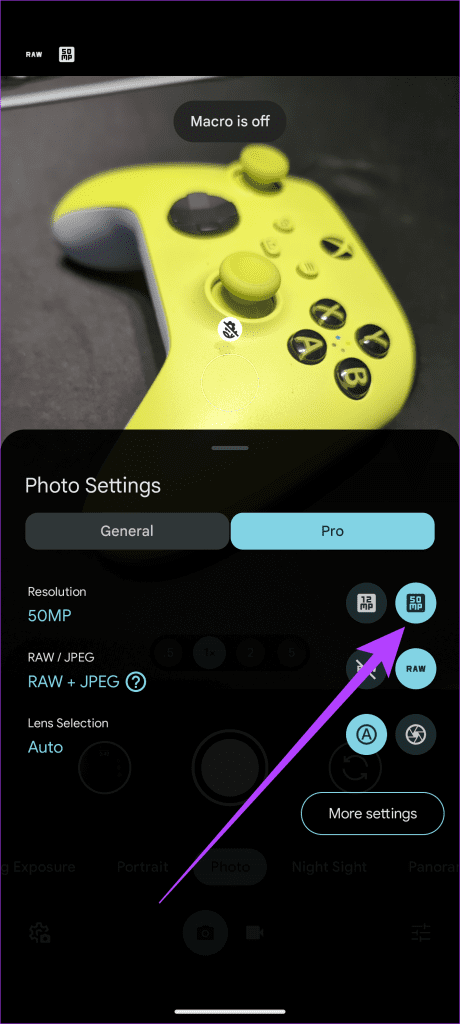
Both the Pixel 8 and 8 Pro feature the same processor and the same camera sensor, but Google has unfortunately reserved this feature only for the Pixel 8 Pro. Hopefully, a future update brings this feature to the Pixel 8 as well.
8. Use Best Take
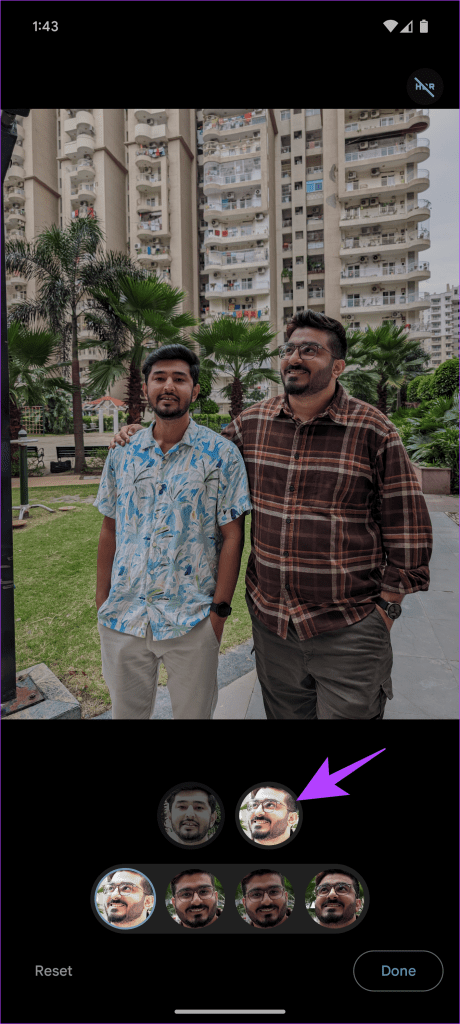
Best Take is a new Pixel feature that uses AI to automatically select the best face for each person in a group photo from a series of shots. This is great for capturing fast-moving subjects or large groups, ensuring you always get a fantastic photo.
To use Best Take, simply open the group photo you’d like to edit inside the Google Photos app. At the bottom bar, tap on Edit > Tools > Best Take. And that’s it. The phone will automatically analyze the photo and search for similar shots. Once done, it will generate a shot of its choosing. Additionally, you can tap on a person’s face to change their facial expressions.
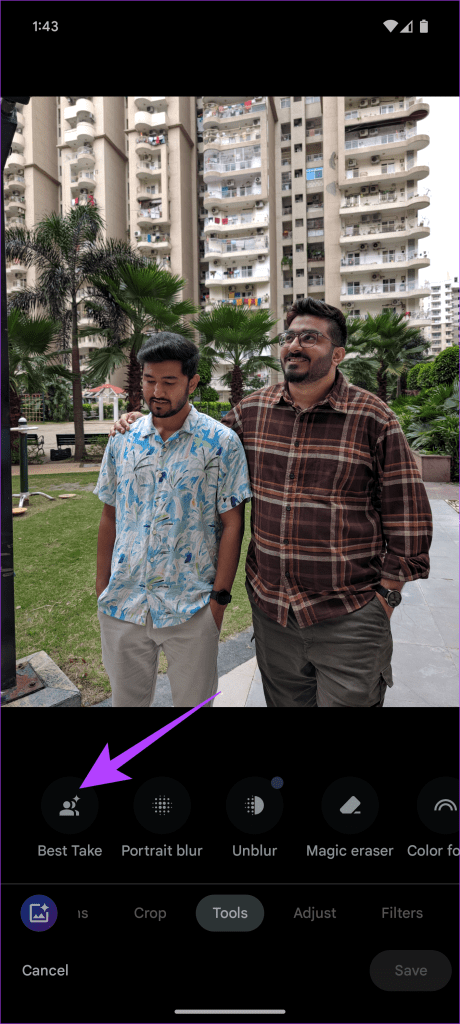
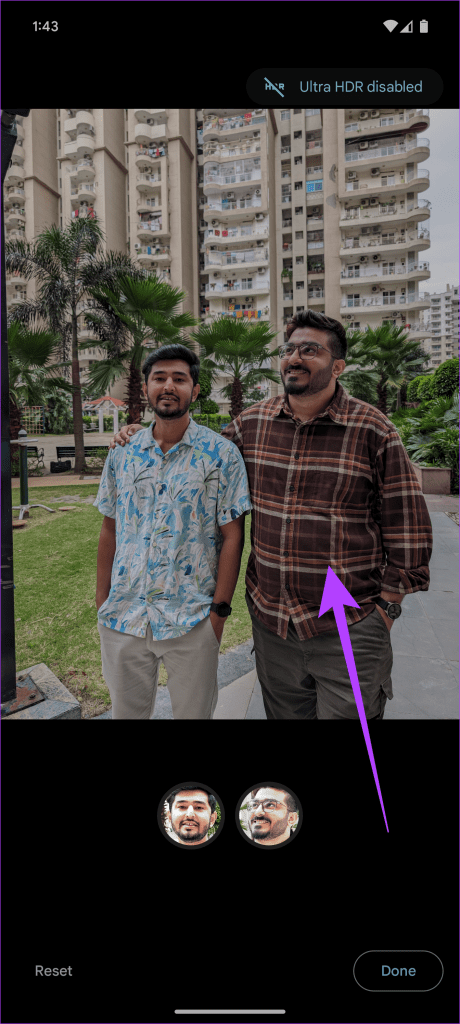
Apart from Best Take, Google also offers plenty of other AI features, such as Audio Eraser, Magic Editor, and more. We’ve covered the same in our Google Pixel 8 and 8 Pro device tips and tricks article, so do give it a read.
Was this helpful?
Last updated on 05 April, 2024
The article above may contain affiliate links which help support Guiding Tech. The content remains unbiased and authentic and will never affect our editorial integrity.


