Method 1. Set Up Text Replacement on Windows Using Built-In Tools
One of the simplest ways to set up text replacement on Windows is by utilizing two built-in features: AutoText and AutoCorrect. AutoText allows you to create shortcuts for frequently used phrases, sentences, or paragraphs.
On the other hand, AutoCorrect is another built-in tool that corrects common spelling mistakes as you type. You can also use it to create text shortcuts. Here’s how to use both of them.
1. Use Autotext
Step 1: Launch Microsoft Word and open a blank document—type in a phrase you wish to create a shortcut for your choice.

Step 2: Select the text and press Alt + F3 on your keyboard. This will open up the Create New Building Block window. Press OK to save it.

Step 3: Your AutoText should now be saved. To use it, switch to the Insert tab on the ribbon at the top and click on Quick Parts.
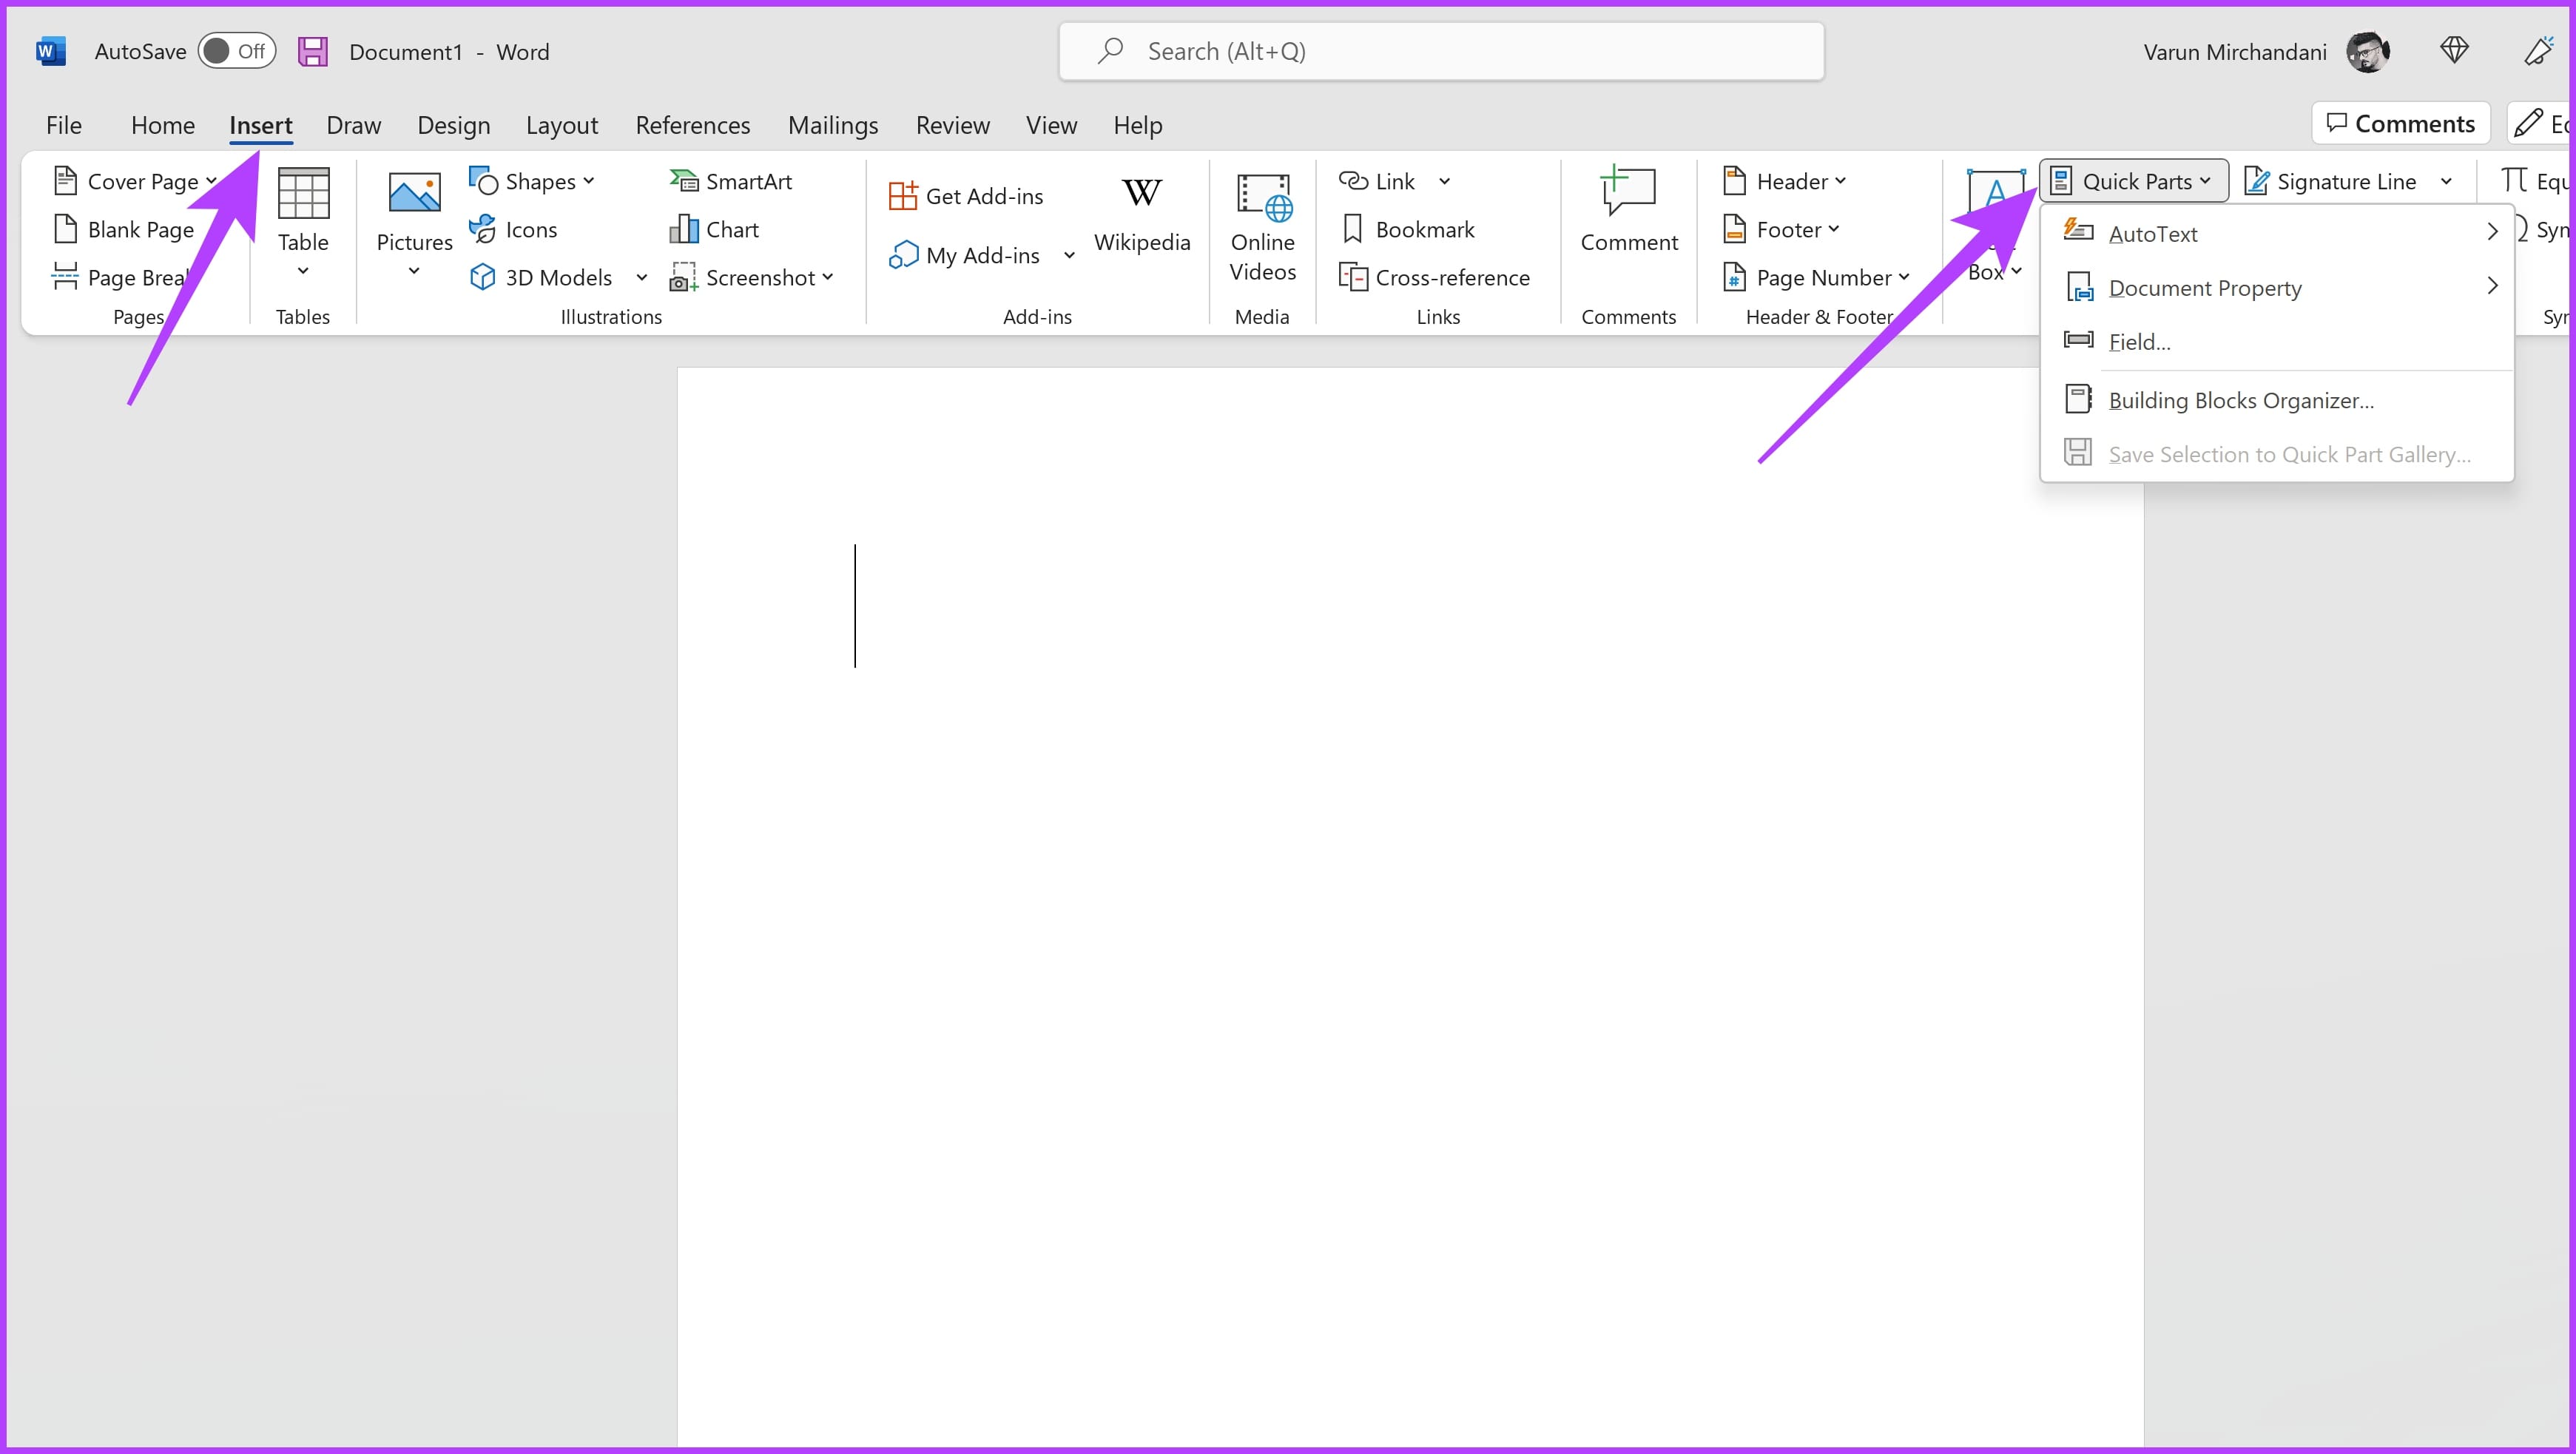
Step 4: Finally, click on AutoText and then select the shortcut you saved.

Microsoft will automatically insert it at your desired location. The advantage to this is that using AutoText, you can add multiple lines, along with custom formatting, and Windows will preserve all of that.
However, it requires extra clicks. On the other hand, if you want the text to be automatically replaced, you can use AutoCorrect. Here’s how to go about it.
2. Create Text Replacement Shortcuts Using AutoCorrect
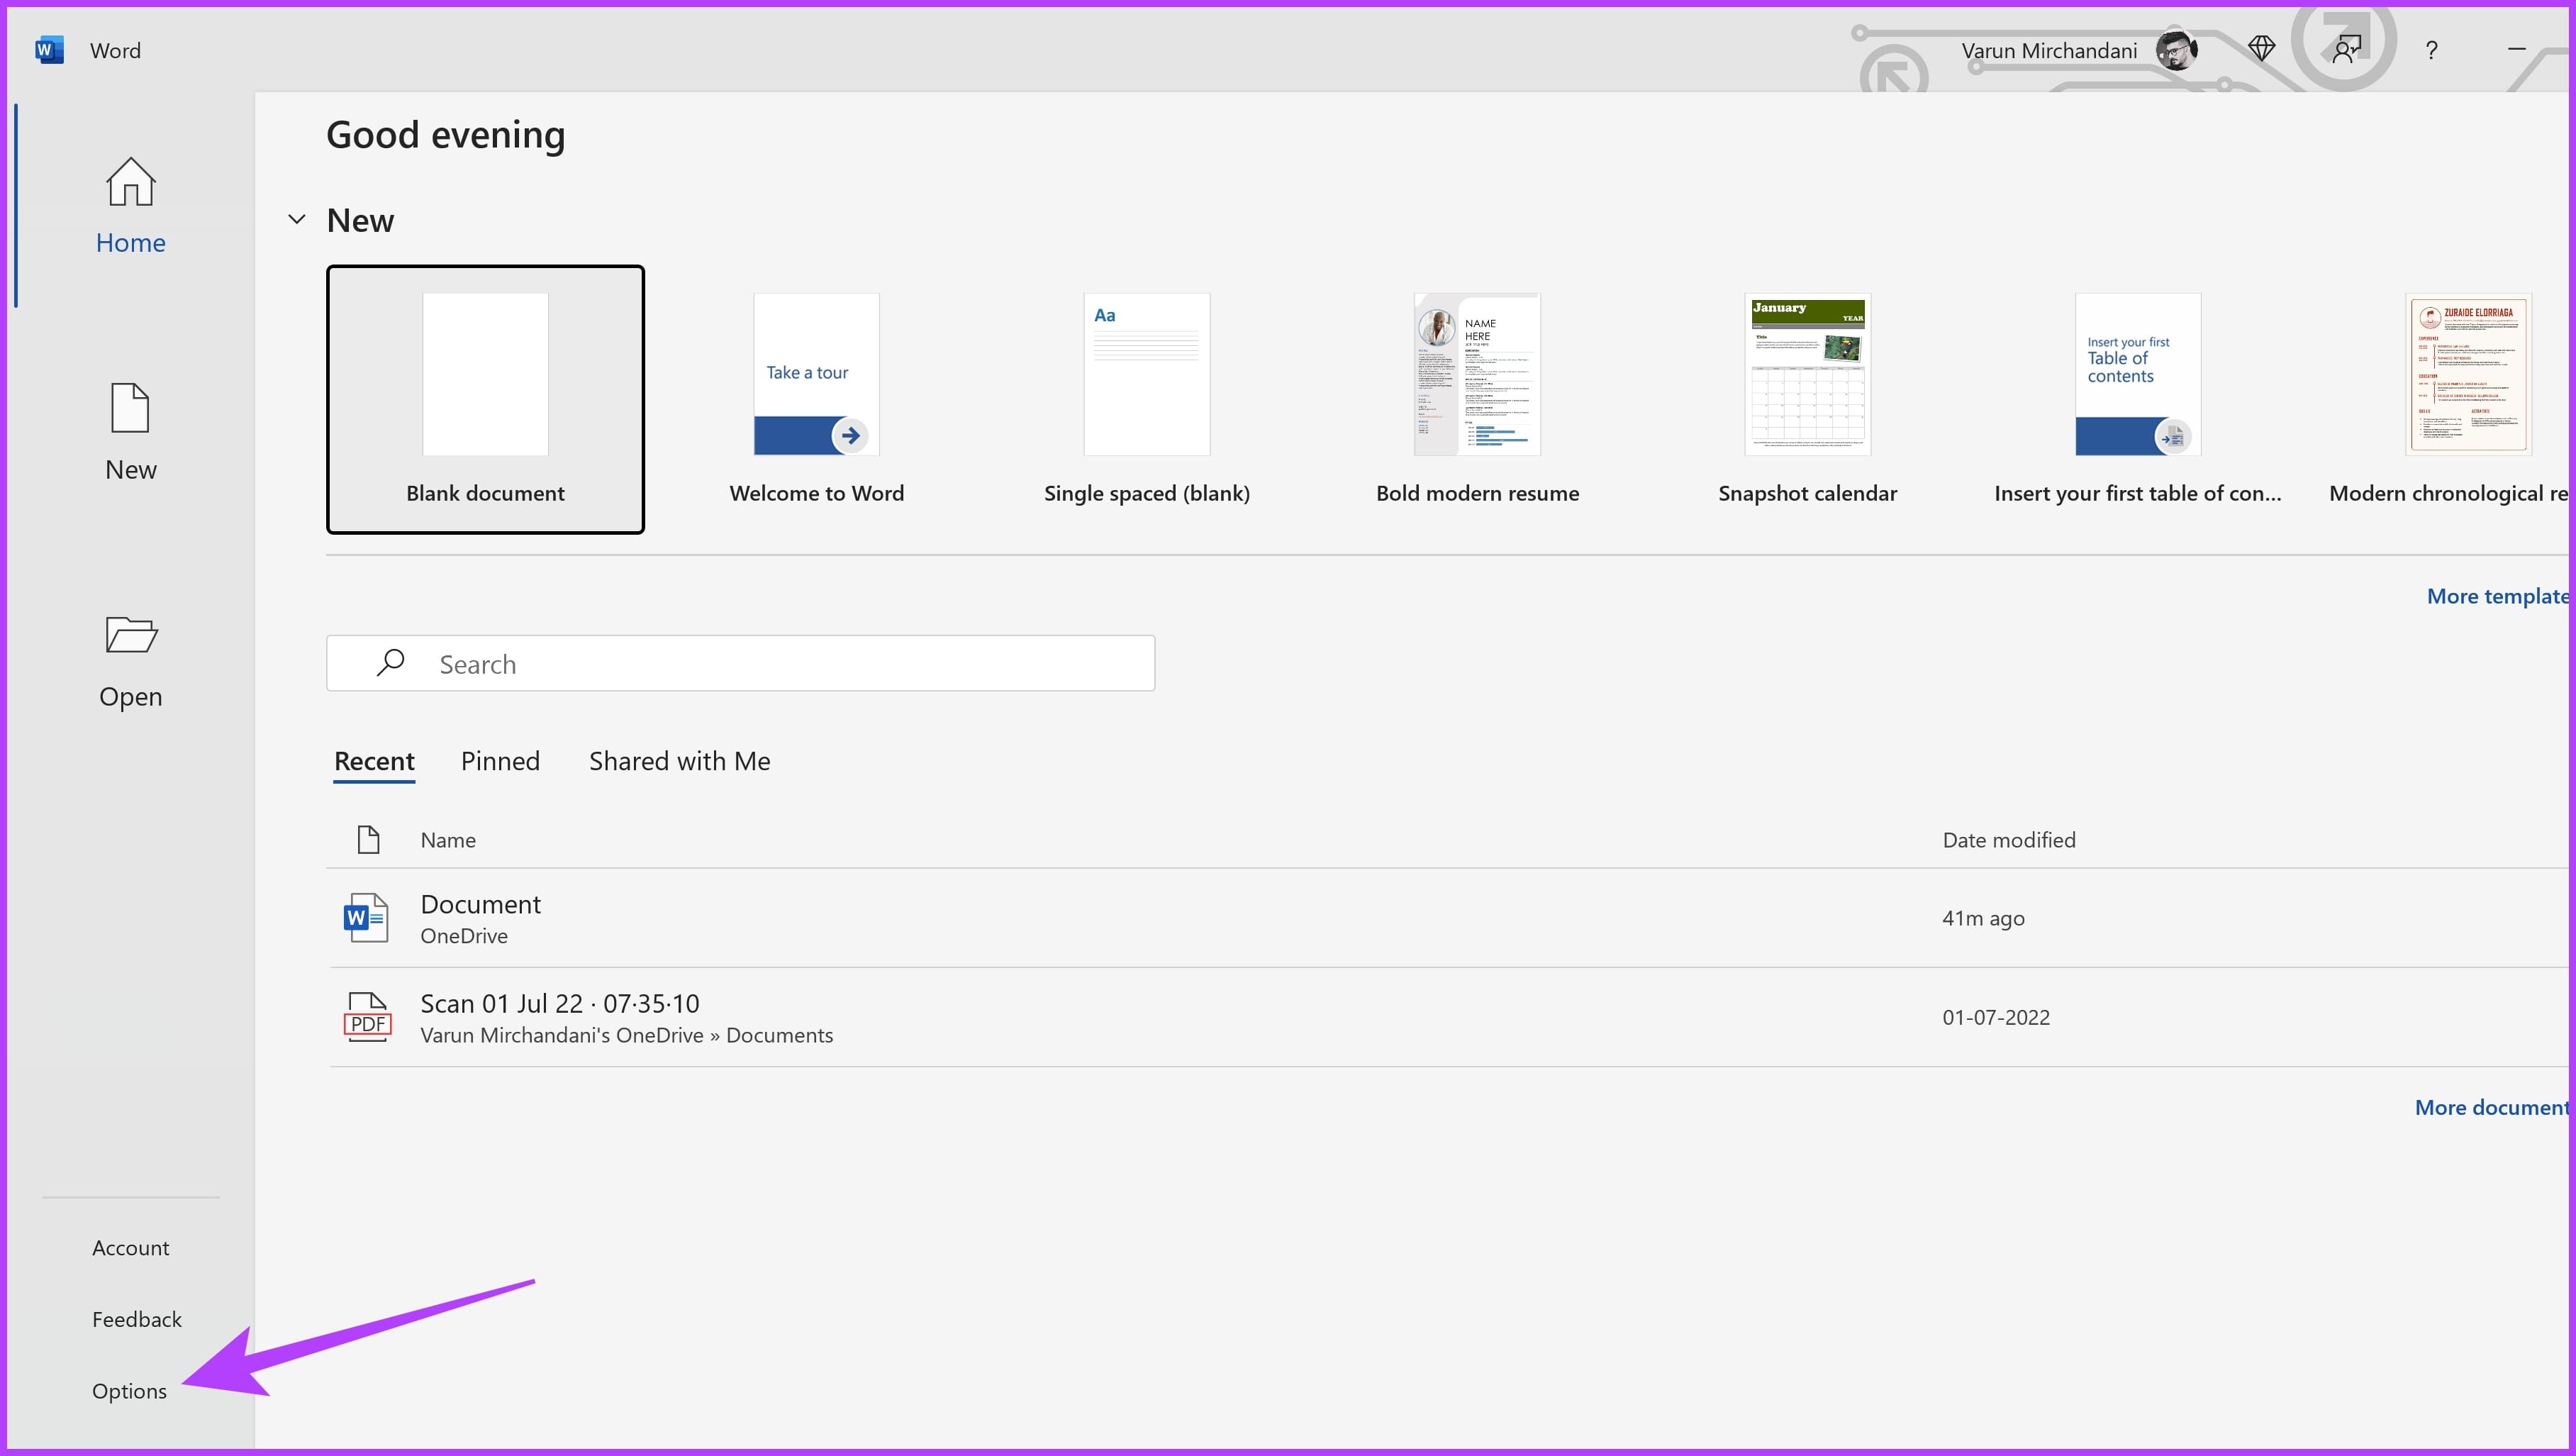
Step 1: Launch Microsoft Word and click on Options from the left sidebar in the File menu.
Step 2: In the Word Options window, click on Proofing in the left sidebar. This will take you to the Proofing settings.

Step 3: Now, click on AutoCorrect Options.

Step 4: Check the box next to Replace as you type. Now, enter the keyword in the Replace section and the keyphrase you’d like it to replace within the With section.

Step 5: Once done, click on Add.

And that’s it. When you enter the keyword, Windows will automatically replace it with the keyphrase you specified. However, AutoCorrect works for up to 255 characters and doesn’t preserve formatting or long-form text.
Limitations of AutoText and AutoCorrect
AutoText and AutoCorrect offer an essential text expansion feature. However, these features have some limitations. Firstly, they only work with specific apps like Microsoft Word or Outlook. So, if you set up replacements there, they won’t magically work everywhere else on your computer.
Additionally, the performance isn’t that great, either. Many users complain that AutoText entries take a few seconds to expand. This can be not very pleasant if you’re typing quickly. As for AutoCorrect, it’s not perfect either and can sometimes make mistakes, such as replacing a correct word with a misspelled word.
So, move on to the next section for a better text replacement option on Windows.
Method 2. Set Up Automatic Text Replacement on Windows Using Beeftext
Thankfully, there are better solutions to make the job easier. In this guide, we’ll use Beeftext to create text replacement shortcuts on Windows. Beeftext is a free and open-source third-party text expansion app that allows you to create complex text replacement rules for any Windows application.
Step 1: Download and install Beeftext on your Windows PC. Once installed, launch Beeftext.
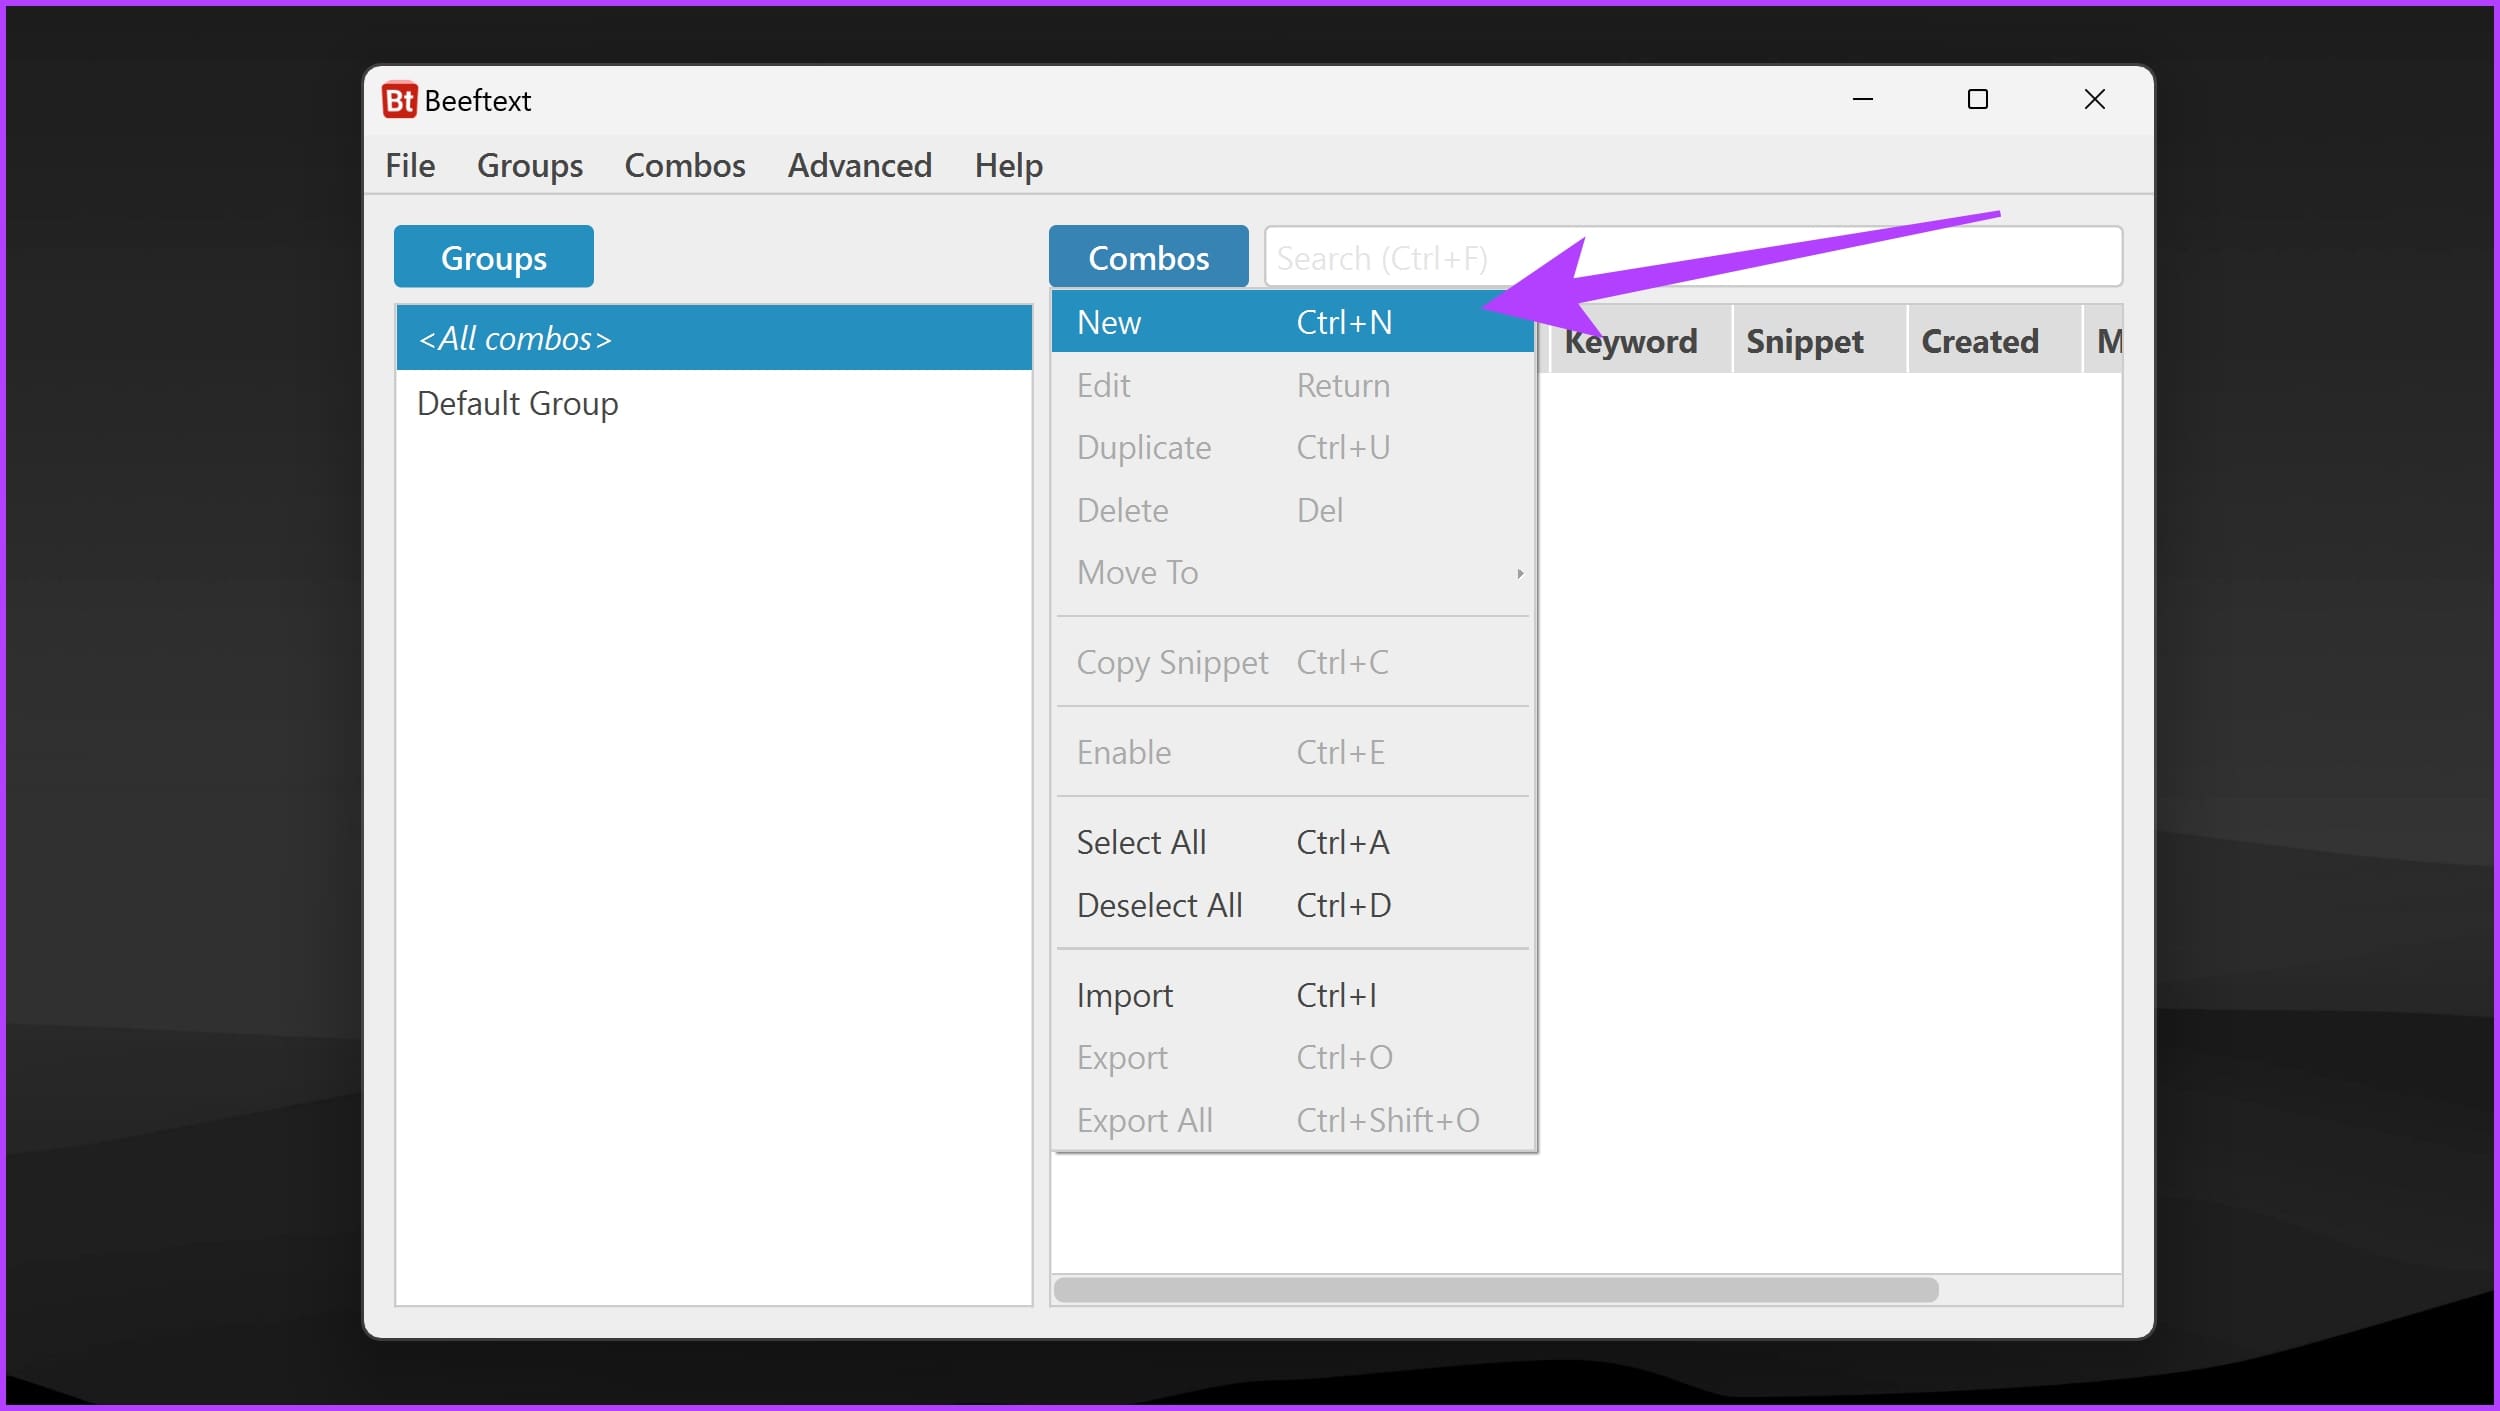
Step 2: Now, click on Combos and select New from the drop-down list of options. Alternatively, press the Ctrl + N keys together on your keyboard.
Step 3: Enter the full-text keyphrase for which you want to create a shortcut in the Snippet window.

Step 4: Create a shortcut or abbreviation once you’ve done that. Enter that in the Keyword section.

Step 5: Click on OK when you’re done.

And that’s it. Your custom text replacement shortcut is ready for use on Windows. It replaces text as you type, similar to Windows AutoCorrect, and preserves text formatting, similar to AutoText.
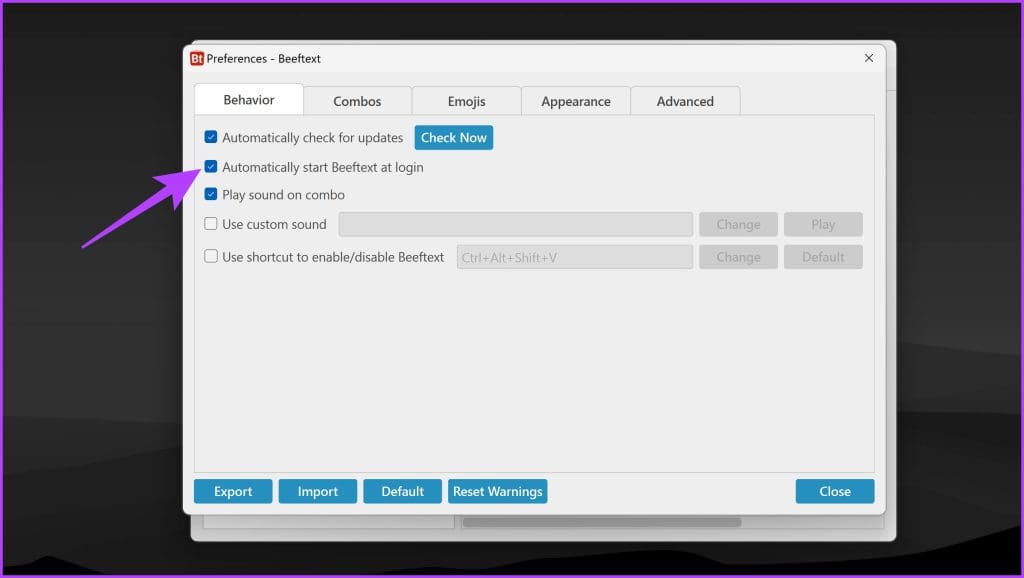
Note that your text replacement functionality will only work when the Beeftext app is running. As such, it is advisable to ensure that the app auto-starts when starting Windows. To do that, open the Beeftext app, navigate to File > Preferences, and enable the checkbox next to Automatically start Beeftext at login option.
FAQs
What Is The Difference Between Autotext And Autocorrect?
AutoText is used to create shortcuts for frequently used phrases or blocks of text. AutoCorrect is used to correct common misspellings and typos automatically.
Can I Use Autotext And Autocorrect In All Applications?
No, AutoText and AutoCorrect are only available in applications that support them. Most Microsoft Office applications support AutoText and AutoCorrect, but others may not.
Can I Use Text Replacement In All Applications With Beeftext?
Unlike AutoText and AutoCorrect, Beeftext works across applications, providing system-wide text replacement functionality.
Was this helpful?
Last updated on 09 August, 2024
Read Next
 3 Ways to Fix Text Replacement Not Working on Mac
Basic Fixes Check app compatibility: Launch the app > click on Edit > find the Substitutions sub-menu item.
3 Ways to Fix Text Replacement Not Working on Mac
Basic Fixes Check app compatibility: Launch the app > click on Edit > find the Substitutions sub-menu item.
 5 Best Replacement Earpads for Audio-Technica ATH-M50x Headphones
Audio-Technica makes terrific headphones and the company’s M50x and M50BT can still hold their own and sound superb, to say the least.
5 Best Replacement Earpads for Audio-Technica ATH-M50x Headphones
Audio-Technica makes terrific headphones and the company’s M50x and M50BT can still hold their own and sound superb, to say the least.
 How to Add Text to Video in Microsoft Photos on Windows 10
Once the reality hits you that Windows Movie Maker no longer exists on Windows 10, you start exploring its replacement, the Photos app.
How to Add Text to Video in Microsoft Photos on Windows 10
Once the reality hits you that Windows Movie Maker no longer exists on Windows 10, you start exploring its replacement, the Photos app.
 A Complete Guide to Fixing Blurry Text in Windows 10
Microsoft’s Windows 10 operating system enjoys a comfortable lead over the rivals in the desktop OS market share.
A Complete Guide to Fixing Blurry Text in Windows 10
Microsoft’s Windows 10 operating system enjoys a comfortable lead over the rivals in the desktop OS market share.
 3 Ways to Extract Text From Images on Windows 11
Method 1: Using Snipping Tool's Text Action The Snipping Tool comes with a very capable Text Action feature.
3 Ways to Extract Text From Images on Windows 11
Method 1: Using Snipping Tool's Text Action The Snipping Tool comes with a very capable Text Action feature.
 4 Ways to Add Arrows or Text to Photos on Windows
Method 1: Using Microsoft Photos The Microsoft Photos app is a fantastic tool to view and edit a picture on a Windows computer.
4 Ways to Add Arrows or Text to Photos on Windows
Method 1: Using Microsoft Photos The Microsoft Photos app is a fantastic tool to view and edit a picture on a Windows computer.
 4 Fixes for Can’t Select or Highlight Text in Microsoft Word for Windows
Try Basic Fixes Rule out issues with your mouse or touchpad: A malfunctioning mouse or touchpad might fail to register clicks and drag motions.
4 Fixes for Can’t Select or Highlight Text in Microsoft Word for Windows
Try Basic Fixes Rule out issues with your mouse or touchpad: A malfunctioning mouse or touchpad might fail to register clicks and drag motions.
 8 Fixes When the Text Cursor Turns White on Windows 11
Basic Fixes: Uninstall recent Windows updates: If the cursor problem starts after an update, rolling back the update will fix it.
8 Fixes When the Text Cursor Turns White on Windows 11
Basic Fixes: Uninstall recent Windows updates: If the cursor problem starts after an update, rolling back the update will fix it.
The article above may contain affiliate links which help support Guiding Tech. The content remains unbiased and authentic and will never affect our editorial integrity.