Method 1: Attempt Uninstallation With Admin Rights
You need to locate the application’s uninstaller file and re-attempt the uninstallation with administrator privileges.
Step 1: Navigate to the program’s folder you want to uninstall.
Usually, all installed apps are located in the Program Files or Program Files (x86) folder, but they can be in another location or on another drive as well.

Step 2: Right-click on the uninstaller executable file and select the Run as administrator option.

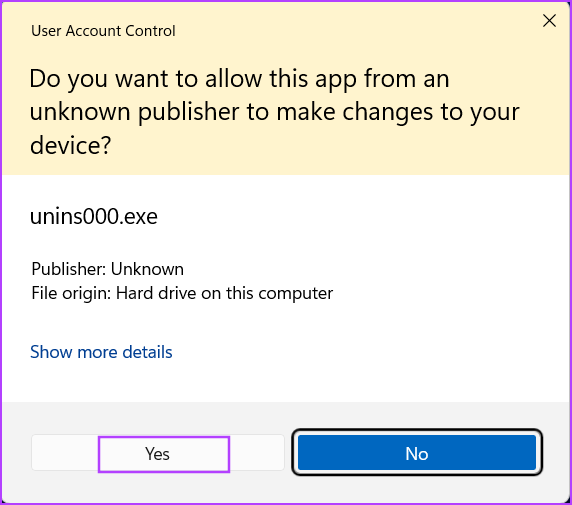
Step 3: When the User Account Control window opens, click on the Yes button.
Step 4: Follow the on-screen instructions and check if the program uninstalls completely.
Method 2: Enable the Built-in Admin Account
If granting administrator privileges to the uninstaller file doesn’t help, enable the built-in administrator account and try removing the program.
Step 1: Open Command Prompt as an administrator.

Step 2: Enter the below command.
Net user administrator /active:yes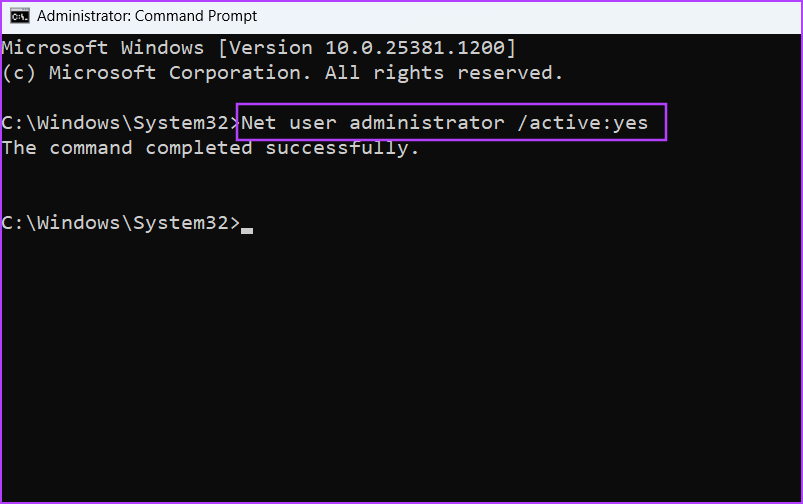
Step 3: Close the Command Prompt window.
Step 4: Press the Windows key and click on the User Profile icon. Select the newly activated Administrator user profile.
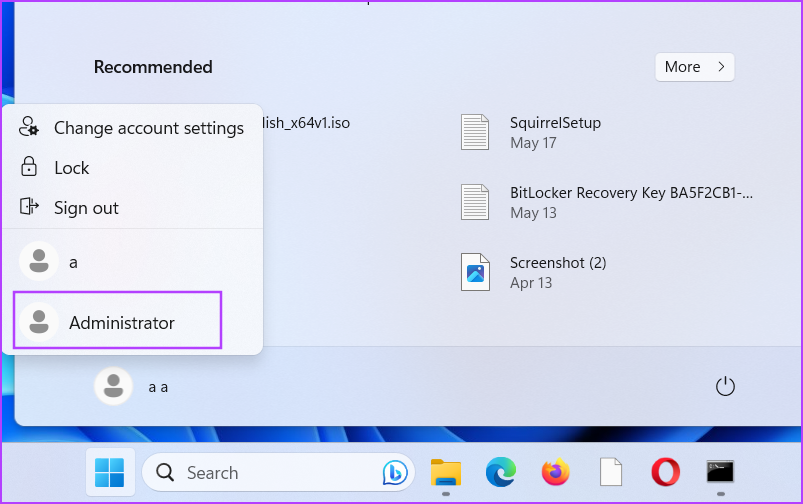
Step 5: Create a new password and sign in to the Administrator account. Try to uninstall the troublesome program.

Method 3: Restart Windows Installer Service
If there is a problem with the Windows Installer Service, you cannot uninstall a system program or a third-party app on Windows.
Step 1: Press the Windows key to open the Start menu, type services in the search bar, and press Enter.

Step 2: Locate the Windows Installer service and right-click on it. Select Restart.
Step 3: Close the Services utility and run the uninstaller once again.

Also Read: How to open Services on Windows
Method 4: Temporarily Disable User Account Control
User Account Control notifies you about a program that is making changes to your system. But if it becomes too overprotective, temporarily disable it and finish the uninstallation.
Step 1: Press the Windows key to launch the Start menu, type UAC in the search bar, and press Enter.

Step 2: Drag the slider to the bottom position and click on OK.
Step 3: Run the uninstaller executable file and remove the program from your PC.

Ensure to revisit the UAC settings page and re-enable it afterward.
Method 5: Uninstall the App Using Command Prompt
You can use Command Prompt to remove any program installed on your PC. However, you must know the exact path of the uninstaller file.
Step 1: Open the C: Drive and click on the Program Files Folder.
Step 2: Locate and select the uninstaller executable file and right-click on it. Select Copy as path.

Step 3: Open Command Prompt. Paste the copied path of the uninstaller file in Command Prompt and press Enter.
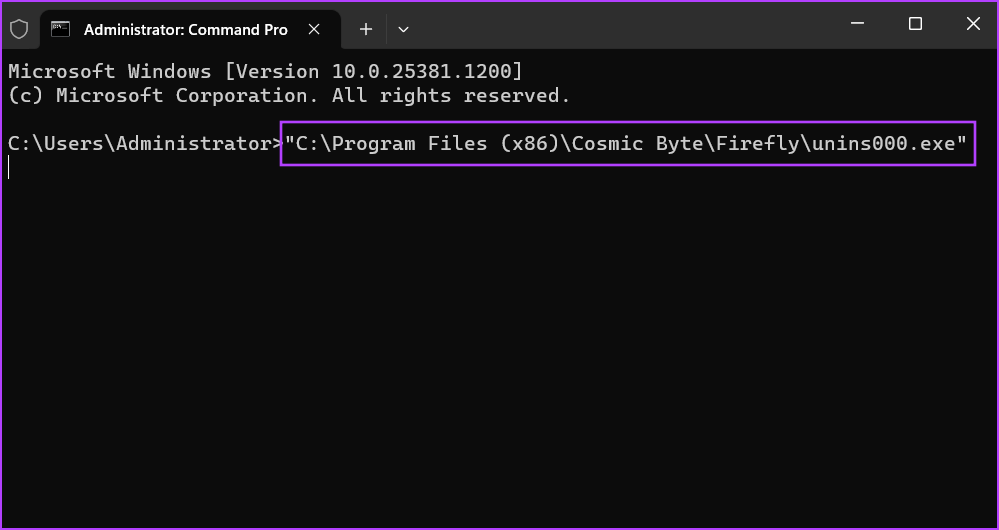
Step 4: The Program Uninstaller window will launch. Follow the on-screen instructions to remove it from your Windows PC.
Method 6: Take Full Ownership of the Uninstaller File
If you still see the “You must be an administrator to remove this application” error message, you must take Full Ownership of the installation folder and all the files inside it.
Step 1: Open the C: Drive > click on the Program Files or Program Files (x86) folder.

Step 2: Find the installation folder of the program that you can’t uninstall. Select and right-click on the folder > select Properties.

Step 3: Switch to the Security tab. Scroll down to find your username and click on it. Then, click on Edit.

Step 4: A new window will open. Select your username again. Click on the Full control checkbox to select it. Click on Apply and OK.
Run the uninstaller application and remove the program from your computer.

Also Read: How to remove residual files after uninstalling software on Windows
Was this helpful?
Last updated on 09 July, 2024
Read Next
 4 Ways to Fix DirectX ‘Could Not Allocate Sufficient Memory’ Error on Windows 11
Common Fixes Launch the Windows Memory Diagnostic tool: Press the Windows key, search Windows Memory Diagnostic tool, and click to open it.
4 Ways to Fix DirectX ‘Could Not Allocate Sufficient Memory’ Error on Windows 11
Common Fixes Launch the Windows Memory Diagnostic tool: Press the Windows key, search Windows Memory Diagnostic tool, and click to open it.
 6 Ways to Fix “Folder Access Denied” Error on Windows
Basic Fixes Check if the folder is encrypted. The administrator could have password-locked or encrypted the folder, so contact them for assistance.
6 Ways to Fix “Folder Access Denied” Error on Windows
Basic Fixes Check if the folder is encrypted. The administrator could have password-locked or encrypted the folder, so contact them for assistance.
 4 Ways to Fix Exception Access Violation Error on Windows 11
Fix 1: Use the Built-in Troubleshooter The Hardware and Device troubleshooter can help you resolve hardware-related issues that trigger the Exception Access Violation error.
4 Ways to Fix Exception Access Violation Error on Windows 11
Fix 1: Use the Built-in Troubleshooter The Hardware and Device troubleshooter can help you resolve hardware-related issues that trigger the Exception Access Violation error.
 4 Ways to Fix Access Denied Error in Steam for Windows
Try Basic Fixes Check if Steam is down: Just like any other service, Steam is vulnerable to occasional server-side glitches.
4 Ways to Fix Access Denied Error in Steam for Windows
Try Basic Fixes Check if Steam is down: Just like any other service, Steam is vulnerable to occasional server-side glitches.
 Top 10 Fixes for ‘Can’t Access Router Admin Page’ on Windows 11
For the most part, most users don't have to constantly access their Wi-Fi router's admin page.
Top 10 Fixes for ‘Can’t Access Router Admin Page’ on Windows 11
For the most part, most users don't have to constantly access their Wi-Fi router's admin page.
 5 Fixes for “Word Experienced an Error Trying to Open the File” Error in Windows
Fix 1: Unblock Your Word File Microsoft Word may fail to open a document if it has been altered by third-party software.
5 Fixes for “Word Experienced an Error Trying to Open the File” Error in Windows
Fix 1: Unblock Your Word File Microsoft Word may fail to open a document if it has been altered by third-party software.
 6 Best Ways to Access Windows Tools on Windows 11
Windows Tools carries useful utilities like Event Viewer, Task Scheduler, and System Configuration Tool, organized into a folder for easy access.
6 Best Ways to Access Windows Tools on Windows 11
Windows Tools carries useful utilities like Event Viewer, Task Scheduler, and System Configuration Tool, organized into a folder for easy access.
 7 Ways to Force Uninstall Programs on Windows 11
Method 1: Uninstall Programs Using the File Explorer Step 1: Firstly, open the Start Menu, type the name of the program you want to uninstall in the search bar, and choose
7 Ways to Force Uninstall Programs on Windows 11
Method 1: Uninstall Programs Using the File Explorer Step 1: Firstly, open the Start Menu, type the name of the program you want to uninstall in the search bar, and choose
The article above may contain affiliate links which help support Guiding Tech. The content remains unbiased and authentic and will never affect our editorial integrity.