Basic Fixes
- Restart Spotify: Open the Task Manager, right-click on Spotify, and select End Task. Re-launch Spotify to check if the issue is fixed.
- Close unwanted apps: Close apps you aren’t using to free up memory that may increase Spotify’s performance.
- Update or reinstall Spotify: If there’s a blue bubble next to your username on Spotify, it means an update is available. Install the update, or try re-installing the Spotify app.
- Clear storage: Clear the storage space on your Windows PC to prevent bottleneck issues affecting app performance.
Fix 1: Run Spotify as Admin
Whenever you run an application as an admin, you get completely unrestricted access to all of its components, and this method can potentially fix the issue.
Step 1: Search for Spotify in the start menu.
Step 2: Right-click on Spotify and select Run as administrator.

Fix 2: Run Spotify in Compatibility Mode
Running Spotify in a compatibility mode for an older version of Windows can fix the problem if it is randomly crashing.
Step 1: Search for the Spotify app in the Start menu and select Open file location.

Step 2: Right-click on the highlighted Spotify option and select Properties.

Step 3: Select Compatibility.
Step 4: Check the box for Run this program in compatibility mode for:

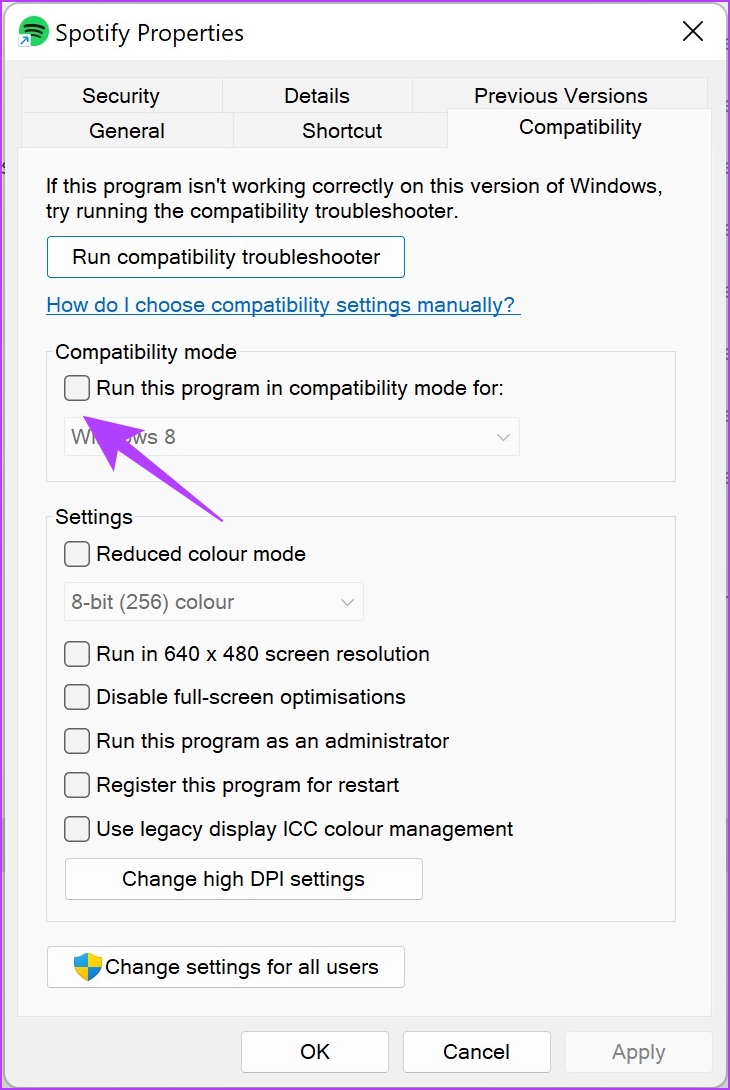
Step 5: Select an older version of Windows, say Windows 8.
Step 6: Select OK. This will apply the compatibility mode for the selected older version of Windows.


Fix 3: Troubleshoot Spotify
Using the troubleshooter for Spotify can help your PC detect and fix problems.
Step 1: Search for the Spotify app in the Start menu, and select Open File Location.

Step 2: Now, right-click on the highlighted Spotify option and select Show more options.

Step 3: Select Troubleshoot compatibility.

Step 4: Now, select Try recommended settings, and follow the on-screen instructions to complete the process.
If it doesn’t fix the issue, go back to the troubleshooter and select the Troubleshoot program option to provide more information about the problem.

Fix 4: Disable Hardware Acceleration
Many users have reported issues with the Spotify app’s hardware acceleration option in online forums.
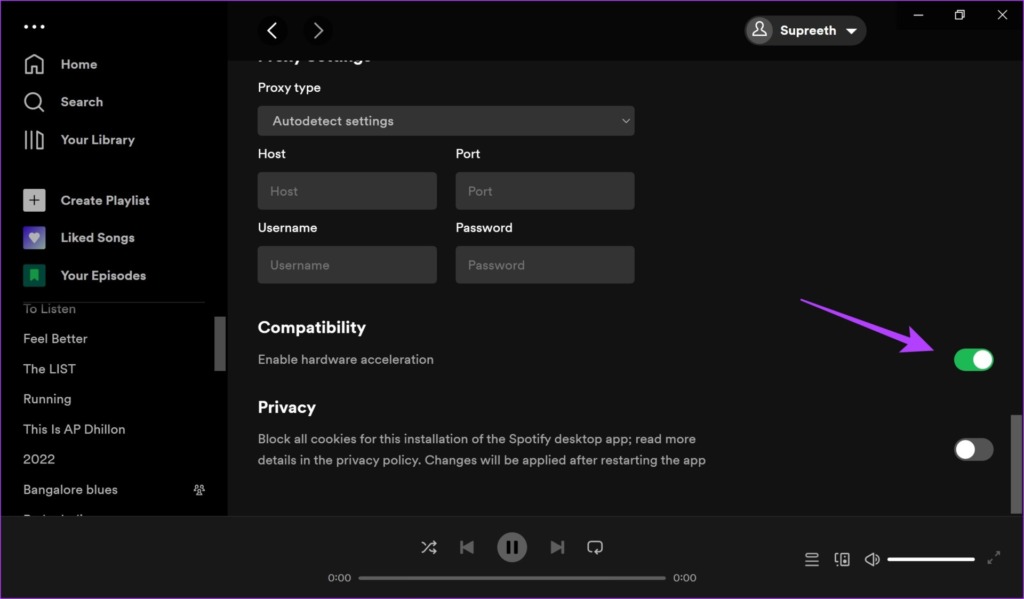
Step 1: Open the Spotify app. Click on the username at the top and select Settings.

Step 2: Turn off the toggle for Enable hardware acceleration.
Fix 5: Clear Spotify Data and Cache
Cache and junk files can occupy a lot of storage, and it can slow down Spotify and cause a crash. Here’s how to clear Spotify data and cache on Windows.
Firstly, access hidden files to search and delete the Spotify cache folder.
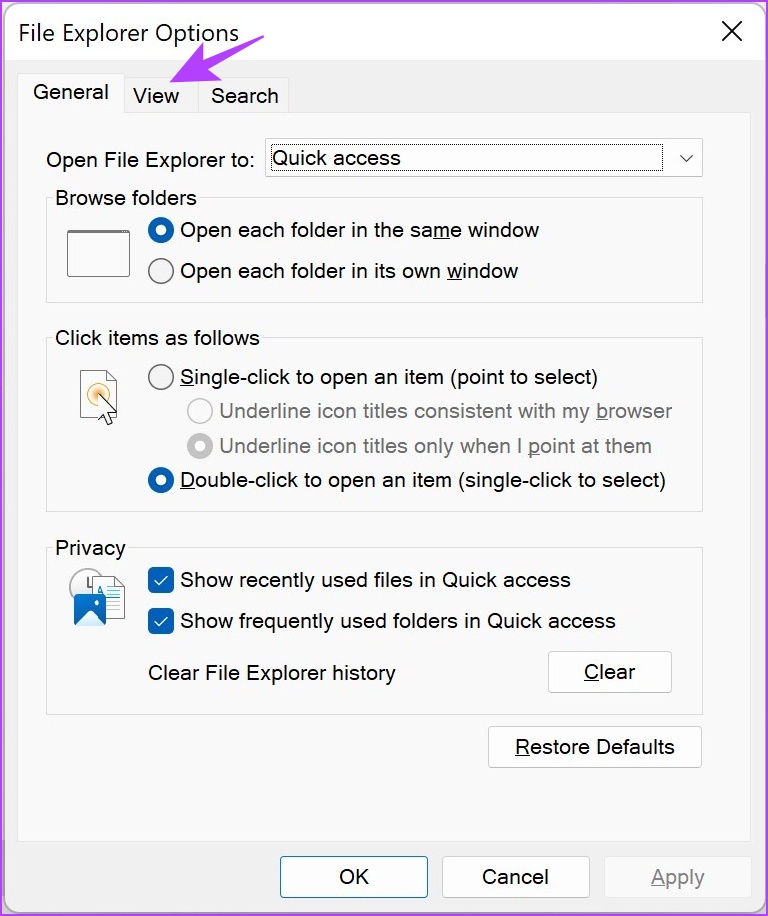
Step 1: In the start menu, search for File Explorer Options and click on the first result.

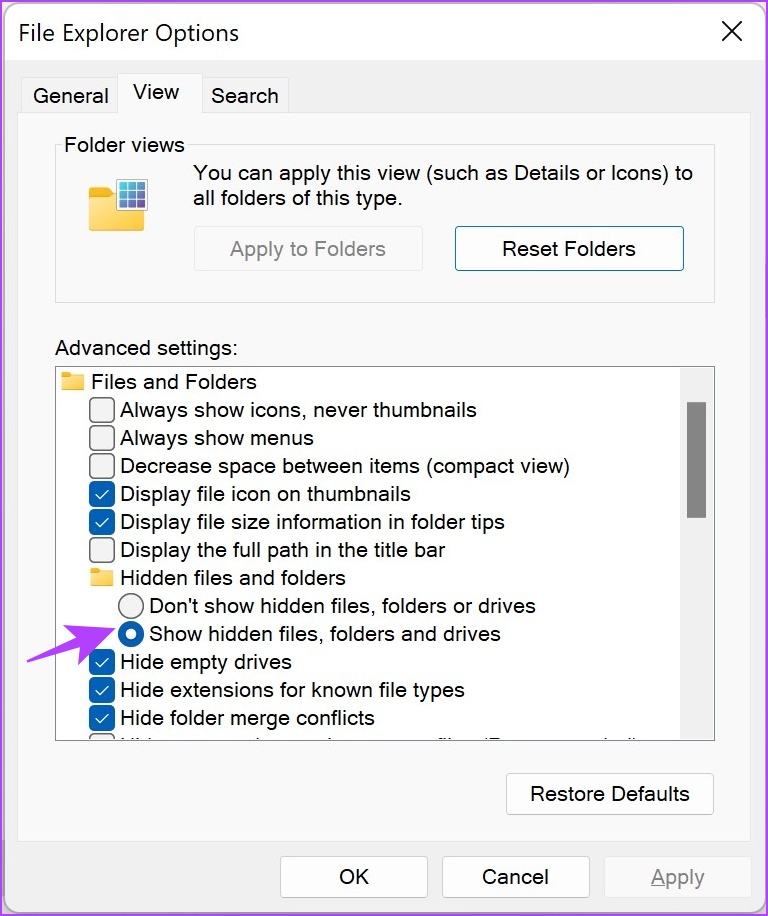
Step 2: Once opened, click on the View tab. Select the radio button for Show hidden files, folders, and drives. Click on OK to apply the settings.
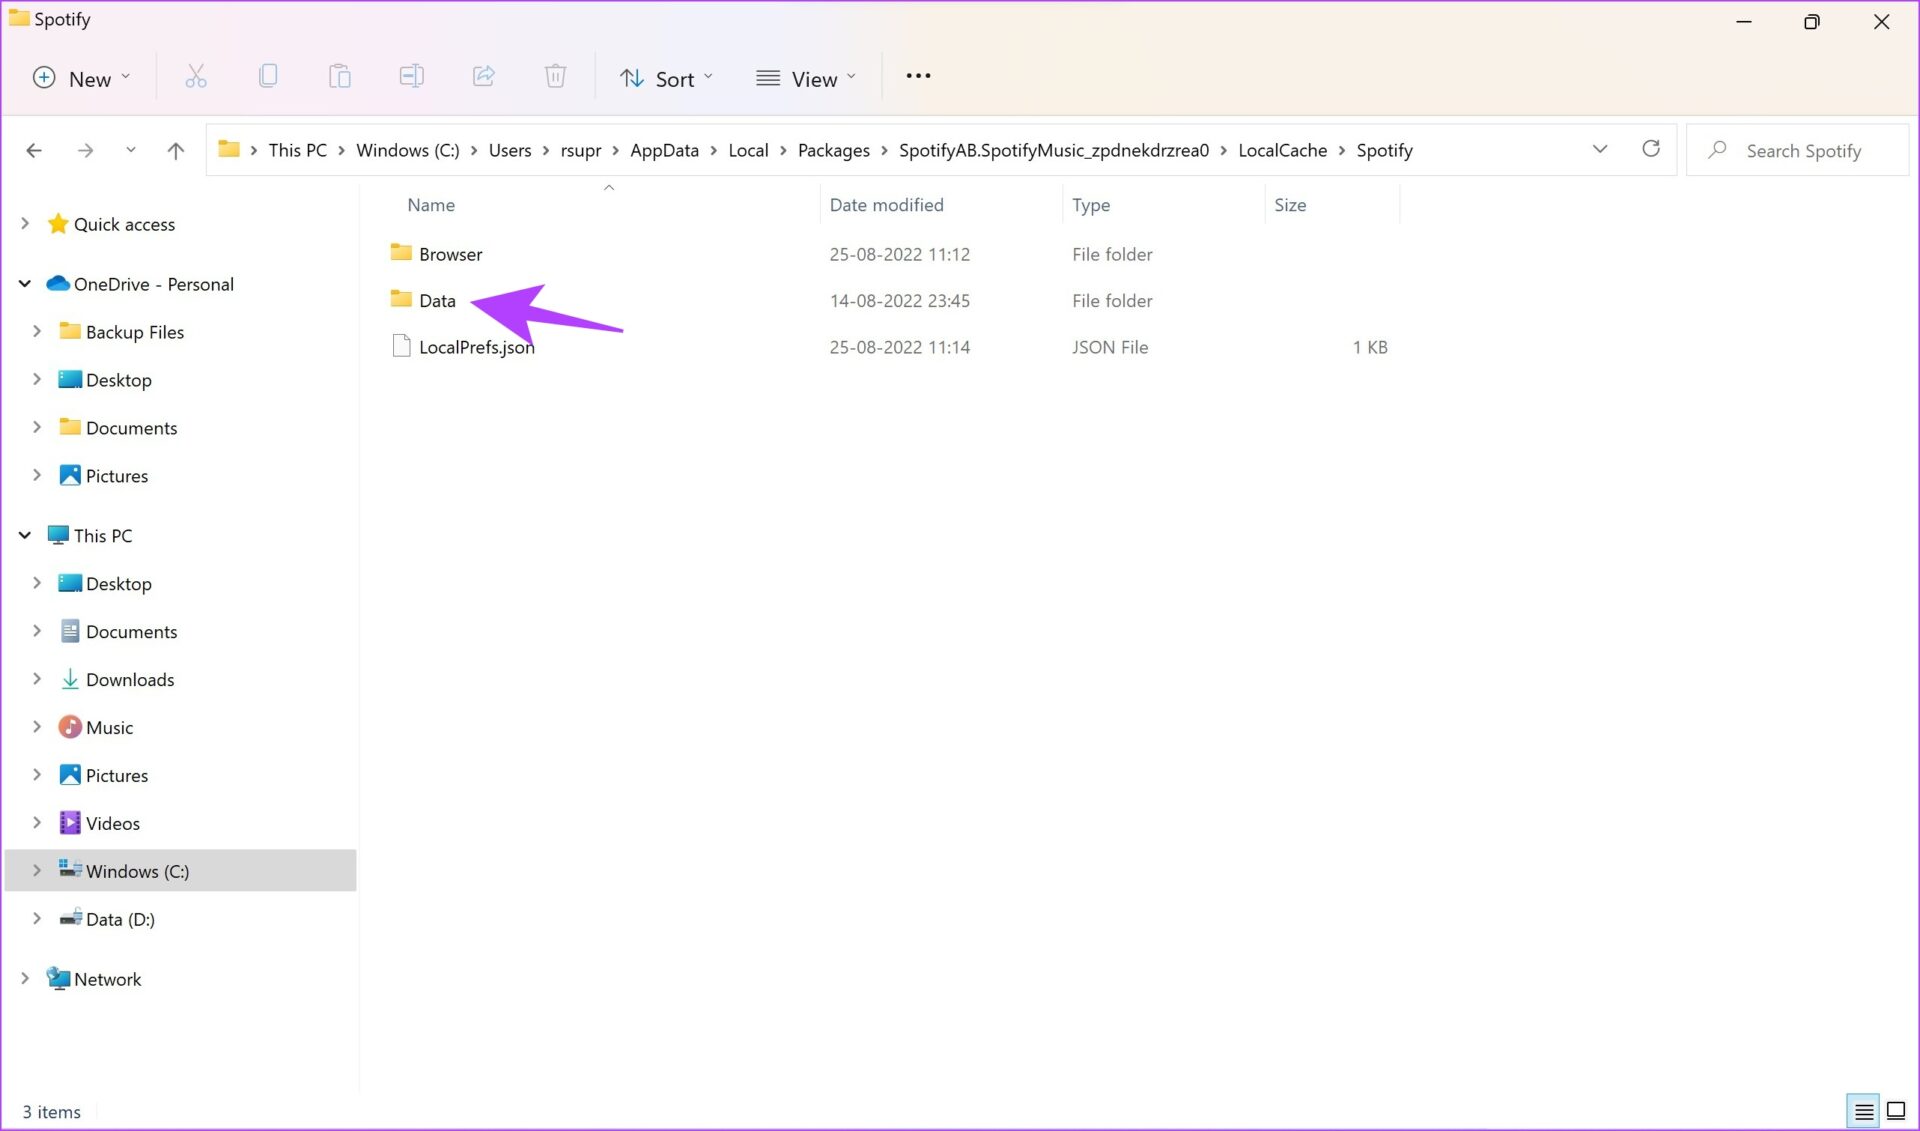
Step 3: Navigate to the following destination in File Explorer.
C:\Users\[Username]\AppData\Local\Packages
Step 4: Select a folder containing the keyword Spotify.

Step 5: Next, go to LocalCache > Spotify > Data. Select all folders inside and click on Delete.
If none of the above methods work, try using Spotify Web Player on a browser.
Was this helpful?
Last updated on 04 September, 2024
1 Comment
Leave a Reply
Read Next
 5 Ways to Fix Android Messages Keeps Crashing Issue
Basic Fixes: Restart Phone: Start the troubleshooting process by restarting your phone.
5 Ways to Fix Android Messages Keeps Crashing Issue
Basic Fixes: Restart Phone: Start the troubleshooting process by restarting your phone.
 4 Ways to Fix Word Keeps Crashing on Windows
Basic Fixes Restart PC: Restart your PC to eliminate any temporary bugs and glitches.
4 Ways to Fix Word Keeps Crashing on Windows
Basic Fixes Restart PC: Restart your PC to eliminate any temporary bugs and glitches.
 Top 10 Ways to Fix Google Chrome Keeps Freezing or Crashing on Windows 10
Google Chrome is the go-to browser of millions across the world.
Top 10 Ways to Fix Google Chrome Keeps Freezing or Crashing on Windows 10
Google Chrome is the go-to browser of millions across the world.
 5 Ways to Fix Discord Keeps Crashing on Windows Computer
https://youtu.be/_uU0Ob5vTWM Try Basic Fixes End Discord processes using Task Manager: Press Ctrl + Shift + Esc keys to open Task Manager.
5 Ways to Fix Discord Keeps Crashing on Windows Computer
https://youtu.be/_uU0Ob5vTWM Try Basic Fixes End Discord processes using Task Manager: Press Ctrl + Shift + Esc keys to open Task Manager.
 7 Best Ways to Fix Hogwarts Legacy Crashing Issue on Windows 11
Hogwarts Legacy is an open-world game set in the Harry Potter world.
7 Best Ways to Fix Hogwarts Legacy Crashing Issue on Windows 11
Hogwarts Legacy is an open-world game set in the Harry Potter world.
 6 Ways to Fix OBS Keeps Crashing on Windows
Preliminary Fixes Run OBS Studio as Administrator: If OBS crashes on startup, it's best to give it a shot by giving the app an administrative privilege.
6 Ways to Fix OBS Keeps Crashing on Windows
Preliminary Fixes Run OBS Studio as Administrator: If OBS crashes on startup, it's best to give it a shot by giving the app an administrative privilege.
 How to Fix Photos App Crashing Issue on Windows 10
The Photos app on Windows 10 isn’t one of the most optimized of apps around.
How to Fix Photos App Crashing Issue on Windows 10
The Photos app on Windows 10 isn’t one of the most optimized of apps around.
 3 Ways to Fix Telegram Keeps Crashing on Android and iPhone
Try Basic Fixes Force stop and reopen Telegram: When an app on your phone starts misbehaving, the first thing to do is force close it and open it again.
3 Ways to Fix Telegram Keeps Crashing on Android and iPhone
Try Basic Fixes Force stop and reopen Telegram: When an app on your phone starts misbehaving, the first thing to do is force close it and open it again.
The article above may contain affiliate links which help support Guiding Tech. The content remains unbiased and authentic and will never affect our editorial integrity.

Forget all of the above…
Spotify has a major problem in its program. As far as Windows 11 is concerned playing Spotify is DOING NOTHING. Therefore your brand new PC goes asleep after 5 minutes (since you started the music and leave it…). That’s because the default sleeptime is set for 5 minutes.
Wordkarround is to set the sleeptimer to ‘never’. Still; it is a Spotify problem. No other player will timeout to sleeping.
It took me several days to understand becaus when moving the mouse gave me the idea that the problem was solved…