Sure, uploads always seem to take a little longer than downloads, but has your OneDrive been stuck on “Preparing to upload” for a while now? This is an aggravating error, with a number of potential causes. In this article, we’re going to attempt to give just as many solutions. Let’s get started.
What Causes the Upload Error?
Before getting started on the fixes, it might be helpful to understand the underlying issues causing the error. In the case of OneDrive uploads, these include:
- The file you’re trying to upload is currently open or being worked on
- The internet connection is shaky
- A lack of storage in your OneDrive folder
- An error with the app itself.
- Outdated software clashes
- A file name that’s too long for OneDrive
How to Fix a OneDrive Stuck on “Preparing to Upload”
With these in mind, let’s look at possible fixes to get things running smoothly again:
Obvious Fixes
It never hurts to mention the easiest and most obvious fixes first, which might end up saving you some time. Before you try anything else:
- Be sure to check the internet connection and signal strength on your device.
- Make sure that your PC is updated to the latest version of Windows, and that the OneDrive app is too.
- Restart your machine, just to be sure.
Rename Your File
OneDrive caps its file name lengths at 255 characters, in addition to excluding certain symbols that can’t be in file names (# % & * : < > ?, etc.). But even if it hasn’t issued a warning, that doesn’t mean that you’re good to go. Check your file name length and make sure that it isn’t too long.
Check Your File Size
Another overlooked area is the file size. OneDrive has a hard limit of 250GB per upload. This isn’t for folders or bulk uploads, but individual files. If you happen to have a file that exceeds this limit, know that it won’t upload.
Pause and Restart the Upload Process
A simple yet effective way to nudge OneDrive into action is by deactivating and reactivating the upload process. Here’s what to do:
Step 1. Click your OneDrive icon in the System Tray.
Step 2. Click the Settings icon in the top right of the window that pops up.
Step 3. Choose the “Pause Syncing” option and the length of time you want to have syncing deactivated.
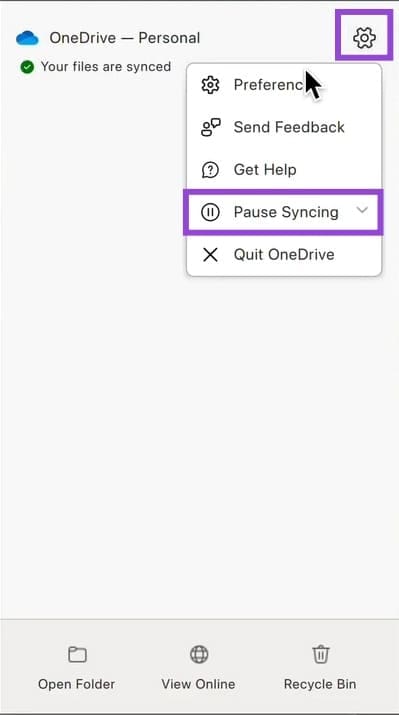
Step 4. Once the syncing process stops, open up the Settings menu again and click the “Resume syncing” option.
Step 5. See if this resolves the issue.
Delete Zero-Byte Files in PowerShell
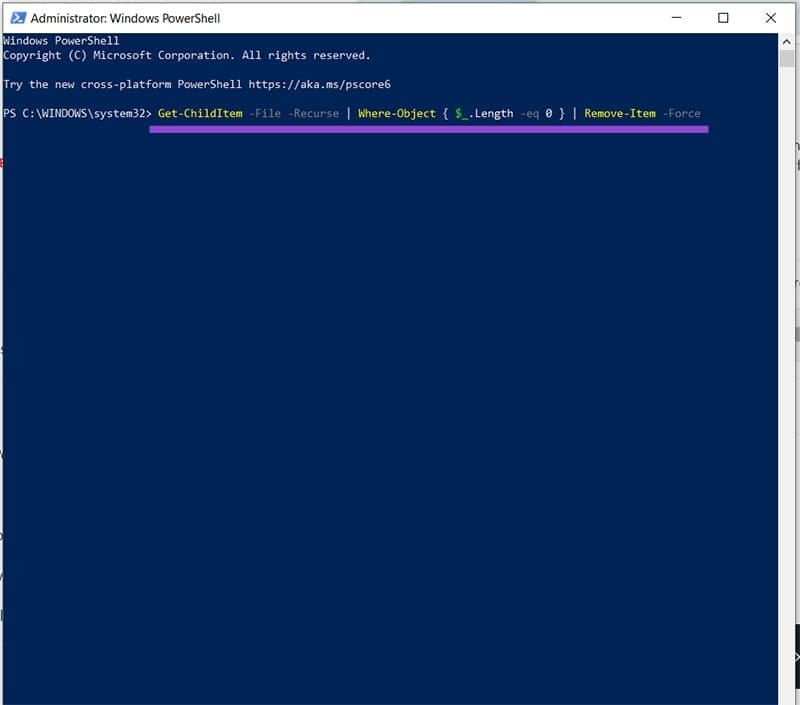
Blank files in your system without data might be blocking the entire upload process. You can find and delete these files with the PowerShell tool. Here’s how:
Step 1. Type “PowerShell” into the search bar, choose the first option, and run as Administrator.
Step 2. Once inside, type the following: “Get-ChildItem -File -Recurse | Where-Object { $_.Length -eq 0 } | Remove-Item -Force” and press “Enter.”
Step 3. All zero-byte files should be deleted. See if the upload process has resumed.
Unlink and Relink Your PC
If you’re still struggling, maybe reestablishing the connection between your PC and OneDrive is in order. Here’s what to do:
Step 1. Open up your OneDrive by clicking the icon in the System Tray.
Step 2. Click the Settings icon and navigate to the “Account” tab.
Step 3. Select the “Unlink this PC” text below the avatar.

Step 4. Once unlinked, open up the OneDrive app again via the search bar.
Step 5. Enter your login details and sign in. See if this resolves your problem.

Was this helpful?
Last updated on 20 August, 2025
Read Next
 5 Ways to Fix Google Drive Stuck at Starting Upload on Android
How to Stop Google Drive Uploads in Progress on Android Before we get started on how to fix the issue of Google Drive uploads getting stuck, let us have a
5 Ways to Fix Google Drive Stuck at Starting Upload on Android
How to Stop Google Drive Uploads in Progress on Android Before we get started on how to fix the issue of Google Drive uploads getting stuck, let us have a
 5 Fixes for OneDrive Camera Upload Not Working on iPhone
Basic Fixes Connect Your iPhone to a Wi-Fi Network: Try connecting to a 5GHz Wi-Fi network if you have a dual-band router.
5 Fixes for OneDrive Camera Upload Not Working on iPhone
Basic Fixes Connect Your iPhone to a Wi-Fi Network: Try connecting to a 5GHz Wi-Fi network if you have a dual-band router.
 15 Ways to Fix OneDrive Sync Is Pending or Stuck Error in Windows 10
One of the most common issues with any cloud storage service is broken sync.
15 Ways to Fix OneDrive Sync Is Pending or Stuck Error in Windows 10
One of the most common issues with any cloud storage service is broken sync.
 How to Fix OneDrive Stuck on Processing Changes
OneDrive is usually a reliable cloud storage service, but you might occasionally encounter the frustrating issue of OneDrive stuck on processing changes.
How to Fix OneDrive Stuck on Processing Changes
OneDrive is usually a reliable cloud storage service, but you might occasionally encounter the frustrating issue of OneDrive stuck on processing changes.
 3 Ways to Fix Google Drive Waiting to Upload Error
Basic Fixes Check Google Drive storage status: Check how much storage space is left in your Google Drive account.
3 Ways to Fix Google Drive Waiting to Upload Error
Basic Fixes Check Google Drive storage status: Check how much storage space is left in your Google Drive account.
 3 Ways to Fix Threads Posts Failed to Upload
Fix 1: Check Cellular Data Access If you're trying to post on Threads using mobile data and it does not seem to work, check if you've disabled cellular data access
3 Ways to Fix Threads Posts Failed to Upload
Fix 1: Check Cellular Data Access If you're trying to post on Threads using mobile data and it does not seem to work, check if you've disabled cellular data access
 How to Upload Photos to Google Photos on Android, iPhone, PC
How to Upload Photos on Google Photos From Mobile There are two ways to add pictures to Google Photos from Android or iOS devices.
How to Upload Photos to Google Photos on Android, iPhone, PC
How to Upload Photos on Google Photos From Mobile There are two ways to add pictures to Google Photos from Android or iOS devices.
 How to Upload Private and Unlisted Videos on YouTube
How to Upload an Unlisted or Private Video on YouTube On Web Browser Step 1: Open YouTube on your web browser.
How to Upload Private and Unlisted Videos on YouTube
How to Upload an Unlisted or Private Video on YouTube On Web Browser Step 1: Open YouTube on your web browser.
The article above may contain affiliate links which help support Guiding Tech. The content remains unbiased and authentic and will never affect our editorial integrity.