Basic Fixes:
- Restart the iPhone and modem: Long-press the power button and turn off your iPhone. At the same time, disconnect the power cord from the modem. Wait a few seconds and reconnect the power cord. Then, restart your iPhone and wait for it to connect to the internet.
- Turn Airplane mode on and off: Enabling Airplane mode blocks all the network connectivity on a device. Then, turn off Airplane mode and wait for your iPhone to connect to the Wi-Fi. This can help resolve Wi-Fi issues as it refreshes your device’s network connections.
- Disable VPN: VPNs also disrupt Wi-Fi connectivity on your iPhone. So, if you use a VPN through the built-in feature or via an app, disable it and try connecting to the internet again.
- Ensure Location services are enabled: Some countries require you to turn on location services to connect to Wi-Fi networks. If it is disabled, turn it on. However, if the setting is already enabled, switch it off and see if there is any difference in Wi-Fi.
Fix 1: Forget and Reconnect to Wi-Fi Network
If you’ve recently changed your Wi-Fi network’s password, it might not work even if your device gets connected. Ensure you know the updated Wi-Fi password. Then, follow these steps to forget and reconnect to your Wi-Fi network on your iPhone.
Step 1: Open Settings and go to Wi-Fi. Here, tap on the info icon for your Wi-Fi.
Step 2: Select Forget This Network and confirm your decision. Wait for the Wi-Fi to disconnect.


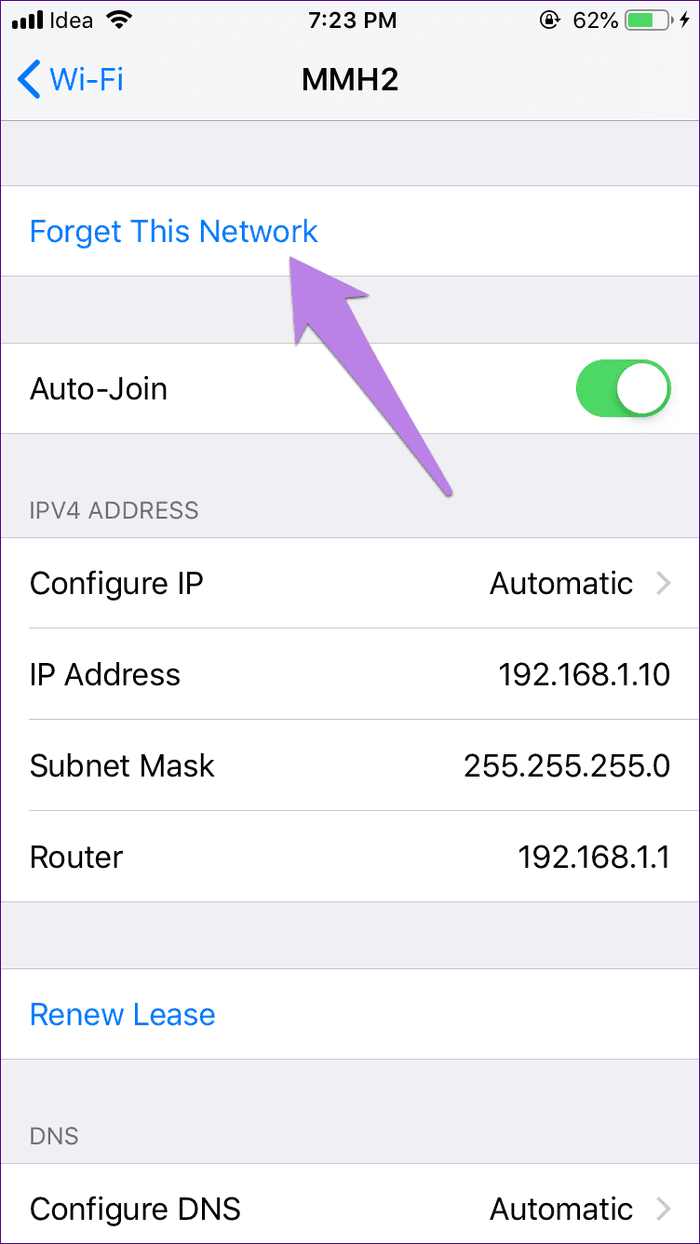
Now, tap on the relevant Wi-Fi network again and enter the correct Wi-Fi password. Wait for it to connect to the internet and check.
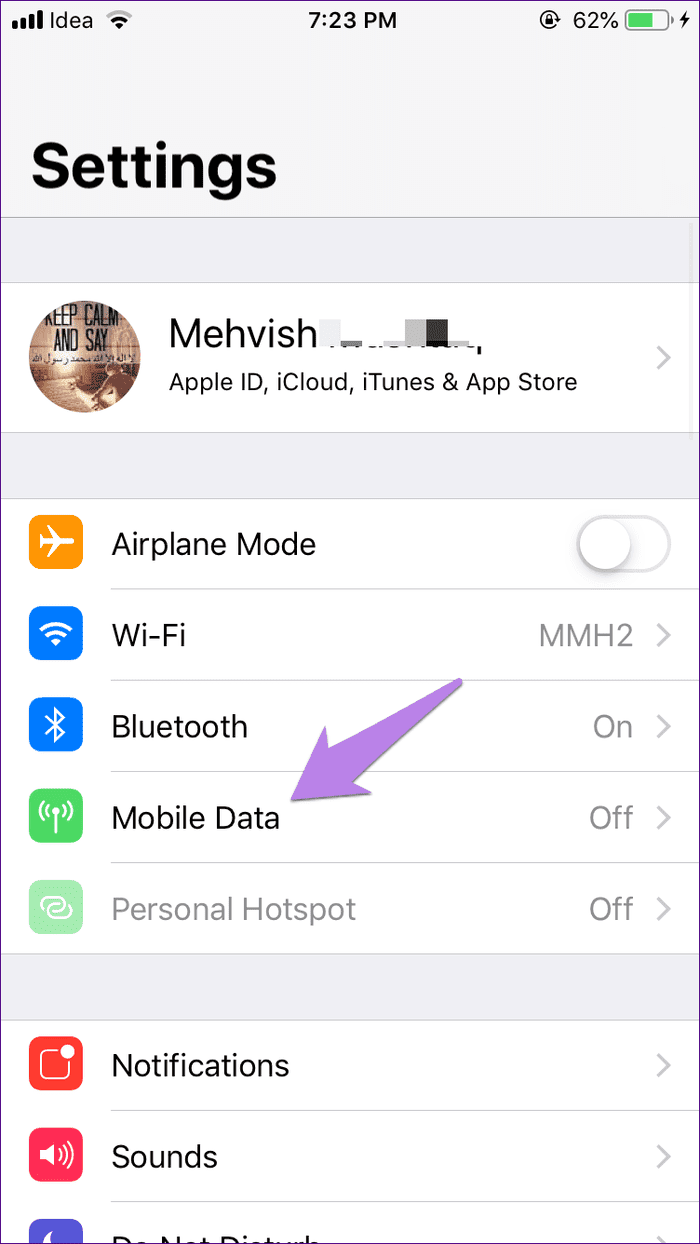
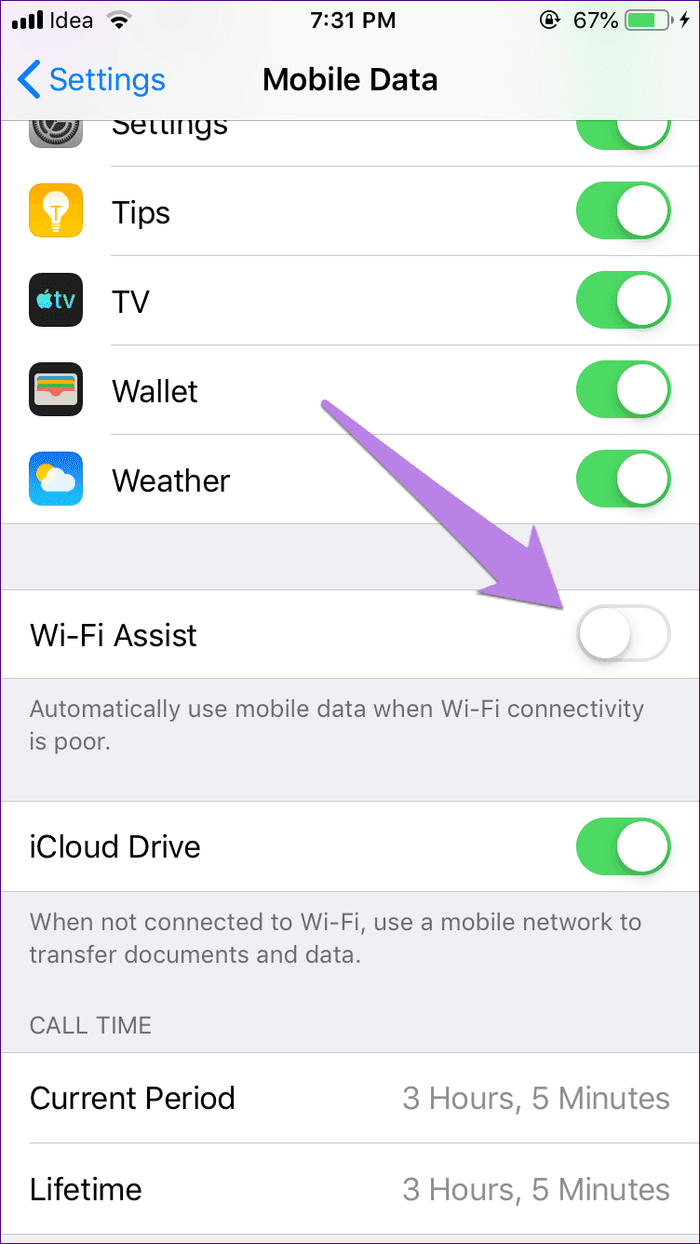
Fix 2: Turn off Wi-Fi Assist
Wi-Fi Assist helps your iOS device switch to mobile data during poor Wi-Fi connectivity. While the feature is useful, it may interfere with the Wi-Fi connection. So, switch it off and see the results. Here’s how to do it.
Step 1: Open Settings and go to Mobile Data. Scroll down and turn off the Wi-Fi Assist toggle.
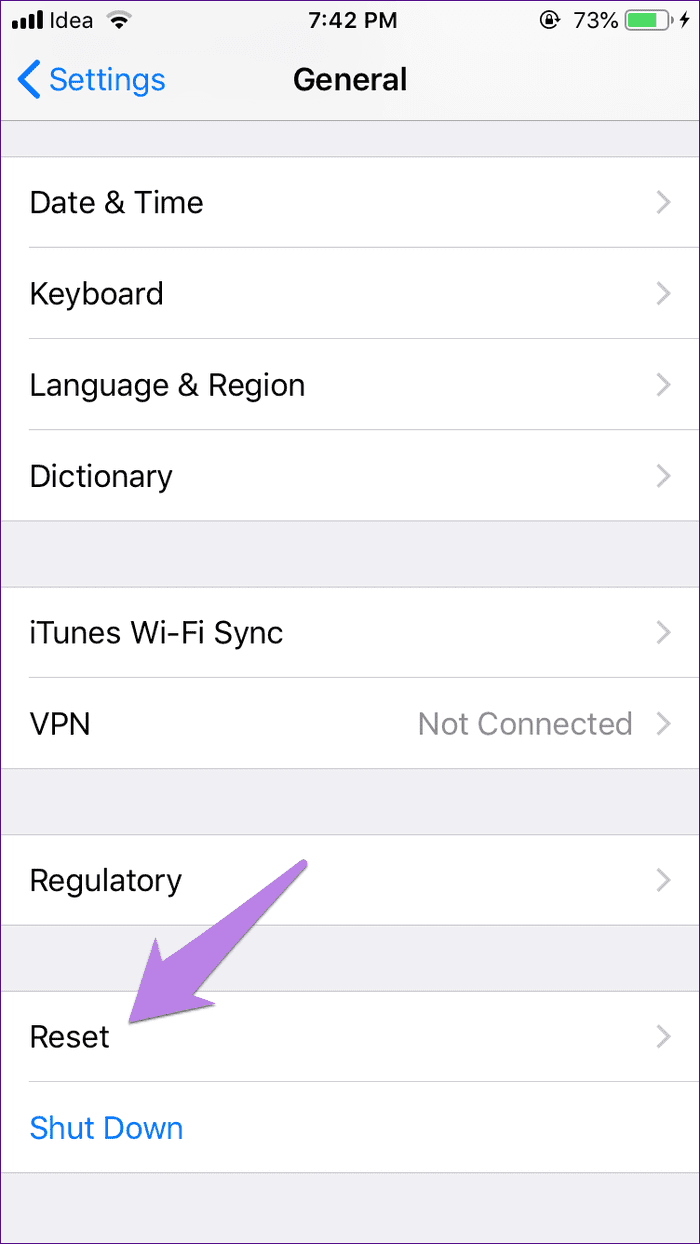
Fix 3: Reset Network Settings
Another useful fix is to reset the network settings on your iPhone. This will not delete device data but reset network settings such as Wi-Fi information, Bluetooth device data, etc. Follow the below steps to do it.
Step 1: Open Settings and tap on General → Transfer or Reset iPhone.
Step 2: Here, tap on Reset. Then, tap on Reset Network Settings.


Follow the on-screen instructions to finish the reset process. Then, enter your Wi-Fi details and see if your phone’s internet is working as expected.
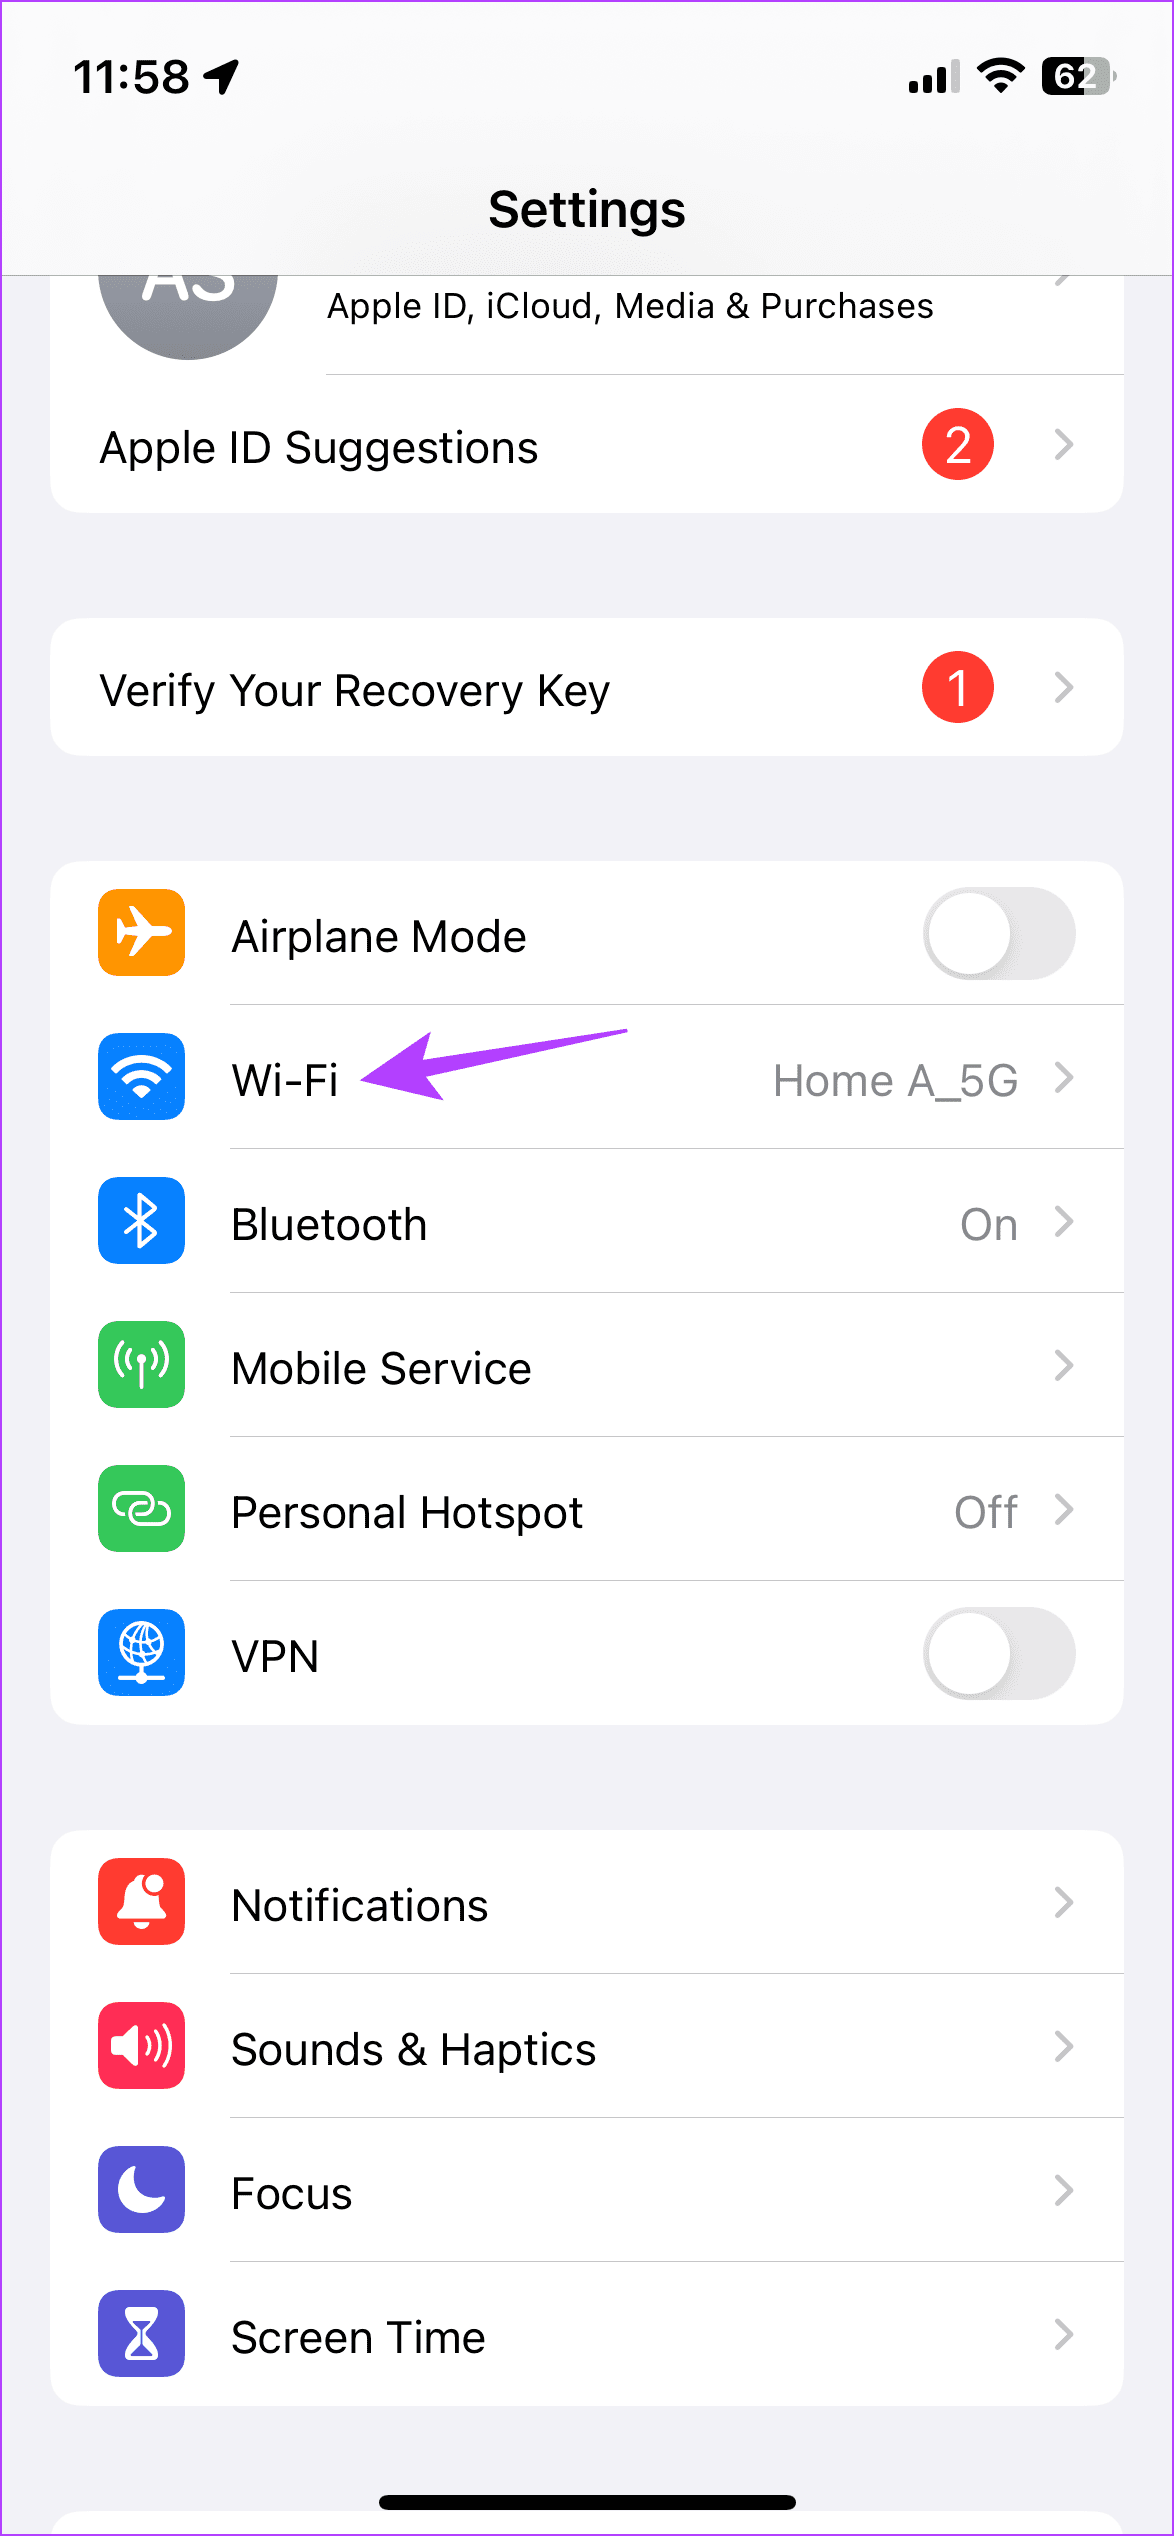
Fix 4: Use Google DNS
All Wi-Fi networks configure the DNS automatically by default. However, changing it to Google DNS can sometimes help resolve internet problems, especially if there are issues with the current DNS server. Here’s how to do it.
Step 1: Open Settings and tap on Wi-Fi. Tap the info icon next to your Wi-Fi.
Step 2: Here, tap on Configure DNS and select Manual. Remove the currently added DNS servers and tap on Add Server.
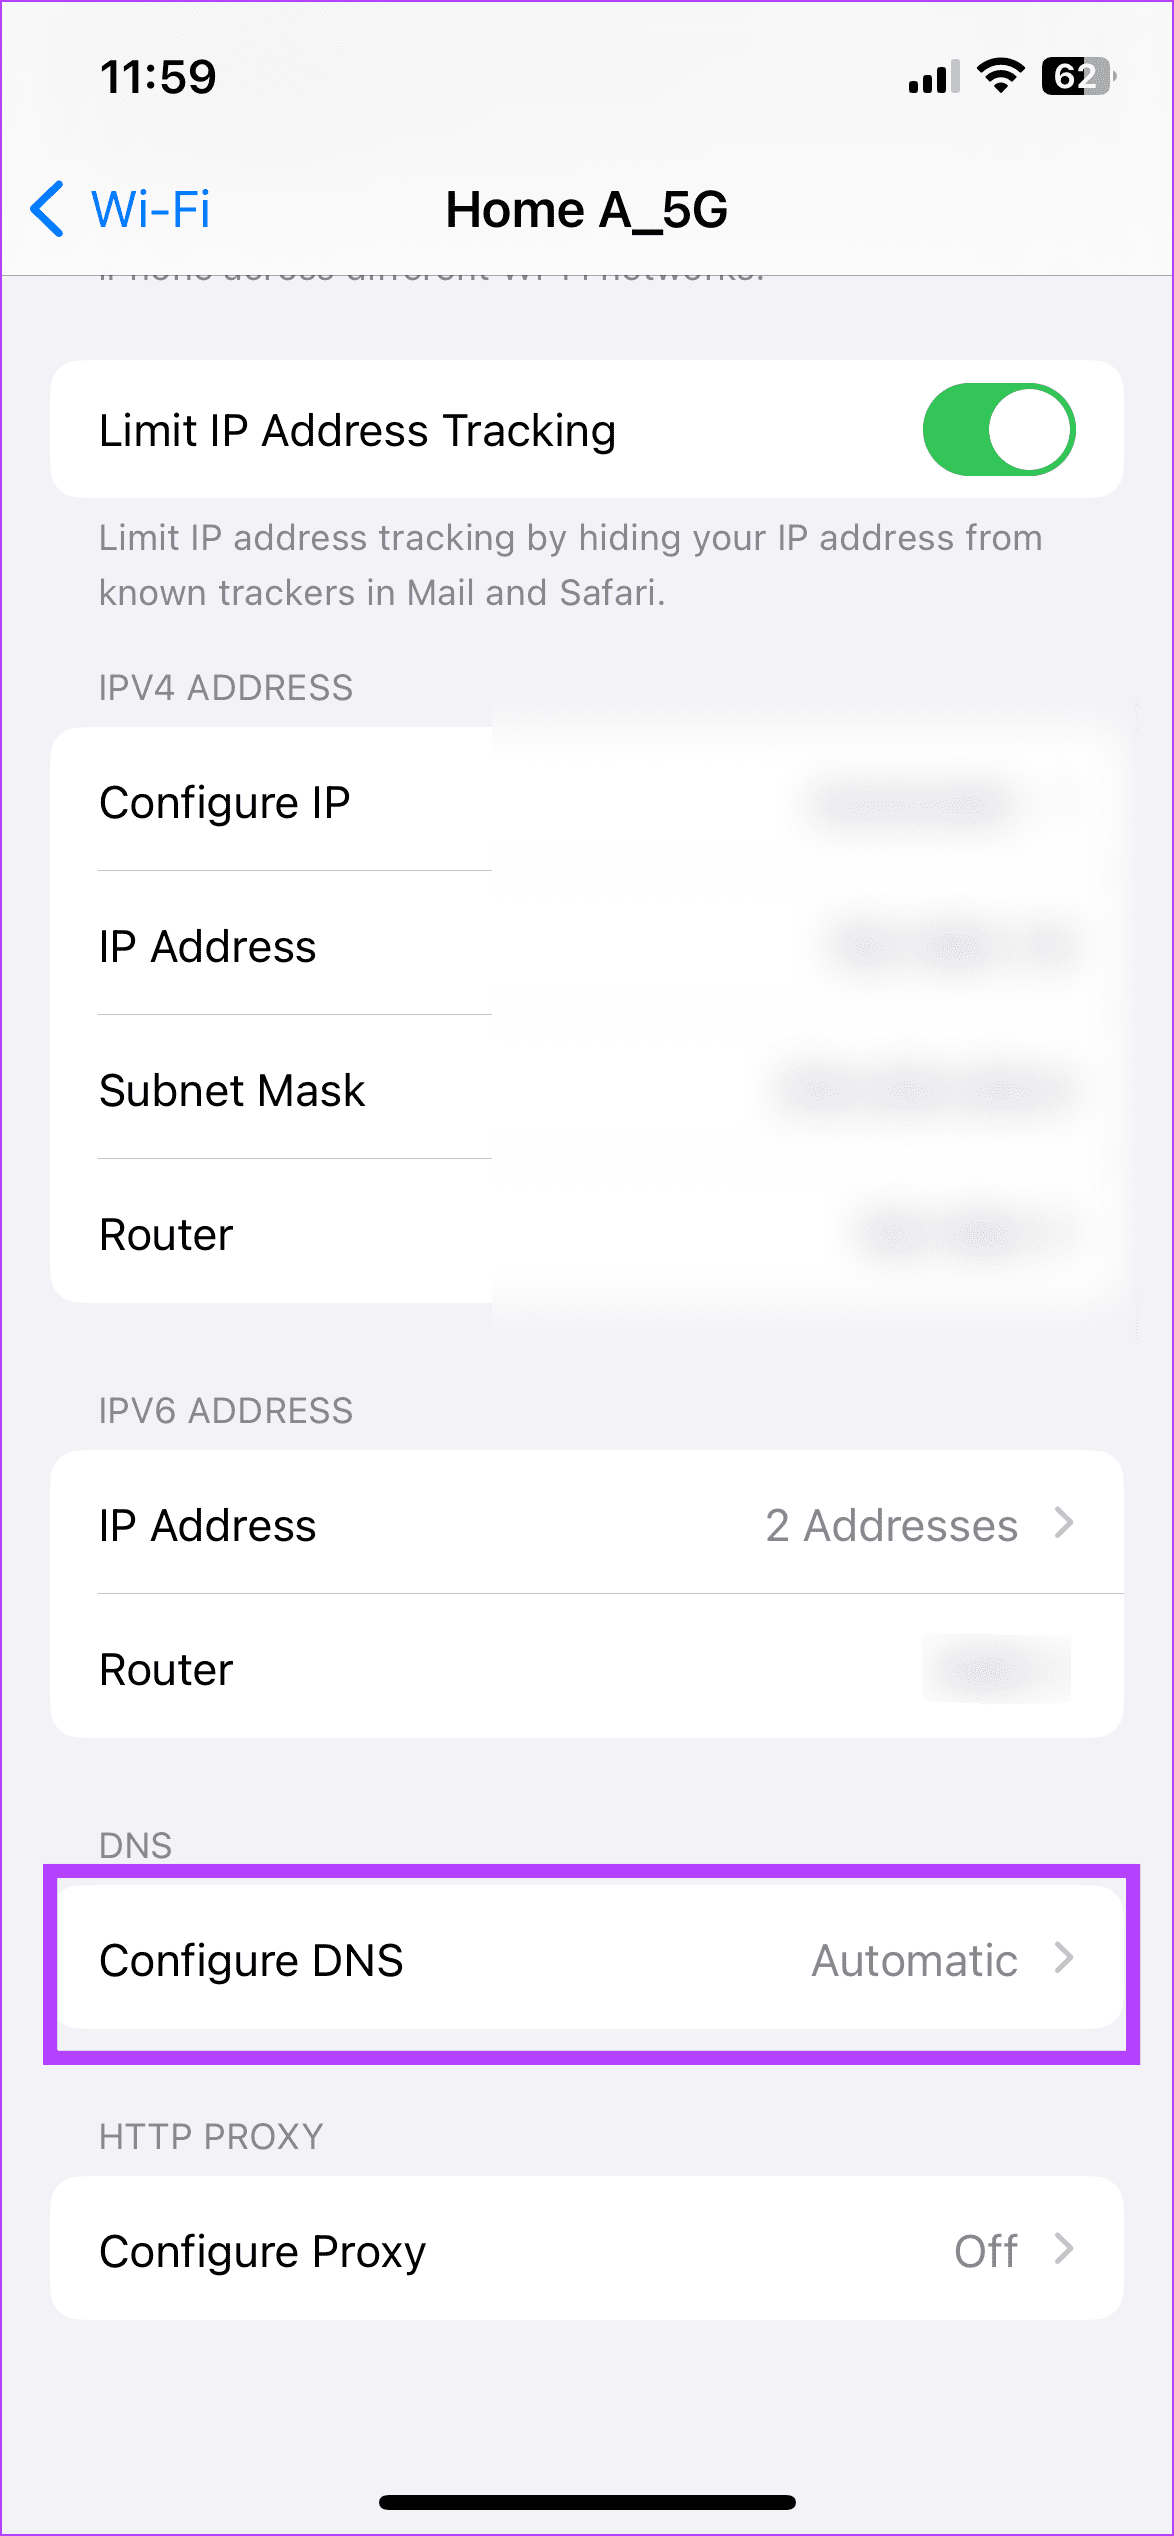
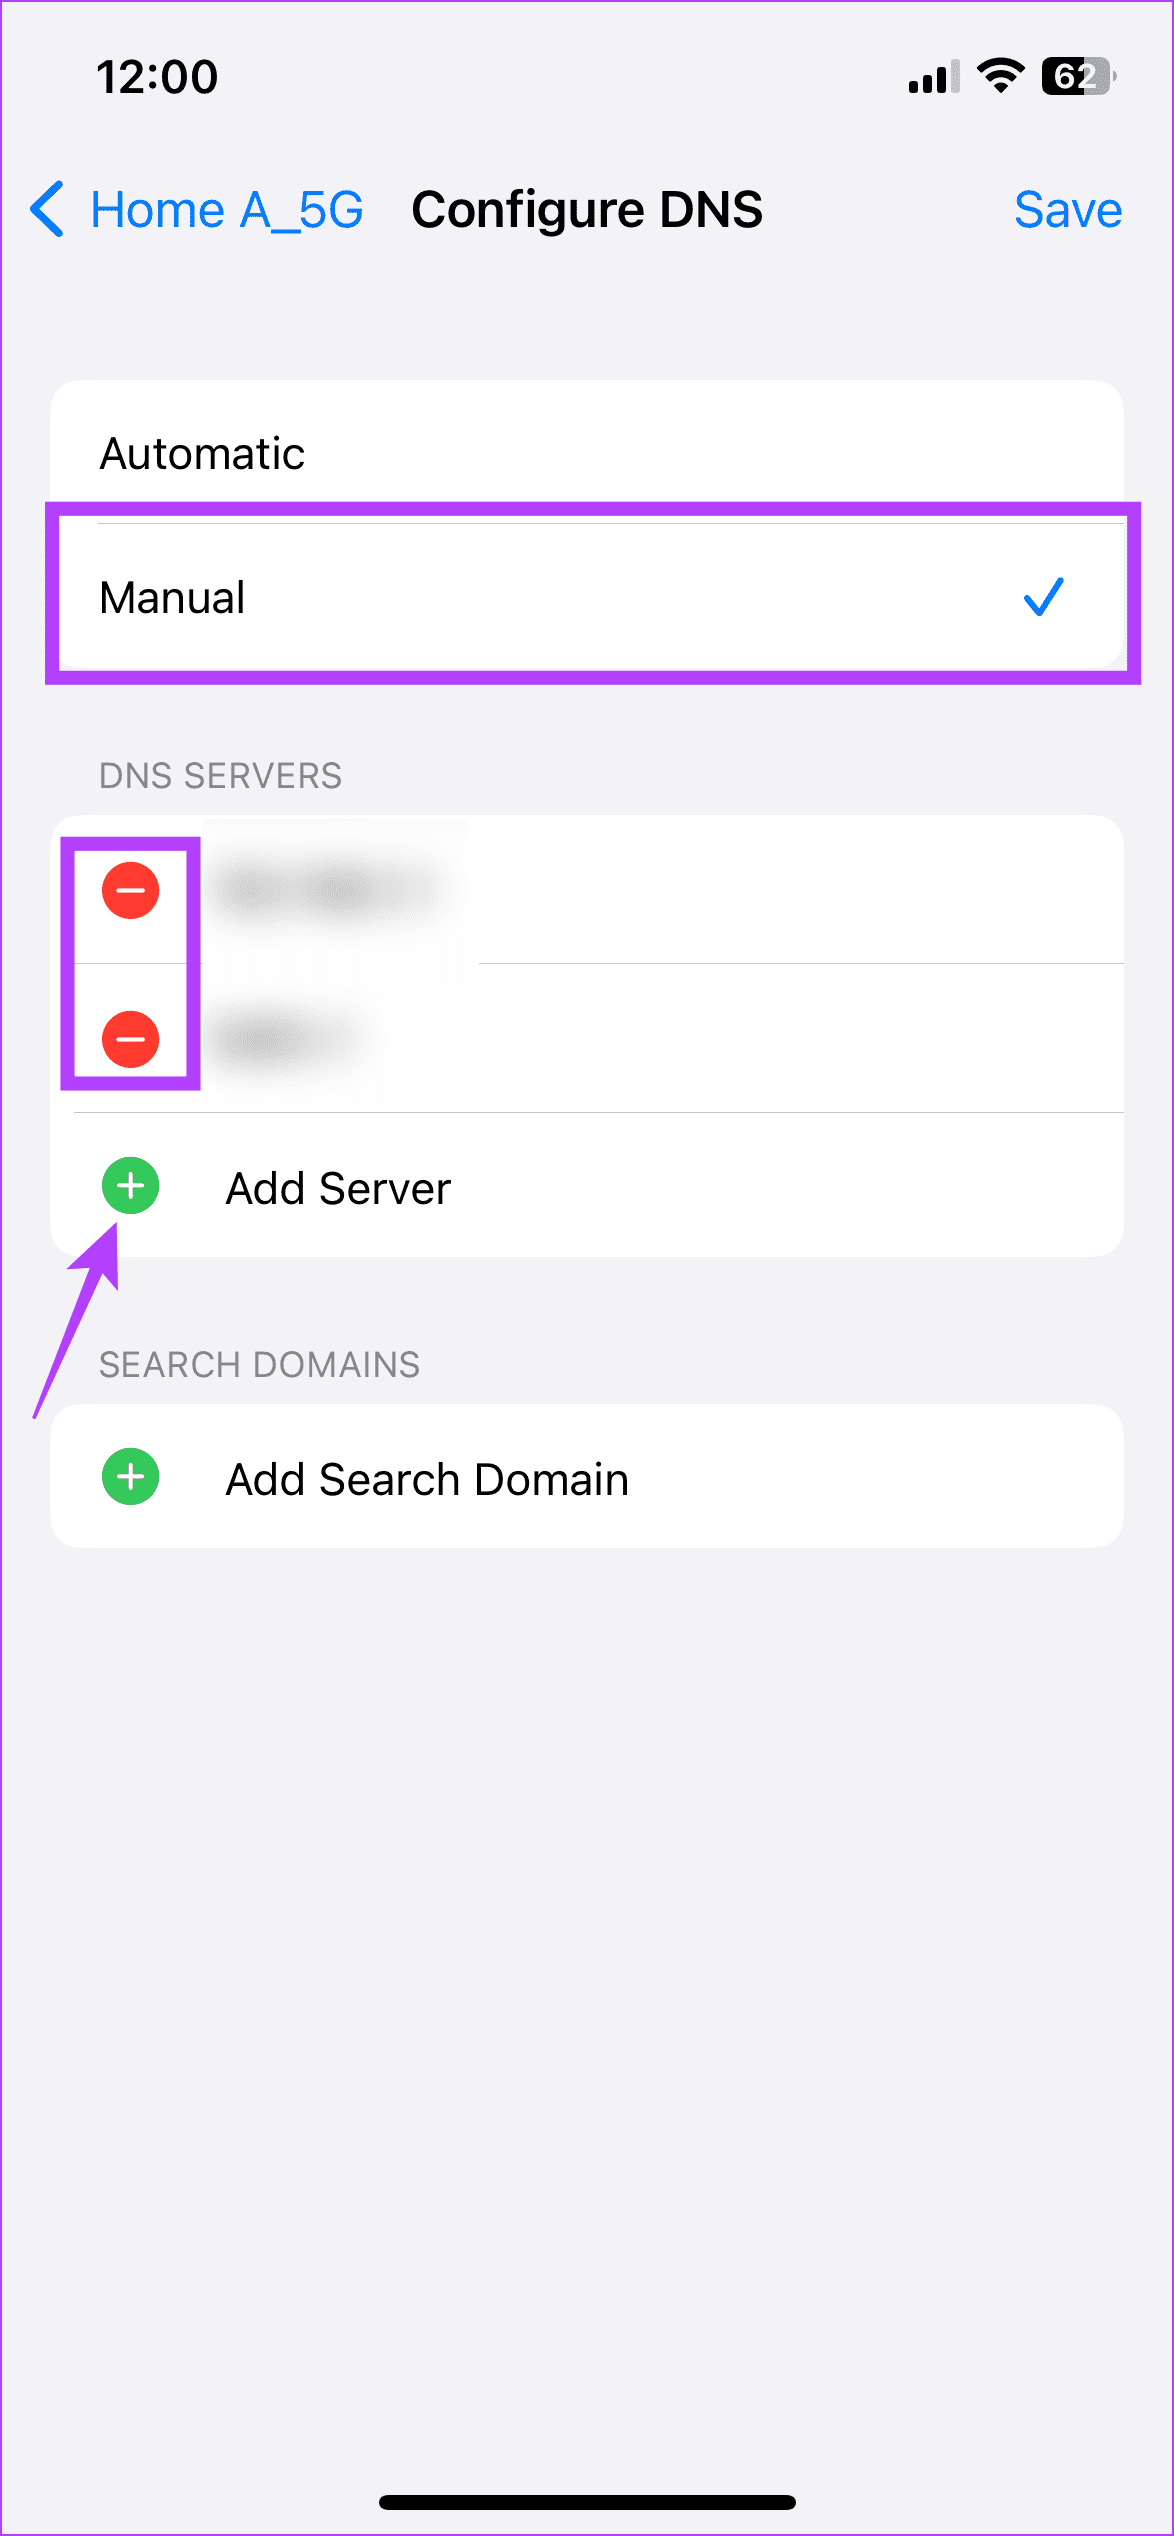
Now, enter 8.8.8.8 and 8.8.4.4 for Google DNS in the respective field and tap on Save to exit the window. Then, use the internet to see if the issue has been fixed on your iPhone.
Was this helpful?
Last updated on 26 June, 2024
Read Next
 6 Ways to Fix iPad Connected to Wi-Fi but No Internet
Basic Fixes: Restart the router and iPad: Power off your iPad and Wi-Fi router.
6 Ways to Fix iPad Connected to Wi-Fi but No Internet
Basic Fixes: Restart the router and iPad: Power off your iPad and Wi-Fi router.
 4 Ways to Fix Wi-Fi Connected but No Internet on Windows 11
Common Fixes Let's begin with some basic solutions to fix the Wi-Fi connected but no internet issue on your Windows machine: Check your internet plan - If you have exceeded
4 Ways to Fix Wi-Fi Connected but No Internet on Windows 11
Common Fixes Let's begin with some basic solutions to fix the Wi-Fi connected but no internet issue on your Windows machine: Check your internet plan - If you have exceeded
 4 Ways to Fix Wi-Fi Connected But No Internet on Android
https://youtu.be/tuxyxswCbWI Try Basic Fixes Sign in to the network: Although most public Wi-Fi networks are free to use, some require you to sign in with your email address or phone
4 Ways to Fix Wi-Fi Connected But No Internet on Android
https://youtu.be/tuxyxswCbWI Try Basic Fixes Sign in to the network: Although most public Wi-Fi networks are free to use, some require you to sign in with your email address or phone
 Top 7 Ways to Fix Samsung Galaxy Phone Connected to Wi-Fi But No Internet
Most Samsung Galaxy phone users prefer a robust Wi-Fi connection to download large apps, games, TV shows, movies, and playlists from the likes of Netflix, Disney Plus, and Spotify.
Top 7 Ways to Fix Samsung Galaxy Phone Connected to Wi-Fi But No Internet
Most Samsung Galaxy phone users prefer a robust Wi-Fi connection to download large apps, games, TV shows, movies, and playlists from the likes of Netflix, Disney Plus, and Spotify.
 4 Fixes for Amazon Echo Connected to Bluetooth but No Sound
Fix 1: Remove AUX Cable Is an aux cable connected to your Echo?
4 Fixes for Amazon Echo Connected to Bluetooth but No Sound
Fix 1: Remove AUX Cable Is an aux cable connected to your Echo?
 5 Best Ways to Fix Mac Wi-Fi Connected But Not Working
Sometimes, your Mac may connect to a Wi-Fi network but fails to open any site or run apps.
5 Best Ways to Fix Mac Wi-Fi Connected But Not Working
Sometimes, your Mac may connect to a Wi-Fi network but fails to open any site or run apps.
 How to Fix Wi-Fi Stops Working on Windows When an External Monitor Is Connected
Basic Fixes: Check Monitor Cable: Bad connection cables can cause your Wi-Fi to stop working when an external monitor is connected on Windows.
How to Fix Wi-Fi Stops Working on Windows When an External Monitor Is Connected
Basic Fixes: Check Monitor Cable: Bad connection cables can cause your Wi-Fi to stop working when an external monitor is connected on Windows.
 How to Fix the Windows Sandbox No Internet Connection Issue
The Windows Sandbox lets you do just about anything.
How to Fix the Windows Sandbox No Internet Connection Issue
The Windows Sandbox lets you do just about anything.
The article above may contain affiliate links which help support Guiding Tech. The content remains unbiased and authentic and will never affect our editorial integrity.