The Windows 11 Terminal allows you to use both the features of the Command Prompt and the PowerShell run dialog in one package. This can be further improved if you enable the Windows 11 Terminal right-click menu. It allows you to seamlessly copy and paste content (since the default right-click can lead to accidental duplications and incorrect commands). Here’s how.
Enable Windows 11 Terminal Right-Click Menu Step-by-Step
Unlike with the old Command Prompt, which only accepted textual input and the shortcut commands, you can use the built-in Settings option to enable right-click menu in Terminal.
Step 1. Open the Terminal as an admin (recommended, but not strictly necessary if you’re already working on an account with administrator privileges).
Step 2. Click on the small down arrow next to the “plus” icon in the tab section on the top toolbar.
Step 3. Select “Settings.” This opens a new tab inside the app.

Step 4. Go to the “Defaults” tab on the right (in the “Profile” subsection).
Step 5. Scroll down and select “Advanced.”
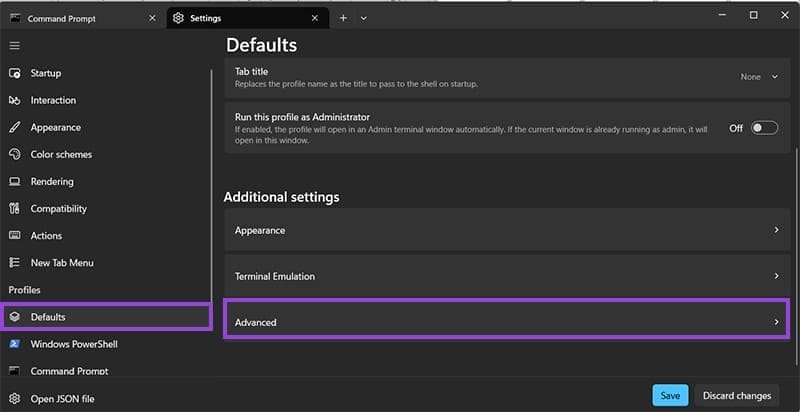
Step 6. Scroll down and toggle on the option named “Display a menu on right-click.”
Step 7. Click on “Save” to apply the changes.

After you set this globally, the setting should automatically propagate to any profile and app that the Terminal uses from then on. When you create a new profile, you can recheck for it specifically in a similar process.
Enabling the Terminal (Admin) as an Option in Windows 11 Right-Click Context Menu
In recent versions of Windows, you can also open folders directly in the Terminal (which simply moves the context window to that folder so you can perform file-based operations on it directly). However, if you want to use commands that require administrator access, this might not work.
In that case, you’ll need to get an additional Windows 11 Terminal right-click menu option that allows you to choose profiles. This is done by modifying the registry with a few settings. Note that you have to be on an administrator account to change the settings, but after you do, any account can access it.
If you want to make sure you can undo the changes, create a backup copy of the registry via the Registry Editor.
Step 1. Download the file listed here (from Elevenforum.com). This will open a browser tab and automatically start a download. If it doesn’t, wait and click for manual download.

Step 2. Since it’s a registry file, most browsers will block it. You may need to manually allow the file to be saved through the Downloads pop-up on the sidebar (or top or down, depending on the browser and version). For Edge, open the Downloads tab and click on “Keep.”
Step 3. Run the .REG file you’ve downloaded, which will prompt you to incorporate it into the registry. Click on “Run” to continue.
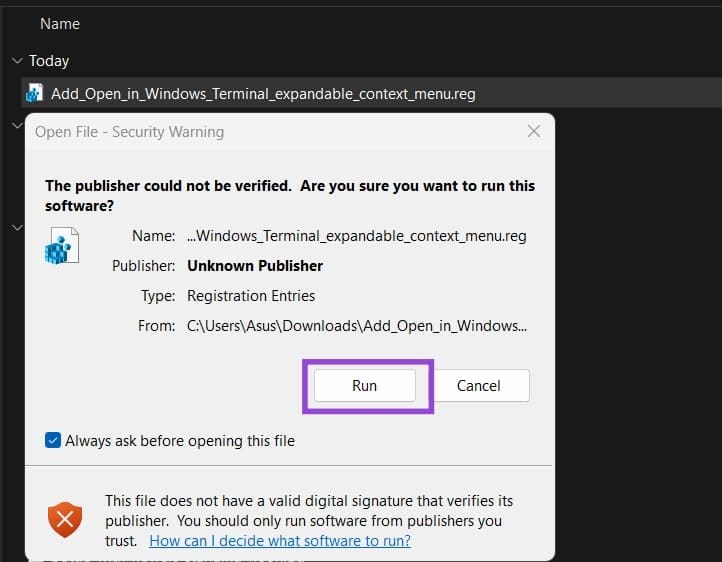
Step 4. Click on “Yes” for user account control, then “Yes” on the dialog, and “OK” to finalize the merge.
After the registry changes are made, you’ll get more options via the right-click context menu, but only if you expand it to show more options.
Was this helpful?
Last updated on 16 November, 2025
Read Next
 How to Fix a Slow Windows 10 Desktop Right-Click (Context) Menu
The desktop right-click menu, otherwise known as the desktop context menu, provides instant access to numerous useful options ranging from aligning desktop icons to customizing display settings.
How to Fix a Slow Windows 10 Desktop Right-Click (Context) Menu
The desktop right-click menu, otherwise known as the desktop context menu, provides instant access to numerous useful options ranging from aligning desktop icons to customizing display settings.
 2 Ways to Disable the Show More Options Context Menu in Windows 11
Method 1: Revert to Old Context Menu Using Command Prompt Command Prompt is a command-line interpreter that lets you perform various complicated tasks on your PC with a few text
2 Ways to Disable the Show More Options Context Menu in Windows 11
Method 1: Revert to Old Context Menu Using Command Prompt Command Prompt is a command-line interpreter that lets you perform various complicated tasks on your PC with a few text
 11 Steps to Restore the Windows 11 Classic Context Menu (And a Temporary Fix)
How does it always seems like Microsoft manages to break two things every time it fixes one?
11 Steps to Restore the Windows 11 Classic Context Menu (And a Temporary Fix)
How does it always seems like Microsoft manages to break two things every time it fixes one?
 3 Ways to Launch Windows Terminal on Windows 11
Method 1: Launch Windows Terminal Using the Run Dialog The Run dialog lets you execute any program or command within the same network on your computer.
3 Ways to Launch Windows Terminal on Windows 11
Method 1: Launch Windows Terminal Using the Run Dialog The Run dialog lets you execute any program or command within the same network on your computer.
 4 Ways to Fix Windows Terminal Not Opening on Windows 11
Fix 1: Ensure Windows Terminal Is Not Disabled If you cannot launch Windows Terminal via the Start menu or Run dialog box, ensure the app is not disabled on your
4 Ways to Fix Windows Terminal Not Opening on Windows 11
Fix 1: Ensure Windows Terminal Is Not Disabled If you cannot launch Windows Terminal via the Start menu or Run dialog box, ensure the app is not disabled on your
 How to Fix Mouse Left Click (Button) Not Working on Windows
Basic Fixes: Check for hardware issues: Most mouse-related problems are associated with hardware failures.
How to Fix Mouse Left Click (Button) Not Working on Windows
Basic Fixes: Check for hardware issues: Most mouse-related problems are associated with hardware failures.
 3 Fixes for Right Click Not Working on Windows 11
Basic Fixes: Unplug peripheral devices: This will work because it isolates possible software interference and hardware conflicts that may trigger the problem.
3 Fixes for Right Click Not Working on Windows 11
Basic Fixes: Unplug peripheral devices: This will work because it isolates possible software interference and hardware conflicts that may trigger the problem.
 How to Enable or Disable Mouse Click Sound on Windows 11
Enable the Mouse Click Sound on Windows 11 If you're tired of your default mouse or trackpad click sound, setting a custom sound will enhance your navigation experience.
How to Enable or Disable Mouse Click Sound on Windows 11
Enable the Mouse Click Sound on Windows 11 If you're tired of your default mouse or trackpad click sound, setting a custom sound will enhance your navigation experience.
The article above may contain affiliate links which help support Guiding Tech. The content remains unbiased and authentic and will never affect our editorial integrity.