Method 1: Using File Explorer
Like many applications, Windows Defender stores the Protection History log on your computer as an accessible file. The quickest and easiest way to access and delete the Protection History log on Windows 11 is by using File Explorer. Here’s how to do that:
Step 1: Press the Windows + E key to open File Explorer. Click the Windows OS drive, which is generally C for most users.
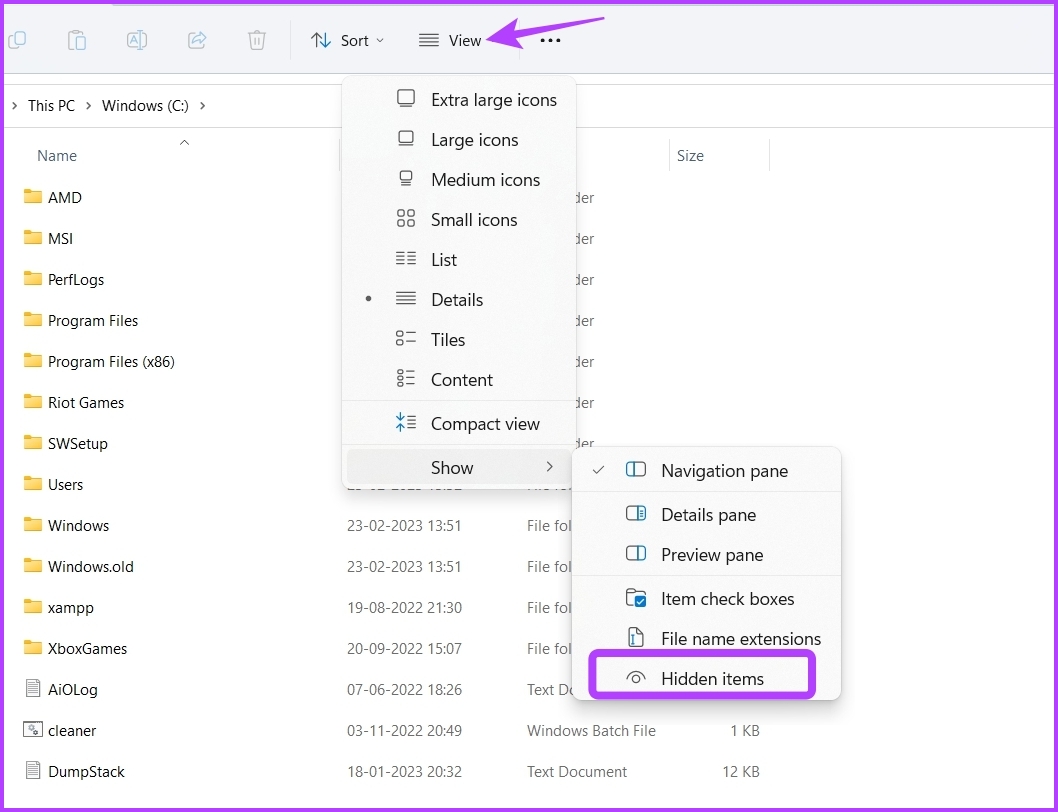
Step 2: Click the View option at the top > select Show from the context menu > choose Hidden items from the submenu.
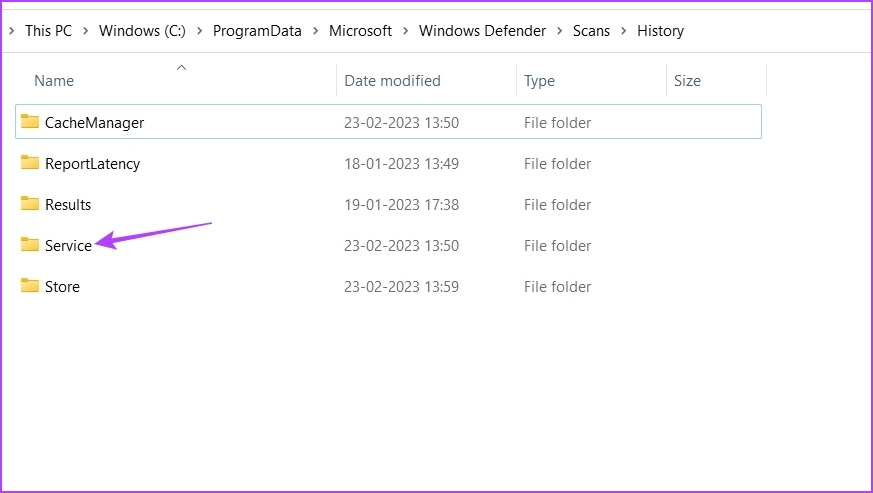
Step 3: Next, navigate to the following location or copy-paste it in the address bar of File Explorer:
C:\ProgramData\Microsoft\Windows Defender\Scans\History
Step 4: Click the Service folder.
Step 5: Press the Control + A keys to select everything > press the Shift + Delete keys to permanently remove all the history files.

If this is the first time you’ve removed Windows Defender’s Protection History from your computer, you’ll gain some storage space.
Method 2: Using the Group Policy Editor
The Group Policy Editor is a Windows utility to manage and edit important Windows policies. However, the Group Policy Editor is unavailable in the Windows 11 Home Edition. If you’re using the edition on your computer, skip this solution.
Step 1: Press the Windows + R keys to open the Run dialog box.
Step 2: Type gpedit.msc in the search bar and click OK.

Step 3: In the Group Policy Editor, navigate to the following location in the left sidebar:
Computer Configuration > Administrative Templates > Windows Components > Microsoft Defender Antivirus > Scan

Step 4: In the right pane, double-click on the Turn on removal of items from scan history folder.
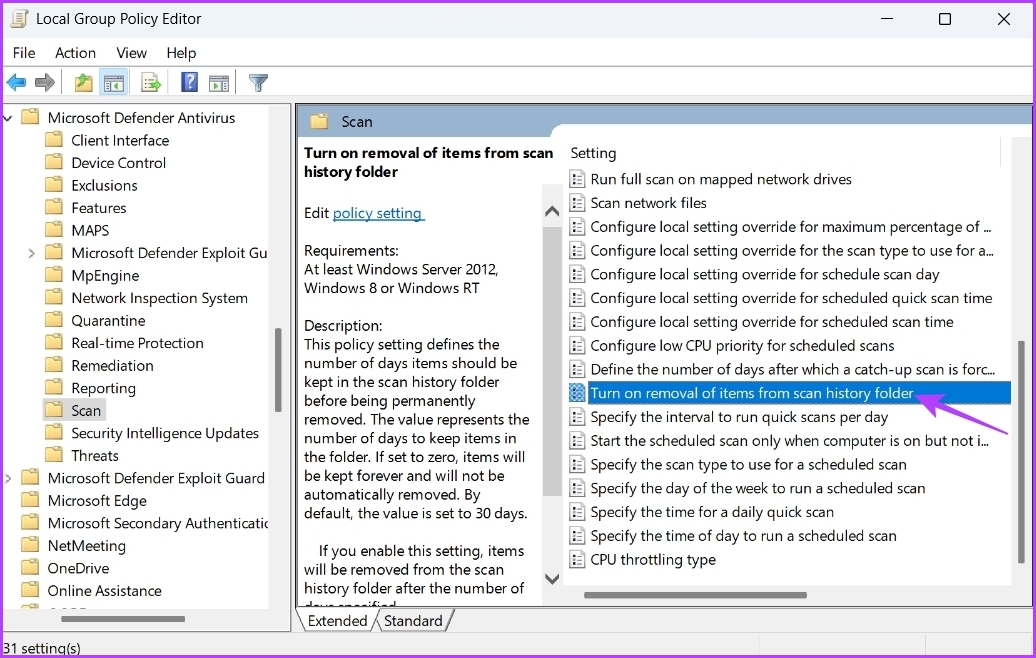
Step 5: Choose Enabled. Also, assign several days, after which the history gets cleared automatically. By default, it’s set to 30 days.

Step 6: Click Apply > OK.
Method 3: Using Event Viewer
Windows stores a log of messages from the system, including features like errors, warnings, information, and other messages in Event Viewer. So, another quick way to clear Windows Defender Protection History is through the Event Viewer. Here’s how:
Step 1: Press the Windows key to open the Start Menu > type Event Viewer in the search bar > choose Open from the right pane.
Step 2: Click the drop-down arrow before Applications and Services logs in the left sidebar.

Step 3: Click the drop-down arrow next to the Microsoft folder in the left sidebar.
Step 4: Now, click the drop-down arrow before the Windows folder in the left sidebar.
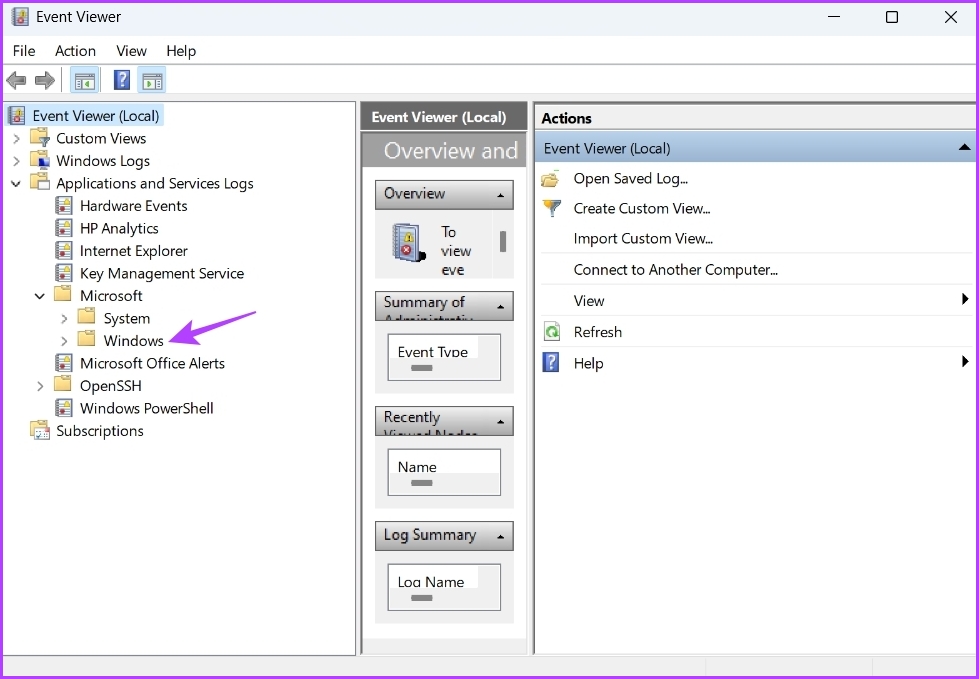
Step 5: Double-click on the Windows Defender folder from the left sidebar.

Step 6: Right-click on the Operational log > choose Clear log from the context menu.

Step 7: Choose Save and Clear in the confirmation box.

Method 4: Using Command Line Tools
Windows PowerShell is a command-line tool to manage programs, solve system issues, and much more. You can also use it to clear the Windows Defender Protection History log on Windows 11. Here’s how:
Step 1: Open the Start Menu > type Windows PowerShell in the search bar > choose Run as administrator.

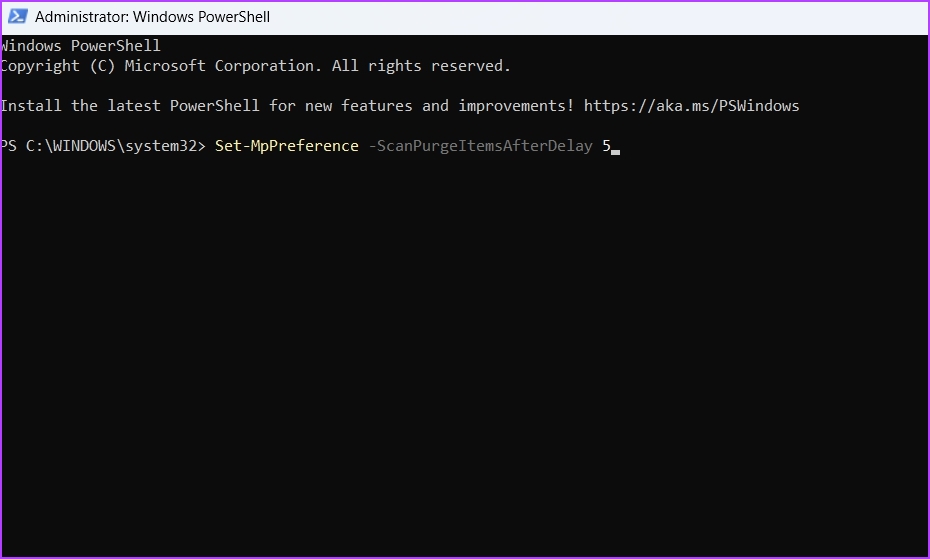
Step 2: Type the following command in the elevated PowerShell window and press Enter. Ensure to replace Days in the command with the number of days after which you want the Protection History log to be cleared automatically. For example, we’ve chosen 5 days.
Set-MpPreference -ScanPurgeItemsAfterDelay Days
Was this helpful?
Last updated on 12 August, 2024
Read Next
 5 Ways to Completely Disable Windows Defender
Method 1: Using Command Prompt Step 1: Press the Windows key on your keyboard, type Command Prompt, and click Run as administrator.
5 Ways to Completely Disable Windows Defender
Method 1: Using Command Prompt Step 1: Press the Windows key on your keyboard, type Command Prompt, and click Run as administrator.
 How to Fix “This App Has Been Blocked for Your Protection” on Windows 11
Basic Fixes Run the app as an administrator: Right-click the app and select 'Run as administrator' from the context menu to launch the app with administrative permissions.
How to Fix “This App Has Been Blocked for Your Protection” on Windows 11
Basic Fixes Run the app as an administrator: Right-click the app and select 'Run as administrator' from the context menu to launch the app with administrative permissions.
 Otterbox Defender vs. Lifeproof Fre: Which is the Ultimate Phone Case?
Otterbox has established a name for itself over the years as the supreme brand of protective iPhone and Android cases.
Otterbox Defender vs. Lifeproof Fre: Which is the Ultimate Phone Case?
Otterbox has established a name for itself over the years as the supreme brand of protective iPhone and Android cases.
 5 Best Energy Efficient Power Strips (with Surge Protection)
Power strips are life and space savers for connecting multiple devices to a single power source.
5 Best Energy Efficient Power Strips (with Surge Protection)
Power strips are life and space savers for connecting multiple devices to a single power source.
 4 Ways to Fix Unable to Clear History in Safari for iPhone
Fix 1: Disable Web Content Restrictions The Screen Time feature on your iPhone lets you apply content restrictions and block inappropriate websites.
4 Ways to Fix Unable to Clear History in Safari for iPhone
Fix 1: Disable Web Content Restrictions The Screen Time feature on your iPhone lets you apply content restrictions and block inappropriate websites.
The article above may contain affiliate links which help support Guiding Tech. The content remains unbiased and authentic and will never affect our editorial integrity.