Hyper-V is Windows 11’s answer for building virtual machines natively, letting you test software on different operating systems without dual-booting. The main advantage of Hyper-V is that it uses hardware-assisted virtualization and a hypervisor-based architecture to isolate virtual machines from the host operating system. Here’s what you need to know about configuring Hyper-V in Windows 11.
Requirements for Installing and Configuring Hyper-V in Windows 11
Generally, newer machines should have no problem installing and configuring Hyper-V, with a few caveats:
- Windows 11 Home doesn’t offer this option, and it doesn’t seem like it’s going to get it soon or at all.
- The CPU needs to run on a 64-bit architecture (which includes most PCs nowadays) with support for SLAT and VM Monitor Mode Extensions.
- The BIOS or UEFI needs to have hardware-assisted virtualization enabled, such as Intel Virtualization Technology (VT-x) or AMD-V.
- The PC needs to have at least 4GB of RAM, although more memory may be needed depending on the virtual machines you run.
You can check for SLAT by running CoreInfo, Microsoft’s Sysinternals tool. It can display processor features, including virtualization-related capabilities
Step 1. Download the CoreInfo tool and extract the zip’s contents to a folder.
Step 2. Run the appropriate Coreinfo executable, such as Coreinfo64 or CoreInfoEx64.
Step 3. Open the CPU Features view and check for virtualization-related features such as:
- VMX (Intel)
- SVM (AMD)
- EPT (Intel SLAT)
- NPT (AMD SLAT)
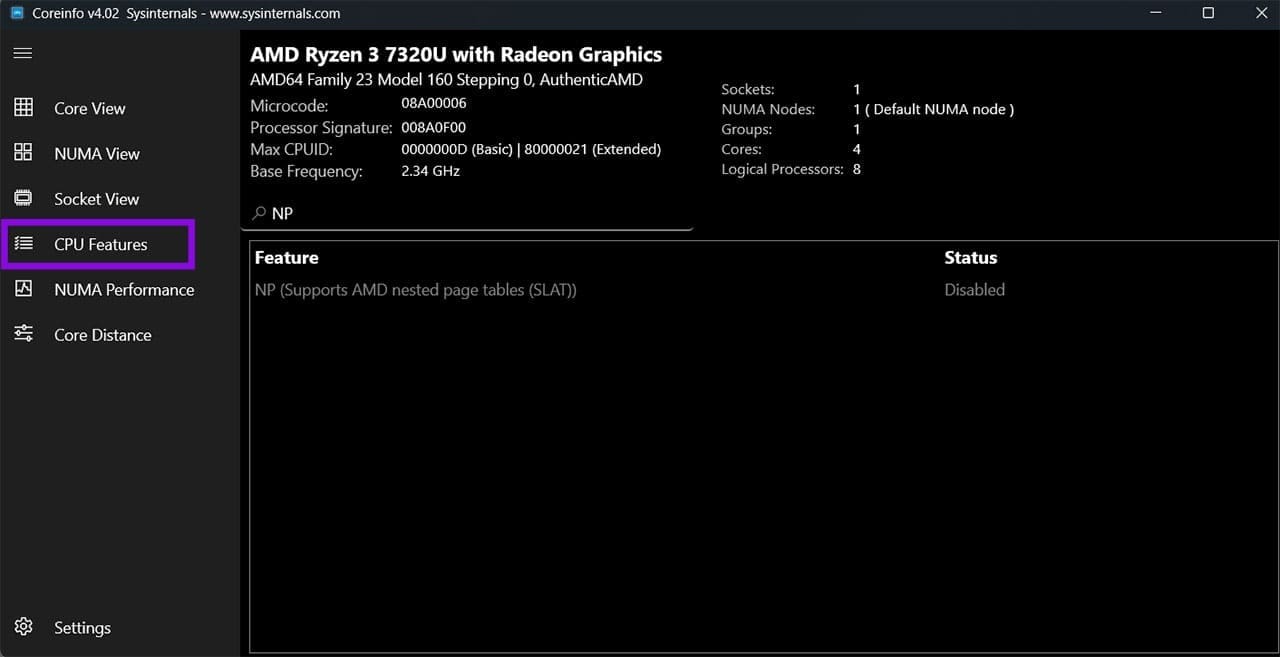
If the CoreInfo tool lists that Hypervisor is enabled, another hypervisor or Windows virtualization feature may already be running. Third-party virtualization software such as VirtualBox may have compatibility issues when Hyper-V is running, but it does not necessarily need to be uninstalled
If your processor lacks the required virtualization support or SLAT, you can’t use Hyper-V at all.
Part 1 – Enabling Virtualization in BIOS for Configuring Hyper-V
If you meet all the requirements, you’ll need to enable hardware-assisted virtualization in the BIOS or UEFI firmware.
Step 1. Search for “Advanced startup options” and select the result to go to the “Recovery” subsection in “Settings.”
Step 2. Click on “Restart now” for Advanced startup. This allows you to bypass the need to enter the correct key when restarting the PC to enter BIOS (which is usually F2, F10, or F12, depending on the motherboard).

If you’ve used this method, in the Advanced startup screen, select “Troubleshoot,” then “Advanced options,” then “UEFI Firmware settings.” Select “Restart.”
Step 3. In the UEFI or BIOS, find and enable the hardware virtualization setting. On Intel systems, this may be called Intel Virtualization Technology (VT-x); on AMD systems, it may be called AMD-V or SVM. The exact location and name vary by manufacturer.
Some motherboards also have separate settings for SLAT or VT-x with Extended Page Settings. You’ll need to consult your motherboard’s manual to find them if needed.
Step 4. Save and exit BIOS.
Part 2 – Enabling Hyper-V in Windows 11
You can use the Command Prompt or PowerShell to enable the option if all the requirements are met.
Step 1. Right-click the “Start” button and select “Terminal (Admin).”
Step 2. Run the command:
Enable-WindowsOptionalFeature -Online -FeatureName Microsoft-Hyper-V -All

Step 3. Restart the PC.
Common Issues
In some cases, if you have another virtualization method, Hyper-V will not be enabled or might even “brick” the PC upon trying to boot. This can be avoided by launching in Safe Mode, disabling one or both virtualization options, then restarting.
Safe Mode can be launched by repeatedly restarting the PC until you reach the Windows Recovery Environment. In there, select “Troubleshoot,” then “Advanced options,” then “Startup Settings,” and select “Restart.” When the Startup Settings screen appears, press 5 or F5 to select “Enable Safe Mode with Networking.”
In there, you’ll need to find and disable the other virtualizer from trying to run in the background on boot, or revert the PowerShell script:
Disable-WindowsOptionalFeature -Online -FeatureName Microsoft-Hyper-V-All
If that doesn’t work, try:
bcdedit /set hypervisorlaunchtype off
Was this helpful?
Last updated on 24 September, 2026
Read Next
 4 Ways to Disable Hyper-V in Windows
Method 1: Using Control Panel The simplest method to disable Hyper-V is by using the Control Panel.
4 Ways to Disable Hyper-V in Windows
Method 1: Using Control Panel The simplest method to disable Hyper-V is by using the Control Panel.
 3 Quick Ways to Find Product Key on Windows 10 or Windows 11
1.
3 Quick Ways to Find Product Key on Windows 10 or Windows 11
1.
 How to Use Quick Access in Windows 11
Pin or Unpin Folders to Quick Access When you open File Explorer on Windows 11, you're greeted with Quick Access, which displays your 10 most frequently used folders and 20
How to Use Quick Access in Windows 11
Pin or Unpin Folders to Quick Access When you open File Explorer on Windows 11, you're greeted with Quick Access, which displays your 10 most frequently used folders and 20
 5 Ways to Fix Quick Settings Not Working on Windows 11
Try Basic Fixes Restart Windows Explorer: Windows Explorer facilitates the graphical interface for several utilities, including the Quick Settings panel.
5 Ways to Fix Quick Settings Not Working on Windows 11
Try Basic Fixes Restart Windows Explorer: Windows Explorer facilitates the graphical interface for several utilities, including the Quick Settings panel.
 5 Quick Ways to Open Services on Windows 11
Method 1: Using the Task Manager The Task Manager is used to monitor computer performance, background applications running, and system resource usage.
5 Quick Ways to Open Services on Windows 11
Method 1: Using the Task Manager The Task Manager is used to monitor computer performance, background applications running, and system resource usage.
 7 Quick Ways to Open Remote Desktop Connection Tool in Windows 11
Method 1.
7 Quick Ways to Open Remote Desktop Connection Tool in Windows 11
Method 1.
 5 Quick Ways to Show FPS Counter in Windows 11
Method 1: Using the Xbox Game Bar Xbox Game Bar is baked into Windows 10 and Windows 11.
5 Quick Ways to Show FPS Counter in Windows 11
Method 1: Using the Xbox Game Bar Xbox Game Bar is baked into Windows 10 and Windows 11.
 How to Remove Recent Files From Quick Access in Windows 11
Remove Files and Folders From Quick Access in File Explorer If you want to remove only specific files or folders from Quick Access (or Home) in File Explorer, follow the
How to Remove Recent Files From Quick Access in Windows 11
Remove Files and Folders From Quick Access in File Explorer If you want to remove only specific files or folders from Quick Access (or Home) in File Explorer, follow the
The article above may contain affiliate links which help support Guiding Tech. The content remains unbiased and authentic and will never affect our editorial integrity.